
Setup: Remington QuickCut Clipper HC4250 User Manual
Content
Remington QuickCut Clipper HC4250
Introduction
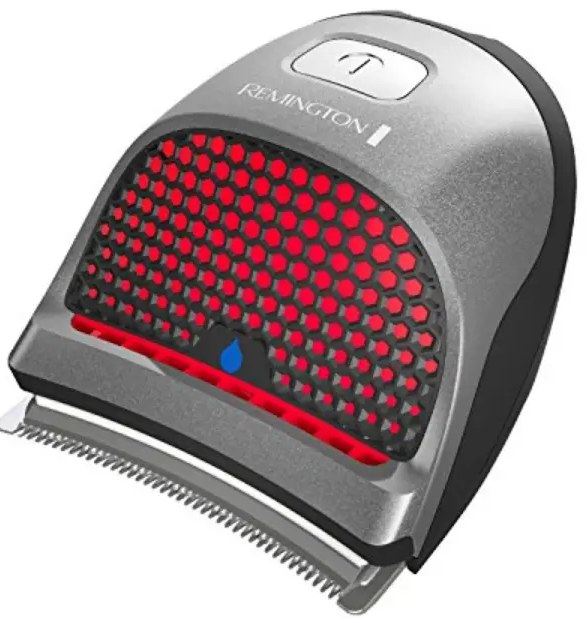
The Remington QuickCut Clipper HC4250 is a revolutionary self-haircut kit designed for fast, precise, and effortless hair cutting at home. Featuring an ergonomic design that fits comfortably in the palm of your hand, this clipper enables users to achieve professional-quality results without the need for salon visits. Its standout feature is the extra-wide, curved stainless steel blade that follows the natural contours of your head and face, ensuring even and smooth cuts every time. The HC4250 is ideal for individuals seeking a convenient, time-saving solution for regular hair maintenance, especially those who prefer buzz cuts or self-trimming around the neckline and ears.
With a cordless runtime of up to 40 minutes powered by a reliable lithium battery, the QuickCut HC4250 offers flexibility and convenience. The device also supports corded operation for uninterrupted use. It comes with nine detachable length combs, ranging from 1/16" to 5/8" (1.5 mm to 15 mm), enabling customizable hair length for various styles. This clipper is suitable for casual users, busy professionals, and anyone looking to maintain a sharp haircut at home. Available at an estimated price range of approximately $60 to $70, it is widely accessible through online retailers and major stores, making it an excellent value for money in the home grooming market.
Specifications of Remington QuickCut Clipper HC4250
- Blade Type: Precision-ground, stainless steel curved blades designed to reduce pulling and snagging
- Cutting Width: 57% wider blade surface compared to standard clippers for faster cutting
- Corded/Cordless Operation: Offers both corded use and up to 40 minutes of cordless runtime on a full charge
- Battery: Lithium-ion rechargeable battery with a 4-hour charge time and LED charging indicator
- Length Settings: Nine detachable combs ranging from 1.5 mm (1/16") to 15 mm (5/8") for versatile hair length options
- Ergonomic Design: Fits comfortably in the palm with a rubberized grip for ultimate control and ease of use
- Maintenance: Washable clipper with cleaning brush and water-cleanable blade port
- Additional Accessories: Travel pouch, cleaning brush, oil bottle, and user manual included
Compared to similar products, the HC4250 stands out with its uniquely wide curved blade that enables faster, more even cuts, making it particularly suitable for buzz cuts and quick trims. While competitors like Wahl and Andis offer professional-grade clippers, Remington's QuickCut HC4250 balances performance and ease-of-use for non-professional users, making it a popular choice for home grooming.
PARTS
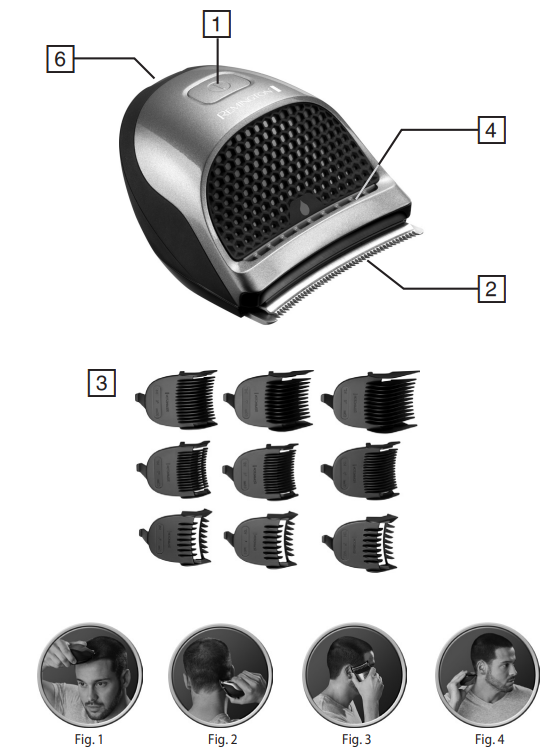
- On/off switch
- Blade set
- 9 attachment guide combs
- Washout port
- Travel pouch
- Charging indicator
- Cleaning brush (not shown)
- Oil bottle (not shown)
- Adaptor (not shown)
INSTRUCTIONS FOR USE
- For corded use,, connect the product to the adaptor, then to the mains.
- CAUTI::ON Extended mains-only use will result in the reduction of the battery life.
- CORDLESS USE
- When the unit is switched on and fully charged, the product can be used in cordless mode for up to 40 minutes.
- Switch the product on by pressing the on/off switch.
- BEFORE STARTING THE CUT
- Inspect the clipper, making sure that it is free from hair and dirt.
Before cutting, always comb the hair so it is tangle-free and dry.
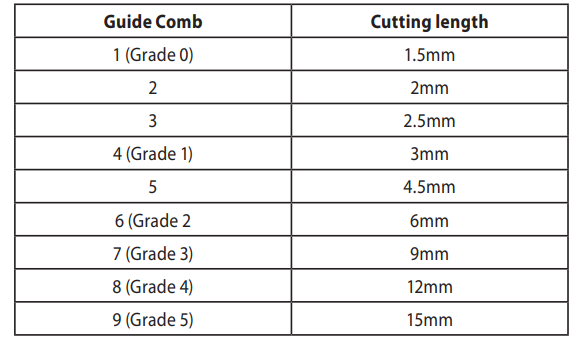
- Use the clipper without any fixed combs for trimming hair close to the skin.
- This will trim hair to 1mm. Holding the clipper so the blades are perpendicular to the skin will trim hair to 0.5mm.
TO ATTACH A COMB
Hook the front edge of the comb to the front teeth of the wide trimmer blade. Then push the back of the comb down until it snaps in place.
TO REMOVE THE COMB
- Push up the back of the comb until it clicks off the clipper blade.
INSTRUCTIONS FOR CUTTING HAIR
- The QuickCut Clipper’s ergonomic design provides many different ways of holding the clipper in use.
- For clipping the top of the head (see fig. 1).
- For clipping the back of the head (see fig. 2).
- For clipping the sides of the head (see fig. 3).
- For detailing (see fig. 4).
- For even cutting, allow the comb attachment/blade to cut its way through the hair. Do not force it through quickly. If you are cutting for the first time, start with the maximum comb attachment.
- For one, all over cut length, attach the desired guide comb and slowly guide the clipper through the hair against the direction the hair normally grows.
- Remove the guide comb. To produce a clear,n straight line at the sideburns and the base of the neck, reverse the hair clipper. Place the reversed clipper at right angles to the head, tips of the blades lightly touching the skin, in and then work downwards.
- The following instructions are for those users who want different trimming lengths on the sides, back, and top of the head.
STEP 1 – NAPE OF THE NECK
- Set the comb to 3mm or 6mm.
- Hold the clipper with the blade teeth pointing upwards. Begin starting at the centre of the head at the base of the neck.
- Slowly lift the clipper, working upwards and outwards through the hair, trimming just a little at a time.
STEP 2 – BACK OF THE HEAD
- With the comb set at 9mm or 12mm, cut the hair at the back of the head.
STEP 3 – SIDE OF THE HEAD
- With the comb set at 3mm or 6mm, trim sideburns. Then change to the longer 9mm guide comb and continue to cut the top of the head.
STEP 4 – TOP OF THE HEAD
- Use the longer length comb attachment and set it to 12mm or 15mm, then cut hair on top of the head against the direction in which the hair normally grows.
STEP 5 – THE FINISHING TOUCHES
- Use the clipper without an attachment comb for close trimming around the base and sides of the neck and around the ears.
- To produce a clean,n straight line at the sideburns, reverse the hair clipper. Place the reversed clipper at right angles to the head, tips of the blades lightly touching the skin, and then work downwards.
CARE FOR YOUR HAIRCLIPPER
- To ensure long-lasting performance of your clipper, clean the blades and unit regularly.
- Always keep the clipper in the provided travel pouch.
- Ensure the appliance is switched off and unplugged from the mains before cleaning.
- Do not use harsh or corrosive cleaners on the unit or blades.
- Cleaning should be done with a soft brush.
- After each use, brush the accumulated hair from the blades.
WASHABLE CLEANING
- The QuickCut Clipper is fully washable for easy cleaning.
- Ensure the appliance is switched off and unplugged from the mains.
WASHOUT PORT INSTRUCTIONS
Note: Never rinse, wash, or otherwise subject this product to liquid whilst the power cord is connected.
- For best results, keep the trimmer running while running it under the tap. Allow water to run through the washout port and over the blades. Recommended to rinse after each use.
- Ensure the clipper is dry after cleaning.
- For more thorough cleaning, the blade set can be easily removed to wash any hair trimmings from the blades. To release the blade set, push the blade set release button found on the base of the clipper.
- Ensure the blades are dry after rinsing under the tap. To reattach, align the blade set onto the clipper and push the blade set towards the clipper body until it clicks into place.
- Place a small drop of cutter or sewing machine oil onto the blades at each end and at the middle point of the blades. Turn the unit on for a few seconds to distribute the oil, then turn off and wipe off excess oil.
BATTERY REMOVAL
- The battery must be removed from the appliance before it is scrapped.
- The appliance must be disconnected from the supply mains when removing the battery.
- Ensure the clipper is discharged of all power.
- Starting at the seam on either side of the charge indicator lens, pry open the seam working back and forth from one side to the other, little by little, following the seam as it stretches from from the indicator lens to the blade set until the top shell has been pried apart all the way from the rest of the clipper.
- Remove the two screws from the inner housing.
- Gently pull the inner housing straight up and away to remove the inner housing shell.
- Remove the two screws from the inner structure located on each side of the circuit board.
- Gently pull the inner structure containing the battery and circuit board up out of the lower housing structure of the clipper.
- From the underside of this inner structure, cut the red and black wires that lead to the battery.
- With the inner housing structure right side up, pull upward firmly on the circuit board to allow room to remove the battery.
- Pry the battery out of its holder.
- Dispose of the batteries safely.
Troubleshooting Guide for Remington QuickCut Clipper HC4250
- Clipper Won’t Turn On: Ensure the battery is fully charged; plug in the charger and wait for the LED indicator to signal full charge. If the problem persists, check the power cord and charger connections.
- Clipper Pulls or Snags Hair: Clean the blades thoroughly with the provided brush and apply clipper oil regularly to maintain blade sharpness and reduce friction.
- Short Battery Runtime: Recharge the battery fully; avoid overcharging. Battery degradation over time may require replacement if performance drops significantly.
- Blade Not Cutting Evenly: Remove and clean the blades under running water as per instructions; ensure blades are properly aligned and secured before use.
- Error Codes: The HC4250 does not display specific error codes; troubleshooting is primarily manual based on symptoms.
Preventive measures include regular cleaning after each use, oiling the blades monthly, avoiding use near water while corded, and storing the clipper in a dry, safe place. The product includes a 2-year manufacturer's warranty with an additional 1-year extension if registered online within 28 days of purchase. For further support, customers can contact Remington customer service through their official website or hotline.
Pros & Cons of Remington QuickCut Clipper HC4250
- Pros:
- Extra-wide curved blade cuts 57% faster than standard clippers, ideal for quick buzz cuts
- Ergonomic, palm-friendly design offers excellent control and comfort during use
- Versatile cordless and corded operation with up to 40 minutes of cordless runtime
- Nine length combs provide a wide range of cutting lengths for customized styling
- Easy to clean with a washable blade design and included cleaning tools
- Good value for money considering its features and performance
- Cons:
- Battery life may be limited for users needing longer continuous The charging time of around 4 hours is relatively long compared to some competitors.
- Not designed for professional barber use or highly detailed haircuts beyond buzz and trim styles
- Some users report needing to move the clipper slowly for best results to avoid hair pulling.g
Customer Reviews and Feedback on Remington QuickCut Clipper HC4250
The Remington QuickCut Clipper HC4250 enjoys a strong reputation among users, averaging around 4.5 stars from over 500 customer reviews. Most users praise its ergonomic design, ease of use, and the speed of haircuts enabled by the wide blade. Many highlight how the clipper fits perfectly in the palm, making it easy to reach difficult areas like the back of the head and around the ears.
Common praises focus on the cordless convenience and the variety of comb lengths that allow personalized haircuts. Some users note that the battery life is adequate for typical home use but may need recharging during longer sessions. Occasional complaints mention that the clipper requires a somewhat slow pace to avoid hair pulling, which is manageable once accustomed.
Overall, customers recommend the Remington QuickCut HC4250 for anyone seeking a reliable, affordable, and user-friendly home haircut solution, particularly for buzz cuts and maintenance trims.
Faqs
How do I set up my remington QuickCut Clipper HC4250 for the first use?
What should I do if my remington QuickCut Clipper HC4250 is not powering on or working properly?
How do I correctly attach and remove the guide combs on the remington QuickCut Clipper HC4250?
Can the remington QuickCut Clipper HC4250 be used both cordless and corded, and how does this affect battery life?
What maintenance steps are recommended to keep the remington QuickCut Clipper HC4250 blades sharp and functioning well?
What are the blade length settings available on the remington QuickCut Clipper HC4250 and how do I select them?
How does the quick charge function work on the remington QuickCut Clipper HC4250?
What safety precautions should I observe when using the remington QuickCut Clipper HC4250?
More remington manuals
- How to Use: Remington ProPower Hair Clipper HC7170 User Manual
- How to Use: Remington Body Hair Trimmer BHT100 User Manual
- How to Use: Remington Touch Control Hair Clipper HC5960 User Manual
- How to Use: Remington Vacuum Hair Clipper HC6550 User Manual
- Setup: Remington X3 Power-X Series Hair Clipper Giftpack HC3000GP User Manual
- Setup: Remington Stylist Hair Clipper HC363C Owner Manual
Leave a Comment