Roland Musical Instrument Bench RPB-500BK User Manual
Content
Introduction
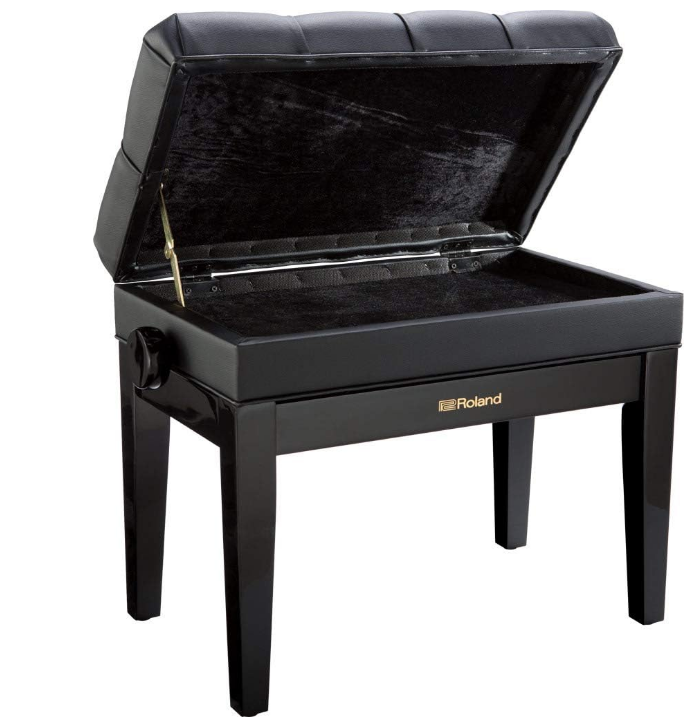
The Roland Musical Instrument Bench RPB-500BK is a premium seating solution designed for musicians seeking comfort and functionality. With its solid wood construction and cushioned seat, this adjustable-height bench provides excellent support during long practice sessions. It also features a convenient storage compartment for sheet music and accessories, making it ideal for both home and studio use. Priced at approximately $241.99, the RPB-500BK is a stylish and practical addition to any musical setup.
Specifications
- Sturdy steel frame for durability and stability
- High-density foam cushioning for comfort
- Adjustable height to accommodate different playing styles
- Weight capacity: up to 250 lbs (113 kg)
- Dimensions: 20.5" x 11.8" x 18.5"-22.8" (H x W x D)
- Weight: approximately 15 lbs (6.8 kg)
- Color: Black
Check the Included Items
Before you begin assembling the stand, check that all the items were supplied.
Symbol | Name | Quantity |
A | Bench seat | 1 |
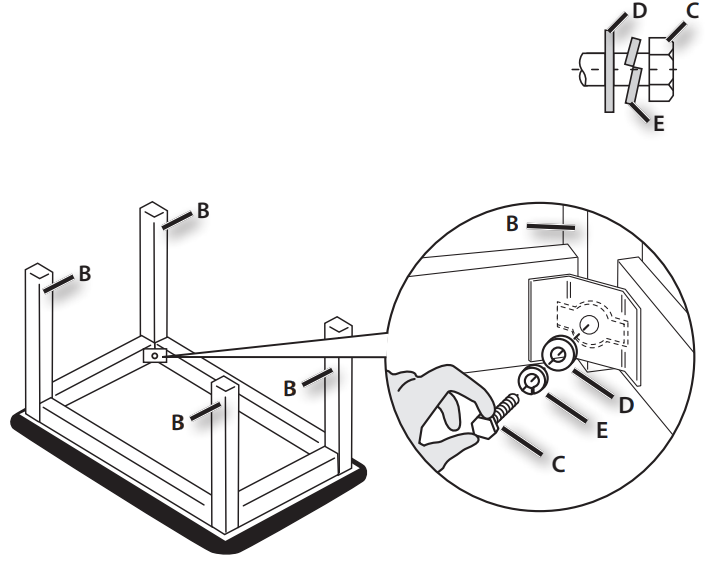
B | Legs | 4 |
C | Hex bolts *1 | 4 |
D | Washers *1 | 4 |
E | Spring washers *1 | 4 |
F | Wrench *2 | 1 |
- Attached to the legs.
- Attached to the bench seat.
- To prevent injury, work gloves should be worn while performing the assembly.
- When removing the wrench from the bottom of the seat, pay attention to the tip of the holder.
Description
Roland Musical Instrument Bench is engineered to meet the demands of musicians who need a reliable and comfortable seating solution. The bench features a sturdy steel frame that ensures stability and durability, while the high-density foam cushion provides superior comfort during extended practice sessions. The adjustable height setting allows musicians to customize the bench to their preferred playing position, enhancing both comfort and performance.
The sleek black finish of the RPB-500BK makes it aesthetically pleasing and easy to integrate into any musical setup. Whether you are practicing at home, rehearsing with a band, or performing on stage, this bench is designed to provide the support and comfort you need.
Roland Musical Instrument Bench RPB-500BK Assembly
Place the bench seat (A) upside down in a stable location.
When placing the bench seat upside down, take care to protect the seating surface from damage. Handle it with care so that it does not fall or overturn.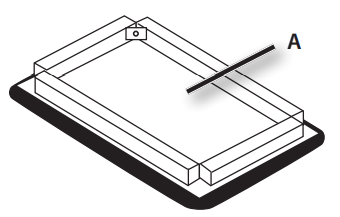
- Attach the legs (B).
Place a spring washer (E) and a washer (D) on each hex bolt (C), and provisionally tighten each leg (B). At this time, tighten the hex bolts (C) by hand.- Place the spring washer (E) and washer (D) on the hex bolt (C) in that order
Note the position of the screw holes in the legs (B) and the holes in the metal fixtures of the bench seat (A).
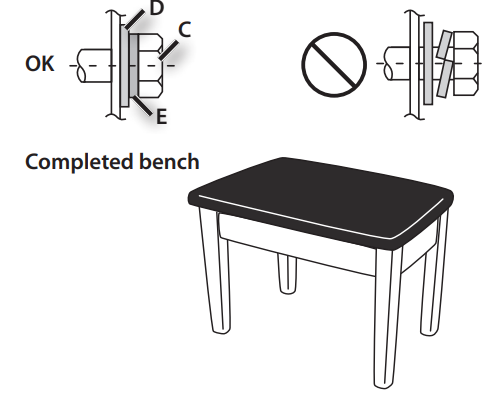
Place the bench in the location in which you are going to use it, and tighten the legs (B).
While applying pressure on the seat, go around and tighten each hex bolt (C) little by little, while adjusting the position of the legs as necessary to prevent any wobbling. In other words, tighten the hex bolt for each leg gradually, a little each time, as you go around in order starting with leg number 1, then moving to number 2, then number 3, then number 4; after which you can go back to number 1 and repeat the process.If the height of the bench is adjustable, be careful not to insert your hand into the metal components of the height adjustment mechanism.

If the bench wobbles after you’ve fastened all the legs, fi rst loosen the hex bolt for leg number 1. Then, while applying pressure to the center of the seat, retighten the hex bolt.
If necessary, repeat this process for the other legs until the wobbling is eliminated.- Finally, tighten the hex bolts (C) further, and verify that none of them are loose.
Use the included wrench (F) to fi rmly tighten the hex bolts (C) until there is no space between the spring washers (E) and the washers (D).
In the interest of product improvement, the specifi cations and/or appearance of this product are subject to change without prior notice.
Maintenance
At regular intervals, please check that the hex bolts are fi rmly tightened and that the legs are stable. If any hex bolts are loose, retighten them.
If you notice any other abnormality, immediately stop using the bench, and contact your dealer for service.
USING THE UNIT SAFELY
INSTRUCTIONS FOR THE PREVENTION OF FIRE, ELECTRIC SHOCK, OR INJURY TO PERSONS
About WARNING and CAUTION Notices
![]() WARNING
WARNING
Used for instructions intended to alert the user to the risk of death or severe injury should the unit be used improperly. Used for instructions intended to alert the user to the risk of injury or material damage should the unit be used improperly.
About the Symbols
![]() CAUTION
CAUTION
Material damage refers to damage or other adverse effects caused with respect to the home and all its furnishings, as well to domestic animals or pets.
![]() The
The ![]() symbol alerts the user to important instructions or warnings. The specific meaning of the symbol is determined by the design contained within the triangle. In the case of the symbol at left, it is used for general cautions, warnings, or alerts to danger.
symbol alerts the user to important instructions or warnings. The specific meaning of the symbol is determined by the design contained within the triangle. In the case of the symbol at left, it is used for general cautions, warnings, or alerts to danger.![]() The
The ![]() symbol alerts the user to items that must never be carried out (are forbidden). The specific thing that must not be done is indicated by the design contained within the circle. In the case of the symbol at left, it means that the unit must never be disassembled.
symbol alerts the user to items that must never be carried out (are forbidden). The specific thing that must not be done is indicated by the design contained within the circle. In the case of the symbol at left, it means that the unit must never be disassembled. The
The ![]() symbol alerts the user to things that must be carried out. The specific thing that must be done is indicated by the design contained within the circle. In the case of the symbol at left, it means that the power-cord plug must be unplugged from the outlet.
symbol alerts the user to things that must be carried out. The specific thing that must be done is indicated by the design contained within the circle. In the case of the symbol at left, it means that the power-cord plug must be unplugged from the outlet.
ALWAYS OBSERVE THE FOLLOWING
WARNING
Do not disassemble or modify by yourself
Do not carry out anything unless you are instructed to do so in the owner’s manual. Otherwise, you risk causing malfunction.
Do not repair or replace parts by yourself
Refer all servicing to your retailer, the nearest Roland Service Center, or an authorized Roland distributor, as listed on the “Information.”
Do not use or store in the following types of locations
- Subject to temperature extremes (e.g. direct sunlight in an enclosed vehicle, near a heating duct, on top of heat-generating equipment); or are
- Damp (e.g., baths, washrooms, on wet floors); or are
- Exposed to steam or smoke; or are
- Subject to salt exposure; or are
- Exposed to rain; or are
- Dusty or sandy; or are
- Subject to high levels of vibration and shakiness.
Do not place in an unstable location
Otherwise, you risk injury as the result of this product toppling over or dropping down.
Be cautious to protect children from injury
Always make sure that an adult is on hand to provide supervision and guidance when using this product in places where children are present, or when a child will be using this product.
Do not drop or subject to strong impact
Otherwise, you risk causing damage or malfunction.
CAUTION
Take care so as not to get fi ngers pinched
When handling the following moving parts, take care so as not to get fi ngers, toes, etc., pinched. Whenever a child uses this product, an adult should be on hand to provide supervision and guidance.
- Height adjustment handle
Precautions concerning use of bench
When using the bench, please observe the following points:
- Do not use the bench as a toy, or as a stepping stool.
- Do not allow two or more persons to sit on the bench.
- Do not adjust the height while sitting on the bench.
- Do not sit on the bench if the bolts holding the bench legs are loose. (If the bolts are loose, immediately re-tighten them using the supplied tool.)
- Never insert your hand into the gap (the metal height adjustment mechanism) under the seat lid. Doing so may cause your hand to be pinched or injured.
Keep small items out of the reach of children
To prevent accidental ingestion of the parts listed below, always keep them out of the reach of small children.
- Included Parts
- Washers
- Spring washers
Placement
- Do not expose this product to direct sunlight, place it near devices that radiate heat, leave it inside an enclosed vehicle, or otherwise subject it to temperature extremes. Also, do not allow lighting devices that normally are used while their light source is very close to this product (such as a piano light), or powerful spotlights to shine upon the same area of this product for extended periods of time. Excessive heat can deform or discolor this product.
- Do not allow rubber, vinyl, or similar materials to remain on this product for long periods of time. Such objects can deform or discolor this product.
- Do not paste stickers, decals, or the like to this product. Peeling such matter off this product may damage the exterior fi nish.
- Do not place containers or anything else containing liquid on top of this product. Also, whenever any liquid has been spilled on the surface of this product, be sure to promptly wipe it away using a soft, dry cloth.
Maintenance
- If the unit should become soiled, wipe it with a soft dry cloth or a firmly wrung-out cloth. Wipe with even pressure across the entire unit. The finish may be damaged if you strongly rub only a specifi c location.
- Never use benzine, thinners, alcohol or solvents of any kind, to avoid the possibility of discoloration and/or deformation.
Additional Precautions
- Do not apply excessive force to the height adjustment handle, since this could cause malfunctions.
- When you need to transport this product, pack it in shock-absorbent material. Transporting this product without doing so can cause it to become scratched or damaged, and could lead to malfunction.
- When adjusting the height of the seating surface, take care not to pinch your fi ngers in the movable parts. If the unit is used where small children are present, you must provide adult supervision and guidance.
- This unit is a bench specifi cally designed for use with musical instruments. Use it only when playing a musical instrument. Sit on the center of the bench.
- In some cases, the color of your clothing might transfer to the seating surface. Do not use this bench when wearing dark-colored clothing.
- If you use this bench on a wood fl oor or a woven mat, the legs of the bench could leave marks on its surface. In such cases, we recommend that you place a rug or similar protective surface under the bench.
- If you tighten the height adjustment handle excessively, it may stop working.
WARNING
This product contains chemicals known to cause cancer, birth defects and other reproductive harm, including lead.
Setup Guide
Setting up the Musical Instrument is straightforward and requires minimal effort.
Here are the steps to follow:
- Unpack the bench from its packaging and ensure all parts are included.
- Assemble the legs to the main frame by screwing them in place. Make sure they are securely tightened.
- Adjust the height of the bench to your preferred setting using the adjustment mechanism.
- Place the cushion on top of the frame and ensure it is properly aligned.
- Finalize the setup by checking the stability of the bench and making any necessary adjustments.
Troubleshooting
If you encounter any issues with your Roland, here are some common problems and solutions:
- Instability: Check if the legs are evenly adjusted and securely tightened. Ensure the surface on which the bench is placed is level.
- Cushion Slippage: Make sure the cushion is properly aligned and securely attached to the frame.
- Adjustment Issues: Refer to the user manual for proper adjustment techniques. If the issue persists, contact Roland customer support.
Instructions and Warnings
- Avoid overloading the bench beyond its weight capacity.
- Regularly inspect the bench for any signs of wear or damage.
- Follow all instructions provided in the user manual for assembly and use.
Pros & Cons
Pros
- Sturdy and durable construction
- Adjustable height for customizable comfort
- High-density foam cushion for superior comfort
- Aesthetically pleasing black finish
- Affordable price point
Cons
- Limited color options (only available in black)
- May require additional assembly time for some users
- No built-in storage for accessories
Customer Reviews
Customer reviews of the Roland Musical Instrument Bench RPB-500BK have been overwhelmingly positive. Many users praise its durability, comfort, and ease of setup. Here are some common sentiments:
- "This bench has been a game-changer for my piano practice. It's so comfortable and sturdy!" - Emily R.
- "I was surprised by how easy it was to assemble. The instructions were clear and straightforward." - John D.
Some common complaints include the limited color options and the lack of built-in storage for accessories.
Faqs
What is the weight capacity of the Instrument Bench?
How do I adjust the height of the Instrument?
Is the Instrument Bench easy to assemble?
What materials are used in the construction of the Roland Musical?
Can I use this bench for other musical instruments besides keyboards and pianos?
Is there a warranty on the Roland?
How do I clean and maintain my Roland Musical Instrument?
Can I purchase replacement parts for my Musical Instrument?
What are the dimensions of the Roland Musical Instrument?
Is this bench suitable for heavy use in professional settings?
Leave a Comment