Rollibot RolliCool Mini-Split Air Conditioner P800 User Manual
Content
Introduction
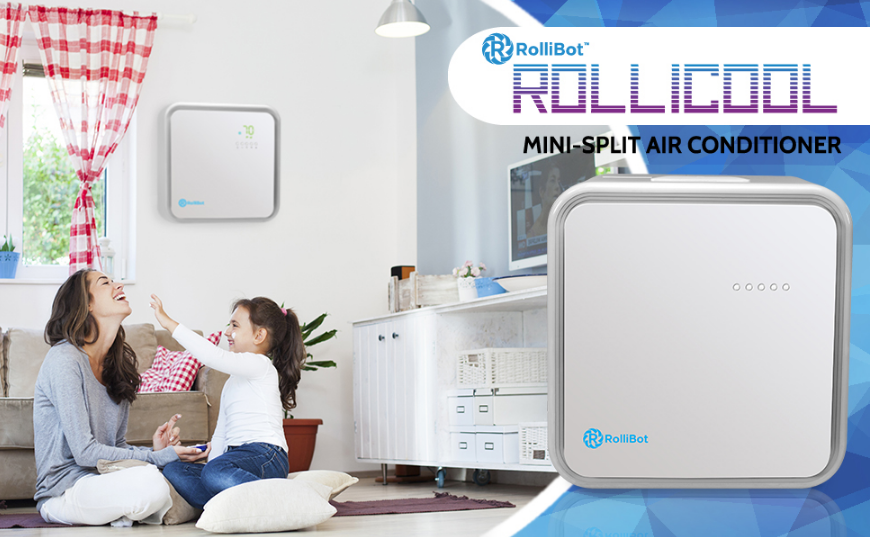
The RolliBot RolliCool Mini-Split Air Conditioner P800 is a compact and efficient air conditioning solution designed for versatile home cooling. The RolliCool P800 is priced at approximately $499.99. With a cooling capacity of 10,000 BTU, this unit is perfect for spaces up to 450 square feet, making it ideal for bedrooms, living rooms, or small offices. It features multiple operating modes, including cooling, dehumidifying, and fan settings, all controllable via a user-friendly app or remote.
Specifications
- Cooling Capacity: 8,000 BTU
- Energy Efficiency: SEER 22.5, EER 12.5
- Dehumidification: Up to 60 pints per day
- Operating Temperature Range: 64°F - 90°F
- Noise Level: As low as 25 dB
- Remote Control Included
- Wi-Fi Connectivity for Smart App Control
- Auto-Restart Function
- 24-Hour Timer
Setup Guide
To set up your RolliCool Mini-Split AC P800,
- Start by carefully unpacking both the indoor and outdoor units from their boxes.
- Ensure all components are included before proceeding.
- Next, locate a suitable installation spot for the outdoor unit, ensuring it is level and well-ventilated.
- Follow the manual's instructions for mounting the indoor unit securely on your wall.
- Connect the refrigerant lines between the indoor and outdoor units, making sure to follow safety guidelines to avoid any leaks or damage.
- Power on both units and use the remote control or smartphone app to configure settings such as temperature, fan speed, and mode.
Safety Warnings
When reading this manual, note these icons:
- Notes with this icon MUST be read, understood, and obeyed to prevent injury or damage etc.
- Notes with this icon include relevant information.
Overall Usage
- Do not insert objects into the product.
- The product is not a toy. Do not leave children unsupervised around the product.
- The product is designed for indoor use only.
- Keep the product upright at all times.
- Do not use the product near any of the following places:
- Near anything fl ammable
- Direct sunlight
- Damp areas
- Dusty areas
- Do not use wax, thinner, or solvents when cleaning the air conditioner.
- Clean your fi lter once or more every couple of weeks.
- Do not place any obstacles in front of the inlet.
- Do not pull the power lines.
- In the event that the product is malfunctioning, shut the power off immediately.
- Switch off the product before cleaning.
- If used in homes near saltwater locations, the unit may be subject to accelerated corrosion.
- You should only use parts you have received from RolliBot™ or that have been included in the original packaging.
- Do not use the product for any purpose other than described in this user manual.
Installation Warnings
INDOOR UNIT
- Do not install the indoor unit in a sloped setting.
- Do not install the indoor unit in direct sunlight.
- Do not install in places with open fl ames or fl ammable gas.
- Do not use extension cords etc. Only plug the indoor unit into a grounded wall outlet.
- Install in clear area without any obstructions nearby.
- Avoid installing the indoor unit in damp areas.
- Install near the wall with space to link the coolant lines between the indoor and outdoor unit.
OUTDOOR UNIT
- Never install the outdoor unit in a place where the product is likely to fall.
- Make sure to drain the outdoor unit with the drainage pipe.
- Do not install the outdoor unit in direct sunlight.
- Do not install the outdoor unit near open flames or by flammable gas.
- Do not install the outdoor unit in extremely windy areas.
RolliCool Parts
Box Contents
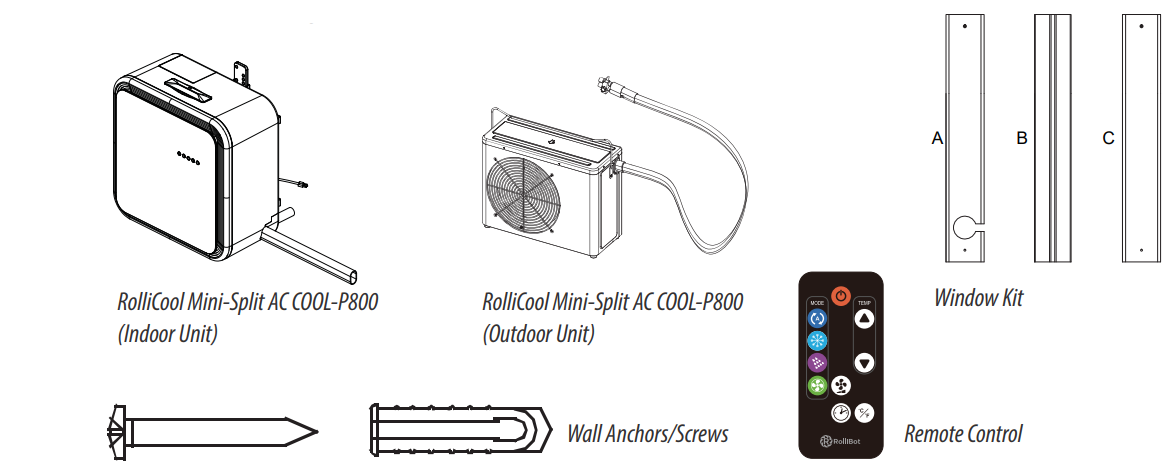
- 1 x RolliCool Mini-Split AC (Indoor Unit)
- 1 x RolliCool Mini-Split AC (Outdoor Unit)
- 1 x Remote Control
- 2 x Air Filter (pre-installed)
- 4 x Wall Anchors/Screws
- 1 x Window Kit
Components Overview
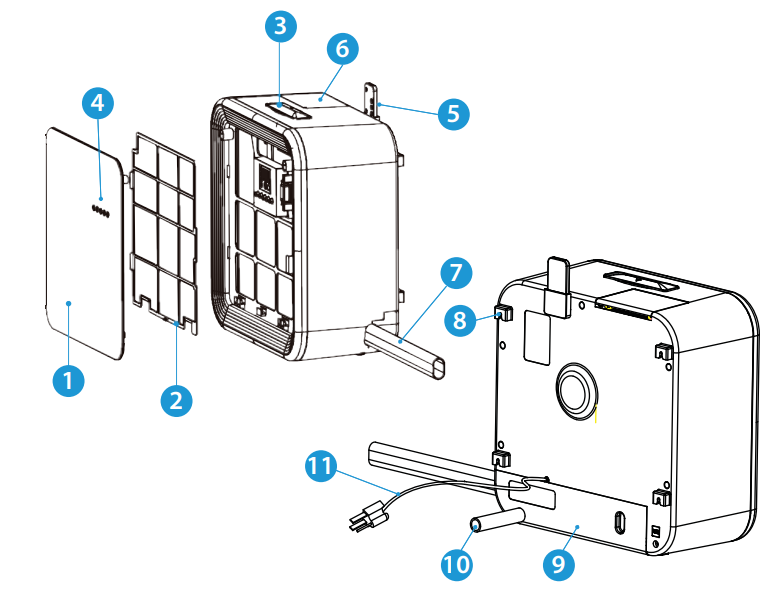
INDOOR UNIT
- Front Panel
- Air Filter
- Handle
- Control Panel
- Remote
- Air Outlet
- Coolant Lines
- Mount Openings
- Coupler Cover
- Drainage Pipe
- Power Cord
OUTDOOR UNIT
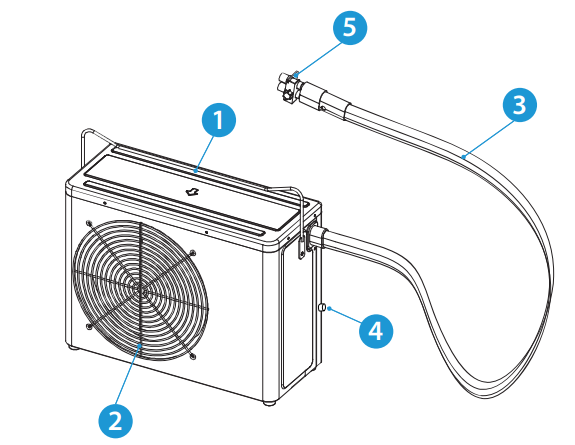
- Handle
- Air Outlet
- Coolant Lines
- Condensation Outlet
- Coupler
Control Panel
The RolliCool Mini-Split AC features an LED Control Panel which lights up when the AC unit turns on and includes buttons.
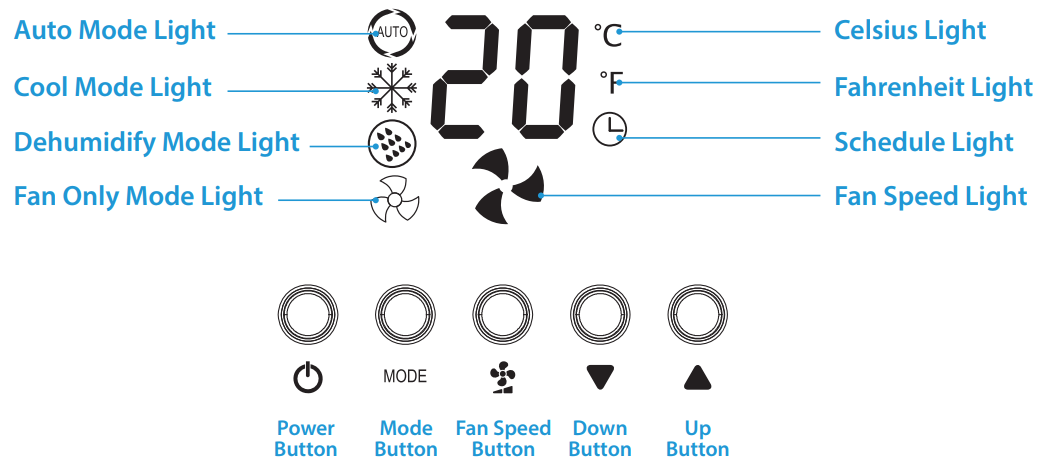
CONTROL PANEL LIGHTS
- Auto. Mode: This icon will light up when the unit is in Auto Mode.
- Cool Mode: This icon will light up when the unit is in Cool Mode.
- Dehumidify Mode: This icon will light up when the unit is in Dehumidify Mode.
- Fan Only Mode: This icon will light up when the unit is in Fan Only Mode.
- Celsius: If selected, this icon will light up when the current temperature is being displayed.
- Fahrenheit: If selected, this icon will light up when the current temperature is being displayed.
- Schedule: This icon will light up when a schedule has been programmed.
- Fan Speed: This icon will light up and change according to the selected fan speed.
CONTROL PANEL BUTTONS
- Power Button: Press to turn the unit on or off .
- Mode Button: Press to cycle between Auto, Cool, Dehumidify, and Fan Only modes.
- Fan Speed Button: Press to cycle between 3 fan speeds.
- Down Button: Press to lower temperature.
- Up Button: Press to raise temperature.
NOTE: Scheduling can be done and/or adjusted via the Control Panel, remote, or the app. See the following section for more information about the remote. See Section 4 for information about the app.
Remote Overview
The RolliCool Mini-Split AC features a remote which may be used with the unit.
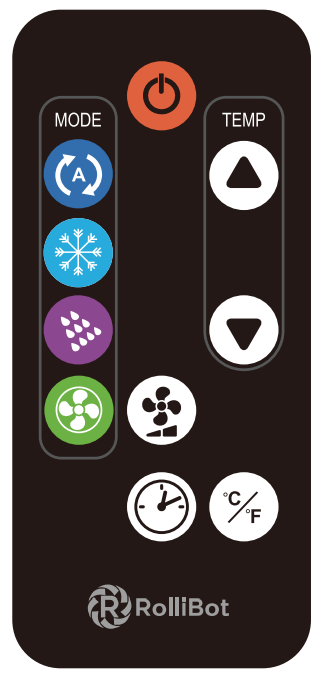
REMOTE BUTTONS
- Power Button: Press to turn the unit on or off .
- Auto Button: Press to turn on Auto Mode.
- Cool Button: Press to turn on Cool Mode.
- Dehumidify Button: Press to turn on Dehumidify Mode.
- Fan Only Button: Press to turn on Fan Only Mode.
- Schedule Button: Press to turn on Schedule Mode.
- Up Button: Press to raise temperature or adjust schedule duration.
- Down Button: Press to lower temperature or adjust schedule duration.
- Fan Speed Button: Press to cycle between 3 fan speeds.
- °C/°F Button: Press to switch between Celsius and Fahrenheit.
NOTE
- Avoid pressing two buttons simultaneously as this may cause malfunctions.
- Avoid using the remote in areas with extreme temperature fl uctuations.
- If the remote will not be used for extended periods of time, remove the battery.
- The remote control’s range is approximately 23 ft. Use it within this range.
- The remote uses one CR2 (CR2035 3V) battery. This battery is included.
Before Using the Remote
Pull the tab to remove the protective fi lm.
To Change the Battery
Pull part A in towards the remote then pull part B out to remove the battery tray. Remove any dead battery and replace with a new battery, + side up.

Description
The RolliBot RolliCool Mini-Split Air Conditioner P800 boasts a sleek and modern design that blends seamlessly into any home decor. It features a compact indoor unit with a slim profile, making it easy to install and maintain. The outdoor unit is equally efficient, ensuring minimal noise and maximum performance.
This air conditioner is equipped with advanced features such as inverter technology for consistent cooling, an air purification system to improve indoor air quality, and a dehumidification mode to reduce moisture levels. The Wi-Fi connectivity allows users to control the unit remotely through a smartphone app, adding convenience and flexibility.
Setting Up the AC
Installing the Indoor Unit
NOTE
- Choose a mounting location situated next to a window as the Coolant Lines must be run through a window in order to keep the Indoor and Outdoor Units connected.
- Using a stud detector for detection and installation into wall studs may be desired for more secure mounting.
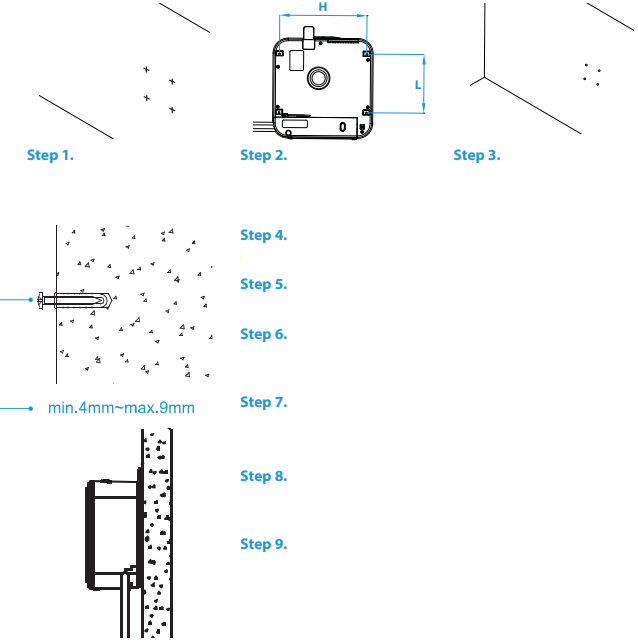
- Step 1.
Choose a suitable location on the wall for mounting the unit. - Step 2.
Measure between the Mount Openings on the back of the unit. - Step 3.
Mark locations on the wall according to the openings. - Step 4.
Use a drill to make 4 holes at each of the marks. - Step 5.
Insert the Wall Anchors into the wall. - Step 6.
Add the screws into their anchors making sure a length of 4mm~9mm is left out of the wall. - Step 7.
Install the Indoor Unit onto the wall making sure the notches in the Mount Openings slide over the screws. - Step 8.
Check to ensure the Indoor Unit is securely installed on the wall. - Step 9.
Remove the Indoor Unit for now to prepare for connection. After installing the Outdoor Unit (Section 3.2) and Connecting the Coupler (Section 3.3), reinstall the Indoor Unit on the wall.
Installing the Outdoor Unit
In order to let off exhaust and hot air, the Outdoor Unit should be placed on level, stable ground outdoors. The Coolant Lines must be used to connect the two units and may be routed through a window with the help of the Window Kit.
NOTE: Please read all installation steps and parts instructions and information before attempting to install.
WINDOW KIT PARTS

SECTIONS
These sections thread into one another and should be placed within a window gap. A may be fl ipped so that the opening is higher or lower.
CONNECTOR
This piece is later inserted into the opening in Section A and used to hold the Coolant Lines in place.
SCREW FASTENER
These parts are used to secure the sections together and can be loosened or tightened when adjusting the sections according to window height.
INSTALLATION
- Step 1.
Separate one Screw Fastener and thread the Screw Base into one end of Section B. - Step 2.
Thread Section A onto the end of Section B and use the Screw Head and Washer to secure the sections together. Step 3.
Repeat Step 1 one at the other end of Section B.
- Step 4.
Thread Section C onto the other end of Section B and use the Screw Head and Washer to secure the sections together. - Step 5.
Separate one Screw Fastener and thread the Screw Base into one end of the second Section B. - Step 6.
Thread the second Section B into the other end of Section C and use the Screw Head and Washer to secure the sections together. - Step 7.
Thread the Coolant Lines into the side of the Connector then fi t the Connector into Section A making sure the notch is in place. - Step 8.
Check that all Sections are connected like so. Step 9.
Install the assembled kit into a window gap and push the window nearly closed to secure it in place. Use the fasteners to adjust as needed.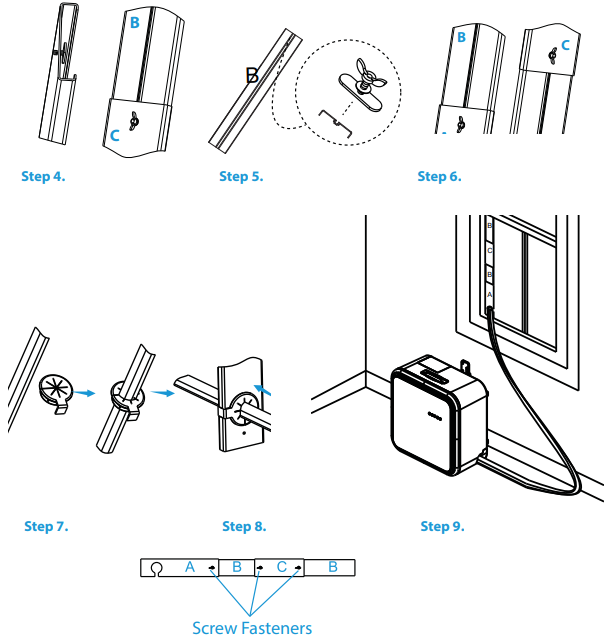
Connecting the Coupler
- Step 1.
Unscrew the screw at the right side of the cover. Push the button at the right side of the cover and pull it away from the unit to remove it. - Step 2.
Remove the rubber stopper from the end of the Coupler if it is installed. Open the latch and line the Coupler up with its connectors. - Step3.
Make sure the Coupler is properly threaded into its connectors and push it straight down. - Step 4.
Slowly close the latch, taking care to use even pressure on the latch. - Step 5.
Connect the power cable to the inside of the unit. Step 6.
Replace the Coupler Cover. Make sure to add the screw.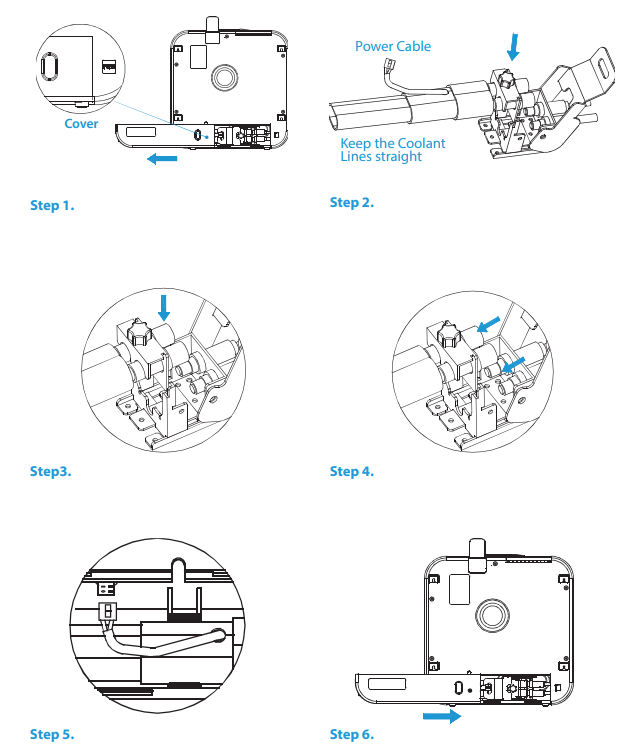
NOTE: Ensure that the rubber stopper is placed in a suitable location. If the Indoor and Outdoor Units are disconnected e.g. when the unit is being moved, the rubber stopper should be reinstalled into the end of the Coupler. If separating the two, review the following section.
Separating the Coupler
If needed, the Indoor and Outdoor Units can be disconnected from one another in case any adjustments or maintenance is needed. Before separating the coupler from the unit, turn off the RolliCool, disconnect it from any power supply and wait at least 5 minutes.
NOTE: Never separate the coupler while the unit is on.
- Step 1.
Unscrew the screw at the right side of the cover. Push the button at the right side of the cover and pull it away from the unit to remove it. - Step 2.
Slowly open the latch and hold the Coolant Lines so that they’re straight. Note, the unit may emit a chugging sound due to the refrigerant; this is normal. - Step 3.
Disconnect the power cable from the inside of the unit. Lift the Coolant Lines up and away from the unit to remove it. Step 4.
Insert the rubber stopper into the end of the Coupler to prevent leakage.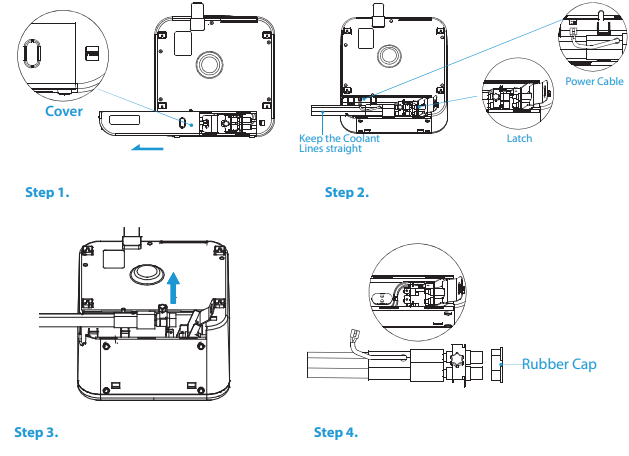
App Setup
For your convenience, there is an app for the RolliCool. The app is compatible with most Android and iOS smartphones. The app can be used to set cooling schedules, change modes, and more. Use your smartphone to search the Play or App Store for the “RolliCool” application then download and install the app according to your operating system. After downloading the app, see the steps and images below to use it and connect to your AC unit. For your convenience, the steps have been divided into parts.
NOTE
- Either wi-fi or Bluetooth® may be used for setup. It is not necessary to set up via both methods.
- Powering on the RolliCool will automatically enable Bluetooth® i.e. Bluetooth® will become enabled and stay enabled as long as the RolliCool is turned on.
- For instructions on how to turn on Bluetooth®, consult materials for your Bluetooth®-enabled smartphone.
- As with most Bluetooth® devices, it is recommended to keep the connected devices at least 32 ft. within each other. The connection may be terminated or fail to work properly if the connected devices are too far apart.
How to Use the RolliCool
The RolliCool Mini-Split AC features a number of ways to keep cool and comfortable. Most features can be used by pressing the buttons on the unit’s Control Panel, the remote, or via the app.
NOTE: In most cases where the remote can be used, the app can also be used as a substitute.
Auto Mode
With this mode, the unit will turn on and regulate temperature as selected.
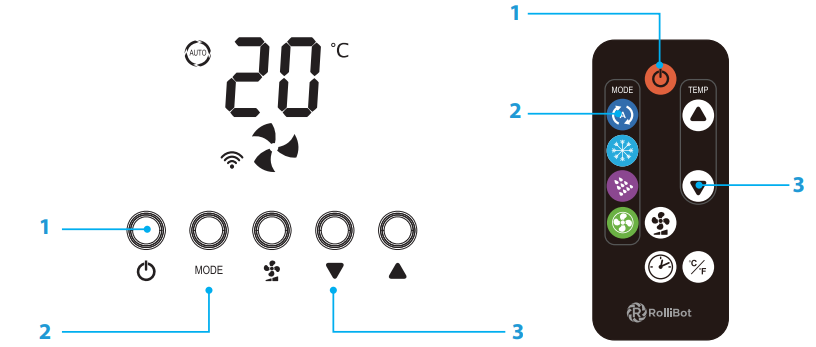
- Press the Power Button on the Control Panel or the remote.
- Press the Mode Button on the Control Panel until the Auto Mode light turns on. Press it multiple times to cycle through diff erent modes. Or simply press the Auto Button on the remote.
- Use the Up and Down Buttons to set the desired temperature between 61~88°F (16~310C ).
- When Auto Mode is active, the unit will not turn on if the chosen temperature is higher than the indoor temperature.
- In Auto Mode, the fan speed is automatically set and cannot be adjusted.
Cooling Mode
With this mode, the unit will turn on and regulate temperature as selected.
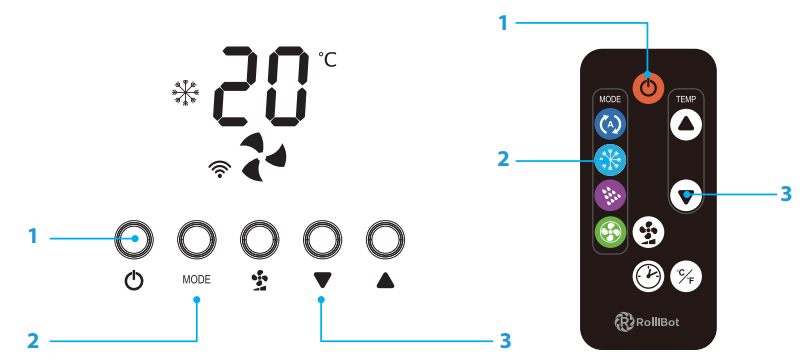
- Press the Power Button on the Control Panel or the remote.
- Press the Mode Button on the Control Panel until the Cool Mode light turns on. Press it multiple times to cycle through diff erent modes. Or simply press the Cool Button on the remote.
- Use the Up and Down Buttons to set the desired temperature between 61~88°F (16~310C ).
- Use the Fan Speed Button to change fan speed. Press it multiple times to cycle through 3 fan speeds.
NOTE: When Cool Mode is active, the unit will not turn on if the chosen temperature is higher than the indoor temperature.
Dehumidify Mode
With this mode, the unit will turn on and begin removing moisture from the air.
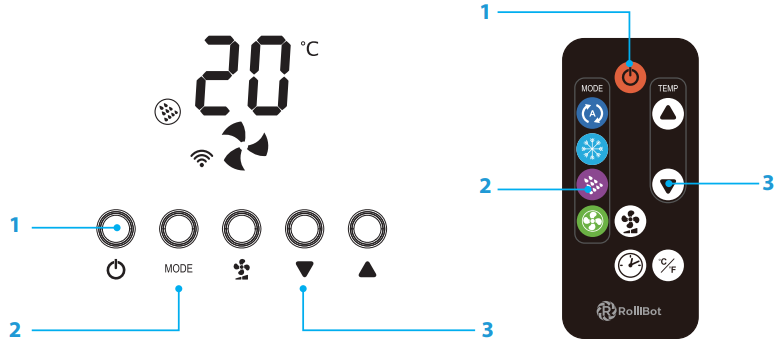
- Press the Power Button on the Control Panel or the remote.
- Press the Mode Button on the Control Panel until the Dehumidify Mode icon appears. Press it multiple times to cycle through diff erent modes. Or simply press the Dehumidify Button on the remote.
NOTE: In Dehumidify Mode, the fan speed is automatically set low and cannot be adjusted.
Fan Only Mode
With this mode, the unit will turn on and begin using the fan to promote air circulation.
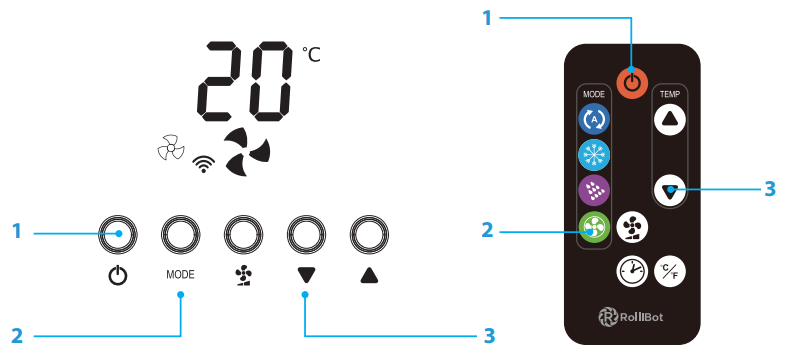
- Press the Power Button on the Control Panel or the remote.
- Press the Mode Button on the Control Panel until the Fan Only Mode icon appears. Or simply press the Fan Only Button on the remote.
- Use the Fan Speed Button to change fan speed. Press it multiple times to cycle through 3 fan speeds.
NOTE: In Fan Only Mode, the fan speed is automatically set low and cannot be adjusted.
Timer
With this mode, the unit will automatically turn on or off and regulate temperature according to the selected times.
NOTE
- Setting the schedule when the unit is off means setting the time the unit will turn on.
- Setting the schedule when the unit is on means setting the time the unit will run before it shuts off .
TO SET A TURN ON TIME
- When the unit and remote are off , press the Timer Button on the Control Panel or the remote.
- Use the Up and Down Buttons to select the time the AC unit will turn on i.e. selecting “03” will prompt the unit to turn on in 3 hours’ time etc.
- After the selection is complete, the display will show the Timer icon.
NOTE: When a schedule is active, the unit will not turn on if the chosen temperature is higher than the indoor temperature.
TO SET A SHUTOFF TIME
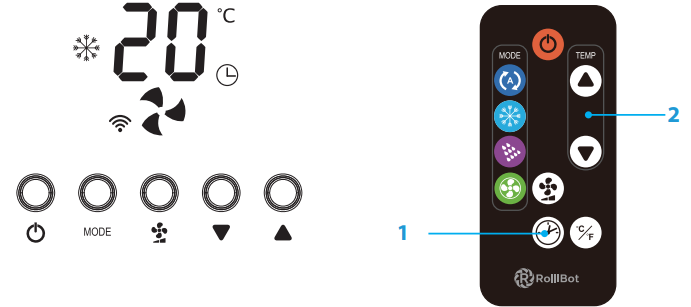
- When the unit and remote are on, press the Timer Button on the Control Panel or the remote.
- Use the Up and Down Buttons to select the time the AC unit will turn off i.e. selecting “03” will prompt the unit to turn off in 3 hours’ time etc.
- After the selection is complete, the display will show the current indoor temperature and the Schedule Light.
Maintenance
Proper maintenance will help improve your RolliCool’s performance. The RolliCool will periodically need its fi lter cleaned. For optimal performance, the fi lters should be cleaned at least twice a month. It is also recommended to regularly inspect the Drainage Pipe.
NOTE: If any type of non-routine maintenance is needed, such as any maintenance not described in Section 6 of this manual, please contact customer service or a certifi ed HVAC professional as the unit contains refrigerant.
How to Clean the Filters
- Please make sure your AC unit is completely powered off before performing any type of maintenance.
- Do not scrape the air fi lters as it may sustain damage.
- A hand vacuum or low-powered vacuum or vacuum modes may be used to clean the fi lters.
- Replace the fi lters after cleaning. Do not use the RolliCool without the fi lters.
- Pull off the front panel.
Pull out the fi lter.
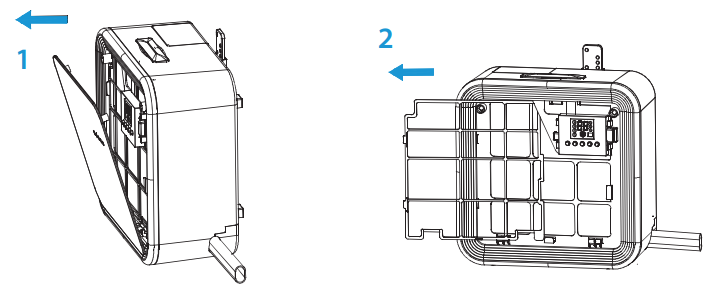
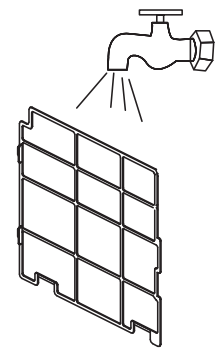
- Remove the fi lter and empty the debris into a waste receptacle.
- Rinse the fi lter in lukewarm water if desired and allow time for it to dry before replacing it.
Mild detergents may also be used.
How to Clean the Indoor Unit
- Wipe the exterior clean with a non-abrasive cloth. If needed, the cloth can be damp-ened with water.
- Do not use harsh chemicals to clean as these may damage the unit.
- Be careful to keep water out of the interior.
How to Drain the Unit
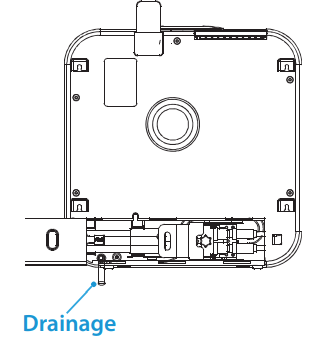
In most cases, the Indoor Unit will not require draining. If this is necessary in some special case, follow the instructions below.
NOTE: Please make sure your AC unit is completely powered off before performing any type of maintenance.
- After turning off the RolliCool, unplug it.
- If needed, remove the Drainage Pipe’s stopper and drain the water down away from the unit. Using a bucket is recommended.
- To completely dry the inside, use Fan Only Mode for at least two hours.
- If the Drainage Pipe needs an extension, materials to do so can be purchased at most hardware stores.
How to Clear Water from Drainage Pipe
If the Drainage Pipe has excessive water that needs to be cleared, follow the instructions below.
Please make sure your AC unit is completely powered off before performing any type of maintenance.
- Step 1. Unplug the unit and remove the Indoor Unit from the wall.
- Step 2. Place the unit on a sturdy surface and remove the Coupler Cover.
- Step 3. Use needle nose pliers to pinch the Drainage Pipe’s metal clasp to release the pipe from the unit.
- Step 4. Clear the water from the Drainage Pipe.
- Step 5. Connect the Drainage Pipe back to the unit and push the clasp around the pipe where it is connected to the unit.
- Step 6. Use needle nose pliers to fi x the metal clasp back in place.
- Step 7. Replace the cover, add and tighten the screw, and place the unit back on the wall.
Troubleshooting
| Problems | Possible Causes |
| Solution(s) |
The unit does not work. | There is no electricity. |
| Turn it on afterconnecting it to a socket with electricity. |
| The overflow indicator displays. |
| Drain the water inside. | |
| The indoor temperature is too low or too high. | Use the unit when the indoor temperature is between 44-950F (7-35 0C ). | ||
Change the set temperature. | |||
| The cooling effect is weak. | There is direct sunlight. |
| Cover any directsunlight coming through the windows. |
| Doors or windows are open; there are a lot of people; or there areother sources of heat. |
| Close doorsand windows. | |
| The filter is dirty. |
| Clean or replace the filter. | |
| The air inletor outlet is blocked. |
| Clear obstructions. | |
| Excessive Noise | The unitis not placedon a flat surface. |
| Put the unit on a fl at and stable surface. |
| Compressor Issues | Overheating protection started. |
| Wait 3 minutes untilthe temperature is lowered then restart the unit. |
| The remote control does not work. | The remote and unit are too far apart. | Get closer to the RolliCool and make sure that the remotecontrol directly facesthe unit. | |
| The remote isn’tpointed in the right direction. | |||
| Batteries are dead. |
| Replace batteries. | |
When the RolliCool encounters errors, the display may show certain error codes. Refer to the table below.
| Code | Possible Cause | Solution(s) |
| E0 | Water hascollected in the unit. | Unplug the unit. Use the Drainage Pipe and drain out any water. Restartthe unit. |
| E1 | Indoor temp. sensorfailure | Contact customer service for troubleshooting. |
| E2 | EVA sensor failure | Contact customer service for troubleshooting. |
| E6 | Overcooling | The unitwas turned on when theindoor temperature was too low. Adjust the temperature as needed. |
| E7 | Overheating | If the coolingeffect is weak,remove and clean the filters. Restart the unit. |
RolliBot RolliCool Mini-Split Air Conditioner P800 Warranty
Violation
The RolliCool Mini-Split Air Conditioner cannot be repaired or serviced within its warranty period if any of the following has occurred:
ONE-YEAR LIMITED HARDWARE WARRANTY
Your RolliCool Mini-Split Air Conditioner (“Product”) includes a One Year Limited Hardware Warranty (“Warranty”). The Warranty covers product defects in materials and workmanship under normal use. This Warranty is limited to residents of the United States and Canada only and is available only to original purchasers. This Warranty gives you specifi c legal rights, and you may also have other rights which vary from state to state.
Pros & Cons
Pros
- Energy Efficiency: High SEER rating makes it cost-effective in the long run.
- Quiet Operation: Low noise levels ensure minimal disturbance.
- Smart Control: Wi-Fi connectivity allows remote control via smartphone app.
- Compact Design: Ideal for small spaces without compromising on performance.
- Advanced Features: Includes dehumidification mode, air purification system, and auto-restart function.
Cons
- Installation Complexity: Requires professional installation which can add to the overall cost.
- Limited Coverage Area: Designed for small to medium-sized spaces only.
- Higher Initial Cost: Although energy-efficient, the initial purchase price might be higher than traditional ACs.
Customer Reviews
Customers have praised the RolliBot RolliCool Mini-Split Air Conditioner P800 for its efficient cooling, quiet operation, and user-friendly interface. Many have appreciated the smart app feature which allows them to control the temperature remotely. However, some users have noted that the installation process can be complex and requires professional assistance.
Common complaints
Including issues with Wi-Fi connectivity and occasional delays in receiving replacement parts for maintenance.
Faqs
How do I reset my RolliBot?
Why is my RolliBot P800 not cooling?
Can I install the RolliCool Air Conditioner myself?
How often should I clean the air filters of my RolliBot?
What is the SEER rating of the RolliBot Air Conditioner P800?
Can I use my Air Conditioner P800 in extremely cold weather?
Is my RolliBot RolliCool covered by a warranty?
How do I pair my smartphone with the P800 via Wi-Fi?
Why does my RolliBot Mini-Split make noise during operation?
How much electricity does my Air Conditioner consume?
Leave a Comment
