How to Connect: Samsung Galaxy Note 8 N950F-DS User Manual
Content
Introduction of Samsung Galaxy Note 8 N950F-DS
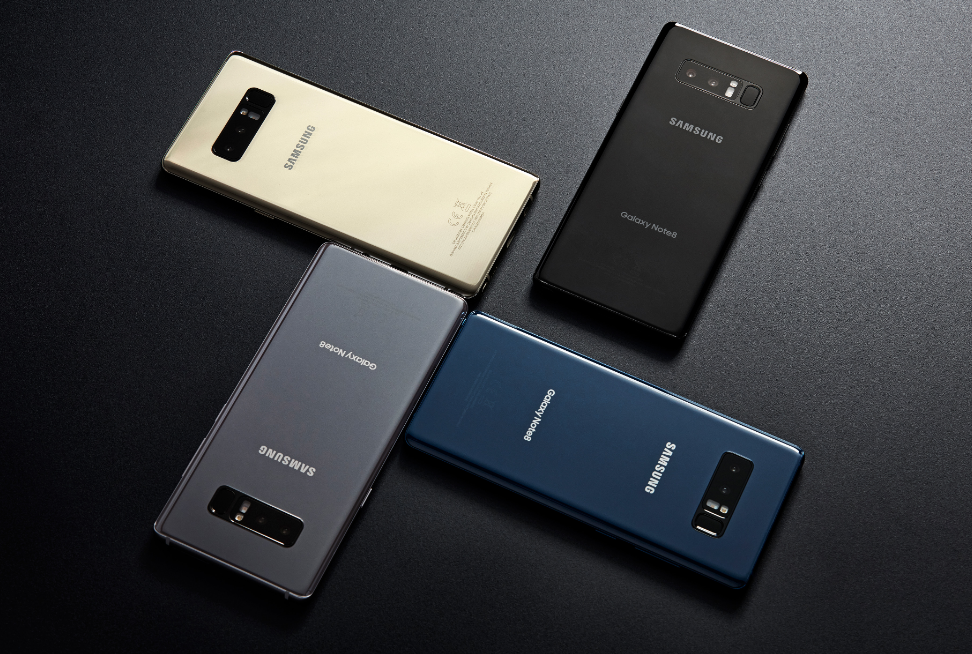
The Samsung Galaxy Note 8 N950F-DS is a strong and versatile smartphone for mobile productivity and creativity. The Galaxy Note 8's 6.3-inch Super AMOLED Infinity Display provides vivid colors and precise details for multimedia and multitasking. The Note 8's S Pen lets you take accurate notes, sketch, and navigate, improving your productivity and creativity. This dual-SIM handset performs well and lasts long because of its Exynos 8895 chipset, 6GB RAM, and 3300mAh battery. A dual-camera system with 12MP wide and telephoto lenses on the Galaxy Note 8 captures outstanding photographs with depth and clarity. Samsung Galaxy Note 8 N950F-DS is the perfect smartphone for style and substance with its sleek appearance, strong features, and simple S Pen capabilities.
Device layout and functions
Package contents
Refer to the quick start guide for package contents.
TIP
- The items supplied with the device and any available accessories may vary depending on the region or service provider.
- The supplied items are designed only for this device and may not be compatible with other devices.
- Appearances and specifications are subject to change without prior notice.
- You can purchase additional accessories from your local Samsung retailer. Make sure they are compatible with the device before purchase.
- Use only Samsung-approved accessories. Using unapproved accessories may cause the performance problems and malfunctions that are not covered by the warranty.
- Availability of all accessories is subject to change depending entirely on manufacturing companies. For more information about available accessories, refer to the Samsung website.
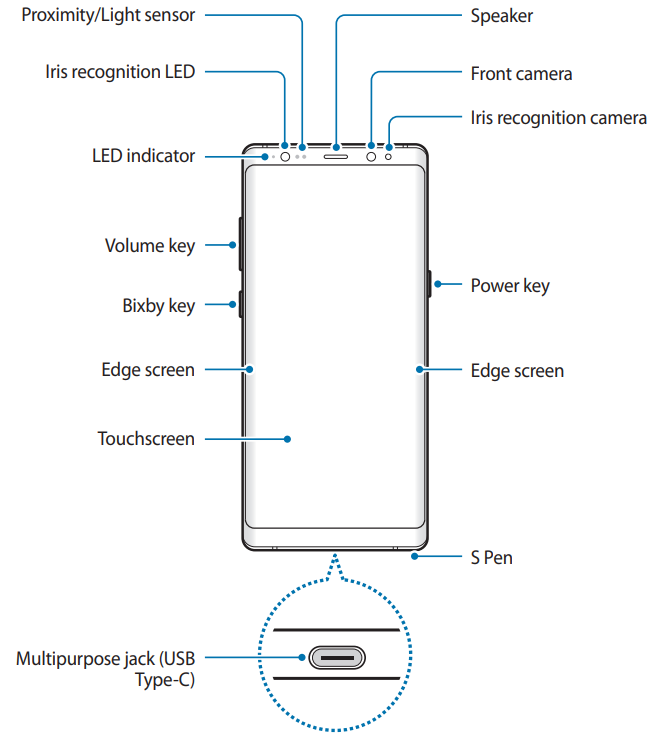
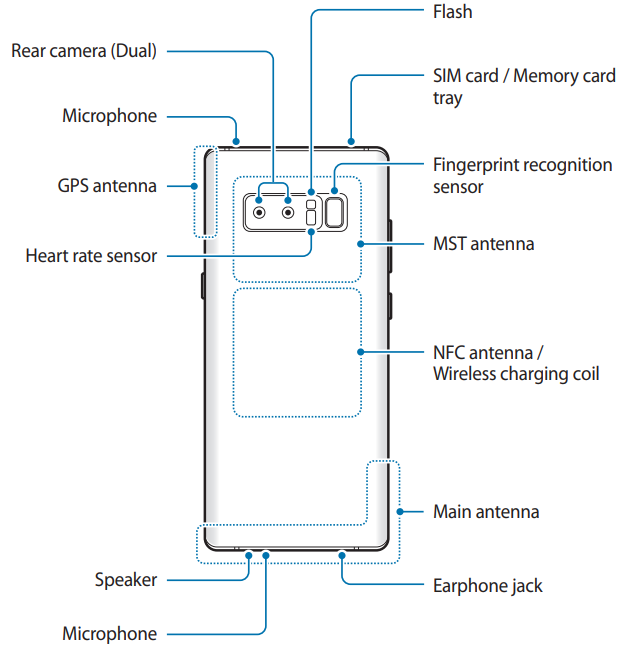
Device layout
TIPS
- Connectivity problems and battery drain may occur in the following situations:
- If you attach metallic stickers on the antenna area of the device
- If you attach a device cover made with metallic material to the device
- If you cover the device’s antenna area with your hands or other objects while using certain features, such as calls or the mobile data connection
- Using a Samsung-approved screen protector is recommended. Unapproved screen protectors may cause the sensors to malfunction.
- Do not cover the proximity/light sensor area with screen accessories, such as a screen protector or stickers. Doing so may cause the sensor to malfunction.
- The colours on the Edge screen may look different depending on your viewing position.
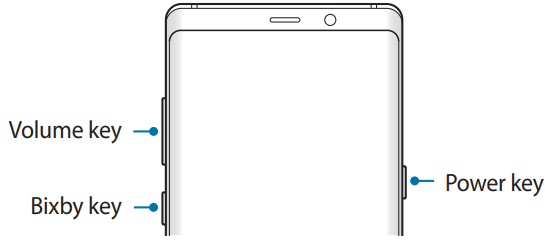
Hard keys
Key | Function |
Power |
|
Bixby |
|
Volume |
|
Soft buttons
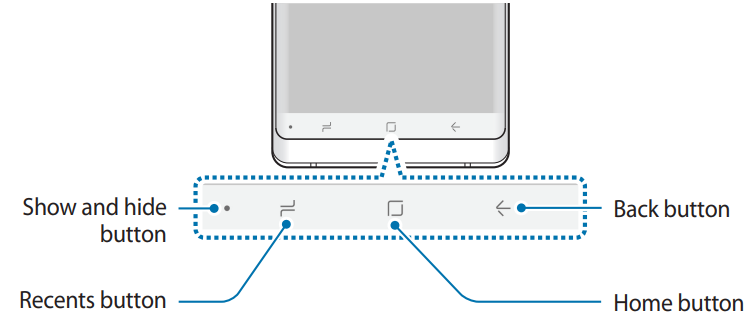
When you turn on the device, the soft buttons will appear at the bottom of the screen. The soft buttons are set to the Recents button, Home button, and Back button by default. Refer to Navigation bar (soft buttons) for more information.
S Pen
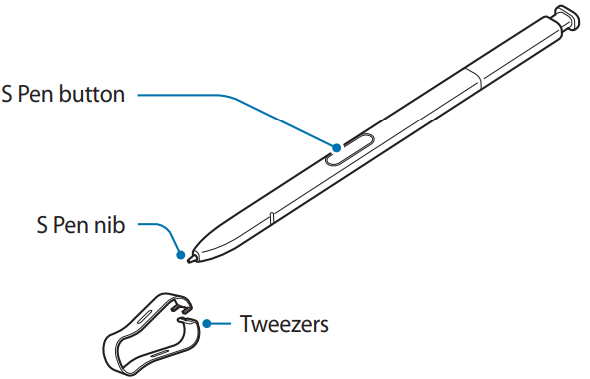
Name | Functions |
S Pen nib |
|
S Pen button |
|
Tweezers |
|
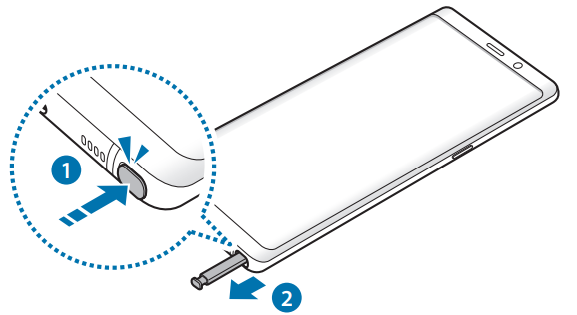
Detaching the S Pen
Press the end of the S Pen to disengage it. Then, pull the S Pen from the slot. To store the S Pen, reinsert it into the slot and push it until it clicks into place.
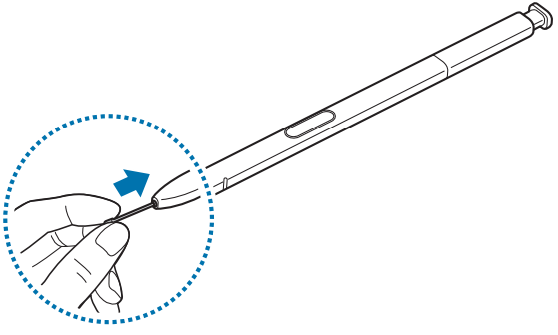
Replacing the S Pen nib
If the nib is dull, replace it with a new one.
Firmly hold the nib with the tweezers and remove it.
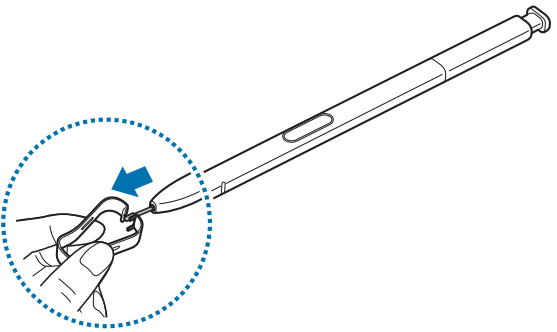
Insert a new nib into the S Pen.
WARNING
Be careful not to pinch your fingers with the tweezers.
CAUTION
- Do not reuse old nibs. Doing so may cause the S Pen to malfunction.
- Do not press the nib excessively when inserting the nib into the S Pen.
- Do not insert the round end of the nib into the S Pen. Doing so may cause damage to the S Pen or your device.
- Do not bend or apply excessive pressure with the S Pen while using it. The S Pen may be damaged or the nib may be deformed.
- Do not hard press on the screen with the S Pen. The pen nib may be deformed.
INFO
- If you use the S Pen at sharp angles on the screen, the device may not recognise the S Pen actions.
- If water enters the S Pen slot, gently shake the device to remove the water from the slot before using it.
- For more information about the S Pen, visit the Samsung website.
- If the S Pen is not working properly, take it to a Samsung Service Centre.
After fully charging, disconnect the device from the wireless charger.
Precautions for wireless charging
- Do not place the device on the wireless charger with a credit card or radio-frequency identification (RFID) card (such as a transportation card or a key card) placed between the back of the device and the device cover.
- Do not place the device on the wireless charger when conductive materials, such as metal objects and magnets, are placed between the device and the wireless charger.
The device may not charge properly or may overheat, or the device and the cards may be damaged.
INFO
- If you use the wireless charger in areas with weak network signals, you may lose network reception.
- Use Samsung-approved wireless chargers. If you use other wireless chargers, the battery may not charge properly.
SIM or USIM card (nano-SIM card)
Installing the SIM or USIM card
- Insert the SIM or USIM card provided by the mobile telephone service provider.
- For dual SIM models, you can insert two SIM or USIM cards so you can have two phone numbers or service providers for a single device. In some areas, data transfer speeds may be slower if two SIM cards are inserted in the device than when one SIM card is inserted.
CAUTION
Use caution not to lose or let others use the SIM or USIM card. Samsung is not responsible for any damages or inconveniences caused by lost or stolen cards.
INFO
Some LTE services may not be available depending on the service provider. For more information about service availability, contact your service provider.
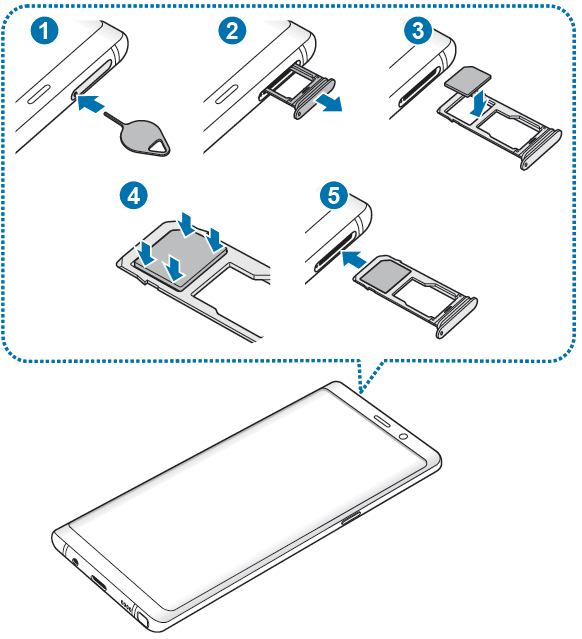
Single SIM models
Dual SIM models
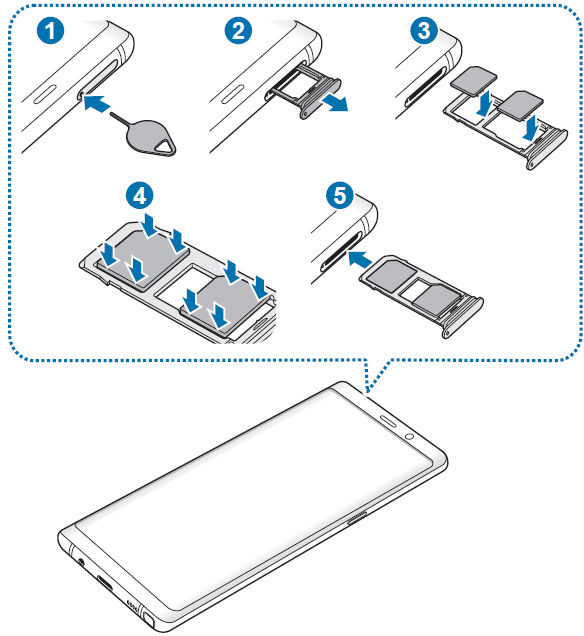
- Insert the ejection pin into the hole on the tray to loosen the tray.
Ensure that the ejection pin is perpendicular to the hole. Otherwise, the device may be damaged. - Pull out the tray gently from the tray slot.
Single SIM models: Place the SIM or USIM card on the tray 1 with the gold-coloured contacts facing downwards.
Dual SIM models: Place the SIM or USIM card on the tray with the gold-coloured contacts facing downwards. Place the primary SIM or USIM card on the tray 1 ( 1 ) and the secondary SIM or USIM card on the tray 2 ( 2 ).
- Gently press the SIM or USIM card into the tray to secure it.
If the card is not fixed firmly into the tray, the SIM card may leave or fall out of the tray. - Insert the tray back into the tray slot.
- TIPS
If you insert the tray into your device while the tray is wet, your device may be damaged. Always make sure the tray is dry. - TIPS
Fully insert the tray into the tray slot to prevent liquid from entering your device.
- TIPS
Correct card installation
Single SIM models
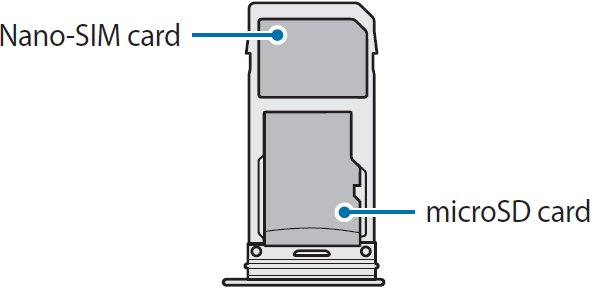
Dual SIM models

TIPS
- Use only a nano-SIM card.
- You cannot insert a nano-SIM card and a microSD card in tray 2 at the same time.
Removing the SIM or USIM card
- Insert the ejection pin into the hole on the tray to loosen the tray.
- Pull out the tray gently from the tray slot.
- Remove the SIM or USIM card.
- Insert the tray back into the tray slot.
Using dual SIM or USIM cards (dual SIM models)
If you insert two SIM or USIM cards, you can have two phone numbers or service providers for a single device.
Activating SIM or USIM cards
Launch the Settings app and tap Connections → SIM card manager. Select a SIM or USIM card and tap the switch to activate it.
Customising SIM or USIM cards
Launch the Settings app, tap Connections → SIM card manager, and then select a SIM or USIM card to access the following options:
- Icon: Change the icon of the SIM or USIM card.
- Name: Change the display name of the SIM or USIM card.
- Network mode: Select a network type to use with the SIM or USIM card.
Setting preferred SIM or USIM cards
When two cards are activated, you can assign voice calls, messaging, and data services to specific cards.
Launch the Settings app, tap Connections → SIM card manager, and then set the feature preferences for your cards in PREFERRED SIM CARD.
Description
The Samsung Galaxy Note 8 N950F-DS is a top-of-the-line smartphone that offers a large and beautiful display, powerful performance, and a versatile camera. The device is perfect for productivity-focused users who want to take advantage of the S Pen stylus for note-taking and drawing. It also has a sleek and premium design that is sure to turn heads. The Note 8 N950F-DS is a great choice for users who want a high-end device that can do it all.
Connecting to an external display
You can connect your smartphone to an external display, such as a TV or monitor, and view presentations or movies on the connected display. Connect your smartphone to an external display using an HDMI cable and HDMI adaptor (USB Type-C to HDMI). You can view your smartphone’s content on the connected screen.
TIPS
- HDMI cables and adaptors (USB Type-C to HDMI) are sold separately.
- Use only a Samsung-approved HDMI adaptor (USB Type-C to HDMI). Performance problems and malfunctions caused by using unapproved accessories are not covered by the warranty.
Connect an HDMI adaptor (USB Type-C to HDMI) to your smartphone.
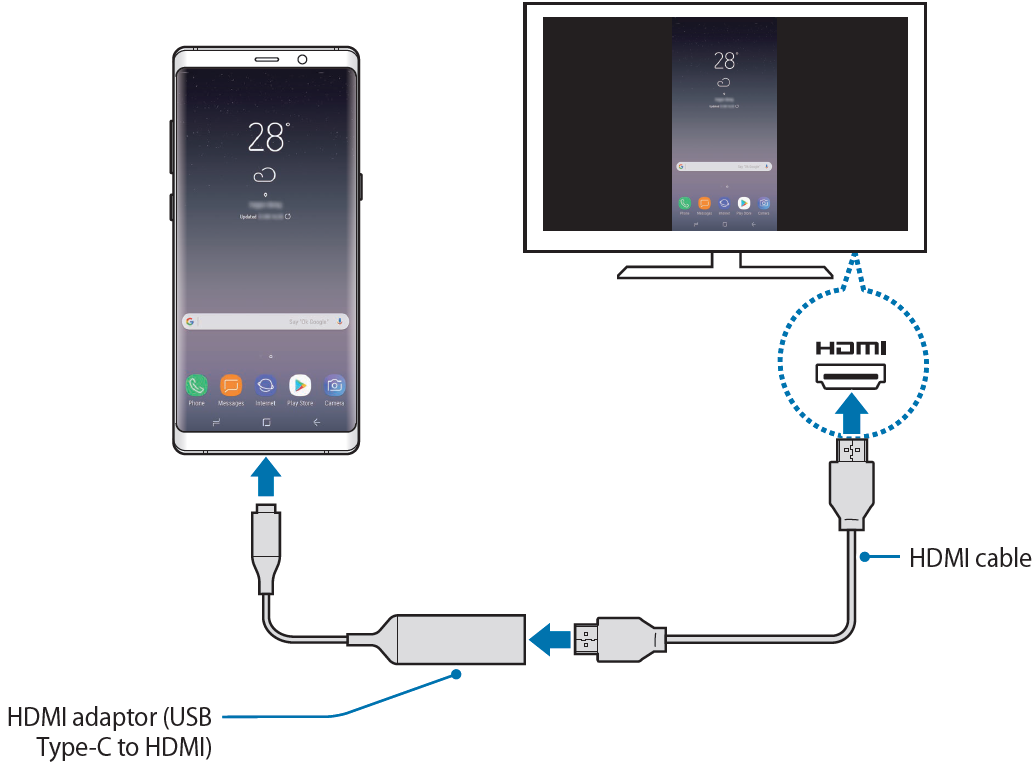
- Connect an HDMI cable to the HDMI adaptor (USB Type-C to HDMI) and to a TV or monitor’s HDMI port.
Your smartphone’s screen will appear on the connected screen.
Google apps
Google provides entertainment, social network, and business apps. You may require a Google account to access some apps.
To view more app information, access each app’s help menu.
INFO: Some apps may not be available or may be labelled differently depending on the region or service provider.
- Chrome
Search for information and browse webpages. - Gmail
Send or receive emails via the Google Mail service. - Maps
Find your location on the map, search the world map, and view location information for various places around you. - Play Music
Discover, listen to, and share music on your device. You can upload music collections stored on your device to the cloud and access them later. - Play Movies & TV
Purchase or rent videos, such as movies and TV programmes, from Play Store. - Drive
Store your content on the cloud, access it from anywhere, and share it with others. - YouTube
Watch or create videos and share them with others. - Photos
Search for, manage, and edit all your photos and videos from various sources in one place. - Google
Search quickly for items on the Internet or your device. - Duo
Make a simple video call.
Setup Guide
To set up the Galaxy Note 8 N950F-DS,
- First, insert the SIM card and any additional memory cards.
- Then, turn on the device and follow the on-screen instructions to set up the language, date and time, and other preferences.
- To set up the S Pen, remove it from its holder and follow the on-screen prompts.
- To pair the device with a Bluetooth accessory, go to Settings > Connections > Bluetooth and select the desired device.
Settings
Introduction
- Customise settings for functions and apps. You can make your device more personalised by configuring various setting options.
- Launch the Settings app.
- To search for settings by entering keywords, tap .
Connections
Options
Change settings for various connections, such as the Wi-Fi feature and Bluetooth.
On the Settings screen, tap Connections.
- Wi-Fi: Activate the Wi-Fi feature to connect to a Wi-Fi network and access the Internet or other network devices. Refer to Wi-Fi for more information.
- Bluetooth: Use Bluetooth to exchange data or media files with other Bluetooth-enabled devices. Refer to Bluetooth for more information.
- Phone visibility: Allow other devices to find your device to share content with you. When this feature is activated, your device will be visible to other devices when they search for available devices using their Transfer files to device option.
- Data usage: Keep track of your data usage amount and customize the settings for the limitation. Set the device to automatically disable the mobile data connection when the amount of mobile data you have used reaches your specified limit.
- TIP: You can also activate the data saver feature to prevent some apps running in the background from sending or receiving data. Refer to Data saver for more information.
- Flight mode: Set the device to disable all wireless functions on your device. You can use only non-network services.
- HINT: Make sure the device is turned off during takeoff and landing. After takeoff, you can use the device in flight mode if allowed by aircraft personnel.
- NFC and payment: Set the device to allow you to read near field communication (NFC) tags that contain information about products. You can also use this feature to make payments and buy tickets for transportation or events after downloading the required apps. Refer to NFC and payment for more information.
- Mobile hotspot and tethering: Use the device as a mobile hotspot to share the device’s mobile data connection with other devices when the network connection is not available. Connections can be made via Wi-Fi, USB, or Bluetooth. Refer to Mobile hotspot and tethering for more information.
- Mobile networks: Configure your mobile network settings.
- SIM card manager (dual SIM models): Activate your SIM or USIM cards and customise the SIM card settings. Refer to SIM card manager (dual SIM models) for more information.
- Location: Change settings for location information permissions.
- More connection settings: Customise settings to control other features. Refer to More connection settings for more information.
Wi-Fi
Activate the Wi-Fi feature to connect to a Wi-Fi network and access the Internet or other network devices.
HINT
Turn off Wi-Fi to save the battery when not in use.
Connecting to a Wi-Fi network
- On the Settings screen, tap Connections → Wi-Fi, and then tap the switch to activate it.
- Select a network from the Wi-Fi networks list.
Networks that require a password appear with a lock icon. Enter the password and tap CONNECT.
NOTE- Once the device connects to a Wi-Fi network, the device will reconnect to that network each time it is available without requiring a password. To prevent the device connecting to the network automatically, select it from the list of networks and tap FORGET.
- If you cannot connect to a Wi-Fi network properly, restart your device’s Wi-Fi feature or the wireless router.
Wi-Fi Direct
Wi-Fi Direct connects devices directly via a Wi-Fi network without requiring an access point.
- On the Settings screen, tap Connections → Wi-Fi, and then tap the switch to activate it.
- Tap Wi-Fi Direct.
The detected devices are listed.
If the device you want to connect to is not in the list, request that the device turns on its Wi-Fi Direct feature. - Select a device to connect to.
The devices will be connected when the other device accepts the Wi-Fi Direct connection request.
Sending and receiving data
You can share data, such as contacts or media files, with other devices. The following actions are an example of sending an image to another device.
- Launch the Gallery app and select an image.
- Tap → Wi-Fi Direct and select a device to transfer the image to.
- Accept the Wi-Fi Direct connection request on the other device.
If the devices are already connected, the image will be sent to the other device without the connection request procedure.
Ending the device connection
- On the Settings screen, tap Connections → Wi-Fi.
- Tap Wi-Fi Direct.
The device displays the connected devices in the list. - Tap the device name to disconnect the devices.
Bluetooth
Use Bluetooth to exchange data or media files with other Bluetooth-enabled devices.
NOTES
- Samsung is not responsible for the loss, interception, or misuse of data sent or received via Bluetooth.
- Always ensure that you share and receive data with devices that are trusted and properly secured. If there are obstacles between the devices, the operating distance may be reduced.
- Some devices, especially those that are not tested or approved by the Bluetooth SIG, may be incompatible with your device.
- Do not use the Bluetooth feature for illegal purposes (for example, pirating copies of files or illegally tapping communications for commercial purposes). Samsung is not responsible for the repercussion of illegal use of the Bluetooth feature.
Pairing with other Bluetooth devices
- On the Settings screen, tap Connections → Bluetooth, and then tap the switch to activate it.
The detected devices will be listed. - Select a device to pair with.
If the device you want to pair with is not in the list, request that the device turns on its visibility option. Refer to the other device’s user manuals.
TIP: Your device is visible to other devices while the Bluetooth settings screen is open. - Accept the Bluetooth connection request on your device to confirm.
The devices will be connected when the other device accepts the Bluetooth connection request.
Sending and receiving data
Many apps support data transfer via Bluetooth. You can share data, such as contacts or media files, with other Bluetooth devices. The following actions are an example of sending an image to another device.
- Launch the Gallery app and select an image.
- Tap
 → Bluetooth, and then select a device to transfer the image to.
If your device has paired with the device before, tap the device name without confirming the auto-generated passkey.
If the device you want to pair with is not in the list, request that the device turns on its visibility option. - Accept the Bluetooth connection request on the other device.
Dual audio
You can connect up to two Bluetooth audio devices to your smartphone. Connect two Bluetooth headsets or speakers to use them at the same time.
TIP: To use this feature, the Bluetooth audio devices you want to connect must support the Media audio feature.
- On the Settings screen, tap Connections → Bluetooth, and then tap the switch to activate it.
The detected devices will be listed. - Tap
.png) → Dual audio, tap the switch to activate it, and then tap the Back button.
→ Dual audio, tap the switch to activate it, and then tap the Back button. - Select a device to pair with.
If the device you want to pair with is not in the list, turn on its visibility option or enter Bluetooth pairing mode on the device. Refer to the device’s user manuals for more information. - Tap next to the connected device and tap the Media audio switch to activate it. 5 Select another device from the list and activate its Media audio feature.
Unpairing Bluetooth devices
- On the Settings screen, tap Connections → Bluetooth.
The device displays the paired devices in the list. - Tap next to the device name to unpair.
- Tap Unpair.
Data saver
- Reduce your data usage by preventing some apps running in the background from sending or receiving data.
- On the Settings screen, tap Connections → Data usage → Data saver and tap the switch to activate it.
When the data saver feature is activated, the
 icon will appear on the status bar.
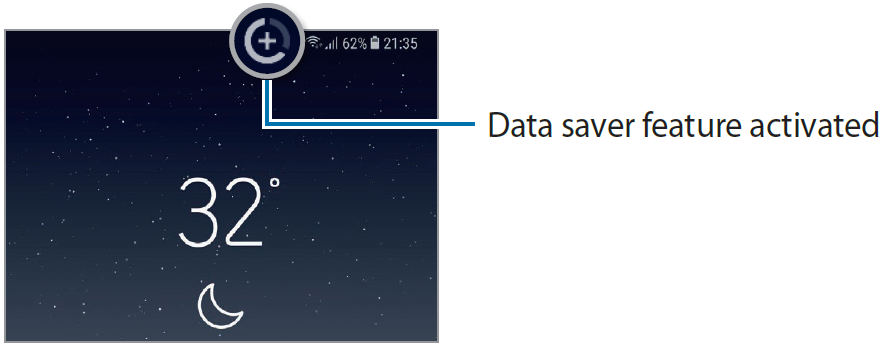
TIP: To select apps to use data without restriction, tap Allow app while Data saver on and select apps.
NFC and payment
Your device allows you to read near field communication (NFC) tags that contain information about products. You can also use this feature to make payments and buy tickets for transportation or events after downloading the required apps.
TIP: The device contains a built-in NFC antenna. Handle the device carefully to avoid damaging the NFC antenna.
Reading information from NFC tags
Use the NFC feature to send images or contacts to other devices, and read product information from NFC tags.
On the Settings screen, tap Connections and tap the NFC and payment switch to activate it.
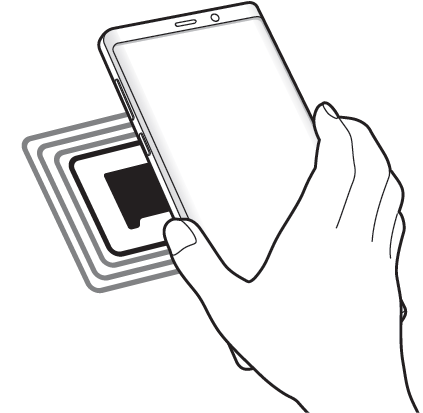
- Place the NFC antenna area on the back of your device near an NFC tag.
The information from the tag appears.
HINT: Ensure that the device’s screen is turned on and unlocked. Otherwise, the device will not read NFC tags or receive data.
Samsung Galaxy Note 8 N950F-DS Troubleshooting
Before contacting a Samsung Service Centre, please attempt the following solutions. Some situations may not apply to your device.
When you turn on your device or while you are using the device, it prompts you to enter one of the following codes:
- Password: When the device lock feature is enabled, you must enter the password you set for the device.
- PIN: When using the device for the first time or when the PIN requirement is enabled, you must enter the PIN supplied with the SIM or USIM card. You can disable this feature by using the Lock SIM card menu.
- PUK: Your SIM or USIM card is blocked, usually as a result of entering your PIN incorrectly several times. You must enter the PUK supplied by your service provider.
- PIN2: When you access a menu requiring the PIN2, you must enter the PIN2 supplied with the SIM or USIM card. For more information, contact your service provider.
Your device displays network or service error messages
- When you are in areas with weak signals or poor reception, you may lose reception. Move to another area and try again. While moving, error messages may appear repeatedly.
- You cannot access some options without a subscription. For more information, contact your service provider.
Your device does not turn on
When the battery is completely discharged, your device will not turn on. Fully charge the battery before turning on the device.
The touchscreen responds slowly or improperly
- If you attach a screen protector or optional accessories to the touchscreen, the touchscreen may not function properly.
- If you are wearing gloves, if your hands are not clean while touching the touchscreen, or if you tap the screen with sharp objects or your fingertips, the touchscreen may malfunction.
- The touchscreen may malfunction in humid conditions or when exposed to water.
- Restart your device to clear any temporary software bugs.
- Ensure that your device software is updated to the latest version.
- If the touchscreen is scratched or damaged, visit a Samsung Service Centre.
Your device freezes or encounters a fatal error
Try the following solutions. If the problem is still not resolved, contact a Samsung Service Centre.
- Restarting the device
If your device freezes or hangs, you may need to close apps or turn off the device and turn it on again. - Forcing restart
If your device is frozen and unresponsive, press and hold the Power key and the Volume Down key simultaneously for more than 7 seconds to restart it. - Resetting the device
If the methods above do not solve your problem, perform a factory data reset.
Launch the Settings app and tap General management → Reset → Factory data reset → RESET → DELETE ALL. Before performing the factory data reset, remember to make backup copies of all important data stored in the device.
If you registered a Google account to the device, you must sign in to the same Google account after resetting the device.
Calls are not connected
- Ensure that you have accessed the right cellular network.
- Ensure that you have not set call barring for the phone number you are dialling.
- Ensure that you have not set call barring for the incoming phone number.
Others cannot hear you speaking on a call
- Ensure that you are not covering the built-in microphone.
- Ensure that the microphone is close to your mouth.
- If using an earphone, ensure that it is properly connected.
The sound echoes during a call
- Adjust the volume by pressing the Volume key or move to another area.
A cellular network or the Internet is often disconnected or audio quality is poor
- Ensure that you are not blocking the device’s internal antenna.
- When you are in areas with weak signals or poor reception, you may lose reception. You may have connectivity problems due to issues with the service provider’s base station. Move to another area and try again.
- When using the device while moving, wireless network services may be disabled due to issues with the service provider’s network.
The battery icon is empty
Your battery is low. Charge the battery.
The battery does not charge properly (For Samsung-approved chargers)
- Ensure that the charger is connected properly.
- Visit a Samsung Service Centre and have the battery replaced.
The battery depletes faster than when first purchased
- When you expose the device or the battery to very cold or very hot temperatures, the useful charge may be reduced.
- Battery consumption will increase when you use certain features or apps, such as GPS, games, or the Internet.
- The battery is consumable and the useful charge will get shorter over time.
Error messages appear when launching the camera
Your device must have sufficient available memory and battery power to operate the camera app. If you receive error messages when launching the camera, try the following:
- Charge the battery.
- Free some memory by transferring files to a computer or deleting files from your device.
- Restart the device. If you are still having trouble with the camera app after trying these tips, contact a Samsung Service Centre.
The photo quality is poorer than the preview
- The quality of your photos may vary, depending on the surroundings and the photography techniques you use.
- If you take photos in dark areas, at night, or indoors, image noise may occur or images may be out of focus.
Error messages appear when opening multimedia files
If you receive error messages or multimedia files do not play when you open them on your device,try the following:
- Free some memory by transferring files to a computer or deleting files from your device.
- Ensure that the music file is not Digital Rights Management (DRM)-protected. If the file is DRM-protected, ensure that you have the appropriate licens or key to play the file.
- Ensure that the file formats are supported by the device. If a file format is not supported, such as DivX or AC3, install an app that supports it. To confirm the file formats that your device supports, visit www.samsung.com.
- Your device supports photos and videos captured with the device. Photos and videos captured by other devices may not work properly.
- Your device supports multimedia files that are authorized by your network service provider or providers of additional services. Some content circulated on the Internet, such as ringtones, videos, or wallpapers, may not work properly.
Another Bluetooth device is not located
- Ensure that the Bluetooth wireless feature is activated on your device.
- Ensure that the Bluetooth wireless feature is activated on the device you wish to connect to.
- Ensure that your device and the other Bluetooth device are within the maximum Bluetooth range (10 m).
If the tips above do not solve the problem, contact a Samsung Service Centre.
A connection is not established when you connect the device to a computer
- Ensure that the USB cable you are using is compatible with your device.
- Ensure that you have the proper driver installed and updated on your computer.
- If you are a Windows XP user, ensure that you have Windows XP Service Pack 3 or higher installed on your computer.
Your device cannot find your current location
GPS signals may be obstructed in some locations, such as indoors. Set the device to use Wi-Fi or a mobile network to find your current location in these situations.
Data stored in the device has been lost
Always make backup copies of all important data stored in the device. Otherwise, you cannot restore data if it is corrupted or lost. Samsung is not responsible for the loss of data stored in the device.
A small gap appears around the outside of the device case
- This gap is a necessary manufacturing feature and some minor rocking or vibration of parts may occur.
- Over time, friction between parts may cause this gap to expand slightly.
There is not enough space in the device’s storage
Delete unnecessary data, such as cache, using the Smart Manager or manually deleting unused apps or files to free up storage space.
The Apps button does not appear on the Home screen
Without using the Apps button, you can open the Apps screen by swiping upwards or downwards on the Home screen. To display the Apps button at the bottom of the Home screen, launch the Settings app and tap Display → Home screen → Apps button → Show Apps button → APPLY.
The Home button does not appear
The navigation bar containing the Home button may disappear while using certain apps or features. To view the navigation bar, drag upwards from the bottom of the screen.
Bixby Voice does not respond
- Restart your device to clear any temporary software bugs.
- Ensure that your device software is updated to the latest version.
- If you are still having trouble with Bixby Voice after trying these tips, contact a Samsung Service Centre.
The screen brightness adjustment bar does not appear on the notification panel
- Open the notification panel by dragging the status bar downwards, and then drag the notification panel downwards.
- Tap
 next to the brightness adjustment bar and tap the Show control on top switch to activate it.
Samsung Cloud does not work
- Ensure that you are connected to a network properly.
- During a Samsung Cloud service check, you cannot use Samsung Cloud. Try again later.
The device does not recognize my irises from the locked screen
- Ensure that nothing obstructs the iris recognition camera and LED and try again.
- If light conditions are very different from when you registered your irises, the device may not recognize your irises. Move to another location and try again.
- Ensure that the device is not moving or tilted too much.
Removing the battery
- To remove the battery, contact an authorized service center. To obtain battery removal instructions, please visit www.samsung.com/global/ecodesign_energy.
- For your safety, you must not attempt to remove the battery. If the battery is not properly removed, it may lead to damage to the battery and device, cause personal injury, and/or result in the device being unsafe.
- Samsung does not accept liability for any damage or loss (whether in contract or tort, including negligence) that may arise from failure to precisely follow these warnings and instructions, other than death or personal injury caused by Samsung’s negligence.
Samsung Galaxy Note 8 N950F-DS Pros & Cons
Pros
- Large and beautiful Super AMOLED display
- Powerful performance with Exynos 8895 Octa chipset and 6GB of RAM
- Versatile dual camera setup
- S Pen stylus for productivity
- Water and dust resistance
Cons
- Expensive compared to other smartphones
- Battery life could be better
- No fingerprint scanner on the front of the device
Customer Reviews
Customers love the large and beautiful display of the Samsung Galaxy Note 8 N950F-DS, as well as its powerful performance and versatile camera. However, some customers have complained about the high price and short battery life. Overall, the Note 8 N950F-DS is a great choice for users who want a premium device with a stylus and a large screen.
Faqs
What is the screen size of the Galaxy?
How much RAM does the N950F-DS have?
What is the resolution of the Note 8 display?
Is the Galaxy Note 8 water resistant?
What is the battery capacity of the Note 8 N950F-DS?
What is the aspect ratio of the Galaxy display?
Leave a Comment