Samsung Galaxy S9+ Smartphone Setup Guide
Content
Samsung Galaxy S9+ Smartphone Introduction
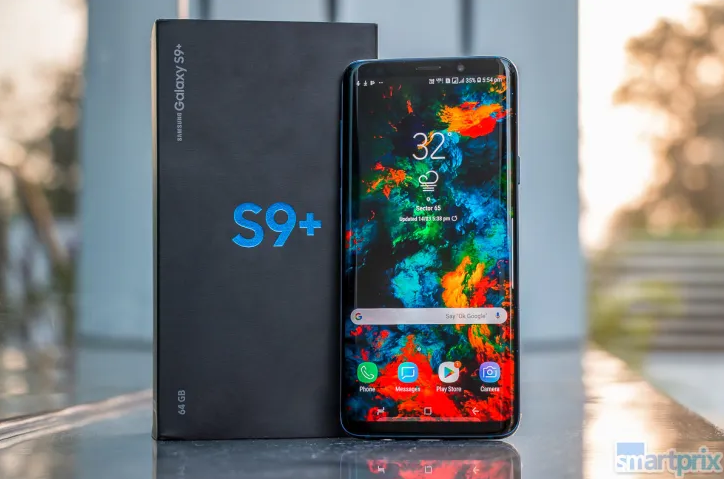
The top Samsung Galaxy S9+ Smartphone redefines performance and luxury thanks to its powerful Exynos 9810 CPU, brilliant 6.2-inch Super AMOLED display, and elegant design. With its dual back cameras' sophisticated photographic features, it guarantees beautiful images and videos in any lighting situation. The gadget is a great option for individuals looking for cutting-edge technology in a high-end package because it also provides better security features like facial recognition and an iris scanner. As a global leader in smartphones, the Galaxy S9+ Ultra distinguishes out for its unique combination of elegance, power, and new features.
Getting Started
Learn about your mobile device hardware, assembly procedures, and how to get started using your new device.
Front View
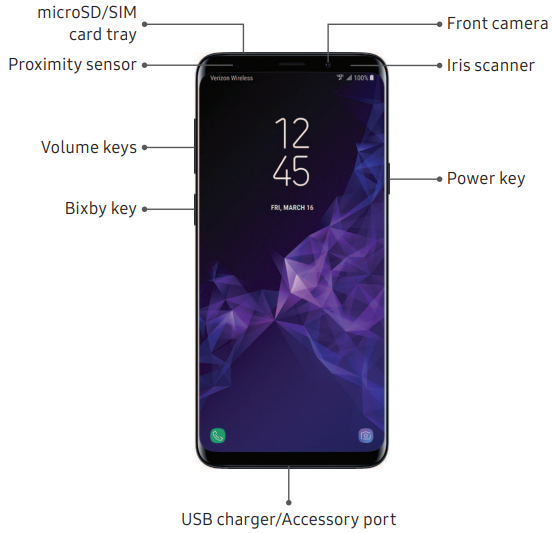
Proximity sensor
- Turns off the screen and disables touch functionality during a call when the device is in close proximity to the body.
- Turns the screen back on and enables touch functionality during a call when the device is outside a specific range from the body.
- Press to turn the screen on or off.
- Press and hold to select a power control option.
- Press twice quickly to launch the camera.
Volume keys
- Adjust the volume for ringtones, media, notifications, and system sounds.
- In the camera app, press a volume key to take a photo.
Bixby key
- Launch Bixby.
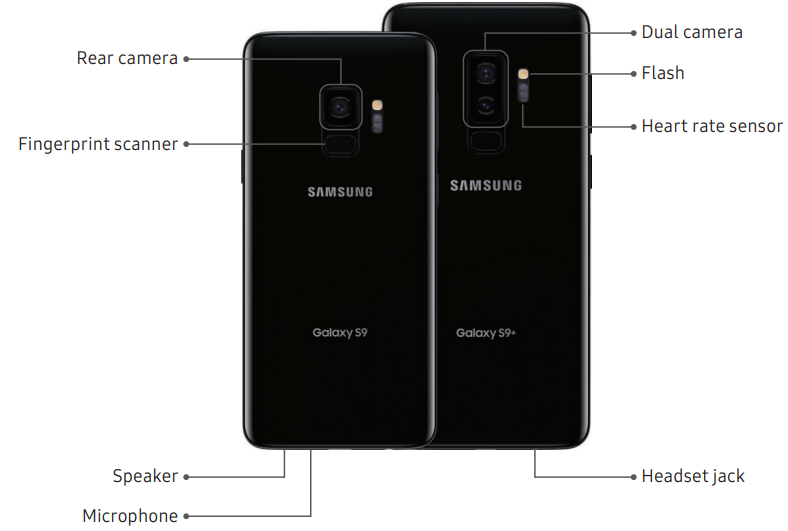
Back View
Detailed Specifications
| Human Interface Input | Dial |
|---|---|
| Other camera features | Super Speed Dual Pixel Rear Dual: 12MP OIS (F1.5/F2.4) 12MP OIS (F2.4) Front: 8MP AF (F1.7) |
| Audio Jack | 3.5 mm |
| Form Factor | Smartphone |
| Color | Coral Blue |
| Phone Talk Time | 35 Hours |
| Whats in the box | Samsung Galaxy S9+, Wall/USB Charger, Micro USB Connector, Stereo Headset, USB Connector, Quick Reference Guide, Terms and Conditions, Smart Switch Insert, SIM Ejector |
| Manufacturer | Samsung |
| Date First Available | February 2, 2018 |
| Memory Storage Capacity | 64 GB |
| Standing screen display size | 6.2 Inches |
| Ram Memory Installed Size | 6 GB |
| Battery Capacity | 3500 Milliamp Hours |
| Weight | 189 Grams |
Description
The Samsung Galaxy S9+ Ultra is a premium smartphone that delivers on all fronts, from its stunning display to its advanced camera system. The build quality is exceptional, with a sleek glass back and a metal frame that exudes elegance and sophistication. The display is bright and sharp, making it perfect for watching videos, playing games, and browsing the web. The camera system is also a standout feature, with the ability to capture stunning photos and videos in a variety of lighting conditions. The phone's powerful performance and long battery life make it an excellent choice for productivity and entertainment, while the water and dust resistance ensure that it can withstand everyday use.
Set Up Your Device
Learn how to set up your device for the first time.
Assemble Your Device
Install a SIM card and an optional memory card (not included), and charge your device before using it.
Install a SIM Card and Memory Card
When you subscribe to a cellular network, you are provided with a SIM card. You may be able to use your previous SIM card. Contact your service provider for more details.
Warning: Small components such as SIM cards and memory cards can pose a choking risk. Please be careful when handling these cards to avoid damaging them.
You can install an optional microSD memory card (not included) to add more memory space to your device. A memory card can be installed at any time. It is not necessary to install it before using the device.
Caution: Be careful when using the removal tool to eject an internal card tray.
- Insert the removal tool into the hole on the SIM card/Memory card tray, and then push until the tray pops out.
- Place the SIM card on the tray with the gold contacts facing down.
Place the memory card on the tray with the gold contacts facing down.
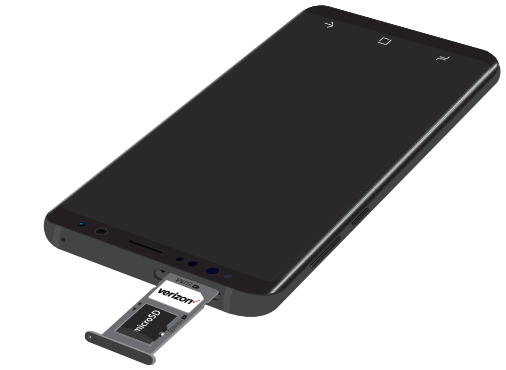
- Slide the SIM card/Memory card tray back into the slot.
Note: Your device is IP68 rated for dust and water resistance. To maintain the water-resistant and dust-resistant features of your device, make sure that the SIM card/Memory card tray openings are maintained free of dust and water, and that the tray is securely inserted prior to any exposure to liquids.
Charge the Battery
Your device is powered by a rechargeable battery. A charger (charging head and USB Type-C cable) is included with the device for charging the battery from any standard outlet.
Note: You should dry the inside of the charging port before inserting a power connector to charge your device. If the charging port is not fully dry, your device may operate abnormally. For example, it may charge more slowly or overheat.
The battery comes partially charged. You can use the device while charging.
Caution: Use only charging devices that are approved by Samsung. Samsung accessories are designed for your device to maximize battery life. Using other accessories may void your warranty and may cause damage.
Insert the USB Type-C cable into the USB charger/Accessory port
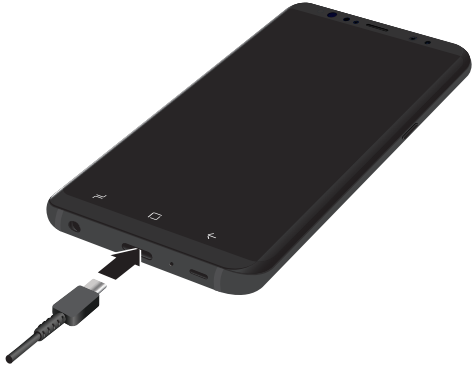
- Connect the USB cable to the charging head, and then plug the charging head into a standard outlet.
- Unplug the charging head from the outlet and remove the USB cable from the device when charging is complete.
- While charging, the device and the charger may become hot when using wireless charging or fast charging. This does not affect the device’s lifespan or performance and is in the device’s normal range of operation.
The charger may stop charging if the battery becomes too hot.
If the device heats up while charging the battery:- Disconnect the charger from the device and close any running apps.
- Wait for the device to cool down, and then begin charging the device again.
- If the lower part of the device overheats, check for damage to the connected USB cable. Replace the damaged USB cable with a new Samsung-approved cable.
- If using a wireless charger, do not place foreign materials between the device and the wireless charger.
Lock Screen and Security
Secure your device and protect your data with Lock Screen and Security settings.
Screen Lock Types
The various Screen lock types offer high, medium, or no security. Choose from the following: Swipe, Pattern, PIN, Password, and None.
Set a Secure Screen Lock
It is recommended that you secure your device using a secure screen lock (Pattern, PIN, or Password).
- From a Home screen, swipe up to access Apps.
- Tap
 Settings > Lock screen and security > Screen lock type and tap a secure screen lock (Pattern, PIN, or Password).
 - Tap On/Off to enable showing notifications on the lock screen. The following options are available:
- Hide content: Enable to hide the content of notifications.
- Notification icons only: Enable to hide notification details and show only the icon.
- Transparency: Adjust the transparency of notifications.
- Auto-reverse text color: Reverse the color of notification text automatically based on the background color.
- Tap Done when finished.
- Configure the following screen lock options:
- Smart Lock: Unlock your device automatically when trusted locations or other devices have been detected. A secure screen lock is required for this feature.
- Secure lock settings: Customize your secure lock settings. A secure screen lock is required for this feature.
Biometric Locks
The following biometric lock types are available:
- Intelligent scan: Combine face and iris recognition to unlock your device. For more information, see “Intelligent Scan” on page 49.
- Face recognition: Use facial recognition to unlock your device. For more information, see “Face Recognition” on page 44.
- Iris scanner: Use iris recognition to unlock the screen. For more information, see “Iris Scanner” on page 45.
- Fingerprint scanner: Use fingerprint recognition to unlock the screen. For more information, see “Fingerprint Scanner” on page 47.
Lock Screen and AOD Settings
Configure display settings for the Lock screen.
- From a Home screen, swipe up to access Apps.
- Tap
 Settings > Lock screen and security for options:
- Clock and FaceWidgets: Customize the clock, FaceWidgets, and contact information that displays on the Lock screen and Always On Display screen.
- Notifications: Select which notifications to display on the Lock screen and Always On Display screen.
- App shortcuts: Select which apps to open from the Lock screen.
Google Play Protect
Configure app safety checks from Google Play.
- From a Home screen, swipe up to access Apps.
- Tap
 Settings > Lock screen and security > Google Play Protect.
 - Tap options to customize security.
Find My Device
Protect your device from loss or theft. You need to sign in to your Google Account to use this feature.
- From a Home screen, swipe up to access Apps.
- Tap
 Settings > Lock screen and security > Find My Device.
- If you are not logged in to a Google Account, tap Find My Device won’t work and follow the prompts to sign in.
- The following options are available:
- Find My Device: Download the app from Google Play.
- Web: Access Find My Device on the Internet.
- Google: Search for “find my device” topics online.
Security Update
The Security update field shows the date of the last software security update.
- From a Home screen, swipe up to access Apps.
- Tap
 Settings > Lock screen and security > Security update.
 - Follow the prompts to check for software updates.
Samsung Pass
Use Samsung Pass to access your favorite services with biometric data. For more information, visit samsung.com/us/support/owners/app/samsung-pass. You must sign in to your Samsung account to use Samsung Pass.
- From a Home screen, swipe up to access Apps.
- Tap
 Settings > Lock screen and security > Samsung Pass.
 - Follow the prompts to sign in to your Samsung account and add your biometric data.
Secure Folder
Lock your private content and apps to enhance security. You must sign in to your Samsung account in order to use Secure Folder. You must also set a secure lock for your device.
- From a Home screen, swipe up to access Apps.
- Tap
 Settings > Lock screen and security > Secure Folder and follow the prompts to secure content on your device.
App Permission Monitor
Get notified when permissions you select are being used by apps running in the background.
- From a Home screen, swipe up to access Apps.
- Tap
 Settings > Lock screen and security > App permission monitor.
 - Tap On/Off next to the apps you want to be notified about when they use certain permissions.
Secure Startup
Protect your device by requiring a numeric PIN, pattern, or password to be entered before it starts up. You must have a secured screen lock for this option to be available.
- From a Home screen, swipe up to access Apps.
- Tap
 Settings > Lock screen and security > Secure startup and select an option.
Encrypt SD Card
Protect your optional memory (not included) card by encrypting its data.
- From a Home screen, swipe up to access Apps.
- Tap
 Settings > Lock screen and security > Encrypt SD card.
 - Tap Encrypt SD card and follow the prompts to encrypt all data on your memory card.
Set Up SIM Card Lock
Require your SIM card PIN to unlock and use your SIM card.
- From a Home screen, swipe up to access Apps.
- Tap
 Settings > Lock screen and security > Other security settings > Set up SIM card lock and follow the prompts.
- Tap Lock SIM card to enable the feature.
- Tap Change SIM card PIN to create a new PIN.
View Passwords
Display password characters briefly as you type them.
- From a Home screen, swipe up to access Apps.
- Tap
 Settings > Lock screen and security > Other security settings > Make passwords visible to enable the feature.
Security Update Service
Automatically receive security updates.
- From a Home screen, swipe up to access Apps.
- Tap
 Settings > Lock screen and security > Other security settings for the following Security update service options:
- Security policy updates: Automatically or manually check for security policy updates.
- Automatic updates can also be limited to only when your device is connected to a Wi-Fi network.
- Send security reports: Use Wi-Fi to send security reports to Samsung for threat analysis.
- Security policy updates: Automatically or manually check for security policy updates.
Device Administration
Manage your device administrators and application installation privileges.
- From a Home screen, swipe up to access Apps.
- Tap
 Settings > Lock screen and security > Other security settings > Device admin apps.
 - Tap an option to enable it as a device administrator.
Credential Storage
Manage your security certificates. You can disable or remove certificates.
- From a Home screen, swipe up to access Apps.
- Tap
 Settings > Lock screen and security > Other security settings for the following options:
- Storage type: Select a storage location for credential contents.
- View security certificates: Display certificates in your device’s ROM and other certificates you have installed.
- User certificates: View user certificates.
- Install from phone storage: Install a new certificate from storage.
- Clear credentials: Erase the credential contents from the device and reset the password.
Settings
Use these options to configure advanced security settings.
- From a Home screen, swipe up to access Apps.
- Tap
 Settings > Lock screen and security > Other security settings for the following advanced options:
- Trust agents: Perform selected actions when trusted devices are connected.
- This option is only displayed when a lock screen is enabled. For more information, see “Set a Secure Screen Lock” on page 193.
- Pin windows: Pin an app on your device screen, preventing access to other features of your device.
- Usage data access: View the applications that can access your device’s usage history.
- Notification access: View the applications that can access notifications you receive on your device.
- Do not disturb permission: View which apps have permission to change the Do not disturb settings.
- Trust agents: Perform selected actions when trusted devices are connected.
Troubleshooting
- If you encounter any issues with your Samsung Galaxy S9+ Ultra, there are a few common solutions to try.
- If the phone is unresponsive, try performing a soft reset by holding down the power button and volume down button simultaneously for 10 seconds.
- If the phone won't charge, check to make sure the charging port is free of debris and that the charging cable is securely connected.
- If you're having trouble with the camera, try clearing the camera app's cache or resetting the camera settings to their default values.
Pros & Cons
Pros
- Stunning display
- Advanced camera system
- Powerful performance
- Long battery life
- Water and dust resistance
Cons
- Expensive
- Large and heavy
- Fingerprint magnet
Samsung Galaxy S9+ Smartphone Customer Reviews
"The Samsung Galaxy S9+ Ultra is an amazing phone that delivers on all fronts. The display is stunning, the camera system is top-notch, and the performance is lightning-fast. I highly recommend this phone to anyone looking for a premium smartphone experience." - John Doe
"I was a little hesitant to spend so much money on a phone, but the Samsung Galaxy S9+ Ultra is worth every penny. The build quality is exceptional, the display is vibrant and sharp, and the camera system is perfect for capturing memories. I couldn't be happier with my purchase." - Jane Smith
Common Complaints
Some users have reported issues with the phone's size and weight, noting that it can be difficult to use one-handed. Others have complained about the phone's fingerprint magnet tendencies, suggesting that a case or skin is necessary to keep it looking clean and new.
Faqs
What is the screen size of the Samsung?
What is the camera system like on the Galaxy S9?
How much RAM does the Samsung have?
What is the battery life like on the Galaxy?
How much internal storage does the Samsung have?
What processor does the Samsung Galaxy use?
Leave a Comment
