Sharp Electronic Cash Register XE-A107 | Instruction Manual
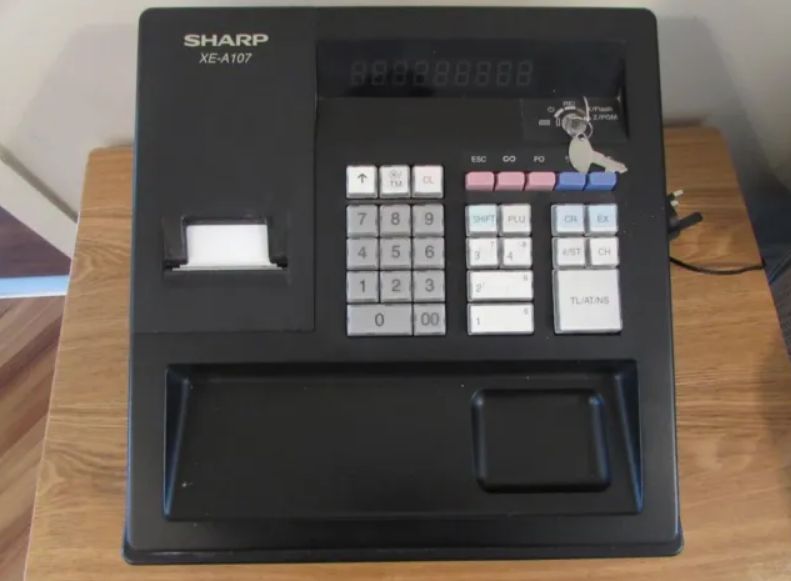
Content

Sharp Electronic Cash Register XE-A107
The Sharp Electronic Cash Register XE-A107 is a state-of-the-art cash register designed to meet the needs of small to medium-sized businesses. This robust and reliable cash register boasts a sleek and compact design, making it an ideal solution for retail stores, restaurants, and other businesses that require an efficient and reliable cash management system. With an estimated price of $200, this cash register is a cost-effective solution for businesses looking to streamline their cash management processes.
Detailed Specifications
The Sharp Electronic Cash Register comes with a range of features designed to make cash management easier and more efficient. These features include
- Model: XE-A107
- Dimensions: 13-31/64 (W) × 14-3/16 (D) × 7-31/64 (H) inches (335 (W) × 360 (D) × 190 (H) mm)
- Weight: Approx. 8.8 lbs. (4.0 kg)
- Power source: 120V AC, 60Hz
Power consumption
- Stand-by: 1.5 W
- Operating: 2.3 W (max.)
- Working temperatures: 32 to 104 °F (0 to 40 ºC)
- Humidity: 20 % to 90 %
- Display: LED (Light-Emitting Diode) 7-segment display (8 positions)
Printer
- Type: 1 station print wheel selective type
- Printing capacity: Max. 13 digits
- Other functions: Receipt (ON-OFF) function
Paper Roll
- Width: 2-1/4 ± 1/64 inches (57.5±0.5 mm)
- Max. diameter: 3-5/32 inches (80 mm)
- Quality: Bond paper (1/64 inch (0.06 mm to 0.08 mm) thickness)
- Cash drawer: 4 slots for bills and 5 for coin denominations
Accessories
- Quick Set-up Guide: 1 copy
- Instruction manual: 1 copy (this manual)
- Operation Reference Guide: 1 copy
- Paper roll: 1 roll Mode key (same as Drawer lock key): 2
- AC adapter: 1
- Ink roller: 1 (already installed)
- EFT flyer: 1
Part Names and Functions
Part Names
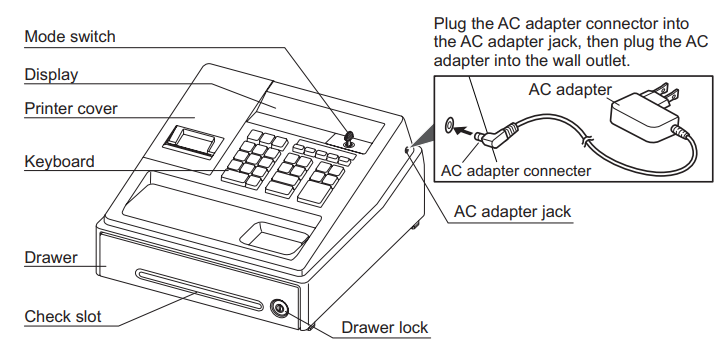
Mode Switch
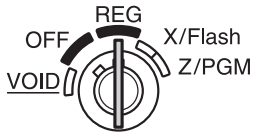
The mode switch enables the register to perform a variety of functions. The mode switch can be operated by inserting the supplied mode key (the same key as drawer lock key). The key can be inserted into or withdrawn from the switch only in the REG or OFF position.
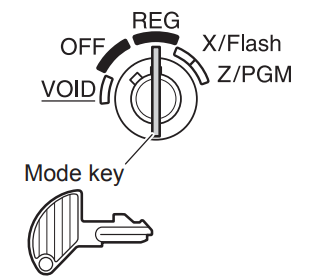
- REG: Permits transaction entry.
- OFF: Turns the display off. No operations are possible.
- VOID: Permits correction after finalizing a transaction.
- X/Flash: Permits printing of sales reports and displaying the flash reports.
- Z/PGM: Permits printing and resetting of sales reports and programming.
Keyboard Layout
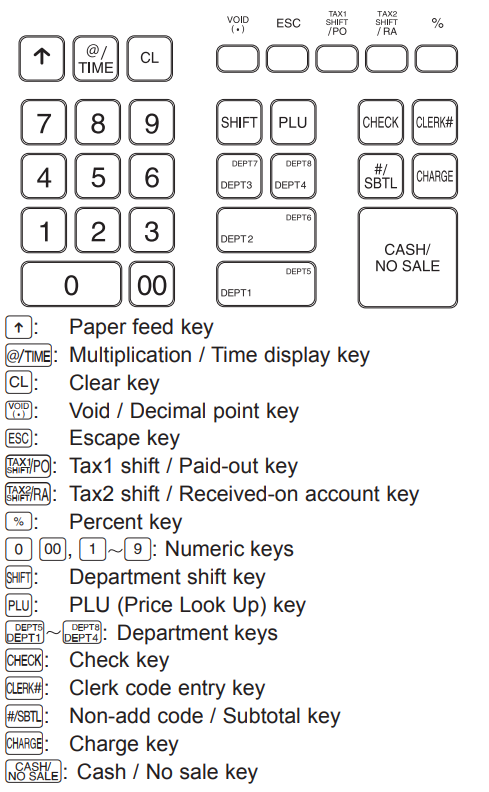
Display
Your register is equipped with a front LED (Light-Emitting Diode) display that affords easy visibility of 8 digits for the operator during the transaction.
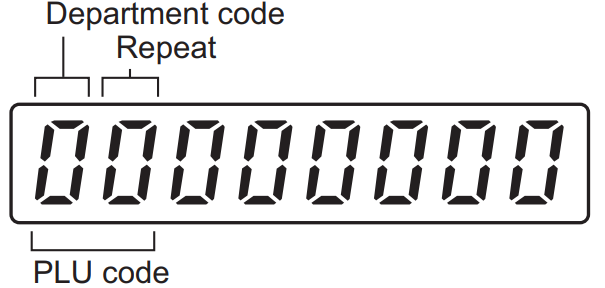
- Department code: Indicates the department entered. For example, if department 1 was pressed, “1” would appear.
- PLU code: Indicates the PLU code entered.
- Repeat: Indicates the number of times the same department key or PLU key is pressed repeatedly. If an entry is repeated more than ten times, only the last digit is displayed (12 displays as “2”).
Symbols and figures appearing on the display
- Error: Appears when an error is made. If this occurs during a transaction because of an extra digit entry, simply press CL and re-enter correctly.
- Program: This appears when the cash register is being programmed in the “Z/PGM” mode.
- Finalization: Appears when a transaction is finalized by pressing
 , CHARGE or
- Subtotal: Appears when the cash register computes a subtotal when
 is pressed, and also when an amount tendered is less than the total sales amount.
 - Change: This appears whenever a change due amount is displayed.
- Low battery: This appears when the voltage of the installed batteries is under the required level. You need to replace the batteries with new ones very soon. (See “Maintenance” section for explanation.)
- No battery: Appears when the batteries are not installed, or the installed batteries are dead. You must immediately replace the batteries with new ones. (See the “Maintenance” section or “Quick Set-up Guide” for an explanation.)
- When the department key sign is set to “minus”, a minus sign (-) appears.
- The decimal point is shown as “DOT ”.
- When the secret code is set, “----” appears when characters are entered.
Detailed Description
The Electronic Cash Register is a versatile and reliable cash register that is ideal for a wide range of businesses. With its large LCD display and spacious cash drawer, this cash register makes it easy to manage cash transactions quickly and efficiently. The built-in thermal printer ensures that receipts are printed quickly and reliably, while the 120-key keyboard and built-in function keys make it easy to operate. The customer display also improves customer interaction, making it ideal for retail stores, restaurants, and other businesses that require an efficient and reliable cash management system.
Setup of Sharp Electronic Cash Register
Setting up the Electronic Cash Register is simple and straightforward. To get started, follow these steps
- Connect the power cord and turn on the cash register
- Load the cash drawer with the appropriate denominations and coins
- Install the thermal paper in the printer
- Set the date, time, and tax rates using the setup menu
- Customize the keyboard layout to suit your business needs
- Begin processing transactions
Entries
Before you begin entries, turn the mode switch to the REG position.
Flow of Register Use During the Day
Before the Store Opens
- Make sure you have enough receipt paper for the day.
- Note, the total currency value placed in the drawer to start the day.
- Run an X report , to confirm daily totals were reset to zero at the close of the previous day. Ifnot, run Z report. (See “3.Reports”)
- Turn the key to the REG position and begin sales.
During the Business Day
- To enter sales (See “Operation Example” ,“1-1. Department” , “1-2.PLU”).
- Use discounts (See “1-3.Percent key”).
- Make corrections (See “1-9.Correction”).
- Clear errors (See “1-12.When an Error Occurs”).
- Check sales totals by running X reports. (See “3.Reports”)
End of Day Register Closing
- Run an end-of-day “Z report” (see “3.Reports) which provide final-day sales and clears sales totals on the cash register.
- Turn the key to the OFF position.
Note, the cash amount started with at the beginning of the day will not be reflected in the X or Z reports
Operation Examples
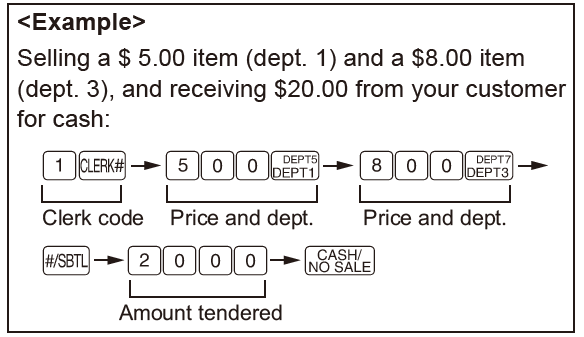
When Paid by Cash
- Turn the mode switch to the REG position.
- Enter the clerk code and press CLEARK. (Once the clerk code is entered, you need not enter the clerk code at the start of each transaction until the clerk is changed.)
- Enter the price for the first item.
- Press the appropriate department key.
- Repeat steps 3 and 4 for all the remaining items.
- Press
 to display the amount due including any tax (you can omit this step).
 - Enter the amount received from the customer(you can omit this step if the amount tendered is the same as the subtotal).
- Press
 , and the change due is displayed and the drawer opens.
 - Close the drawer.
When Paid by a Credit Card
Press CHARGE instead of ![]() at the end of the transaction (Step 8 in the above operation). The amount tendered cannot be entered.
at the end of the transaction (Step 8 in the above operation). The amount tendered cannot be entered.
When Paid by Check
Press CHECK instead of ![]() at the end of the transaction (Step 8 in the above operation). The amount tendered can be entered like a cash sale and the change due is displayed.
at the end of the transaction (Step 8 in the above operation). The amount tendered can be entered like a cash sale and the change due is displayed.
Mixed Tender Sale
When the amount tendered by cash or check is less than the sales amount including tax, the display shows a deficit and “0”. To compensate for the deficit, make an additional amount-tendered entry or make a charge entry.
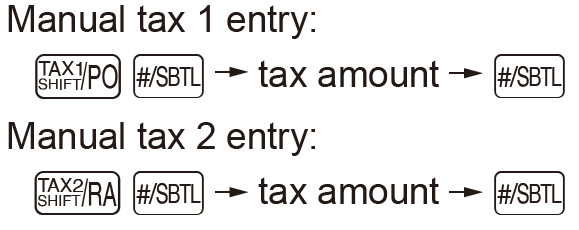
Manual Tax
You can apply tax manually when the automatic tax calculation function cannot be used. Each manual tax entry (for Tax 1 or Tax 2) can be made only once during a transaction. After a manual tax entry, you cannot make any further item entries.
Department
Repetitive Department Entries
To enter two or more of the same item, press the appropriate department key repeatedly.
Single Item Cash Sale (SICS) Entry
This function is used for the sale of one item to be paid by cash. It is applicable only to departments programmed for single-item cash sales or to PLUs associated with such departments. After the appropriate department or PLU key is pressed, the transaction is complete and the drawer opens. For the programming of SICS, see the Department Status section in “Programming”.
PLU (Price Look Up)
The PLU function allows speedy key entries. When a PLU code has been assigned to an item and a price for it has been programmed, entry of the code automatically calls up the price for the item. Up to 80 PLU codes are programmable. See the PLU programming section in “Programming”. To enter a sale of a PLU item, simply enter its code and press PLU .
Entering a Refund
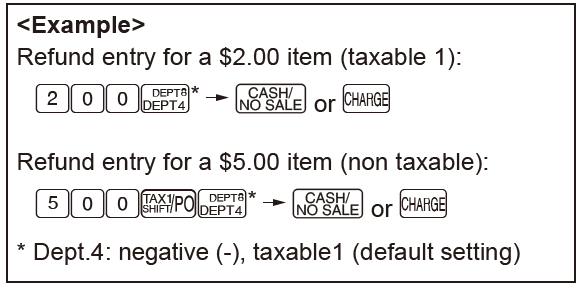
The cash register has no refund key. You must use the following alternative method to make a refund entry. A negative department for refund must be programmed in advance. Check the taxable status of the returned item is the same as that of the programmed negative department. If not, use the appropriate tax shift key to change the taxable status.
Tax Calculation
Automatic Tax Calculation
When the register is programmed with a tax table or tax rate method and the tax status of a department is programmed as taxable, the register automatically computes the tax on any item entered using the department key for that department or a PLU code associated with that department.
Taxable Subtotal
You can display the taxable 1 or taxable 2 subtotal by pressing either tax shift key and then ![]() . The subtotal of taxable 1 or taxable 2 entries is displayed. You cannot display the subtotal of taxable 3 or 4 items.
. The subtotal of taxable 1 or taxable 2 entries is displayed. You cannot display the subtotal of taxable 3 or 4 items.
Tax Shift
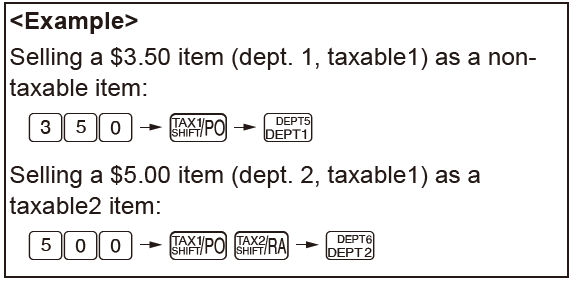
You can change the programmed taxable 1 or 2 status of each department key by pressing one or both of the two tax shift keys ![]() and
and ![]() . To change the taxable status, press the appropriate tax shift key just before the department, PLU, or % key. In case ofrepetitive entries, the shifted tax status is used.
. To change the taxable status, press the appropriate tax shift key just before the department, PLU, or % key. In case ofrepetitive entries, the shifted tax status is used.
Non-add Code Number
Non-add code numbers can be entered and printed on the receipt during the entry of a sale. Nonadd codes can be used for check numbers, serial numbers, product codes, service charge codes or any other numbers for reference to specific transactions. Non-add code numbers can be entered in the REG or VOID mode. Non-add code number entry procedure: a code number of up to 8 digits ![]() .
.
Opening the Drawer with No Sale
Just press ![]() and the drawer opens.
and the drawer opens.
When an Error Occurs
When your register goes into an error mode, it will display the error symbol “ E”. Clear the error state by pressing the l key and take the appropriate action. The error symbol appears for the following reasons.
1. You enter a number of more than 7 digits for the department price or a number larger than the 79999999 (8 digits) for other amounts. Press CL and re-enter the correct number.
2. You make an error in key operation: Press CL and operate keys correctly.
3. You make an entry beyond a programmed entry digit limit: Press CL and check if the entered amount is correct. If not correct, re-enter a correct number. If correct, check the setting of the entry digit limit.
4. A subtotal exceeds 79999999 (8 digits): Press CL and then press ![]() , CHARGE or CHECK to finish the transaction.
, CHARGE or CHECK to finish the transaction.
5. The number of an item exceeds 3 digits in multiplication entry: Press CL and re-enter the correct number.
Programming
Miscellaneous Settings
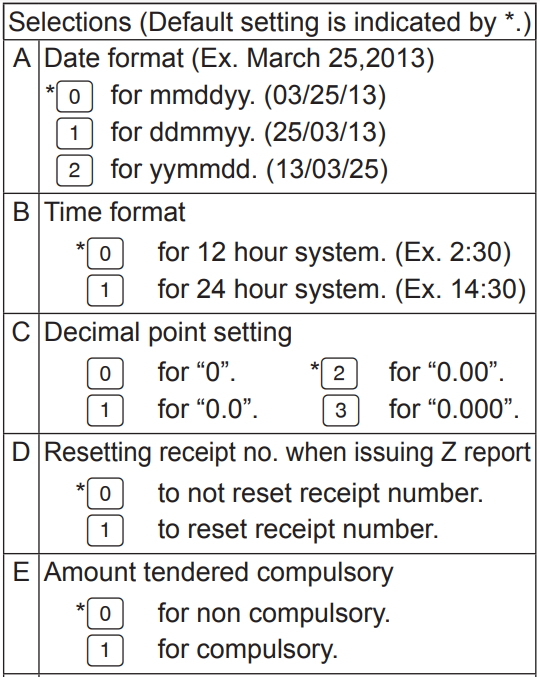
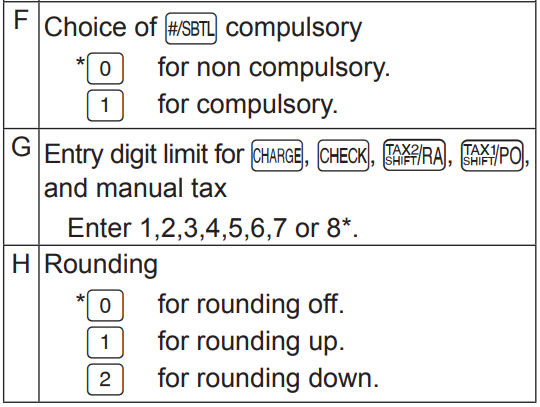
Miscellaneous setting are changed by entering the 1 ![]() key then entering all 8 selection digits(A-H) followed by the
key then entering all 8 selection digits(A-H) followed by the ![]() key.
key.
To change default settings, select one digit from each selection A to H.
<Programming sequence>
Default settings : “00200080”

Select from the following choices for each digit (ABCDEFGH). You must enter all 8 choices.
Department Entry Status
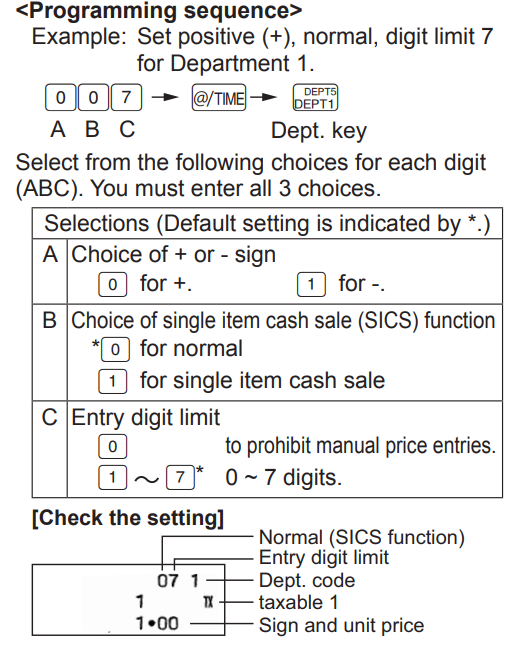
[Check the setting]

Printing Format
You can specify the reciept printing format. Select either “Print” or “No print” for the following items(A,C,D,E,F,G).
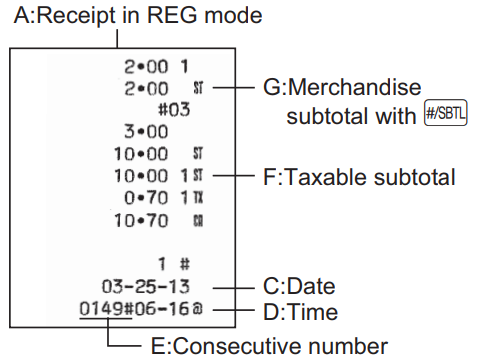
While the key is in the Z/PGM position, press the 2 key and the ![]() key to begin programming. Select the numeric choice of the following indicated by letters A through G. After you have made the numeric choice from letters A-G (all 7 choices must be entered), press the
key to begin programming. Select the numeric choice of the following indicated by letters A through G. After you have made the numeric choice from letters A-G (all 7 choices must be entered), press the ![]() key to finalize your programming.
key to finalize your programming.
<Programming sequence>
Default settings : “0100011”
Select from the following choices for each digit (ABCDEFG). You must enter all 7 choices.
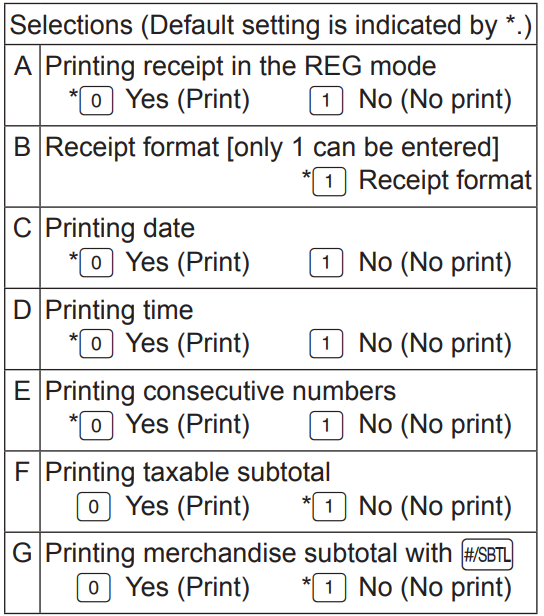
Press the ![]() key after entering 7 digits.
key after entering 7 digits.
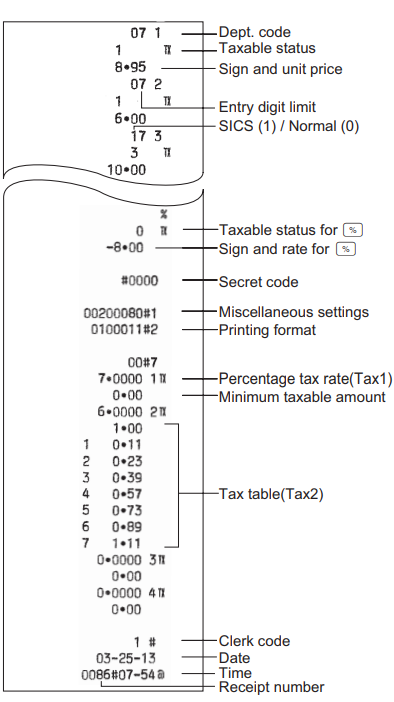
Checking the Machine Settings

To obtain a printout that shows the cash register settings, turn the mode switch to the Z/PGM position and use the following sequence
General & Tax Settings
To see the general and tax settings, turn the mode
switch to the Z/PGM position and press![]()
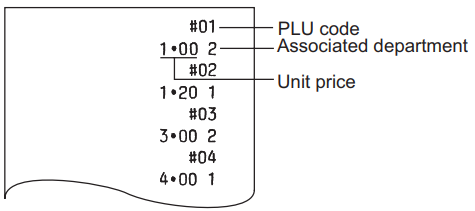
PLU Settings
To see the PLU settings, turn the mode switch to the Z/PGM position and press PLU
Date and Time

Setting the Date
<Programming sequence>
Date (6 digits) ![]()
Enter the date using 6 digits corresponding to the chosen date format. (default is MMDDYY.)

Setting the Time
<Programming sequence>
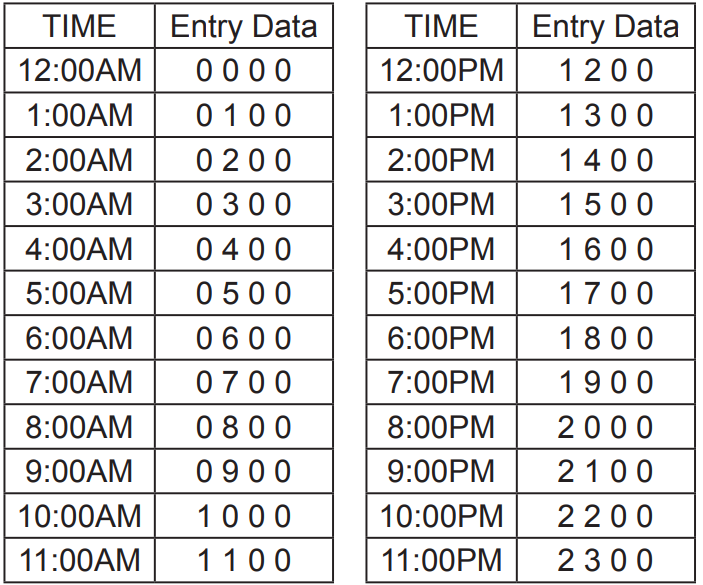
Time (4 digits) ![]()
Enter the time in 4 digits (“hhmm” format) using the 24-hour system.
NOTE: Always enter the time in 4 digits even when the hour is in a single digit. For example, enter 0630 for 6:30 a.m.
Reports
Reading and Resetting Sales
X Reports
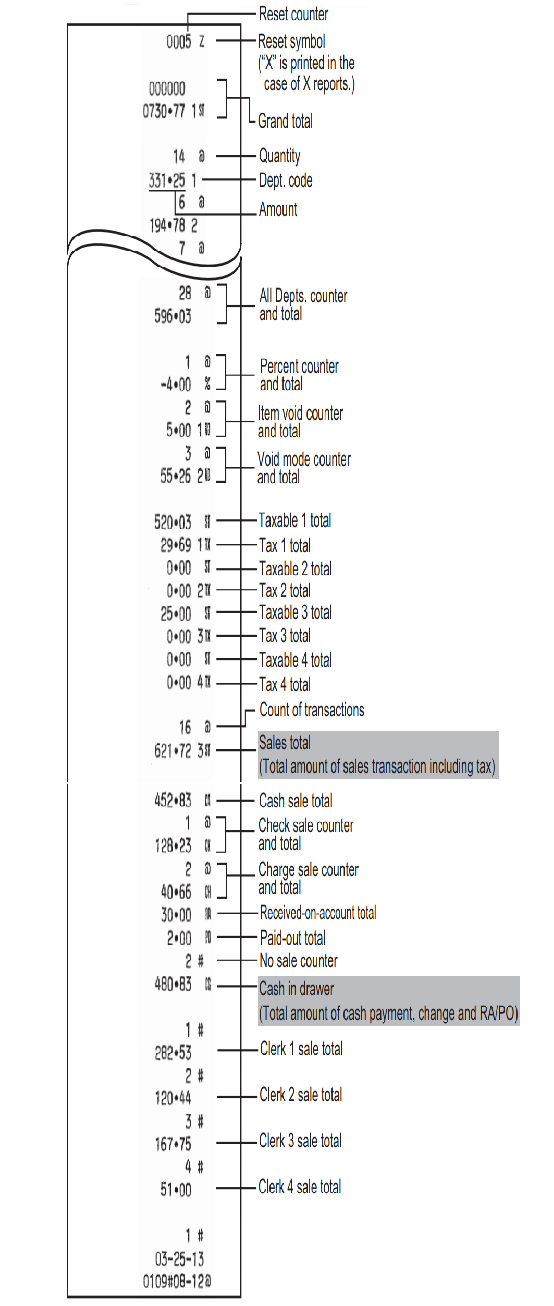
This report, when taken in the X/Flash mode, prints the accumulated information of sales. Taking an X report is a good way to do a mid-day check on daily sales. You can take X reports any number of times, because they do not affect the cash register’s memory. To issue an X report, turn the mode switch to the X/Flash position and press ![]()

Z Reports
The contents of Z reports are the same as those of X reports, but the issuance of a Z report resets all the transaction totals to zero. To issue a Z report, turn the mode switch to the Z/PGM position

For Z reports without grand total resetting
- Press

- If the secret code is programmed, you have to enter the secret code and press
 again after this step.
For Z reports with grand total resetting
If you want to reset the grand total (GT) when taking the Z report, press CHECK instead of ![]() . Other than resetting the grand total, this report is the same as the normal Z reports.
. Other than resetting the grand total, this report is the same as the normal Z reports.
NOTE: If the secret code is programmed, you have to enter the secret code and press CHECK again after this step.
X/Z Report Sample
IMPORTANT
- Be very careful when removing and replacing the printer cover, as the cutter mounted on it is very sharp.
- Install the register in a location not subject to direct sunlight, unusual temperature changes, high humidity or splashing water. Installation in such locations could cause damage to the cabinet and the electronic components.
- Never install the register in saline areas (e.g.: close to the sea). Installing the register in such locations could cause component failure with the corrosion.
- Never operate the register with wet hands. The water could seep into the interior of the register and cause component failure.
- When cleaning the register, use a dry, soft cloth. Never use solvents, such as benzine and/or thinner. The use of such chemicals will lead to discoloration or deterioration of the cabinet.
- The register plugs into any standard wall outlet (120V AC). Other electrical devices on the same electrical circuit could cause the register to malfunction.
- For protection against data loss, please install three alkaline batteries LR6 (“AA” size) after initializing the register.
When handling the batteries, please observe the following
Incorrectly using batteries can cause them to burst or leak, possibly damaging the interior of the register.
- RISK OF EXPLOSION IF BATTERY IS REPLACED BY AN INCORRECT TYPE. DISPOSE OF USED BATTERIES ACCORDING TO THE INSTRUCTIONS.
- Be sure that the positive (+) and negative (–) poles of each battery are facing in the proper direction for installation.
- Never mix batteries of different types.
- Never mix old batteries and new ones.
- Never leave dead batteries in the battery compartment.
- Remove the batteries if you do not plan to use the register for long periods.
- Should a battery leak, clean out the battery compartment immediately, taking care to avoid letting the battery fluid come into direct contact with your skin.
- For battery disposal, follow the corresponding law in your country.
- For complete electrical disconnection, disconnect the AC adapter.
- Be sure to use the attached AC adapter. Otherwise, an electric shock or fire may be caused.
- Do not use the AC adapter in devices other than this register.
Troubleshooting
If you experience any issues with the Sharp Electronic Cash Register, try the following troubleshooting steps
- Check the power cord and outlet to ensure that the cash register is receiving power
- Make sure that the cash drawer is properly loaded and closed
- Verify that the thermal paper is installed correctly in the printer
- Check the setup menu to ensure that the date, time, and tax rates are correctly set
- If the cash register is still not functioning properly, contact Sharp's customer support team for further assistance
WARRANTY
SHARP ELECTRONICS CORPORATION warrants to the first end-user purchaser (the “Purchaser”) that this Sharp brand product (the “Product”), when new and shipped in its original container, will be free from defective workmanship and materials, and agrees that it will, at its option, either repair the defect or replace the defective Product or part thereof with a new or remanufactured equivalent at no charge to the Purchaser for parts or labor for the period(s) set forth below. This warranty does not apply to any appearance items of the Product nor to the additional excluded item(s) set forth below nor to any Product the exterior of which has been damaged or defaced, which has been subjected to improper voltage or other misuse, abnormal service or handling, or which has been altered or modified in design or construction.
Pros & Cons
Pros
- A versatile and reliable cash register that is ideal for a wide range of businesses
- Large LCD display and spacious cash drawer for easy transaction management
- Built-in thermal printer for fast and reliable receipt printing
- Customizable keyboard layout for improved business efficiency
Cons
- May be too basic for larger businesses with more complex cash management needs
- Limited customization options compared to more advanced cash registers
Faqs
How can I proceed if my Sharp XE-A107 refuses to turn on?
Does the Sharp XE-A107 have a memory backup system in place to guard against power disruptions?
What troubleshooting actions need to be performed if there is a paper jam in the Sharp XE-A107 printer?
How can I personalise the Sharp XE-A107's receipt printing feature?
Can sales be tracked by the Sharp XE-A107 for reporting needs?
Could you help me use the Sharp XE-A107 to complete a simple sales transaction?
What ought to be done in the event that the Sharp XE-A107 displays an error message or code?
How can one update the Sharp XE-A107 system with new products or price adjustments?
How can I protect my Sharp XE-A107 from unwanted access and guarantee transaction security?
What is covered by and how long is the Sharp XE-A107 manufacturer's warranty?
Leave a Comment
