Sharper Image Relieve 3D Massage Chair User Manual | Installation
Content
Introduction
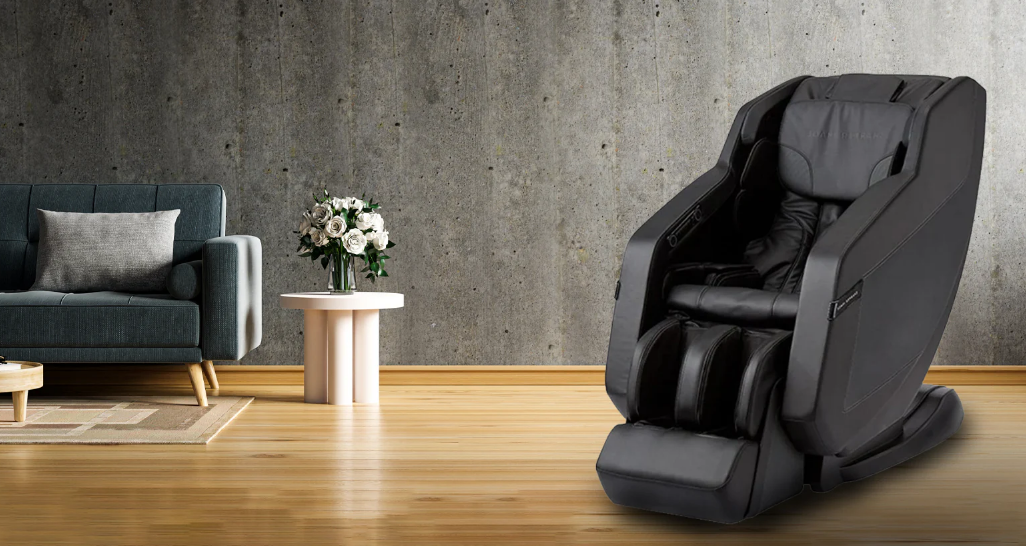
The Sharper Image Relieve 3D Massage Chair offers an unparalleled relaxation experience with its advanced features. Equipped with a 3D massage mechanism and L-Track technology, it delivers a comprehensive massage from the neck down to the glutes. The chair also includes zero gravity recline, integrated heat therapy, and airbag compression for targeted relief. With customizable settings accessible via a smartphone app, it caters to individual preferences. Priced at approximately $1,599, it combines luxury with therapeutic benefits for ultimate comfort.
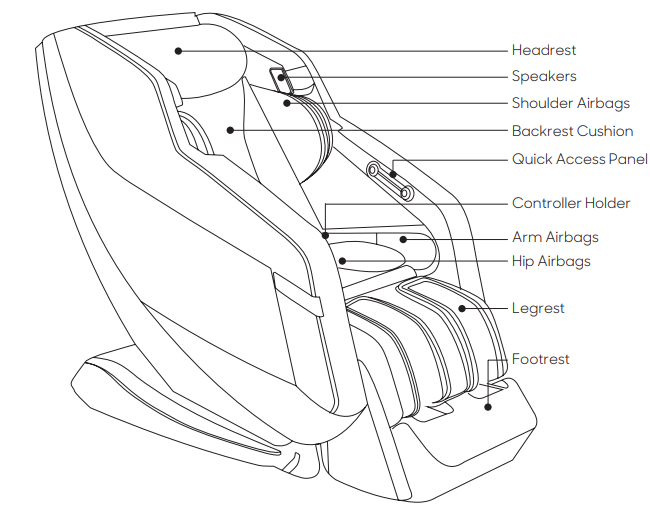
MASSAGE CHAIR TERMINOLOGY
EXTERNAL STRUCTURE
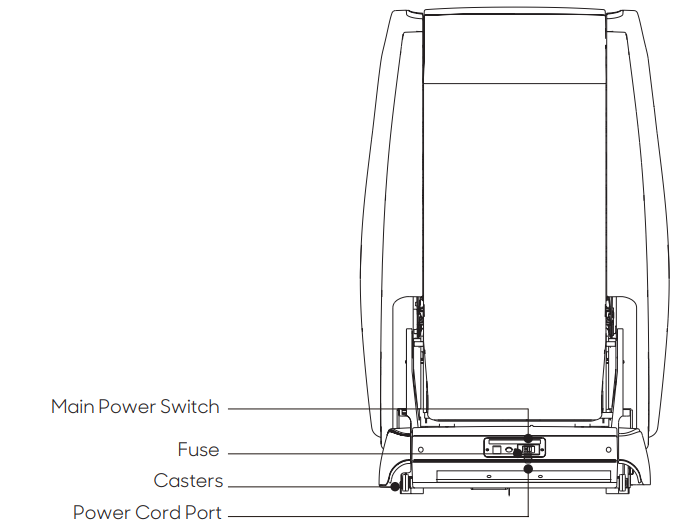
POWER PANEL
Sharper Image Relieve 3D Massage Chair Specifications
| Model | Relieve 3D Massage Chair |
Dimension of Main Body (in) Necessary Clearance to Wall (in) Net Weight (lbs) Shipping Weight (lbs) Max. User Weight (lbs) Voltage Fuse Power Consumption | 67 x 32 x 50 (L x W X H) |
3-4 | |
271 | |
315 | |
300 | |
110V | |
3.15 AMP | |
200W | |
Safety Standards | Type 1 |
Description
The Sharper Image Relieve 3D Massage Chair boasts a sleek and sophisticated design, blending seamlessly into any home decor. Its sturdy frame is built to last, supporting users up to 300 pounds. The chair features a premium leather upholstery that is both durable and easy to clean. The advanced control panel allows for easy navigation through various massage settings, ensuring a personalized experience each time.
INSTALLATION & PLACEMENT
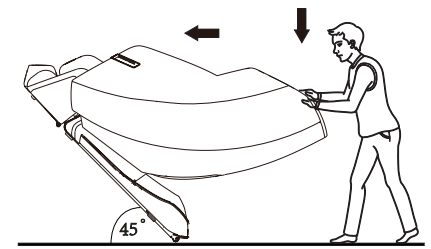
MOVING THE MASSAGE CHAIR
As illustrated, push the backrest downwards and tilt the chair onto its wheels at a 45 angle. Slowly push and maneuver the massage chair to the desired location. Lower the chair slowly until it is fully flat on the floor.
Caution:
- Do not move the massage chair when occupied or in use.
- Moving the massage chair may damage floors. We recommend moving the chair on rugs or carpeted floors.
- Do not drop or suddenly let go of the chair when moving it, as this may damage the chair or the floor.
- We advise two people move the massage chair together.
CHAIR PLACEMENT
- When placing your massage chair, be sure to leave at least 3-4 inches of space between the back of the chair and any wall or other objects to allow it to recline safely.
- When using the massage chair, ensure there are no people, pets, or objects within 32 inches of the chair to allow the footrest to extend safely.
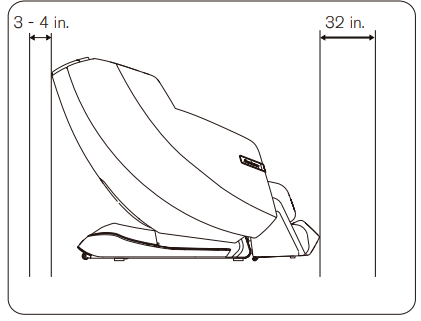
Caution:
- In order to avoid damage or injury, do not place the massage chair on a wet or uneven floor.
PREPARING THE MASSAGE CHAIR
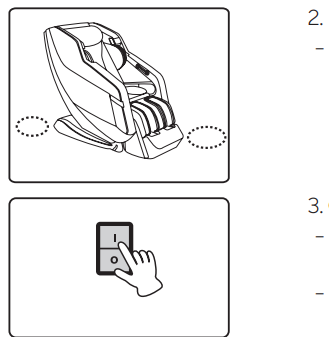
- 2. Check the surrounding environment.
- Make sure there are no objects, pets, or small children around the massage chair before using it.
- 3. Connect the chair to power:
- Connect the power cord to the chair, and then to a grounded 110V outlet.
- Turn on the power switch on the power box, located on therear of the chair.
TURNING OFF THE MASSAGE CHAIR
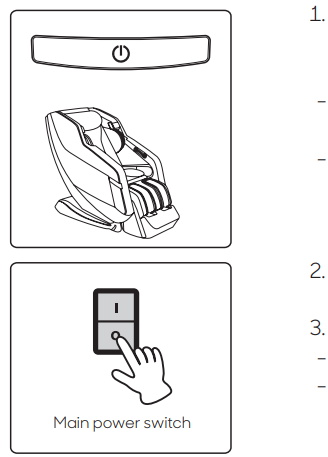
- After the massage program is completed, press the Power button on the massage chair remote to turn it off. The chair will reset to its original upright position.
- Ensure the surrounding area is clear of any pets, children, or objects prior to turning off and resetting the chair.
- Keep your arms and legs away from gaps between the armrest, legrest, and footrest to prevent any pinching or injury.
- Exit chair and turn off the main power switch on the back of the chair at the power panel.
- Unplug the power cord from the outlet.
- Do not pull on the cord to unplug from the wall.
- Do not handle the power cord with wet hands.
REMOTE CONTROL BUTTONS
REMOTE DIAGRAM
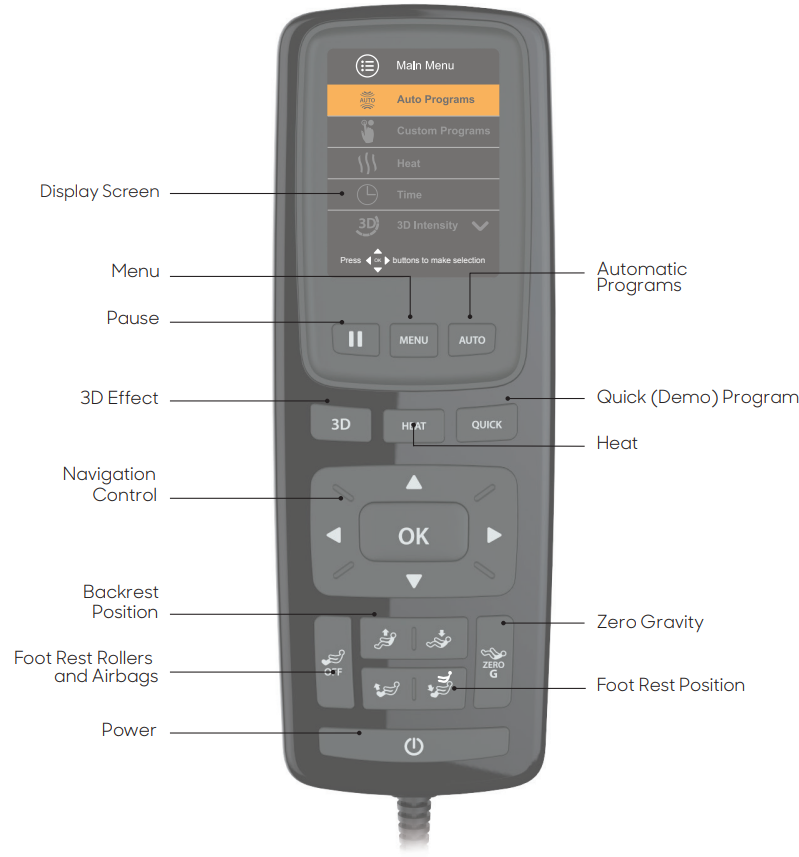
IN-USE SCREEN REMOTE DISPLAY
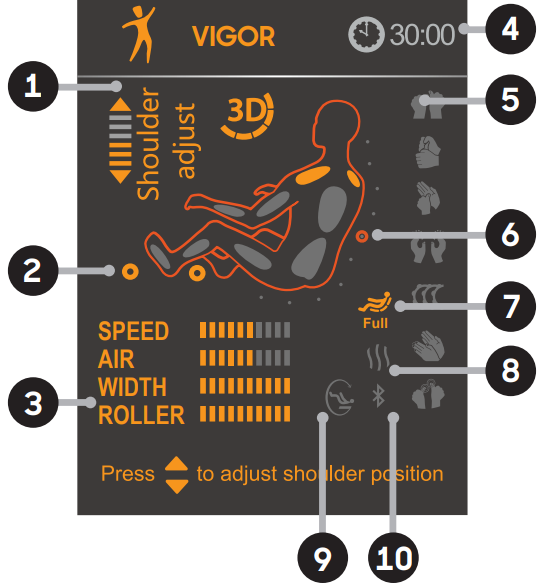
- Shoulder Adjust Indicator
- Active Rollers
- Meters
- Time Remaining
- Active Massage Technique
- Back-roller position
- Active Back Zone
- Heat
- Zero Gravit
- Bluetooth
QUICK ACCESS PANEL DIAGRAM
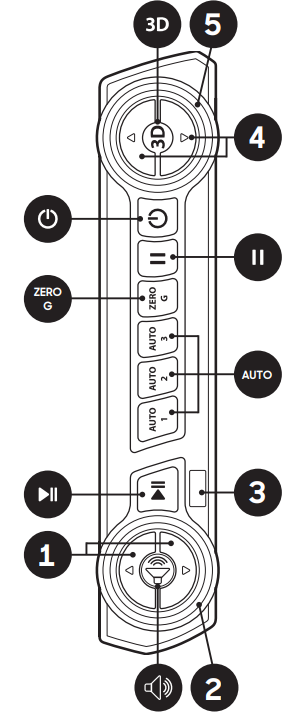
- Volume Up/Volume Down
- Bluetooth LED Indicator
- Bluetooth Button
- Play/Pause Sound
- AUTO Preset Automatic Programs
While running an Automatic Program, press and hold Auto 1, 2, or 3. The button will be set to the current program. To run the program in the future, press the Auto 1, 2, or 3 button. - Enter/Exit Zero Gravity Position
Press the Zero Gravity button on the controller to activate Zero Gravity. Press again to deactivate.
- USB Charging Port
- 3D Level Up/Down
When setting the 3D level, use the 3D Level Up and 3D Level Down buttons to change the depth of the massage node rotation. - 3D LED Indicator
The 3D LED Indicator displays the depth. - 3D Button
Pause
Press this button to force stop the chair during a program
Power
Powers up the chair or returns the chair to the exit position and powers down chair
REMOTE & MASSAGE CHAIR OPERATION
STARTING, PAUSING, AND STOPPING YOUR MASSAGE
- To turn on the massage chair, click on the main power switch on the back of the chair, then press the Power button on the controller, or on the Quick Access Panel . The chair moves to its Home position (legrest slightly raised, backrest slightly reclined, rollers in upper part of backrest), and the Menu Panel on the controller lights up.
- If no selection is made after 3 minutes, the chair will go into sleep mode and the Menu Panel light will go off. The first press of the Power Button will wake the controller up; the second press of the Power Button will return the chair to the Exit position. Any button pressed on the controller will wake the controller from sleep mode.
- To pause the motion and timer, press the Pause Button on the controller, or on the Quick Access Panel . The chair will enter idle mode. The air cells deflate, but the rollers do not return to their Home position. Press again to resume your massage.
- To turn off the massage chair, ensure that there are no obstacles under the foot rest and press the Power button on the controller, or on the Quick Access Panel, or in the Relieve 3D app. The rollers return to their Home position, all air cells deflate, and the chair moves to the Exit position. Click off the main power switch on the back of the chair and unplug the chair.
MAIN MENU OPTIONS
When you turn on the massage chair, the Display screen becomes active and displays the Main Menu.
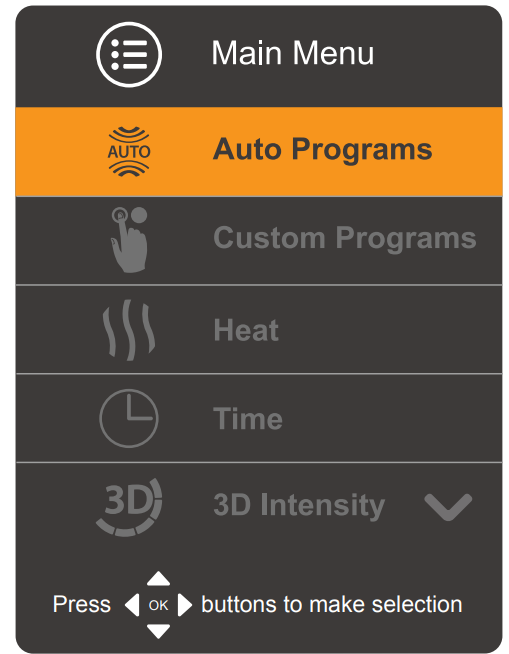
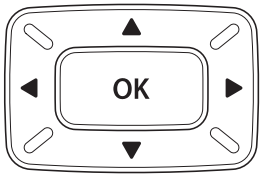
To navigate between the options in the Main Menu, use the Navigation Control’s arrow buttons to move up, down, left, and right. Press OK to confirm your selection. To return to the Main Menu, press the Menu button on the controller or press the left arrow. The six options on the Main Menu are:
AUTO PROGRAMS allows you to select one of 20 automatic massage programs. You can customize some aspects of these programs, such as the sage time and heat setting.
The full list of Auto Programs is below:
- Relieve
- Vigor
- Renew
- Zen
- Calm
- Bedtime
- Rise & Shine
- Air Only
- Zero G
- Extend
- Stretch
- Athlete
- Stress Free
- Mid Body
- Total Body
- Upper Body
- Lower Body
- Neck & Shoulder
- Quick
HEAT allows you to turn the heat feature on or off in target zones. The default is off for most automatic programs.
TIME allows you to set a timer for your massage in increments of 10, 15, 20, and 30 minutes. You can also add 5 minute increments, up to a 30 minute maximum. The default massage time is 15 minutes. This option also shows the Total Runtime, which is the total minutes the chair has run for the life of the chair.
3D INTENSITY allows you to adjust the depth of the massage node rotation (the 3D massage effect), from Level 1 (lightest) to Level 5 (deepest), or select Off.
FOOTREST SETTINGS allows you to select whether the air compression and/or rollers in the foot rest should be On or Off.
REMOTE SOUND allows you to select whether the beeping sounds that alert you to chair movement and controller selections should be On or Off.
BODY SCANNING
When you select an automatic or custom massage, the chair begins by scanning your body height to determine where your shoulders are. The sensor will beep for several seconds, during which time you can adjust the rollers based on the height of your shoulders. Press the UP and DOWN buttons on the navigation control to change the scanned shoulder height. Once the beeping stops, the height is set. To reset, you must power down the chair.
CUSTOM MASSAGE
CUSTOM MASSAGE CONFIGURATION
To custom design a massage to best suit your needs, select the CUSTOM PROGRAMS option on the Main Menu and press OK. The chair will auto-sense your shoulder position (if not previously set) and the Menu Panel will display the CUSTOM massage options.
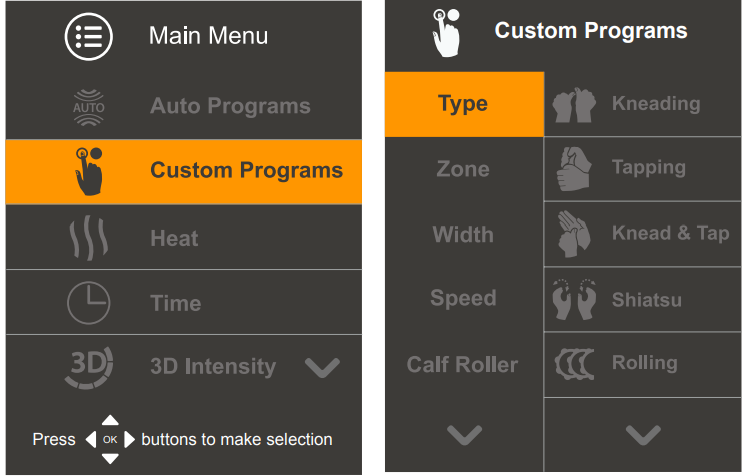
Use the Navigation Control’s arrow buttons to select your massage options, then click OK to confirm your selection and start the massage. You can change individual custom options during your massage.

The default time for a custom massage is 15 minutes, but you can adjust the time with the Time function.
TYPE
Select one of the seven massage styles: Kneading, Tapping, Knead & Tap, Shiatsu, Rolling, Clap-Thai, or Knead & Hold, and press OK to begin the massage.
ZONE
The area of your body to be massaged - Full Body, Upper Body, Lower Body, or Target. When you select Target, the nodes will remain at their current location. You can adjust the target by using the up and down buttons.
WIDTH
The WIDTH of the massage - Wide, Medium, or Narrow. This option is not available in Kneading, Knead & Tap, or Knead & Hold modes.
SPEED
The SPEED of the massage, from Level 1 (slowest) to Level 5 (fastest). This option is not available with Rolling mode.
CALF ROLLER
Select the calf roller speed from 1 (slowest) to 3 (fastest) or Off.
FOOT ROLLER
Select the foot roller speed from 1 (slowest) to 3 (fastest) or Off.
AIR ZONE
Select the air bags to be activated during your massage: Full Body, Shoulder, Hip, Arm, Calf, or Foot.
AIR INTENSITY
Select the intensity of the air pressure to be used in the active air bags, from Level 1 (least intense) to Level 5 (most intense).
 SETTING THE 3D LEVEL: The 3D button on the controller allows you to adjust the depth of the massage node rotation (the 3D massage effect), from Level 1 (lightest) to Level 5 (deepest). The Monitoring Screen displays the 3D level.This button is also available on the Quick Access Panel.
 SETTING THE HEAT OPTION: You can turn the heat option on or off in the Upper Body, Lower Body, or Full Body zones. You can set the heat feature using the Heat button on the controller, or the Heat menu. The Monitoring Screen shows the zones in which heat is activated.
 SELECTING ZERO GRAVITY POSITION: You can enjoy your massage in a standard sitting position or in the Zero Gravity position. In Zero Gravity, the backrest reclines and the foot rest is raised, allowing you to raise your feet above your heart. Press the Zero Gravity button on the controller to activate Zero Gravity. Press again to deactivate.
Once Zero Gravity is activated, it will override any programmed chair movement in the Auto programs. Note that Zero Gravity does not work with the Stretch program.This button is also available on the Quick Access Panel.
ADJUSTING THE FOOT REST AND BACKREST POSITION
You can adjust the position of the foot rest and backrest using the Foot Rest and Backrest position buttons. Press and hold the button until the foot rest or backrest is in your preferred position. Once the foot rest and/or backrest position has been adjusted, it will override any programmed position in the Auto programs.

ACTIVATING FOOT REST ROLLERS AND AIR-BAGS
You can activate and deactivate the rollers and airbags in the foot rest. Press the Foot Rest Rollers and Airbags button once to turn off the rollers in the foot rest. Press again to turn off the air bags in the foot rest. Press a third time to turn the rollers and airbags in the foot rest on. Press once to turn off rollers; press again to turn off airbags; press a third time to turn rollers and airbags on.
BLUETOOTH SPEAKERS
PAIRING A DEVICE
The speakers in your massage chair can connect to a Bluetooth -enabled device. The chair does not have to be powered on to use the Bluetooth feature.
To pair with a device:
- Prepare your device to pair using Bluetooth wireless technology, making sure it is within 33 feet of the massage chair. Refer to your device’s owner’s manual for details if necessary.
- Press and hold the Bluetooth button on the Quick Access Panel for 1 second. The LED indicator is solid orange for 5 seconds as the massage chair searches for previously paired devices. If no connection is made within 5 seconds, the massage chair enters Bluetooth pairing mode. The LED Indicator flashes orange. Once the massage chair is in pairing mode and your device is ready to pair, select Relieve 3D Massage Chair on your device. If prompted, use 0000 as a PIN for the pairing code. Once Relieve 3D Massage Chair is selected, the LED Indicator changes to solid orange and a tone sounds to confirm pairing is complete.
- To enter Bluetooth pairing mode manually, press and hold the Bluetooth button until the LED Indicator starts flashing orange (approximately 2 seconds of holding the Bluetooth button
 if Bluetooth is on, 4 seconds of holding the Bluetooth button if Bluetooth is off).
 - Press the Volume Up
 button to increase the volume. Press the Volume Down button
 button to decrease the volume. The LED Indicator shows the volume level. The maximum volume level is determined by the volume setting on your device.
 - Press the Play/Pause
 button to pause and resume the audio.
 - Press and hold the Bluetooth button for one second to turn Bluetooth mode off. After the initial pairing of your device, the massage chair should automatically pair with your device the next time the unit is put into Bluetooth mode. Depending on your device, you may have to select Relieve 3D Massage Chair in your device’s Bluetooth menu.
To cancel pairing mode, press and hold the Bluetooth button for one second to turn off Bluetooth mode, or wait 10 minutes for the massage chair to cancel pairing mode and turn off Bluetooth mode automatically. The Pairing LED Indicator will turn off.
You can charge USB-compatible devices using the USB Port on the Quick Access Panel.
RELIEVE 3D APP
USING THE RELIEVE 3D APP
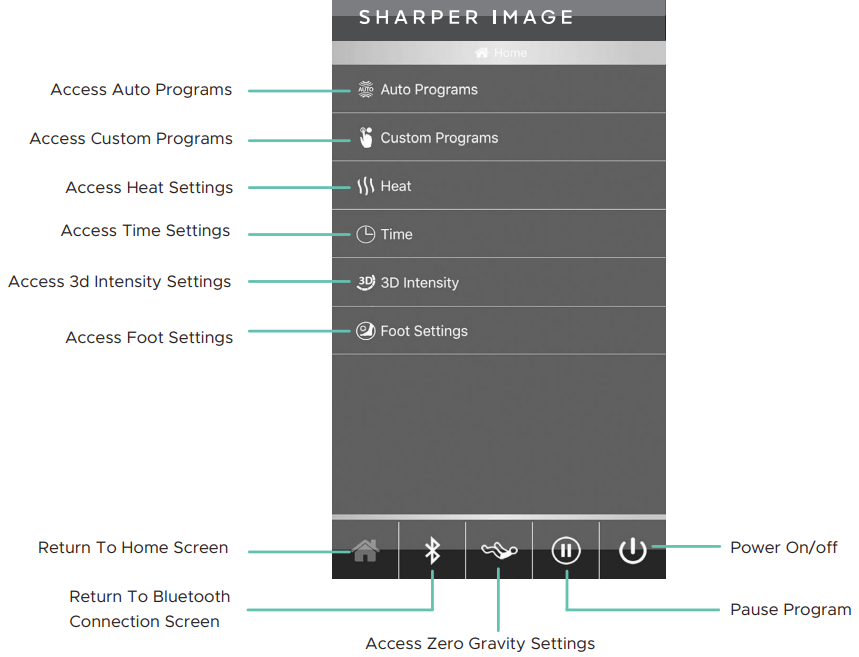
The Relieve 3D Massage Chair can be controlled from a smartphone or other device using the free Relieve 3D app. You can download the free app from the App StoreSM (for Apple® devices) or from Google PlayTM (for AndroidTM devices). The name of the app is Relieve 3D.
The Relieve 3D Massage Chair App is compatible with: Apple iOS 8.0 and later Android 4.3 and later
- Use the controller to familiarize yourself with the chair’s operations before using the app
- Use the controller or the app to control your massage session, but do not switch between the two. Repeatedly switching between the app and the controller during the same massage session can cause synchronization issues.
Apple is a trademark of Apple Inc., registered in the U.S. and other countries.App Store is a service mark of Apple Inc. Google Play and Android are trademarks of Google, Inc.
Setup Guide
- Assembly: The chair comes partially assembled. Follow the included instructions to attach the armrests and footrest.
- Configuration: Plug in the chair and turn it on. Use the remote control to adjust settings such as massage mode, intensity, and heat.
- Pairing: Connect your Bluetooth device to stream music directly through the chair's speakers.
PRODUCT CARE & STORAGE
STORING THE MASSAGE CHAIR
- Disconnect the massage chair from the power source after use.
- Do not expose the massage chair to direct sunlight, high temperature, or high humidity. This could cause fading or other damage to the upholstery.
- Do not put heavy objects on the massage chair.
- If the outer cover is torn or the mechanism is damaged, stop using the chair and contact Sharper Image massage chairs for assistance.
CLEANING THE MASSAGE CHAIR
Follow the steps below to clean your massage chair:
- Remove the main plug from the outlet.
- Clean the synthetic leather, controller, cords with a dry cloth.
- If necessary, you can dampen a soft cloth with a neutral cleaning solution or water to clean the synthetic leather. Lysol wipes are another safe and easy way to clean this material. Then, wipe it with a dry cloth and let air dry.
- Any cloth material of the chair (e.g., the inside of the arm airbags or calf airbags) can be spot cleaned with a soft cloth dampened with a weak neutral detergent and gently clean where necessary. Avoid cleaning the fabric too often so as to avoid wear and tear.
- To clean any plastic parts of the chair (e.g., the base), use a soft cloth lightly soaked in a neutral detergent. Then, wipe again with a water-dampened cloth. Finally, wipe with a clean, dry cloth.
CAUTION
- Do not immerse the chair in water.
- Never use scouring pads, abrasive cleaning agents (e.g., benzene or thinner), or harsh chemicals such as petroleum or acetone to clean the chair. Additionally, never use heat to dry the chair after cleaning.These items may cause fading or other damage to the upholstery.
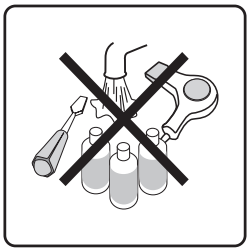
Any additional servicing should be performed by an authorized service representative. This chair has no user serviceable parts inside.
SAFETY PRECAUTIONS
CAUTION
- To reduce the risk of electric shock, do not remove cover. There are no serviceable parts inside.
- To reduce risk of fire or electric shock, do not expose the massage chair to rain or moisture.
WARNING: - This symbol indicates the presence of uninsulated “dangerous voltage” within the massage chair’s enclosure that may be of sufficient magnitude to constitute a risk of electric shock.
DANGER:- This symbol indicates the presence of important operating and maintenance instructions in the literature accompanying the massage chair.
When using an electrical appliance, basic precautions should always be followed. Read all instructions before using this massage chair. This massage chair is intended for household use only.
DANGER - To reduce the risk of electric shock:
- Always unplug this massage chair from the electrical outlet immediately after using and before cleaning.
- If liquid is accidentally spilled onto the chair, remove the power plug from the electrical outlet immediately. Do not use wet hands to connect or disconnect the power plug from the electrical outlet.
- Do not operate during a lightning storm.
- Although operation will be stopped automatically by the Auto Timer function, always remember to turn off the main power switch after use.
- Do not place the power cord under the chair or under any other heavy objects.
- Do not wind the power cord around the chair as this may damage the cord and result in a fire or electric shock.
- Do not operate the chair with a damaged cord or with an extension cord.
- Do not use the chair if the electrical outlet is loose.
WARNING - To reduce the risk of burns, fire, electric shock, or injury:
- Consult your physician before use if you have any conditionunder their care
- Do not operate after consuming pain killers, sedatives, or alcohol.
- Do not use this chair in combination with other therapeutic equipment or items such as an electric blanket, as this may result in ineffectiveness or injury.
- Do not stand on or in this massage chair. Use only while seated.
- Do not disassemble any part of the chair. Touching the internal components may result in malfunction or electric shock. Instead, contact Infinity's technical support team immediately for professional assistance.
- Always position the massage chair on a flat, level surface.
- Do not operate for more than 30 consecutive minutes. Turn off the chair and allow it to rest for 30 minutes before using again. This will prolong the life of the chair.
- Do not perform continuous massage on the same spot of your body for more than 5 minutes at a time, as this may result in excessive stimulation and may have adverse effects.
- Never use the chair on open skin wounds or swollen, inflamed areas.
- Do not apply massage rollers directly on the head, elbow or knee joints, torso, or abdomen.
- If the power goes off during use, be sure to turn the power switch to the OFF position and pull the power plug
- This massage chair should never be left unattended when plugged in. Unplug from outlet when not in use, and before putting on or taking off parts.
- Do not operate under blanket or pillow. Excessive heating can occur and cause fire, electric shock, or other injury.
- Close supervision is necessary when this chair is used by or near children, pets, or disabled individuals. Keep children and pets away from extended foot support.
- Use this massage chair only for its intended use as described in this manual. Do not use attachments not recommended by Sharper Image massage chairs.
- Never operate this massage chair if it has a damaged cord or plug, if it is not working properly, if it has been dropped or damaged, or if it has been damaged by water. Contact Sharper Image massage chairs technical support team at 888-894-9150 for assistance.
- Do not move or carry this massage chair by the power cord, or use the cord as a handle.
- Keep the cord away from heated surfaces.
- Never operate the massage chair with the air openings blocked. Keep the air openings free of lint, hair, and other debris.
- Never drop or insert any object into any opening.
- Do not use outdoors.
- Do not operate where aerosol (spray) products are being used, or where oxygen is being administered.
- To disconnect, turn all controls to the OFF position, then remove the plug from the outlet.
- Use heated surfaces carefully. May cause serious burns. Do not use over sensitive areas or on areas with poor circulation. The unattended use of heat by children or disabled individuals may be dangerous.
- Never use pins or other metallic fasteners with this chair.
- Never remove the cover from this chair. Do not use the chair when the upholstery is ripped, torn, or removed. This may cause injury or malfunction. Carefully examine the covering before each use. Call Sharper Image massage chairs’ technical support team if the covering shows any sign of deterioration, such as blistering, peeling, cracking, or ripping.
- Keep dry. Do not operate the massage chair in a wet or moist environment. Do not use the chair when your body is wet, or operate with wet hands.
- Do not use the massage chair while wearing excessively loose clothing or jewelry.
- Keep long hair away from massage chair openings and moving parts during use.
- Do not insert your hand or foot along the path of the massage rollers during use.
- This massage chair is designed as a non-professional solution to help soothe tired, aching muscles. It is not intended for self-treatment of conditions that should be managed by a qualified healthcare provider. If your ailments and symptoms persist or worsen after use, contact your doctor immediately.
- Do not use this chair if you are not feeling well.
- Stop operation immediately if you experience any discomfort.
- Do not fall asleep during the massage session.
GROUNDING INSTRUCTIONS
This product must be grounded. If it should malfunction or break down, grounding provides a path of least resistance for the electric current to reduce the risk of electric shock. This product is equipped with a cord with an equipment-grounding conductor and a grounding plug. The plug must be plugged into an appropriate outlet that is properly installed and grounded in accordance with all local codes and ordinances.
DANGER: Improper connection of the equipment-grounding conductor can result in a risk of electric shock. Check with a qualified electrician or serviceperson if you are in doubt as to whether the product is properly grounded. Do not modify the plug provided with the product. If it does not fit the outlet, have a proper outlet installed by a qualified electrician. Make sure the product is connected to an outlet having the same configurationas the plug. No adapter should be used with this product.
Troubleshooting
If you encounter problems while operating your Sharper Image Relieve 3D massage chair, try the suggestions below. If the issue(s) persist, flip the main power switch on the back of the chair to the Off position and remove the power plug from the outlet.
Do not disassemble or attempt to repair the massage chair yourself. Doing so will void the warranty and Sharper Image will not bear any responsibility for any subsequent consequences.
Problem | Possible Cause/Solution |
Themmaasssaaggeechcahiraiisr cisocnonencnteecdtteoda tpoowa eproswouerrcseo, buurct ies,nbout tfuisnnctoiot ning. functioning |
|
Sounds are coming from the massage mechanism. | It is normal for the motors to make noise while operating or rubbing against the backrest area. |
MBaycmkreasstsoargleeghreasst wstioll pnopteedxtend or retract. | T-hAeurteomatyicbaentodommauncuhalpprreosgsurarempslaced olansthfoerb1a5cmkriensutteosr l(e6gmreisntu. Rteesdfuocr e the wqueiicgkhpt ororgprraemss)u. rWe ohnenthtehebparcokgrerastmor lceogmrepstle. tes, the chair turns off. - The massage chair may have automatically shut down due to overheating protection devices. Please turn off the power and allow the chair to cool for 30-50 minutes. |
The Controller is responding, but the massage chair is not functioning |
|
Sharper Image Relieve 3D Massage Chair Pros & Cons
Pros
- Advanced 3D Massage Technology: Provides a highly realistic massage experience.
- Multiple Massage Modes: Offers various pre-set programs for different needs.
- Heat Function: Enhances comfort and relaxation.
- Zero-Gravity Positioning: Reduces pressure on the spine for optimal comfort.
- Bluetooth Connectivity: Allows users to enjoy music during their massage sessions.
Cons
- High Price Point: May be out of budget for some consumers.
- Large Footprint: Requires significant space in your home.
- Heavy Weight: Difficult to move around once assembled.
- Complex Assembly: Requires some effort to assemble the chair fully.
Customer Reviews
The Sharper Image Relieve 3D Massage Chair has received positive reviews from customers who appreciate its advanced features and comfort. However, some users have noted that the assembly process can be challenging. Here are some common complaints:
- Assembly: Several users have mentioned that the assembly process is more complicated than expected.
- Space Requirements: Some users have noted that the chair takes up more space than anticipated.
WARRANTY
For the most current Warranty information please visit: https://www.sharperimagemassagechairs.com/warranty
Faqs
What advanced technology does the Sharper use?
Does the Sharper Image Relieve 3D have a heat function?
Is the Sharper Image easy to assemble?
What are some common issues with the Sharper Image?
How much space does the Massage Chair require?
Does the 3D Massage Chair support heavy users?
Can I stream music through the Sharper Image?
What is the zero-gravity positioning feature in the Sharper Image Relieve 3D Massage Chair?
Leave a Comment
