Sharper Image TV WIRELESS HEADPHONES User Guide | Set-up & Connectivity

Content
Introduction
Congratulations on your purchase of our bestselling TV Wireless Headphones. Please use this guide for the fastest setup. For more details, consult the owner’s manual in this package or download it from our website.
- Carefully remove the TV Wireless Headphones from the packaging.
- The ON/OFF switch on the back of the Transmitter Base has 4 positions. Make sure the switch on the back of the Transmitter Base is switched to “ON / Channel 1.”
Switch Positions- OFF (uppermost position)
- ON / Ch. 1
- ON / Ch. 2
- ON / Ch. 3 (bottom position)
- Plug the AC adapter into an AC outlet. Connect the power cord to the Transmitter Base (DC 5V input). When the unit detects power, a BLUE LED will illuminate.
- Decide which audio option you will use to connect the Transmitter Base to your TV. (We recommend the “optical” connection because it is the easiest and also provides the highest quality audio.) The optical audio cable is the thin black cable (approx. 38” long) included in the package.
- Remove the protective plastic caps from BOTH ENDS of the optical audio cable.
- Connect one end of the optical audio cable to your TV (Optical output). Connect the other end to the Transmitter Base (Optical input). When the Transmitter Base detects an audio signal, a BLUE LED will illuminate. NOTE: If your TV does NOT have an Optical output, you may connect your Transmitter Base to your cable box. If these options are not available, you can ALSO connect your TV Wireless Headphones to the TV or cable box via RCA cable or 3.5mm headphone cable (both included). Consult your owner’s manual for details.
- Turn ON the headphones by pressing the POWER button located on the right ear cup. When
the headphones are on, a GREEN LED will illuminate on the headphones. You will hear the audio through the headphones and the TV. Now you can adjust the TV volume and/or the headphone volume to suit all of the viewers in the room.
Detailed Specifications
The Sharper Image TV Wireless Headphones are designed with the latest technology to deliver an exceptional audio experience. Here are the detailed specifications:
- Wireless Connectivity: 2.4 GHz RF wireless technology
- Range: Up to 100 feet (line of sight)
- Frequency Response: 20 Hz - 20 kHz
- Driver Size: 40mm
- Impedance: 32 Ohms
- Sensitivity: 100 dB +/- 3 dB
- Battery Life: Up to 20 hours
- Charging Time: Approximately 3 hours
- Weight: 9.6 ounces
- Additional Features: Automatic shut-off, volume control, and on-ear controls
FEATURES
- Works with all TV sets, including the latest Smart TVs
- Watch TV without disturbing others
- Easy to set up, charge and use
- Charge lasts up to 20 hours
- Wireless range: 160 ft.
- Adjustable volume
- Can also be used as wired headphones
- All cables included
PARTS IDENTIFICATION
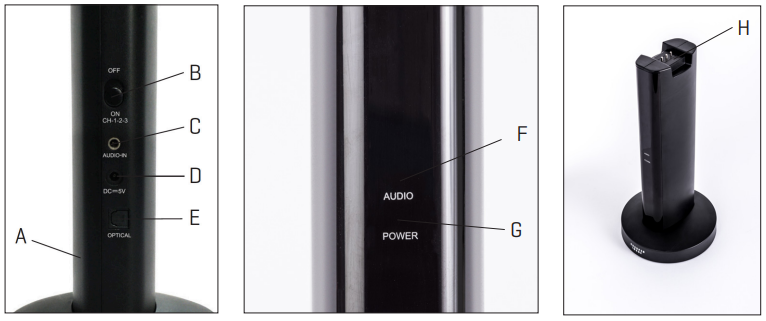
TRANSMITTER BASE

- A. Transmitter base
- B. Audio signal and channel switch
- C. Audio in jack
- D. 5V DC power jack
- E. Optical audio jack
- F. Audio indicator light
- G. Power light
- H. Charging dock
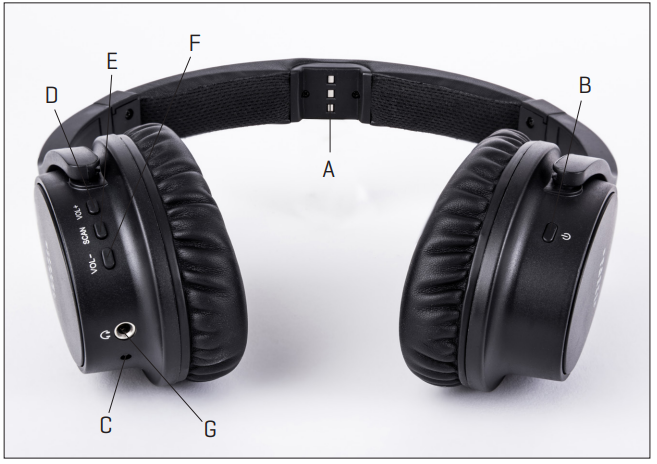
TV WIRELESS HEADPHONES

- A. Charging point
- B. Power button
- C. Signal indicator light
- D. Volume +
- E. Scan button
- F. Volume –
- G. Audio in jack
TECHNICAL SPECIFICATIONS
Transmission Mode: UHF Stereo | Distortion: <0.5% at 1KHz |
Carrier Frequency: 900MHz | S/N Ratio: <95dB |
Operation Voltage (Base Unit):DC5V | Wireless Range: 160ft |
Operation Voltage (Headphones): DC3.7V | Charge Time:5 hours |
Frequency Response: 20Hz - 20kHz | Battery Capacity: 20 hours |
SET-UP
- Plug the included AC adapter into the DC 5V jack in the back of transmitter base. Then, plug the other end into an AC outlet.
- Slide the Audio Signal switch on the back of the transmitter base to the ON position.
- If the blue power (lower) light illuminates, the unit is receiving power.
NOTE: This device must be used with the AC adapter supplied in the package. If your AC adapter is lost or damaged, please contact Sharper Image Customer Service. Do not use any other AC adapters or power cords.
- Make sure the transmitter base is plugged in as described above.
- Slide the Audio Signal switch on the back of the transmitter base to the OFF position.
- Turn off the power on the TV Wireless Headphones, and place them on the transmitter base.
- The power light on the transmitter base will turn RED while the headphones are charging. The power light on the transmitter base will turn BLUE when the headphones are fully charged or in use.
- Store your TV Wireless Headphones on the base when not in use.
NOTE: There are two LED lights on the front of the transmitter base: Audio Indicator Light (upper) and Power Light (lower).
CHARGING YOUR HEADPHONES
For optimum performance, the TV Wireless Headphones must be fully charged before the first use. This can take 5 hours.
- Make sure the transmitter base is plugged in as described above.
- Slide the Audio Signal switch on the back of the transmitter base to the OFF position.
- Turn off the power on the TV Wireless Headphones, and place them on the transmitter base.
- The power light on the transmitter base will turn RED while the headphones are charging. The power light on the transmitter base will turn BLUE when the headphones are fully charged or in use.
- Store your TV Wireless Headphones on the base when not in use.
NOTE: There are two LED lights on the front of the transmitter base: Audio Indicator Light (upper) and Power Light (lower).
Charge Light Indicators
RED | Headphones are charging. |
| BLUE | Headphones are fully charged or in use. |
CONNECTING YOUR TV
- The TV Wireless Headphones can be connected to the TV three different ways:
- Headphone Jack: Use the included 3.5mm audio cable. Plug one end into the TV headphone jack. Plug the other end into the Audio In jack on the back of the transmitter base.
- Audio Out: Check to see if your TV has red and white Audio Out jacks (also called RCA jacks). If so, connect the included RCA to 3.5mm adapter cable to the Audio Out jacks on your TV. Then connect the included 3.5mm cable to the adapter, and plug the other end of the 3.5mm cable into the Audio In jack on the back of the transmitter base.
- Digital Optical Cable: Many new TVs do not have a headphone jack or Audio Out jacks. If this is the case, you must use the optical output on your TV. This jack is also called “optical audio,” “TOSLINK” or “Digital Audio Out (Optical).” Plug the included fiber optic cable into this jack on your TV. Then plug the other end into the Optical input on the back of the transmitter base. NOTE: Please be sure to check the shape of the Digital Optical Cable before you plug it in. The shape of the cable must align with the shape of the jack. Please be sure to remove the clear caps on both ends of the Digital Optical Cable before use. Please be sure the 3.5mm Audio Cable is not plugged in before use of the Digital Optical Cable, or it will default to the Audio Out mode.
- When the transmitter base is connected to the TV, turn on the power on both the transmitter base and your TV. Now turn on the TV. The Audio light on the transmitter base will turn BLUE. NOTE: Make sure your TV is not on mute.
USING THE TV WIRELESS HEADPHONES
- Press the Power button on the right side of the headphones. The indicator light will turn GREEN when successfully connected. The headphones will automatically connect within 5 seconds.
- Please the headphones on your head. Adjust the volume using the Vol+ and Vol- buttons on the left side of the headphones. You should now be able to hear your TV through the headphones.
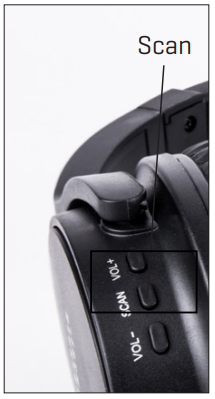
NOTE: If you want to connect more than 1 pair of headphones in a space on different devices, you can set a separate channel for different transmitters to avoid interference. Select channel 1, 2, or 3 by sliding the Power button on the base, then you can select to connect the headphones by pressing the SCAN button on the left side of the headphones. Each transmitter can connect more than 1 pair of headphones at the same time with the same channel.

AUTO SHUTOFF
To protect the battery, the TV Wireless Headphones will turn off automatically when the lithium battery power level drops below 2.7V. If this happens, please return the headphones to the charging base in order to recharge.
WIRED HEADPHONE USE
Your TV Wireless Headphones can also be used as wired headphones, for use outdoors or on a plane (with a smartphone, tablet, laptop, MP3 player, etc.).
- For wired use, connect the included 3.5mm audio cable to the Audio In jack on the headphones. Plug the other end into your mobile device.
- To conserve battery power, be sure headphones are powered off when using them as wired headphones.
- TV Wireless Headphones will not pick up wireless audio signals while the audio cable is plugged into the Audio In jack. When you want to watch TV again, make sure you unplug the 3.5mm audio cable.
SYSTEM RESET
In the rare event of a malfunction, you may need to perform a system reset.
- Turn on the power of the transmitter base.
- Turn on the power of the headphones.
- Press and hold the Scan buttons on the transmitter base and the headphones at the same time. The signal indicator lights will begin to flash blue.
- When you hear a long beep sound, let go of both buttons. The system has now been reset.
Description
Experience high-quality sound with the Sharper Image TV Wireless Headphones. These headphones are designed to deliver clear and crisp audio, with a frequency response of 20 Hz - 20 kHz. The 40mm drivers provide powerful sound, while the impedance of 32 Ohms ensures optimal performance. With a battery life of up to 20 hours, you can enjoy uninterrupted listening for extended periods. The headphones are lightweight and comfortable, making them perfect for long-term use. The automatic shut-off feature saves battery life, while the on-ear controls allow you to adjust the volume or change tracks with ease.
TROUBLESHOOTING
Problem | Possible Solution |
No sound coming from Headphones. |
Important: On some newer TV sets, it may be necessary to turn on or increase the output level of the headphone jack or the Audio Out jacks. Normally, you can check this by pressing the Menu button on your TV remote control and entering the Settings or Set Up menu. Consult your TV owner’s manual for details. |
Sound is distorted, staticky or hissy. |
Important: On some newer TV sets, it may be necessary to turn on or increase the output level of the headphone jack or the Audio Out jacks. Normally, you can check this by pressing the Menu button on your TV remote control and entering the Settings or Set Up menu. Consult your TV owner’s manual for details. |
Sound is distorted, staticky or hissy. (Cont.) |
|
I can hear the TV through the Headphones, but now the TV itself is too loud. | Use your TV remote to turn down the volume on your TV. |
I have tried everything suggested here, but the Headphones still do not work. | Connect TV Wireless Headphones to a different TV in your house. The problem may be with the internal settings of your TV. Refer to your TV owner’s manual to adjust the Audio Out and Headphone volume levels. |
WARRANTY
Sharper Image branded items purchased from SharperImage.com include a 1-year limited replacement warranty. If you have any questions not covered in this guide, please call our Customer Service department at 1 (877) 210-3449. Customer Service agents are available Monday through Friday, 9:00 a.m. to 6:00 p.m. ET.
Pros & Cons
Pros
- High-quality sound with a wide frequency response
- Comfortable to wear for extended periods
- Long battery life
- Automatic shut-off feature saves battery life
- On-ear controls for easy volume and track adjustment
Cons
- May not fit all head sizes comfortably
- The wireless range may be limited in some environments
- The headphones may not be suitable for use with certain devices
- The battery life may be shorter with extended use at high volumes
- The automatic shut-off feature may be inconvenient for some users
Customer Reviews
Customers who have purchased the Sharper Image TV Wireless Headphones have praised their high-quality sound and long battery life. However, some have noted that the headphones may not fit all head sizes comfortably, and the wireless range may be limited in some environments. The automatic shut-off feature has also been both praised and criticized, with some users finding it convenient and others finding it inconvenient.
Faqs
What is the current price of the Sharper Image TV Wireless Headphones?
How do the Sharper Image TV Wireless Headphones compare with other wireless headphones in terms of range?
Do the Sharper Image TV Wireless Headphones have any special features for night-time TV watching?
Can the headphones be used while charging?
How do you turn on the Sharper Image TV Wireless Headphones?
Is it possible to use the headphones as wired headphones?
What should you do if you experience a malfunction with the headphones?
What is the auto shut-off feature on the Sharper Image TV Wireless Headphones?
Leave a Comment
