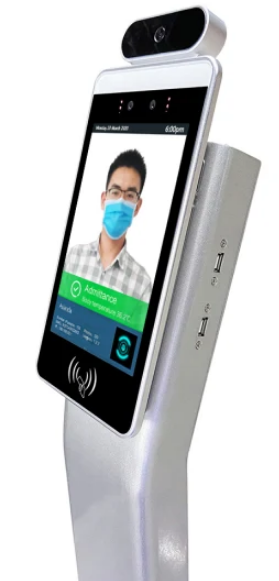
Smart-Pass MIPS Management Platform YXD-f8 Owners Manual
Content
Smart-pass MIPS Management Platform YXD-f8 Introduction
The comprehensive and flexible Smart-pass MIPS Smart Pass administration Platform streamlines access control, attendance monitoring, and security administration across industries. This technology manages access points, tracks attendance, and improves security for educational institutions, corporate offices, healthcare facilities, and government agencies. Smart-pass MIPS makes user identification easy and secure with RFID cards, biometric scans, and QR codes. The platform is configurable, integrates seamlessly with current security systems, and provides extensive reporting and analytics, making it crucial for enterprises trying to improve operational efficiency and security. Smart-pass MIPS offers reliable and scalable management for any enterprise, whether cloud-based or on-premises.
Detailed Specifications
The MIPS Smart Pass Management Platform YXD-f8 boasts the following key features:
- Compatible with all MIPS systems.
- Real-time monitoring and analytics.
- Centralized management dashboard.
- Advanced security features, including encryption and access controls.
- Automated alerts and notifications.
- Scalable architecture to support growing systems.
- Intuitive user interface for easy operation.
- High availability and fault tolerance.
- Integration with third-party tools and systems.
Installation and Login
One-click installation: Double-click the exe installation file and follow the installation instructions for quick installation.
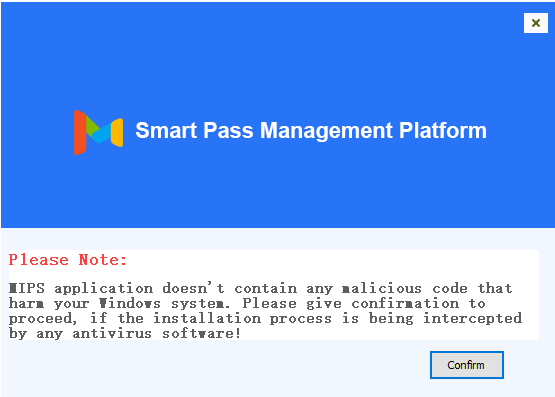
- Note: If the installation process is blocked by a system firewall or third-party antivirus software, always choose to allow the program to operate. Otherwise, the installation process may fail and become unusable.
- After the program is installed, the MIPS service is automatically started by default.
After the start-up is complete, click the "Copy" button. Open the Chrome browser and paste the link to open the MIPS service background. Enter your username and password to log in.
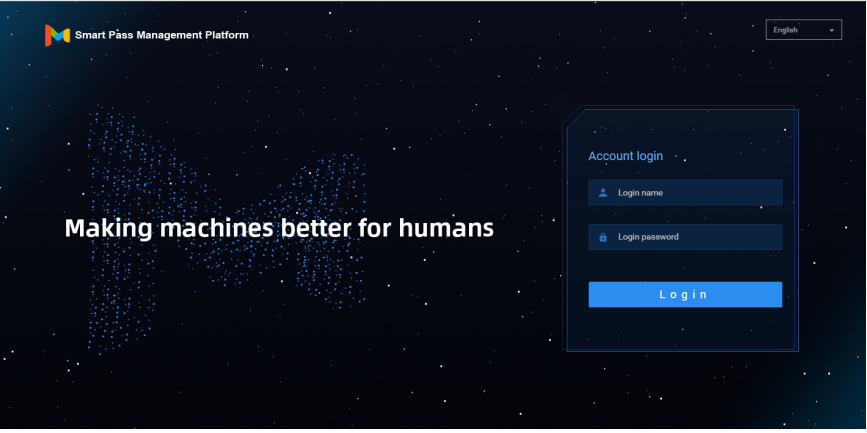
- MIPS system upgrade: You only need to overwrite and install the MIPS system software version installation package higher than the current version.
Description
The Smart-pass MIPS Management Platform YXD-f8 is a comprehensive solution for managing and monitoring MIPS systems. The platform provides a centralized dashboard for managing all MIPS systems, enabling administrators to monitor system performance, identify issues, and optimize system settings. The platform also includes advanced security features, such as encryption and access controls, to ensure the confidentiality and integrity of data. With real-time analytics and automated alerts, the Smart-pass MIPS Management Platform enables administrators to quickly identify and address issues, minimizing downtime and maximizing system availability.
Console
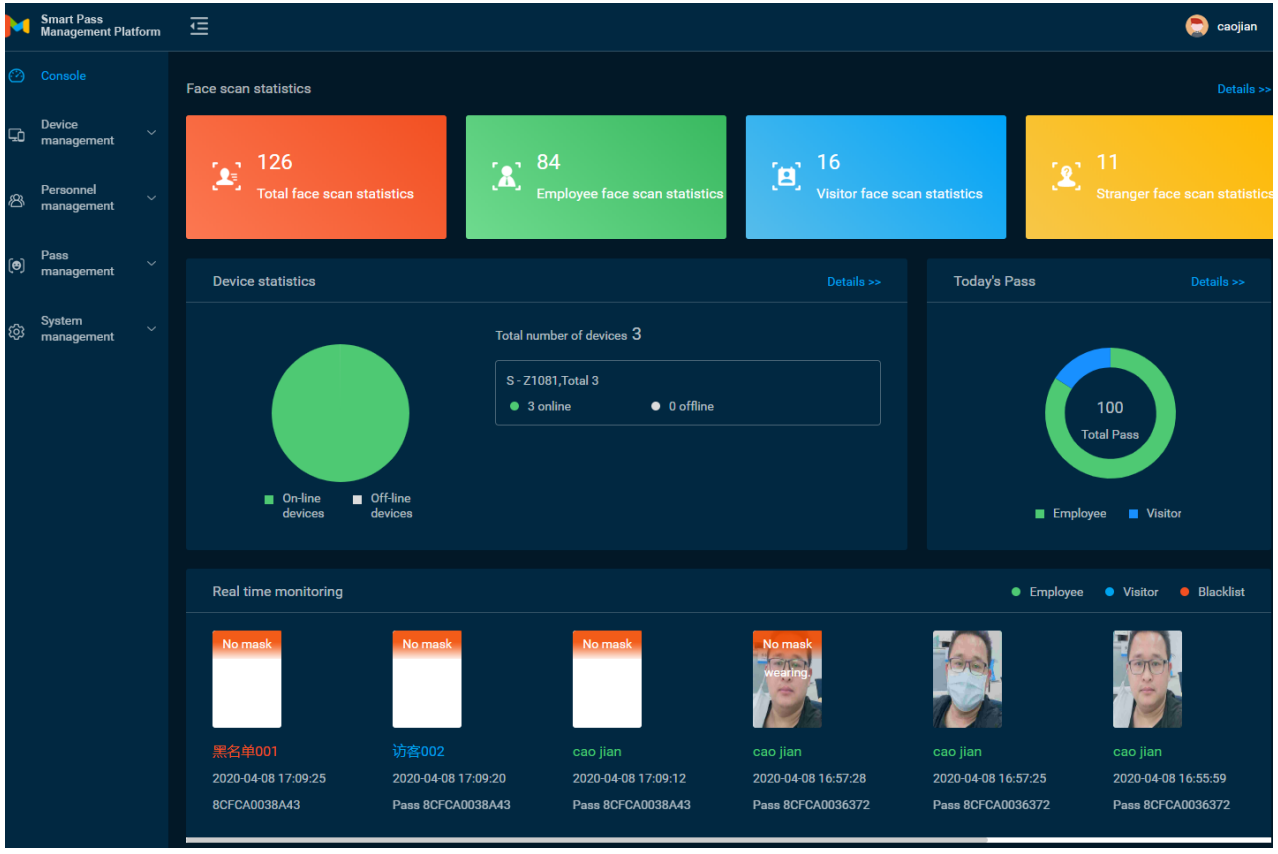
It provides an overview of the number of devices and online status; statistics on the face scan (total face scan, employee face scan, visitor face scan, stranger face scan); today's pass and real-time monitoring (employees, visitors, blacklists, and body temperature); and provides quick access to view details.
Personnel Management
Employee list
The employee list is used to manage employee information, such as viewing, adding, editing, and exporting employee information. Employee information can be added individually or in bulk. The batch adding operation requires information import in bulk first, and then portrait import in bulk.
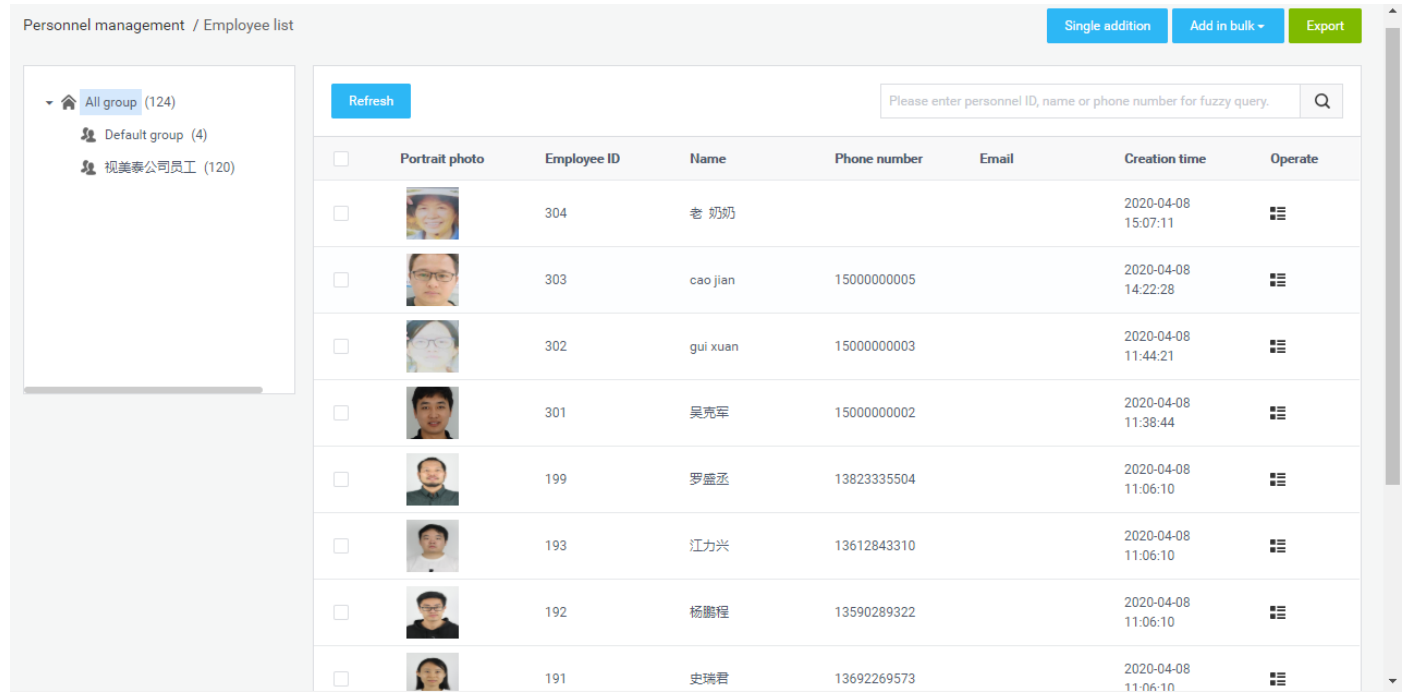
Add employee information individually
- In [Employee list], click the "Single addition" button to enter the employee addition page;
- Fill in the personnel ID, name, gender, belonging group, phone number, ID card number, IC card number, nationality, place of birth, date of birth, contact address and notes. Add a face recognition photo and click "Save" to complete the employee creation operating.
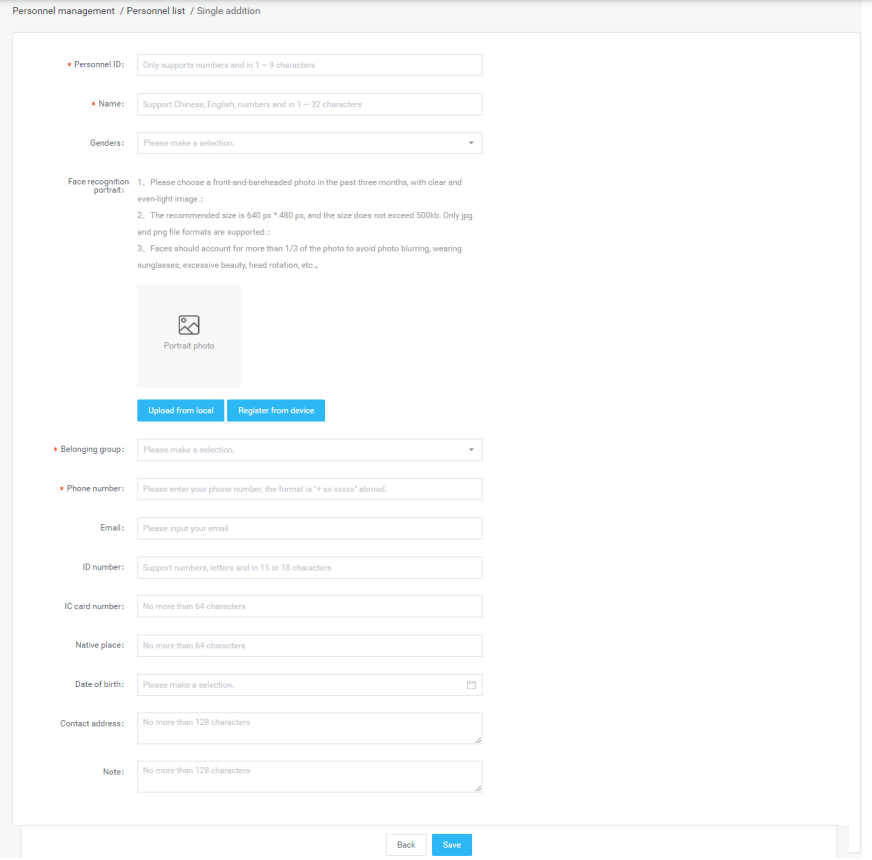
Upload a face recognition photo description
Upload from local
Click "Upload from local" to open the local folder, and select the jpg and png portrait photos in the folder.
Note: Portrait photo specifications
- Please choose a front-and-bareheaded photo from the past three months, with a clear and even-light image.
- The recommended size is 640 px * 480 px, and the size does not exceed 500kb. Only JPG and png files are supported.
- Faces should account for more than 1/3 of the photo, avoiding photo blurring, wearing sunglasses, excessive facial-up, and head rotations.
Register from device
Click "Register from Device" to open the Select Device window and select an online device. Once determined, the device will enter the photo state. After the photo is taken and verified, the photo will be sent back here from the client.
Import employee information in bulk
Steps: In the [Employee list], click the "Add in Bulk - Information Import in Bulk" button.
- The first step, click "Download Template". Download the Excel template file to your computer with the file name "MIPS Personnel Add Template in Bulk.xls". Then fill in the employee information in bulk.
- In the second step, click "Upload Excel file". Select the Excel file with the employee information filled in and upload it. If the file is uploaded successfully, the upload success status and file name will be displayed.
- In the third step, click "Start import". During the import, there will be a progress bar showing "Importing personnel information (1 / total number of people)". After the import is completed, it prompts "Successful batch import of personnel information". After the import is completed, return to the [Person List] to view the imported personnel information.

Description of import method
- Import without overwriting: When importing a file two or more times, duplicate employees are not imported. And the system will prompt abnormal duplicate information.
- Overwrite import: The second import will overwrite the information of the employee that was imported for the first time without prompting for duplicate information.
Description of import failure exception
- The content or format of the uploaded Excel file is incorrect and does not meet the template specifications. Click to start the import, and a prompt will appear: "The file content or format is incorrect. Please fill in the employee information according to the template requirements.
- A field in the employee is malformed or should not be duplicated. After the import fails, the reason for the failure will be notified in a table. After modification, you can re-import.
Import portrait photos in bulk
Steps: In the [Employee list], click the "Add in bulk - Portrait import in bulk".
- Step 1, click "Zip file selection" to open the Select Folder window and select the file upload. After the file upload is successful, the current file storage path is displayed.
- Step 2, click "Start Import", and a progress bar will be displayed during the import: the number of imported files / the total number of folders. And there will be a prompt message: x sheets have been successfully imported, x sheets failed. After the import is complete, the progress bar displays: The portrait photos in this folder have been imported.

Description of portrait import rules:
- [Portrait file naming] The naming of the portrait file needs to correspond to the personnel ID. After the upload is successful, the corresponding person portrait information can be viewed in the person list.
- [Format and size] Only two file formats of jpg and png are supported, and the size of each portrait file must not exceed 500k. Files that do not meet the requirements will not be imported.
- [Portrait Restriction] Faces need to account for more than 1/3 of the photo. Please choose a front-faceless photo in the past three months. The avatar is clear and the light is uniform. Avoid the avatar cannot be used for face recognition.
- [Select Folder Upload] After the above conditions are met, place the named portrait photos in the specified folder and select the folder to import.
Description of failed portrait import
- If the size of an image file does not meet the requirements, the import will fail. After that, a table will appear to display the information of the portrait file that has not been successfully imported. After modification, you can re-import.
Export employee information
- In [Employee list], click the "Export" button to export all employee information in the list to the file "Employee Information.xls" and download it.
Refresh employee information
- In [Employee list], click the "Refresh" button to refresh all employee information in the list to the latest state.
Staff details and editing
Employee details: In [Employee list], after corresponding employee information, click the "Employee details" button, you can enter the details page to view specific employee information.
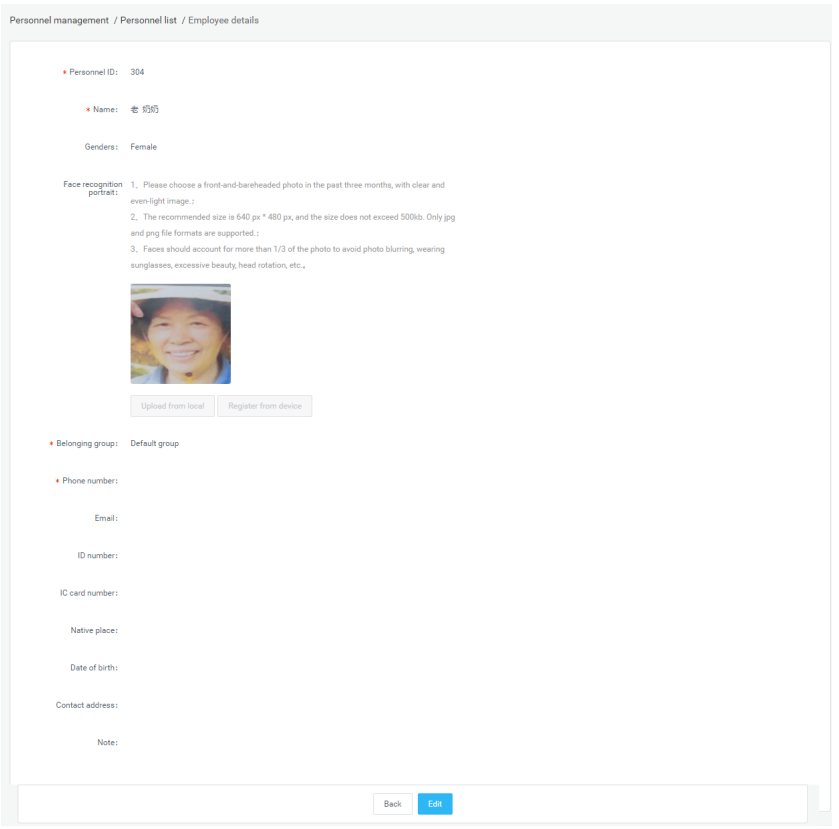
Employee edit: On the details page, click the edit button to modify the employee's basic information and photo information. After modifying the information, click Save.
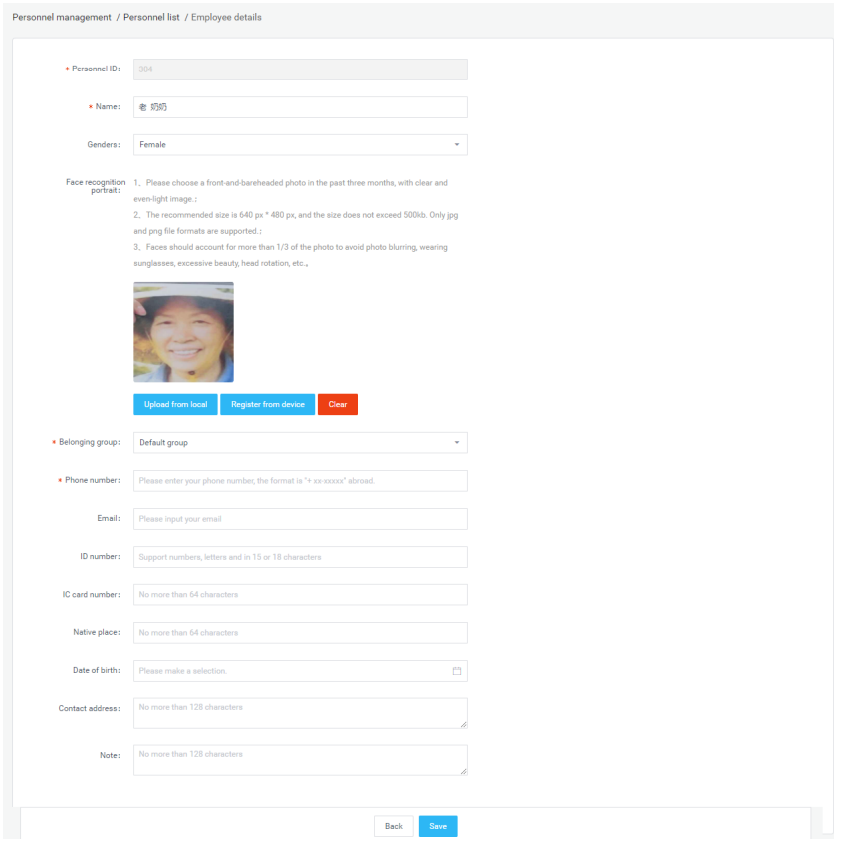
Employee grouping management
Employee grouping uses the organizational structure grouping by default. There is a default employee grouping under each user group. You can add, modify, or delete employee groupings on the user group by yourself. The operation is similar to the user grouping in [Group Structure].
Visitor management
Visitor management is used to view, add, edit, and export visitor information.
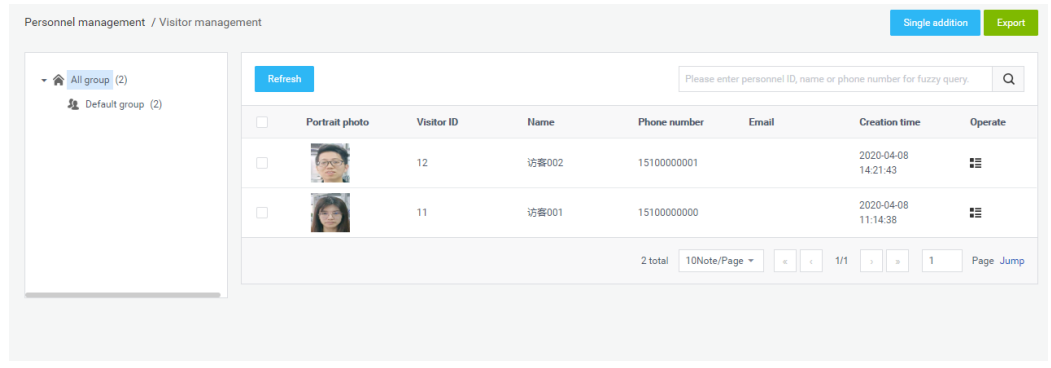
Add visitor individually
- In [Visitor Management], click the "Single Add" button to enter the visitor adding page.
- Fill in the visitor ID, name, gender, affiliation group, mobile phone number, ID card number, IC card number, ethnicity, nationality, date of birth, contact address, and remarks, add face recognition photos, and click "Save" to complete the visitor operating.
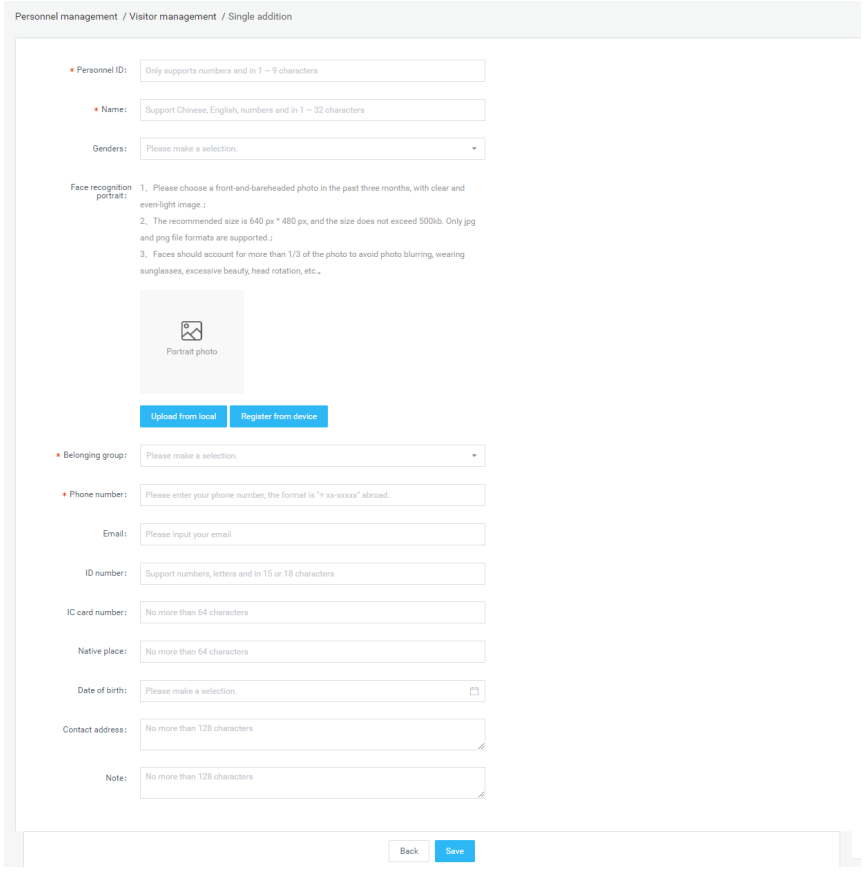
Upload a face recognition photo description
Upload from local
Click "Upload from local" to open the local folder, and select the jpg and png portrait photos in the folder.
Note: Portrait photo specifications
- Please choose a front-and-bareheaded photo from the past three months, with a clear and even-light image.
- The recommended size is 640 px * 480 px, and the size does not exceed 500kb. Only JPG and png files are supported.
- Faces should account for more than 1/3 of the photo, avoiding photo blurring, wearing sunglasses, excessive facial-up, and head rotations.
Register from device
Click "Register from Device" to open the Select Device window and select an online device. Once determined, the device will enter the photo state. After the photo is taken and verified, the photo will be sent back here from the client.
Export visitor information
In [Visitor management], click the "Export" button to export all visitor information in the list to the file "Visitor information.xls" and download it.
Refresh visitor information
In [Visitor management], click the "Refresh" button to refresh all visitor information in the list to the latest state.
Visitor details and editing
Visitor details
In [Visitor management], after corresponding visitor information, click the "Visitor details" button to enter the details page to view specific visitor information.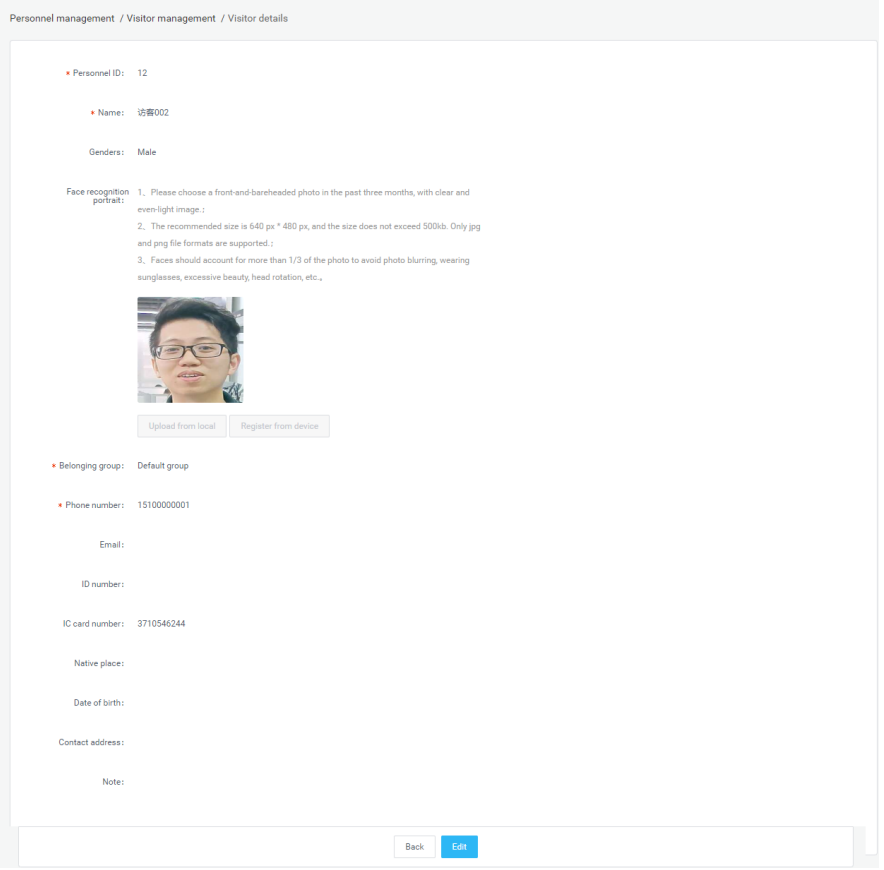
Visitor edit
On the details page, click the edit button to modify the visitor's basic information and photo information. After modifying the information, click Save.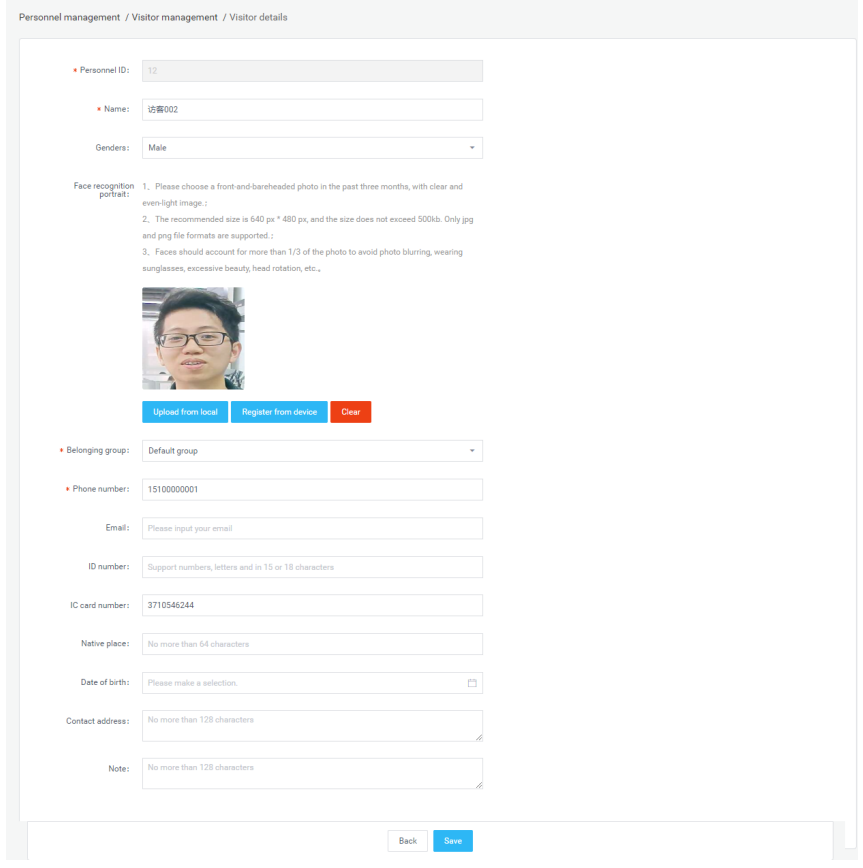
Visitor grouping management
Guest grouping uses the organizational structure grouping by default. Each user group has a default guest grouping, which can add, modify, and delete guest groups on the user grouping. The operation is similar to the user grouping in the [Group structure], which is not described in detail.
Blacklist management
Blacklist management is used to view, add, edit, and export blacklist information.
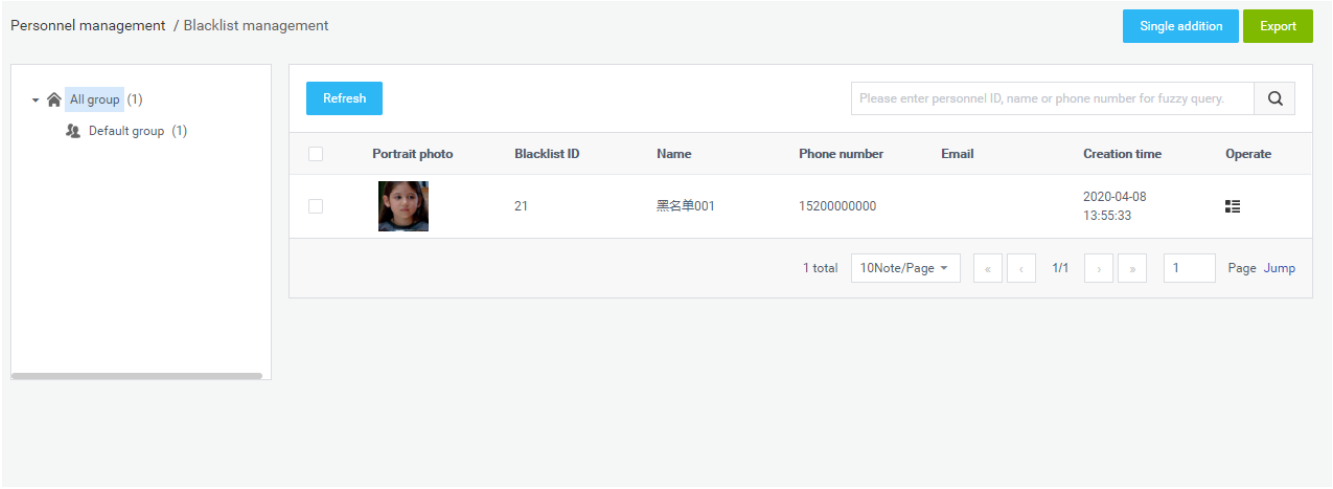
Add blacklist individually
- In [Blacklist management], click the "Single Add" button to enter the blacklist addition page.
- Fill in the blacklist ID, name, gender, belonging group, phone number, ID card number, IC card number, ethnicity, birthplace, date of birth, contact address and remarks. Add face recognition photos and click "Save" to complete the blacklist create operation.
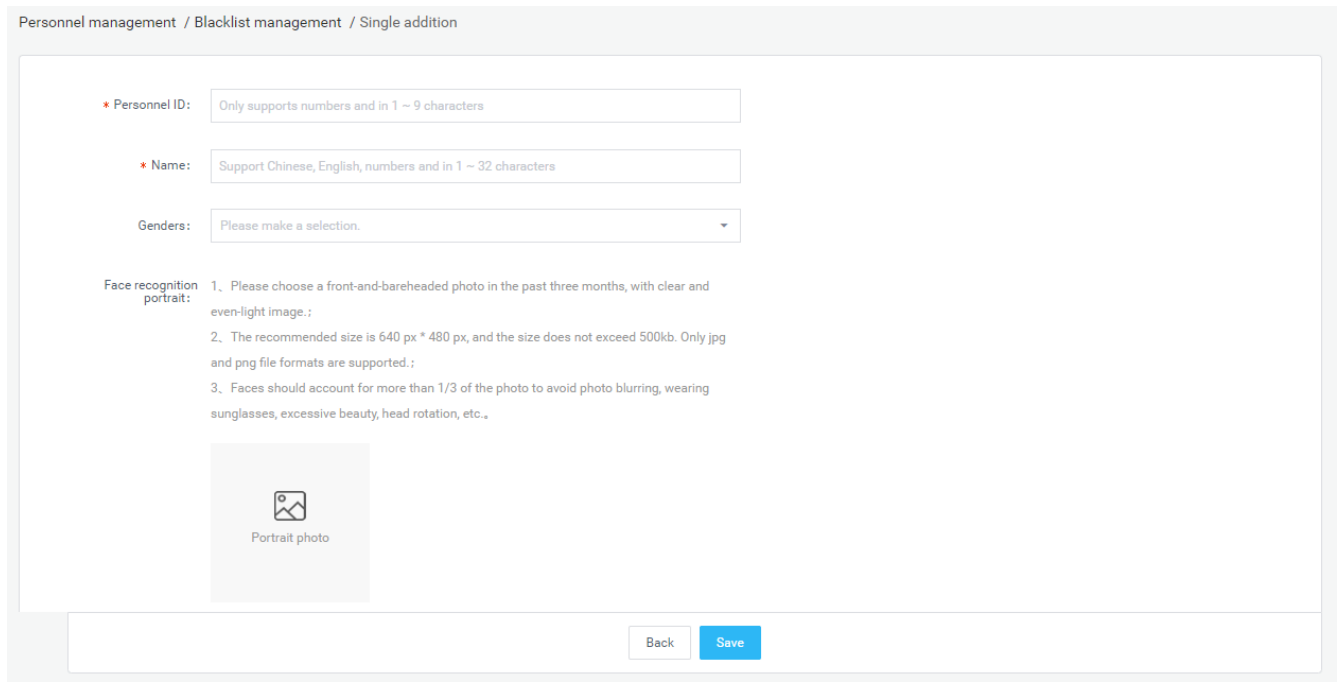
Upload a face recognition photo description
Upload from local
Click "Upload from local" to open the local folder, and select the jpg and png portrait photos in the folder.
Note: Portrait photo specifications
- Please choose a front-and-bareheaded photo from the past three months, with a clear and even-light image.
- The recommended size is 640 px * 480 px, and the size does not exceed 500kb. Only JPG and png files are supported.
- Faces should account for more than 1/3 of the photo, avoiding photo blurring, wearing sunglasses, excessive facial-up, and head rotations.
Export blacklist
In [Blacklist management], click the "Export" button to export all the blacklist information in the list to the file "Blacklist information.xls" and download it.
Refresh blacklist information
In [Blacklist management], click the "Refresh" button to refresh all the blacklist information in the list to the latest state.
Blacklist details and editing
- Blacklist details
In [Blacklist management], after corresponding to the blacklist information, click the "Blacklist details" button to enter the details page to view the specific blacklist information.
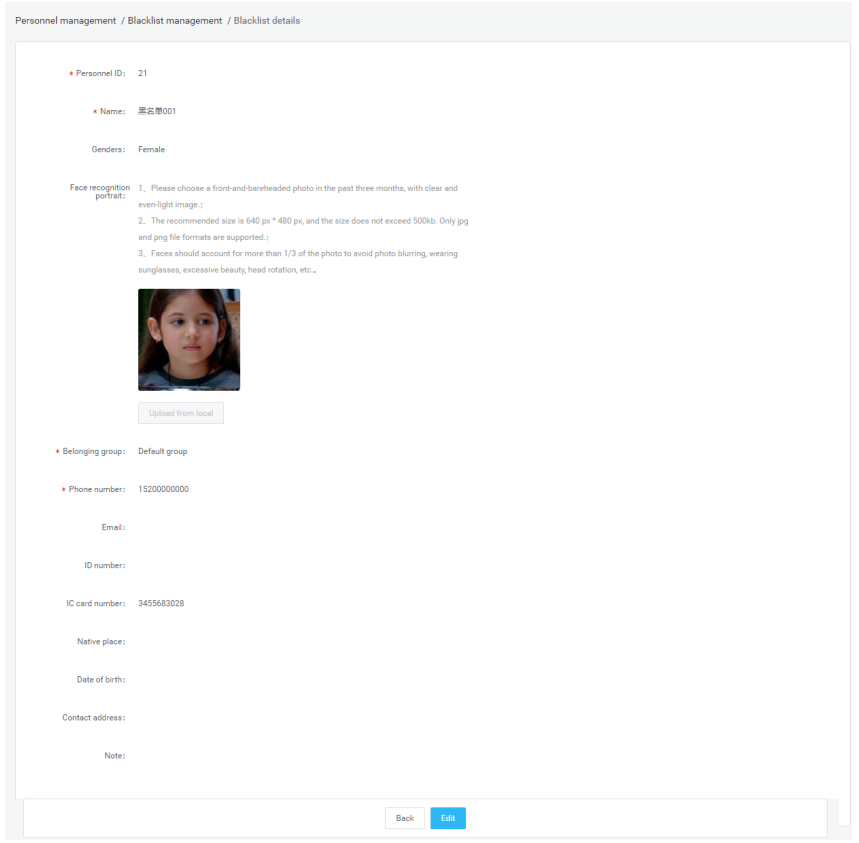
Blacklist edit
On the details page, click the edit button to modify the basic information and photo information of the blacklist. After modifying the information, click Save.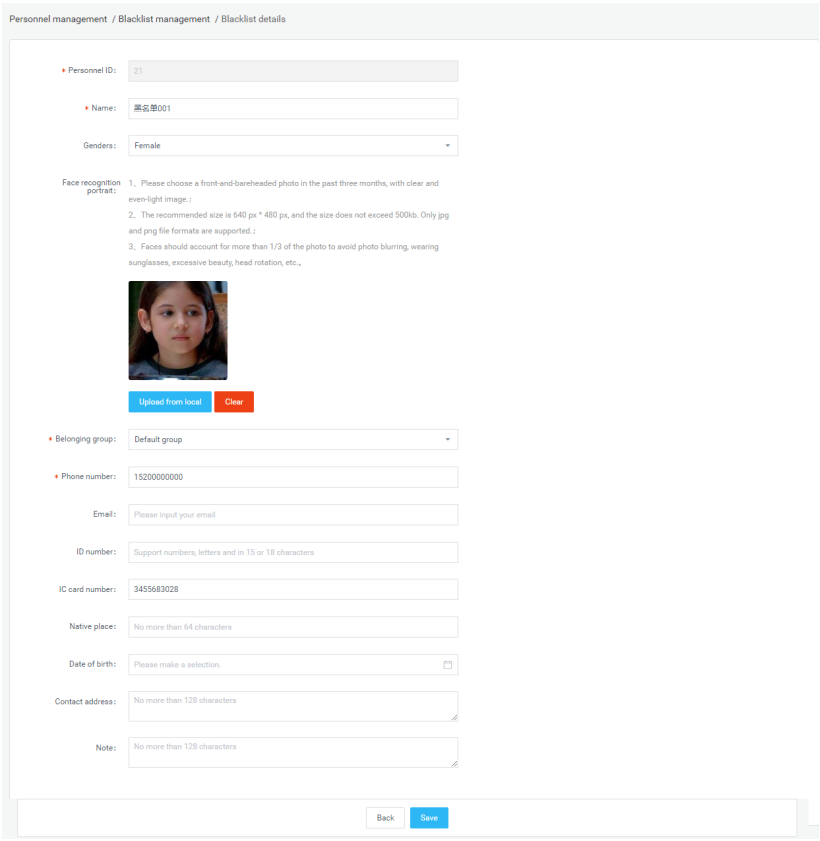
Blacklist grouping management
The blacklist group uses the organizational structure group by default. Each user group has a default blacklist group. You can add, modify, and delete blacklist groups on the user group. The operation is similar to the user grouping in [Group Structure].
Setup Guide
Setting up the Smart-pass MIPS Management Platform YXD-f8 is a straightforward process:
- Install the Smart-pass MIPS Management Platform software on a server or virtual machine.
- Configure the platform by adding MIPS systems and setting up access controls and security features.
- Connect to the platform using a web browser or the Smart-pass MIPS Management Platform mobile app.
- Start monitoring and managing MIPS systems using the platform's centralized dashboard.
System Management
Group structure
The module is used to manage the group structure and enterprise user information management in the enterprise. The hierarchical relationship is created and managed by admin or enterprise administrator.
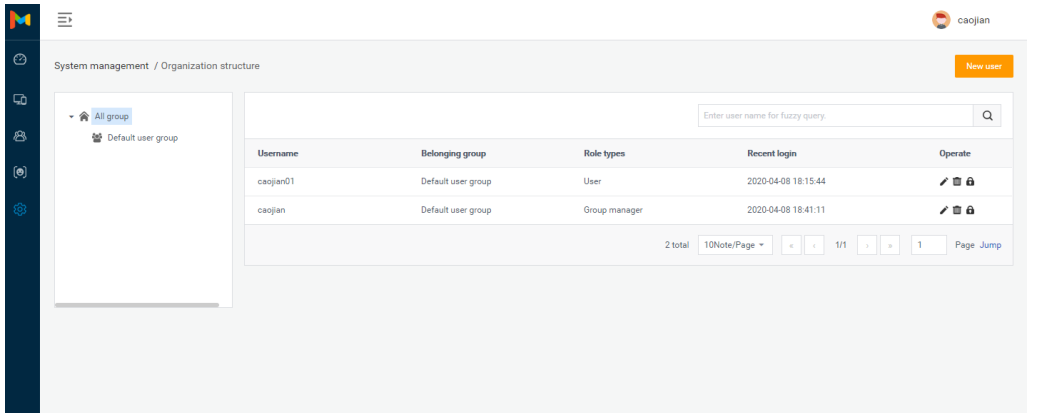
Attribution of business data
- Various business data generated by enterprise users will only be stored under the group structure group in the enterprise where they belong, and all business modules in the enterprise are grouped using the same group structure.
- In the same enterprise organization structure, users at a high level can access business data in a low-level structure. Conversely, low-level users cannot access high-level business data, and other companies cannot access these data.
- In the same enterprise group structure, business data between groups is visible within the group.
- An enterprise administrator can manage all business data in the organization structure of the enterprise, but cannot access data of other enterprises.
Group management
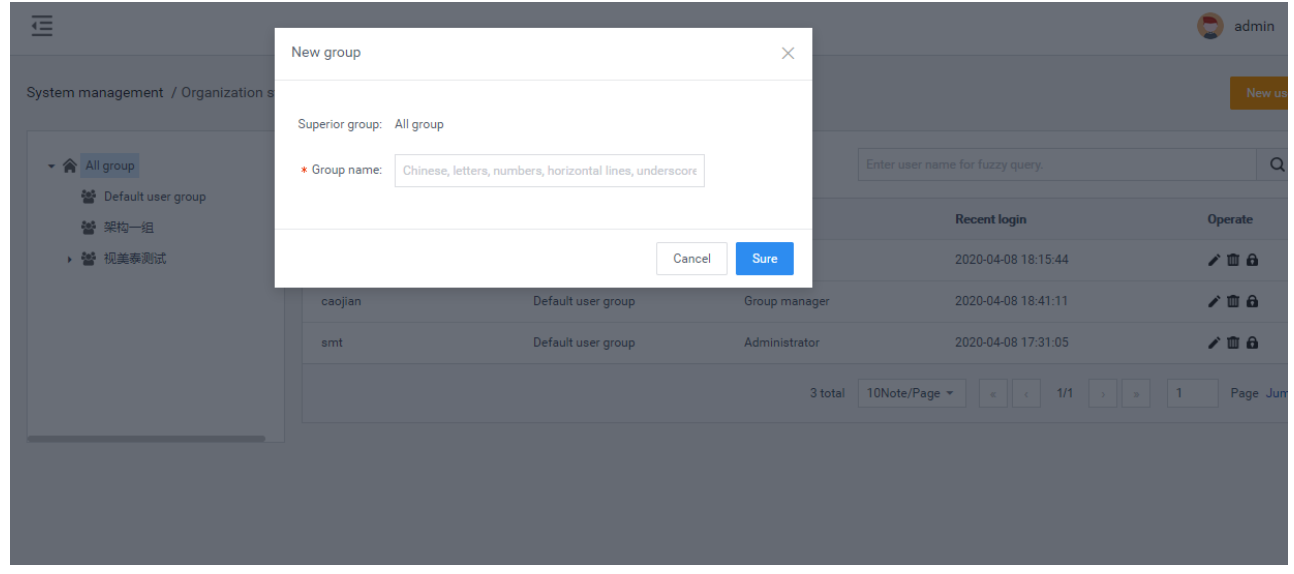
Create a group: select a group and click to enter the [New Group] page. On this page, you only need to fill in the group name and save it。
- Modify and delete operations: (omitted)
Group permission description: visible in the default group
User management
User creation
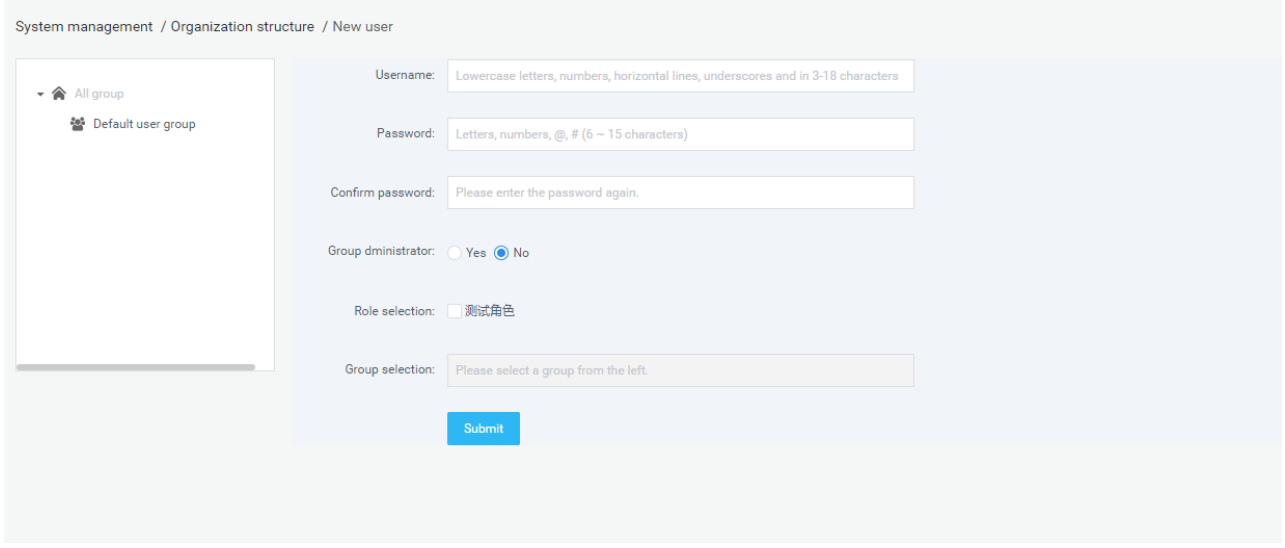
Click "Add User" to enter the [Add User] page. Select the group; fill in the user name and password; after confirming the password, group administrator, and role, click "Submit", as shown below:
Note: By default, it is a normal user. After selecting a normal user, you need to select a role; if you select an administrator, you do not need to select a role to have all the permissions under this group.
- Modify, query, and delete operations: (omitted)
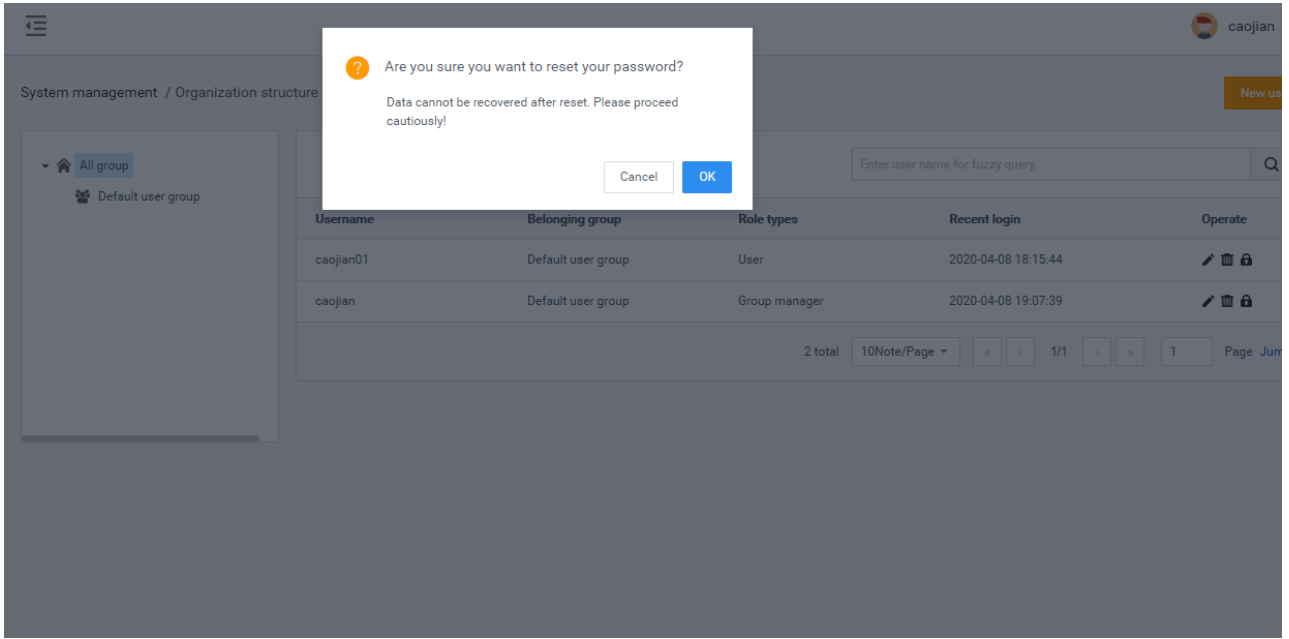
User password modification: Note that only administrators (admin or company administrators) can reset passwords for users in the group. Reset the password to 123456.
Role management
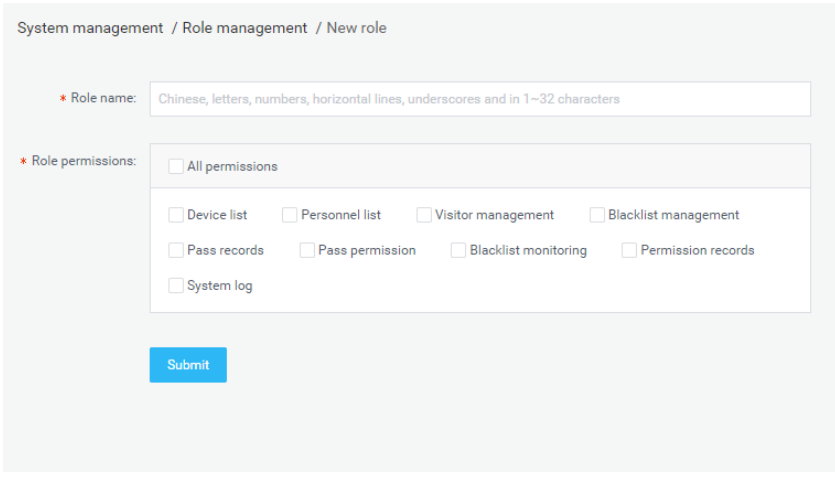
It is used to create and manage roles. Roles are used to control various business function modules and function operations of users in the system. It is composed of different function operation rights.
Description of roles
Each enterprise can create one or more roles with different permission scopes, which are used to perform different functions for different users in the enterprise group structure.
TIP: Role information is independent between enterprises and cannot be accessed by each other.
Note: The role of the admin is the system super administrator, which can manage all the functional modules and business data in the system. Among them, the functions of [System Settings] and [Enterprise Management] can only be managed by admin users, other users cannot see these two modules, including enterprise administrator users.
Role creation
Go to [Permission Management]-[Role Management], and click the "Add Role" button to enter the [Add Role] page.
Business management
The module can only be operated by the super administrator and is used to create and manage enterprise accounts in the system. Each corporate account has corporate administrator rights and can be used to log in to the system. After logging in to the system, the account can manage the organizational structure, users, and roles within the enterprise, and can view and manage all business data created by the enterprise users. But there is no operation authority for the [System Settings] and [Enterprise Management] functions, nor can you see the data of other enterprise users.
Super administrators can create, modify, query, and delete enterprises, as shown in the following figure:
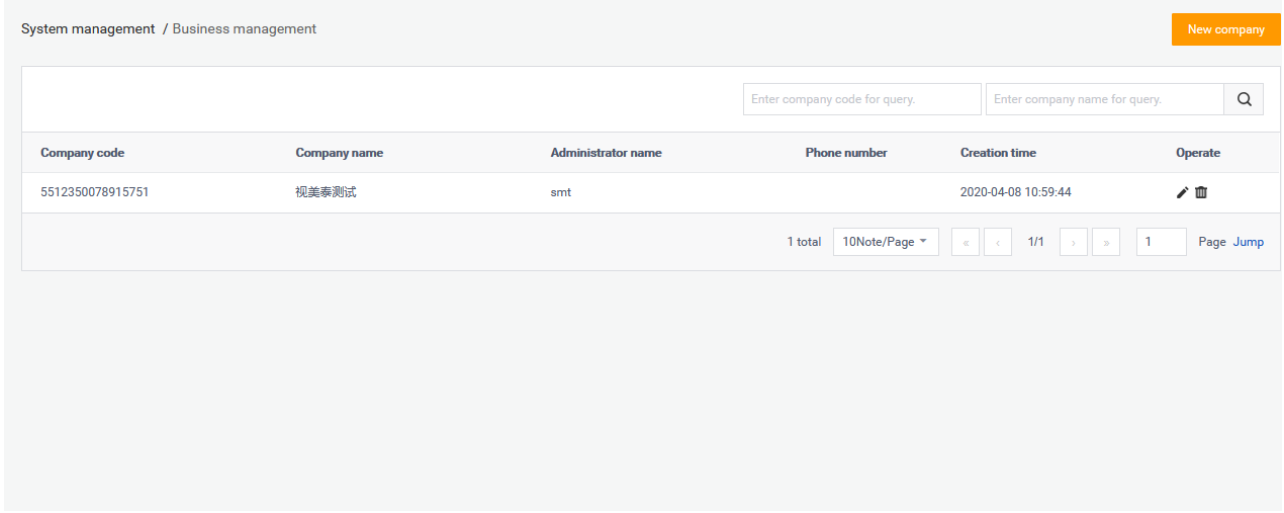
Note: Enterprise delete operation is supported. After deleting an enterprise, all data associated with the enterprise will be deleted, and the devices under the enterprise will belong to the admin default group.
System log
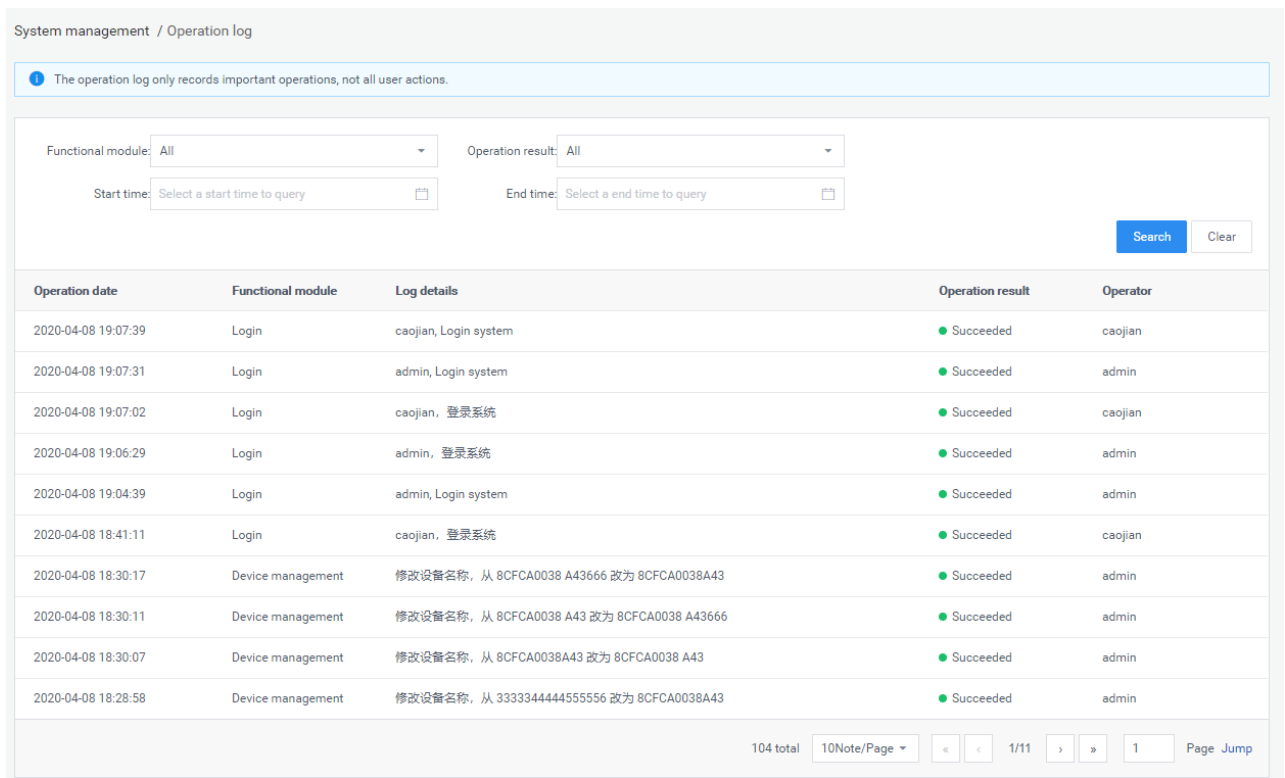
The system log list on the page contains the user's operation date, function modules, log details, operation results, operator, and other information records during the use of the system.
System setting
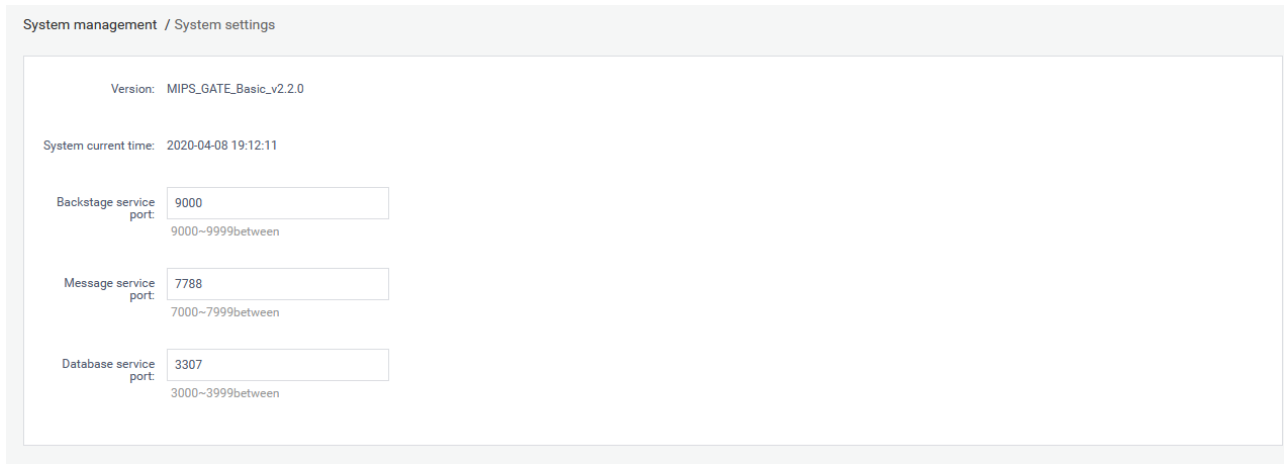
The system settings provide several functions such as "background server port", "message service port" and "database service port configuration".
- Support web service port configurable: background service port can be configured (between 9000-9999), the default is 9000; message service port can be configured (between 7000-7999), the default is 7788; database service port can be configured (Between 3000-3999), the default value is 3306, after setting, you need to restart the background to take effect.
后台支持系统当前时间显示;
Troubleshooting
Common issues with the Smart-pass MIPS Management Platform YXD-f8 include:
- Connectivity issues: Check that the platform is correctly configured and that the server or virtual machine is running.
- Performance issues: Check that the server or virtual machine has sufficient resources, such as CPU, memory, and storage, to support the platform and MIPS systems.
- Security issues: Ensure that access controls and security features are correctly configured and up-to-date.
- Compatibility issues: Ensure that the platform is compatible with the MIPS systems being managed.
Smart-pass MIPS Management Platform YXD-f8 Pros & Cons
Pros
- Centralized management dashboard for all MIPS systems.
- Advanced security features to ensure data confidentiality and integrity.
- Real-time analytics and automated alerts for quick issue identification and resolution.
- Integration with third-party tools and systems for added functionality.
Cons
- Higher cost compared to basic MIPS management tools.
- Requires a server or virtual machine to run the platform software.
- May require technical expertise to configure and manage the platform.
Customer Reviews
"Smart-pass MIPS Management Platform YXD-f8 is a game-changer for managing our MIPS systems. The centralized dashboard and real-time analytics have saved us countless hours of manual monitoring and issue identification. The advanced security features also give us peace of mind knowing that our data is secure." - IT Manager, Large Enterprise
"The Smart-pass MIPS Management Platform YXD-f8 is easy to use and set up, even for non-technical users. The automated alerts and notifications have been a lifesaver for identifying and resolving issues before they become critical." - System Administrator, Small Business
Faqs
What does the Smart-pass MIPS Management Platform YXD-f8 entail?
Which sectors stand to gain from the Smart-pass?
In what ways is access control managed by Smart-pass MIPS?
Is it possible for Smart-pass MIPS Management Platform YXD-f8 to work with current security systems?
Does the Smart-pass MIPS platform run on-premises or in the cloud?
Which kinds of identification techniques is Smart-pass compatible with?
How is the Smart-pass MIPS platform's user data secured?
In what ways does YXD-f8 respond to crises?
Leave a Comment
