Spalding Portable Basketball System M7B61E00 User Guide
Content
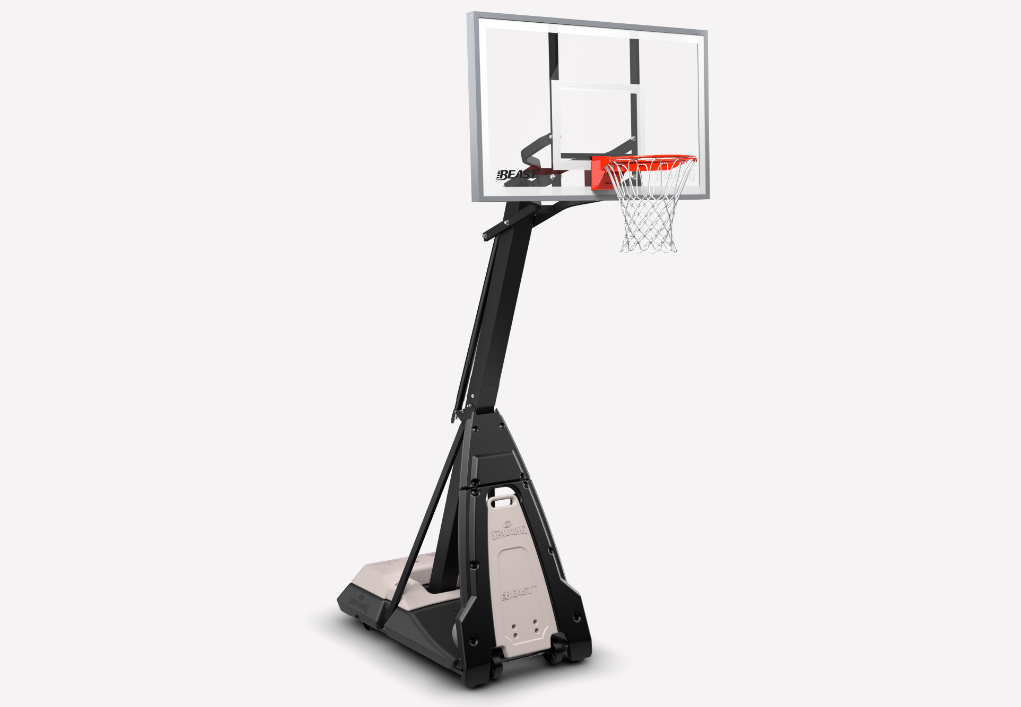
Introduction Spalding Portable Basketball System M7B61E00
The Spalding Portable Basketball System M7B61E00 is a high-quality, adjustable hoop designed for both recreational and competitive play. Featuring a 54-inch acrylic backboard, it includes an Arena Slam breakaway rim and a sturdy 3.5-inch steel pole that can be adjusted from 7.5 to 10 feet. The base is designed for stability, holding up to 19 gallons of water or sand. This portable system is priced at approximately $1,299.99, making it a premium choice for basketball enthusiasts.
Parts List
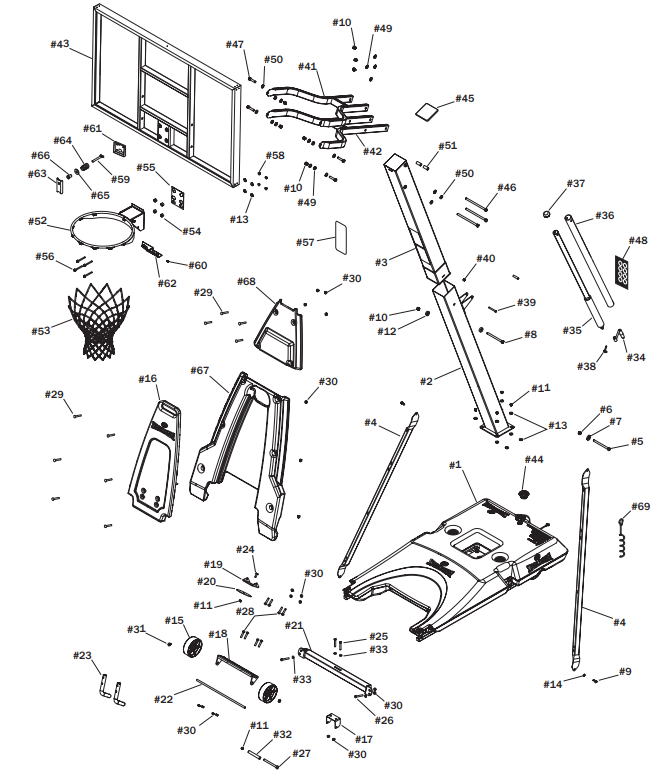
Item | Qty | Part No . | Description |
1 | 1 | 700376 | Base |
2 | 1 | 901329 | Bottom PoleSection |
3 | 1 | 901330 | Top PoleSection |
4 | 2 | 908459 | Strut, Front |
5 | 1 | 202662 | Bolt, Hex Head,5/16-18 x 4.5” Long |
6 | 1 | 207610 | Nut, Acorn,5/16-18 |
7 | 2 | 203218 | Washer, Flat,5/16 |
8 | 1 | 265525 | Bolt, Hex Head, 1/2-13x 6” Long |
9 | 2 | 265523 | Bolt, HexHead, 3/8-16 x 1” Long |
10 | 8 | 206340 | Lock-nut, NylonInsert, 1/2-13 |
11 | 6 | 203063 | Lock-nut, NylonInsert, 3/8-16 |
12 | 2 | 201642 | Plastic Spacer, 0.53”ID x 0.63” Long, Black |
13 | 12 | 203309 | Washer, Flat,3/8 |
14 | 2 | 202602 | Lock-washer, 3/8 |
15 | 2 | 600074 | Wheel, 6” |
16 | 1 | 60007901 | Transport Handle,Plastic |
17 | 1 | 800373 | U-Bracket, Pivot |
18 | 1 | 908466 | Bracket, Wheel |
19 | 1 | 206948 | Bracket, Pivot,Lower |
20 | 1 | 206956 | Disk, Pivot,Plastic |
21 | 1 | 908513 | Cross Member |
22 | 1 | 20694001 | Axle, Rod,20.5” L |
23 | 2 | 908460 | Tube, Hinge |
24 | 1 | 206252 | Bolt, HexHead, 3/8-16 x 1” Long |
25 | 2 | 265563 | Bolt, Hex Head,3/8-16 x 2.5” Long |
26 | 2 | 200514 | Bolt, HexHead, 3/8-16 x 3” Long |
27 | 1 | 203330 | Bolt, Hex Head,3/8-16 x 4.5” Long |
28 | 8 | 203277 | Bolt, Carriage, 3/8-16 x 2” Long |
29 | 10 | 206011 | Bolt, Carriage, 3/8-16x 2.75” Long |
30 | 22 | 203041 | Nut, Hex-Flange, 3/8-16 |
31 | 2 | 207550 | Axle Nut |
32 | 1 | 202274 | Spacer, 0.379 I.D. x 3.5” Long |
33 | 4 | 203299 | Washer, Flat, 3/8 |
34 | 1 | 700009 | Handle, Screw-Jack |
35 | 1 | 80034403 | Screw Jack |
36 | 1 | 60016401 | Sleeve, Screw Jack |
37 | 1 | 600165 | Cap, Screw Jack |
38 | 1 | 202528 | Pin, Handle |
39 | 1 | 201518 | Bolt, Hex-Head, 5/16-18 x 2.75” Long |
40 | 1 | 203099 | Lock-Nut, Nylon Insert, 5/16-18 |
41 | 1 | 901332 | Elevator Tube, Upper |
42 | 1 | 901331 | Elevator Tube, Lower |
43 | 1 | Backboard | |
44 | 1 | 266300 | Base Cap |
45 | 1 | 600052 | Pole Cap |
46 | 3 | 250010 | Bolt, Hex-Head, 1/2-13x 7.5” Long |
47 | 4 | 207885 | Bolt, Hex-Head, 1/2-13x 2.50” Long |
48 | 1 | 204872 | Label, Height Indicator |
49 | 8 | 201651 | Bushing, Plastic, 0.50”I.D. x 0.25” Long |
50 | 14 | 203474 | Washer, Flat, 1.08” O.D. |
51 | 2 | 202862 | Spacer, 0.53” ID x 1.19”Long, Plastic, Black |
52 | 1 | Rim | |
53 | 1 | Net | |
54 | 4 | 208481 | Spacer, Steel 0.50”I.D.x 0.875”O.D.x 0.465” Long |
55 | 1 | 203274 | Pad, Foam |
56 | 4 | 201611 | Bolt, Hex-Flange, 5/16-18x 3” Long |
57 | 1 | 574090 | Label, Height Adjustment and Moving |
58 | 4 | 203100 | Nut, Hex-Flange, 5/16-18 |
59 | 1 | 206048 | T-Bolt 3/8-16x 3” Long |
60 | 2 | 204558 | Screw, SelfTapping, 1/4 |
61 | 1 | 900033 | Rim Bracket, Black |
62 | 1 | Rim Cover |
63 | 1 | 200318 | Spring Bracket, Zinc |
64 | 1 | 208760 | Spring |
65 | 1 | 203470 | Washer, 9/16” |
66 | 1 | 203795 | Hex Nut, 3/8-18 |
67 | 1 | 600077 | Stadium Pad, Bottom |
68 | 1 | 600078 | Stadium Pad, Top |
69 | 1 | 203124 | Ground Stake |
Detailed Specifications
The Spalding Portable Basketball System M7B61E00 comes with several key features that make it an attractive choice:
- Adjustable Height: The system allows for height adjustments from 7.5 to 10 feet, making it suitable for players of all ages and skill levels.
- 52-Inch Glass Backboard: A durable and high-quality backboard that provides excellent rebounding.
- Pro-Style Breakaway Rim: Designed to withstand heavy use and provides a professional playing experience. Filled with sand or water, this base ensures stability without being too heavy to move.
- Easy Assembly: The system is designed for quick and easy setup, requiring minimal tools.
Before You Begin
READ AND UNDERSTAND THE OPERATOR’S MANUAL BEFORE USING THIS UNIT.
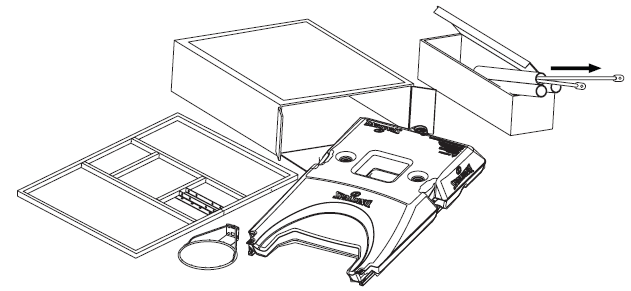
- Remove ALL contents from boxes.
- Be sure to check INSIDE pole sections; hardware and additional parts are packed inside.
- This manual, accompanied by a sales receipt, should be saved and kept on hand as a convenient reference, as it contains important information about your model.
WARNING
FAILURE TO FOLLOW OPERATING INSTRUCTIONS COULD RESULT IN INJURY OR PROPERTY DAMAGE.
Safety Information
WARNING
FAILURE TO FOLLOW THESE SAFETY INSTRUCTIONS MAY RESULT IN SERIOUS INJURY OR PROPERTY DAMAGE AND WILL VOID THE WARRANTY.
Owner must ensure all players know and follow these rules for safe operation of the system.
To ensure safety, do not attempt to assemble this system without following the instructions carefully. Check the entire box and inside all of the packing material for parts and/or additional instruction material. Before beginning assembly, read the instructions and identify parts using the hardware identifier and parts list in this document. Proper and complete assembly, use, and supervision are essential for proper operation and to reduce the risk of accident or injury. A high probability of serious injury exists if this system is not installed, maintained, and operated properly.
- If using a ladder during assembly, use extreme caution.
- Check the base regularly for leakage. Slow leaks could cause the system to tip over unexpectedly.
- Seat the pole sections properly (if applicable). Failure to do so could allow the pole sections to separate during play and/or during transport of the system.
- Climate, corrosion, or misuse could result in system failure.
- If technical assistance is required, contact Customer Service.
- Minimum operational height is 6'-6" (1.98 m) to the bottom of backboard.
Most injuries are caused by misuse and/or not following instructions. Use caution when using this unit.
NOTICE
- Adult assembly required.
- Dispose of ALL packaging materials promptly.
- As with all products, periodically inspect for loose, small parts.
- Assembled unit MUST be filled with sand or water at ALL times.
- ALL basketball systems, including those used for DISPLAYS, MUST be assembled and installed according to instructions.
- Failure to follow instructions could result in SERIOUS INJURY.
- It is NOT acceptable to devise a makeshift support system.
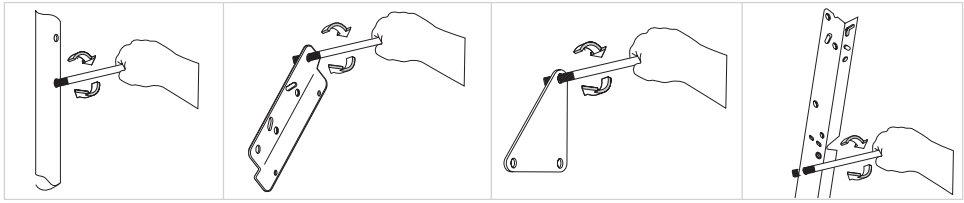
Test-Fit Close Tolerance Bolts
To ensure optimal playability of the backboard system, a close tolerance fit between the elevator components and hardware is required. Test-fit large bolts into large holes of elevator tubes, backboard brackets, and triangle plates. Carefully rock them in a circular motion to remove any excess paint from holes, if necessary
NOTE
Not all items pictured are included with every model.
Package Contents
Check the contents of each kit and other parts to ensure that all components are present. Keep the kit hardware in the labeled bag as they will be used in different assembly steps.
BASE ASSEMBLY
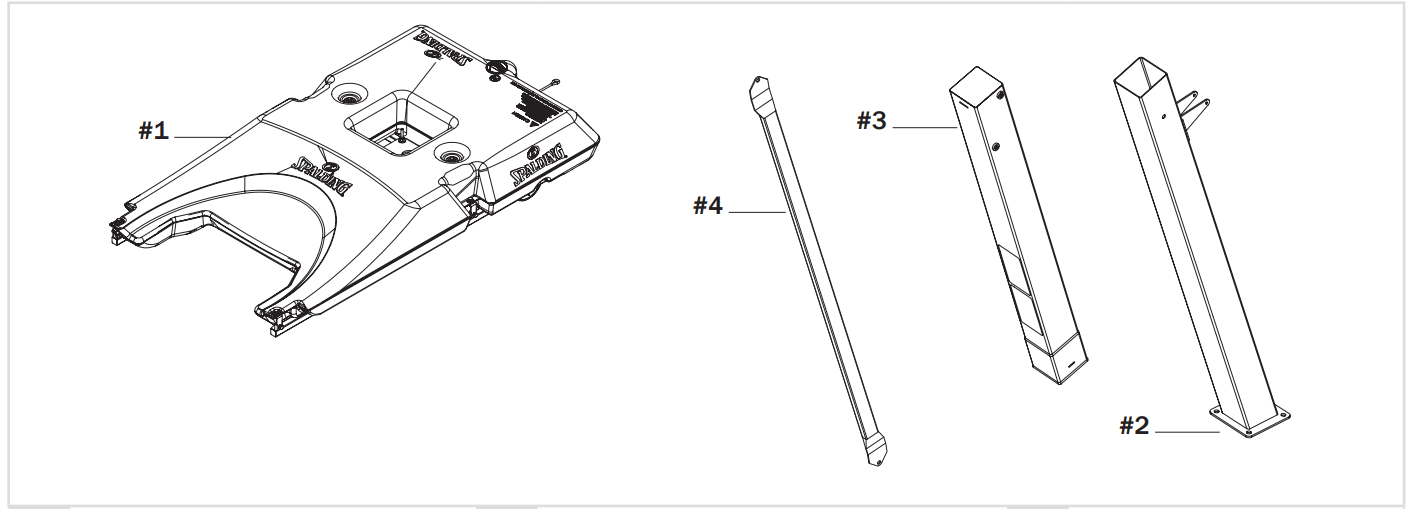
1 | Base (x1) | 2 | Bottom Pole Section (x1) | 3 | TopPole Section (x1) |
4 | 4 Strut, Front (x2) | ||||
KIT 1 – 208745

5 | Bolt, Hex Head, 5/16-18 x 4.5" Long(x1) | 6 | Nut, Acorn, 5/16-18 (x1) | 7 | Washer, Flat, 5/16 (x2) |
KIT 2 – BASE ASSEMBLY – BA00003

8 | Bolt,Hex Head, 1/2-13 x 6" Long (x1) |
9 |
Bolt, Hex Head, 3/8-16 x 1" Long (x2) |
10 |
Lock-nut, Nylon Insert, 1/2-13 (x1) |
11 | Lock-nut, Nylon Insert, 3/8-16 (x4) |
12 | Plastic Spacer, 0.53" ID x 0.63" Long, Black (x2) |
13 |
Washer, Flat, 3/8 (x8) |
14 | Lock-washer, 3/8 (x2) | ||||
WHEEL TO BASE ASSEMBLY
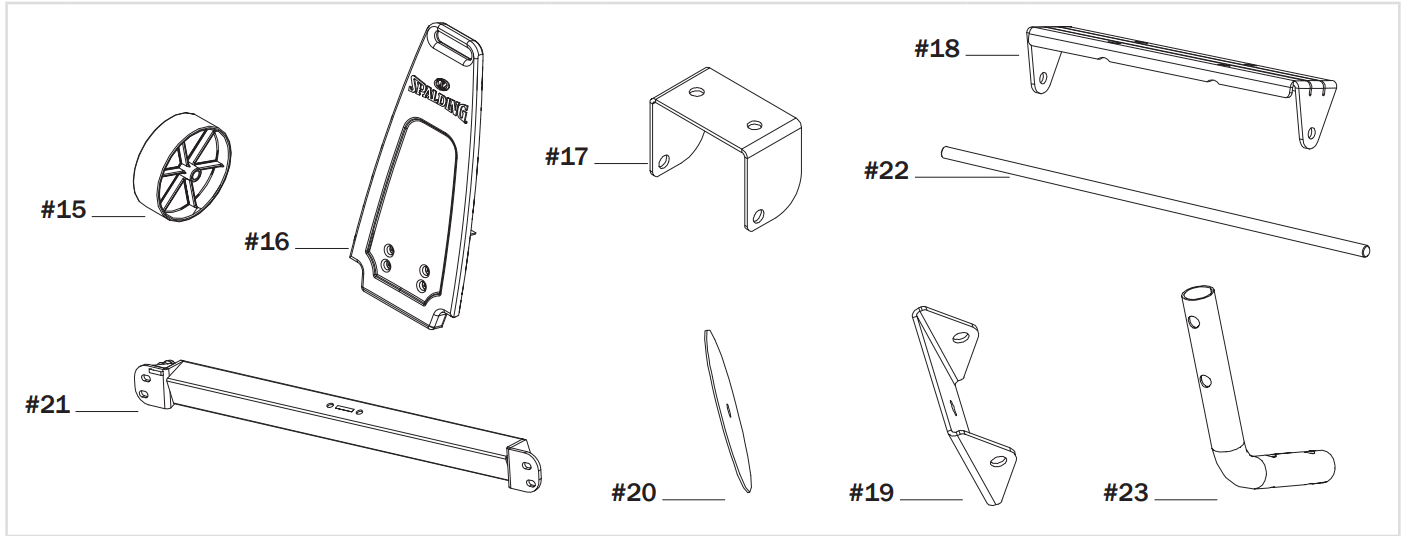
15 | Wheel, 6” (x2) | 16 | Transport Handle, Plastic (x1) | 17 | U-Bracket, Pivot (x1) |
18 | Bracket, Wheel (x1) | 19 | Bracket, Pivot, Lower (x1) | 20 | Disk, Pivot, Plastic (x1) |
21 | Cross Member (x1) | 22 | Axle, Rod, 20.5” Long (x1) | 23 | Tube, Hinge (x2) |
KIT 3 – WHEEL ASSEMBLY – BA00005

11 | Lock-nut, Nylon Insert, 3/8-16 (x2) |
24 |
Bolt, Hex Head, 3/8-16x1L (x1) |
25 |
Bolt, Hex Head, 3/8-16x2.5L (x2) |
26 | Bolt, Hex Head,3/8-16 x 3” Long (x2) |
27 |
Bolt, Hex Head, 3/8-16x4.5L (x1) |
28 |
Bolt, Carriage, 3/8-16 x 2 (x8) |
30 | Nut, Hex-Flange, 3/8-16 (x12) | 31 | Axle Nut (x2) | 32 | Spacer, 0.379IDx0.5ODx3.5L (x1) |
33 | Washer, 3/8 Flat (x4) | ||||
ELEVATOR ASSEMBLY
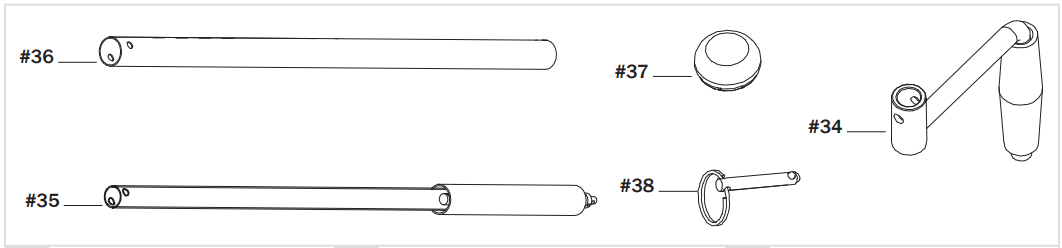
Handle, Screw-Jack (x1) | 35 | Screw Jack (x1) | 36 | Sleeve, Screw Jack (x1) |
Cap, Screw Jack (x1) | 38 | Pin, Handle (x1) | ||
KIT 4 – ELEVATOR TO POLE ASSEMBLY – EL00002

39 | Bolt, Hex-Head, 5/16-18x2.75L (x1) | 40 | Lock-Nut, Nylon Insert, 5/16-18 (x1) |
BACKBOARD ASSEMBLY
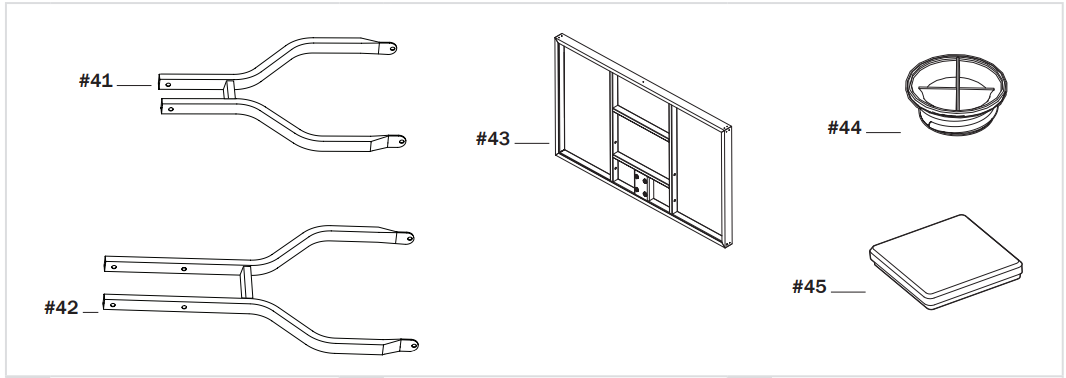
Elevator Tube, Upper (x1) | 42 | Elevator Tube, Lower (x1) | 43 | Backboard (x1) |
Base Cap (x1) | 45 | Pole Cap (x1) | ||
KIT 5 – BACKBOARD – AR00003

Lock-nut, Nylon Insert, 1/2-13 (x7) |
46 | Bolt,Hex-Head, 1/2-13 x 7.5” Long (x3) |
47 | Bolt,Hex-Head, 1/2-13 x 2.50” Long (x4) |
Bushing, Plastic, 0.50” I.D. x 0.25” Long (x8) |
50 |
Washer, Flat, 1.08” O.D. (x14) |
51 | Spacer, 0.53” ID x 1.19” Long, Plastic, Black (x2) |
GOAL ASSEMBLY
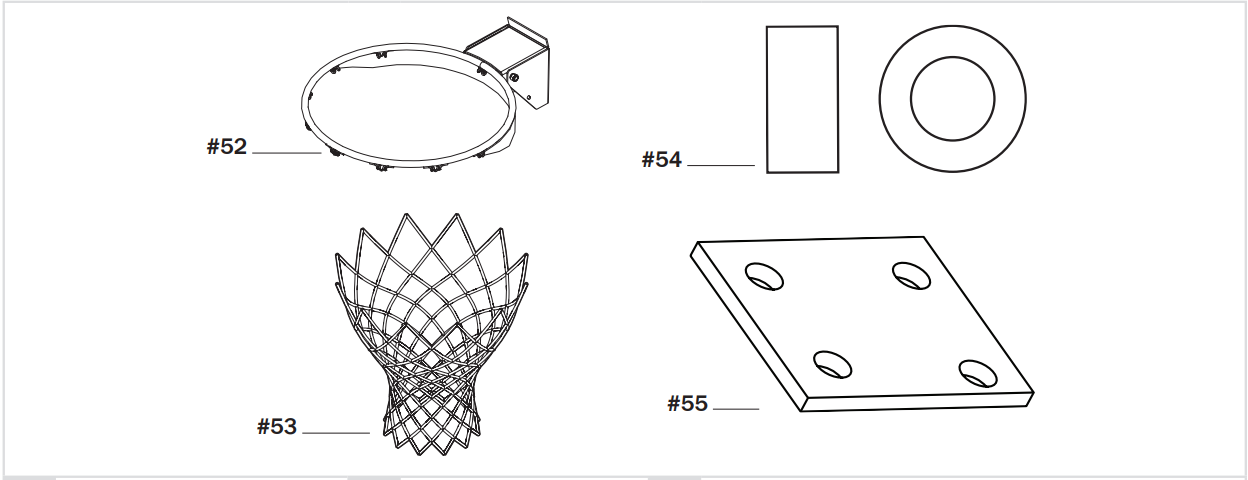
52 | Rim(x1) | 53 | Net (x1) | 54 | Spacer, Steel 0.50” I.D.x 0.875”O.D.x 0.465”Long (x4) |
55 | Pad Foam (x1) | ||||
KIT 6 – GOAL – 222700

13 | Washer, Flat, 3/8 (x4) | 56 | Bolt, Hex-Flange, 5/16-18x3L (x4) | 58 | Nut, Hex-Flange, 5/16-18 (x4) |
KIT 7 – GOAL – 26809003

T-Bolt 3/8-16 x 3” Long (x1) | 60 | Screw, Self Tapping, 1/4” (x2) | 61 | Rim Bracket, Black (x1) |
RimCover (x1) | 63 | Spring Bracket, Zinc (x1) | 64 | Spring (x1) |
Washer, 9/16” (1) | 66 | Ground Stake (x1) | ||
KIT 8 – BOARD PAD HARDWARE – AC00002

Bolt, Carriage, 3/8-16x2.75L (x10) | 30 | Nut, Hex-Flange, 3/8-16 (x10) |
Tools & Materials for Assembly

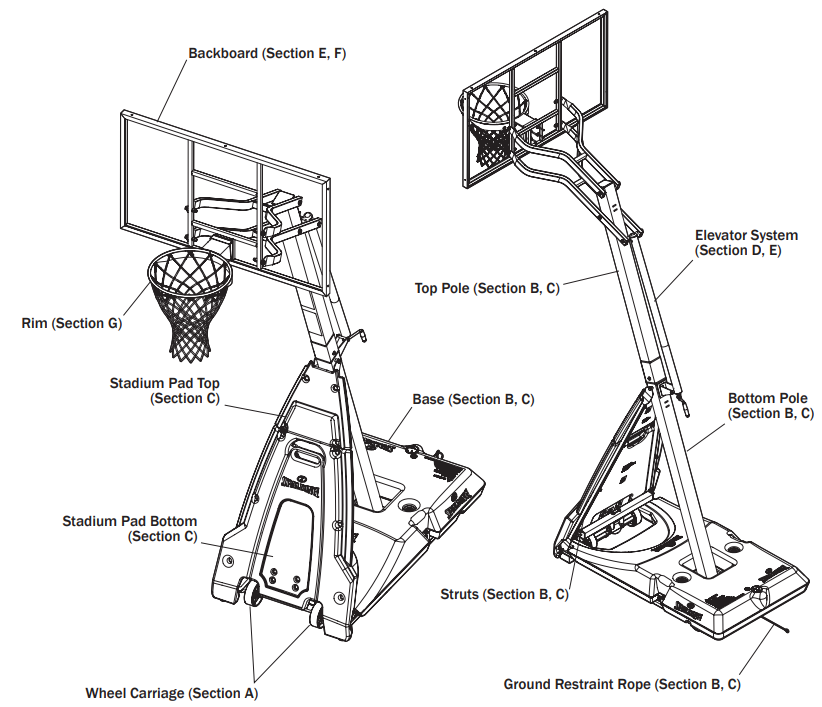
Assembly Overview
Description
The Spalding M7B61E00 boasts a sturdy design that can withstand various weather conditions and heavy use. The 52-inch glass backboard provides a professional-grade playing surface, while the pro-style breakaway rim ensures that the hoop can handle slam dunks and other high-impact shots. The portable base is easy to fill with sand or water, providing stability without compromising on mobility. This system is ideal for anyone looking to enhance their basketball skills or simply enjoy some fun family games.
Assemble the Base
Required Parts
- Kit 1
- Kit 2
- Scrap Wood Board
- 1/2", 9/16", 3/4" Socket Wrench or Wrench
- Socket Extension
- Mallet
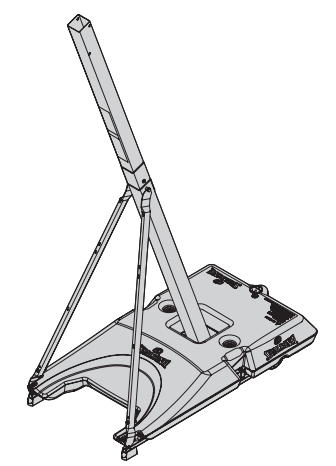
Completed Base Assembly
WARNING
The following components are factory pre-assembled. CHECK THE PRE-ASSEMBLED AREAS FOR TIGHTNESS.
If any parts are missing or damaged please contact our customer service department to receive replacement parts (see customer service information).
PRE-ASSEMBLED COMPONENTS
- ASSEMBLE THE POLE
- Identify the top (3) and bottom (2) pole sections.
Mark 4-5" (10-12.7 cm) from the top of the bottom (2) pole section.
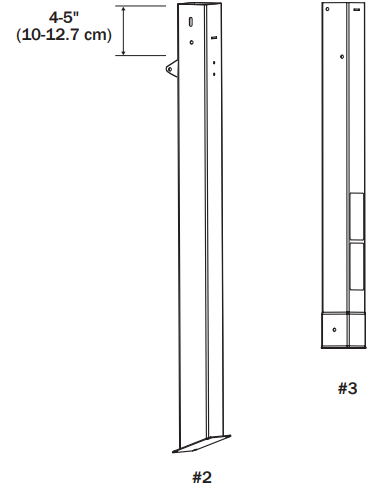
CAUTION: WHEN PROPERLY POUNDED TOGETHER, THE POLE SECTIONS SHOULD HAVE A 4-5" (10-12.7 CM) OVERLAP. IF MINIMUM POLE ENGAGEMENT OVERLAP OF 4-5" (10-12.7 CM) CANNOT BE ACHIEVED !! STOP !! DO NOT PROCEED TO THE NEXT STEP! - CALL SPALDING CUSTOMER SERVICE AT 1-800-558-5234 FOR ASSISTANCE.
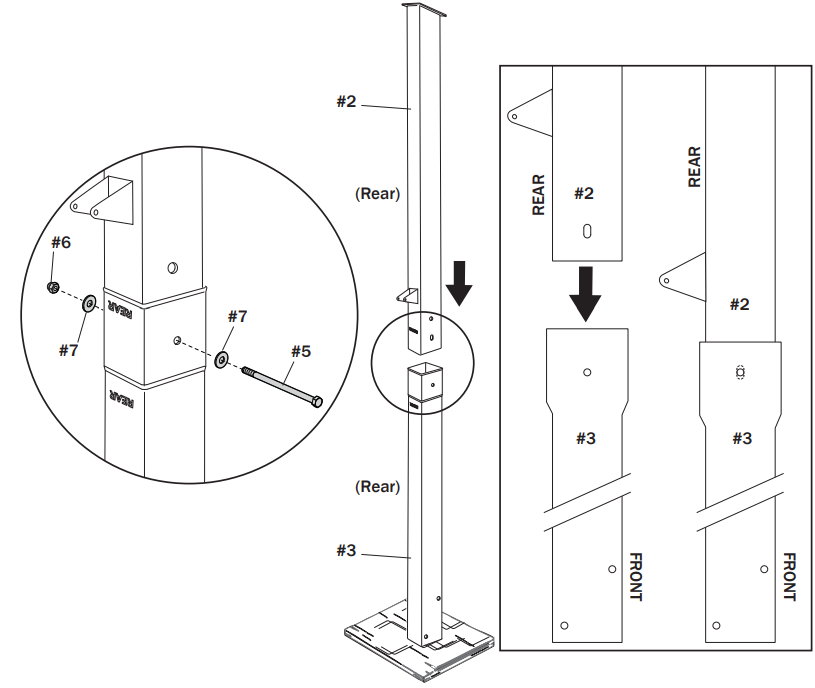
IMPORTANT: NOTE THE ORIENTATION OF EACH POLE SECTION. POSITION EACH POLE SECTION SO THAT THE FRONT AND REAR FACES MATCH DIRECTION WHEN ASSEMBLED.- Align the top (3) pole section with the bottom (2) pole section and slide together.
- Bounce the assembled sections on a scrap wood board until the overlap reaches the marked line.
Secure the pole sections together using the bolt (5), washers (7), and nut (6).
INSTALL THE POLE ONTO THE BASE
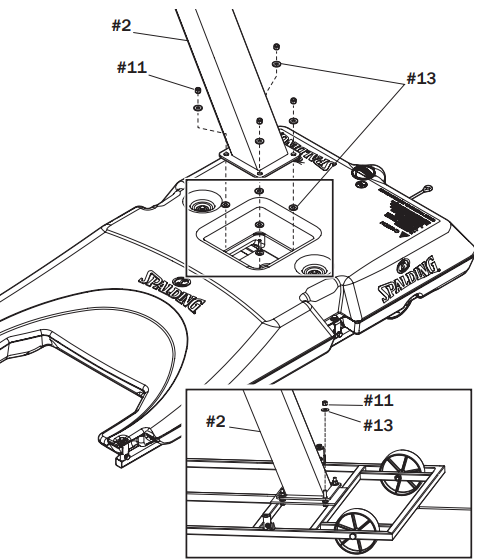
- Place the washers (13) onto the pre-installed bolts.
- Insert the bottom pole (2) onto the pre-installed bolts through the holes in the bottom pole.
Secure the pole assembly to the pole mounting plate using the washers (13) and nuts (11).
WARNING: TWO PEOPLE ARE REQUIRED FOR THIS PROCEDURE. FAILURE TO FOLLOW THIS WARNING COULD RESULT IN SERIOUS INJURY AND/OR PROPERTY DAMAGE.
Secure the base struts (4) to the bottom pole (2) using the bolt (8), spacers (12), and nut (10).
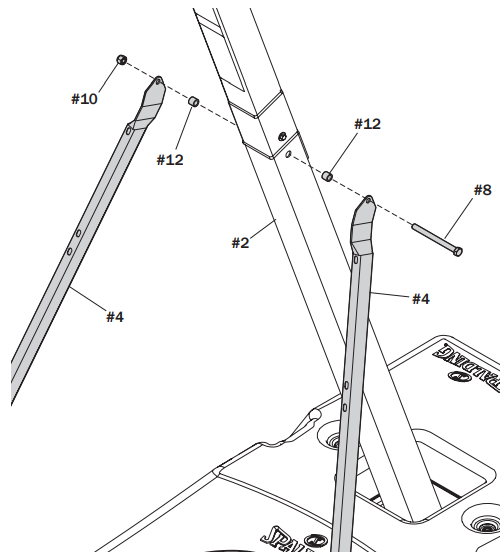
IMPORTANT: DO NOT TIGHTEN COMPLETELY.
- Rotate the non-secured ends of the base struts (4) to align with the mounting holes in the base.
Secure the ends of the base struts (4) to the base frame using bolts (9) and lock washers (14).
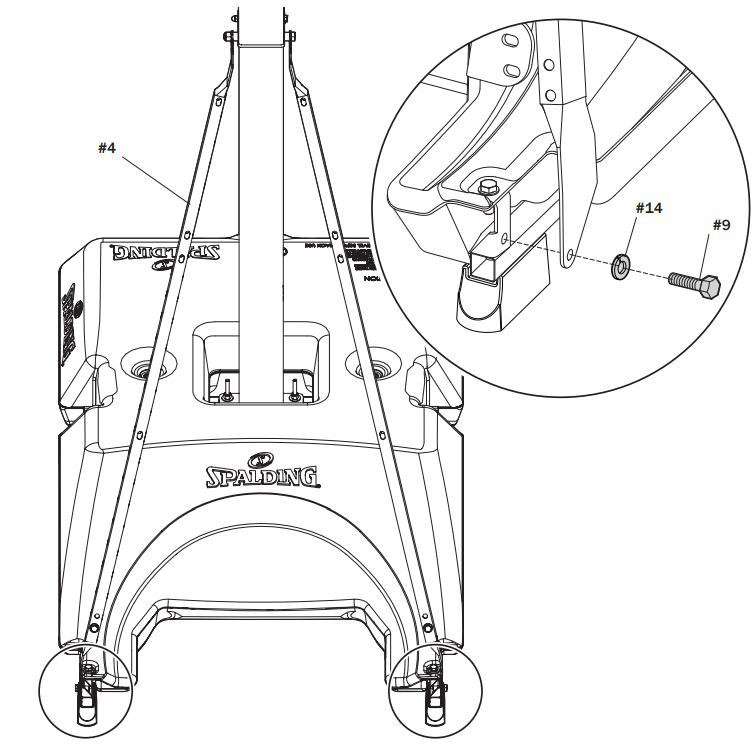
IMPORTANT: TIGHTEN ALL COMPONENTS COMPLETELY.
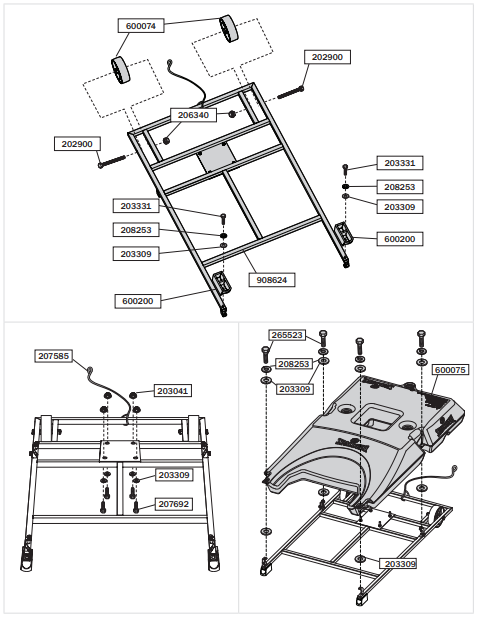
Assemble the Wheel Carriage
Required Parts
- Kit 3
- Scrap Wood Board
- 9/16" Socket Wrench or Wrench
- Mallet
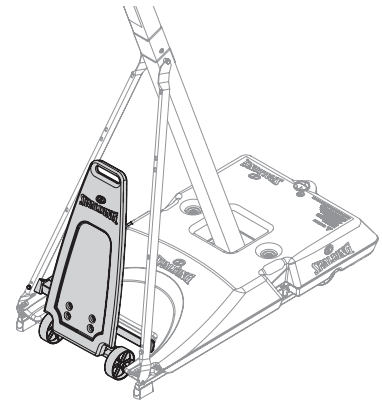
Completed Wheel Carriage Assembly
- PREPARE THE BASE FOR THE WHEELS
Attach the u-bracket (17) to the cross member (21) using the bolts (25), washers (33), and nuts (30).
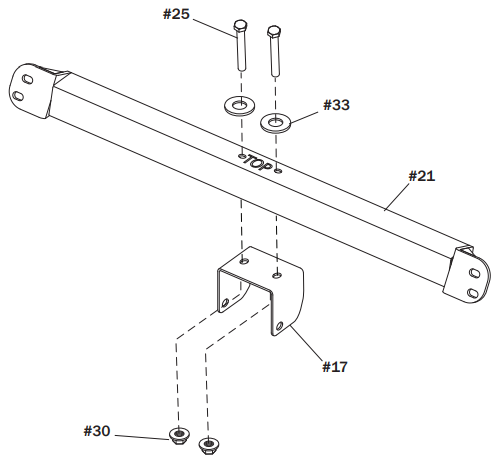
IMPORTANT: NOTE THE ORIENTATION OF THE BRACKET.
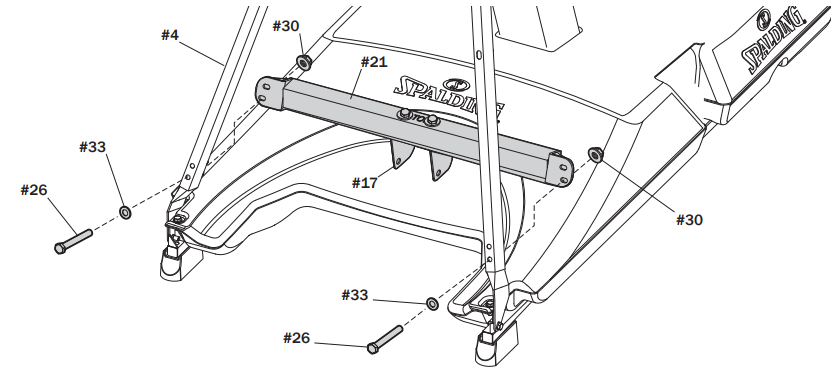
Secure the cross member (21) using only the bottom set of holes to the front struts (4) using the bolts (26), washer (33), and nuts (30).
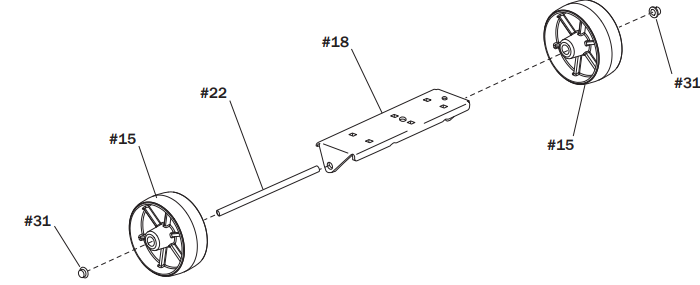
- ASSEMBLE THE WHEELS
- Insert the axle (22) through the wheel bracket (18).
- Secure the wheels (15) to the axle (22) using the axle nuts (31).
Tap the axle nuts (31) onto the axle with a hammer or mallet.
Secure the hinge tubes (23) to the wheel bracket (18) using the bolts (28) and nuts (30).
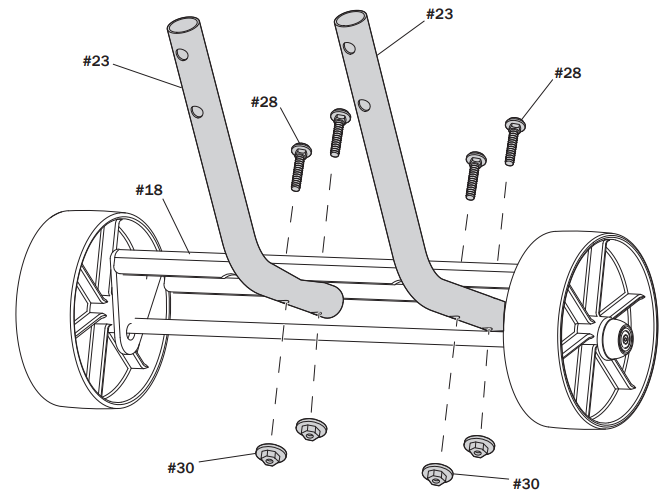
IMPORTANT: NOTE THE ORIENTATION OF THE HINGE TUBES (23). THE SHORT ENDS GO UNDER THE WHEEL BRACKET (18). DO NOT OVERTIGHTEN.
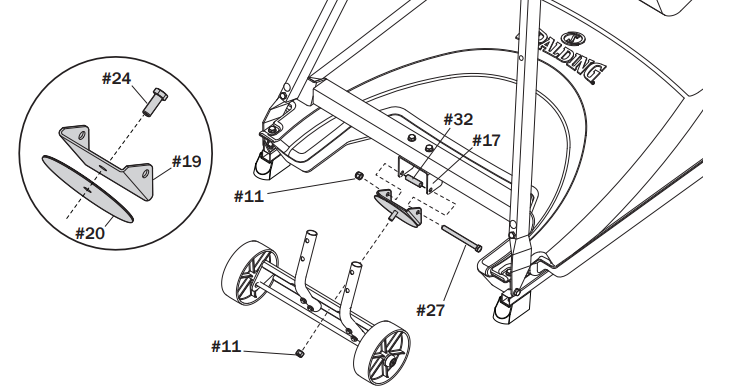
INSTALL THE WHEEL ASSEMBLY
- Secure the lower pivot bracket (19) to the wheel assembly using the bolt (24), pivot disk (20), and nut (11).
Secure the wheel assembly to the u-bracket (17) using the bolt (27), spacer (32), and nut (11).
Attach the transport handle (16) to the wheel assembly using the carriage bolts (28) and nuts (30).
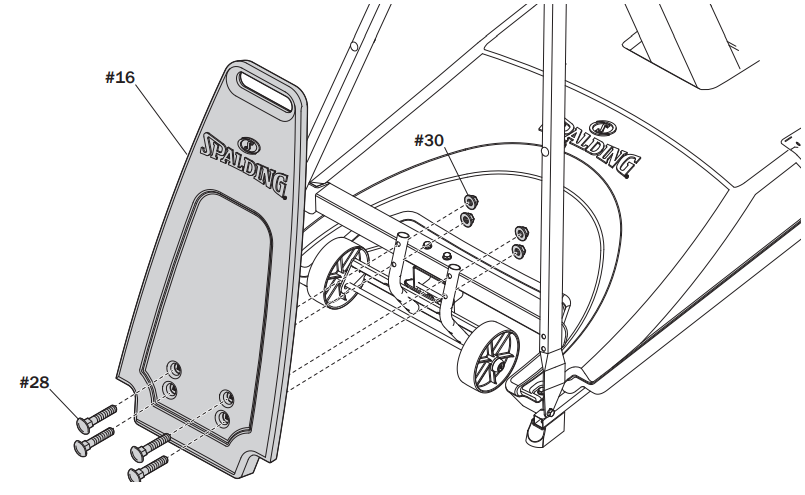
IMPORTANT: Tighten all components completely.
Elevator Assembly
Required Parts: Completed
- Kit 4
- 1/2" Socket Wrench or Wrench
Elevator Assembly
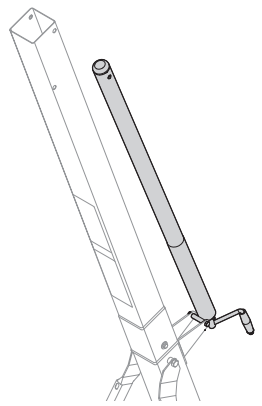
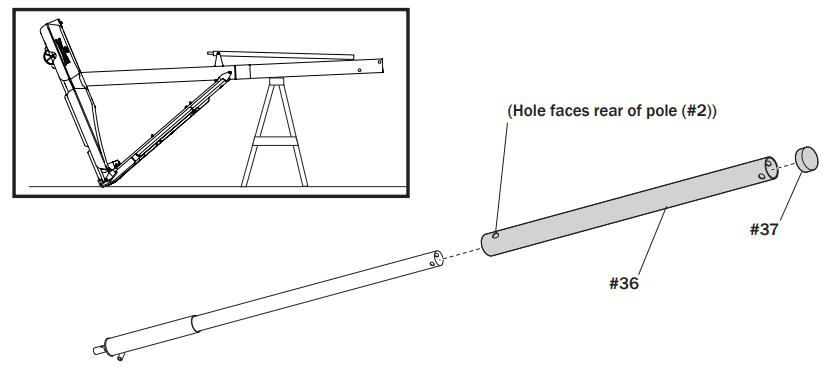
INSTALL THE ELEVATOR ASSEMBLY
- Securely rest the assembly on a sawhorse.
Slide the screw-jack sleeve (36) over the screw jack and attach the cap (37) to the top end.
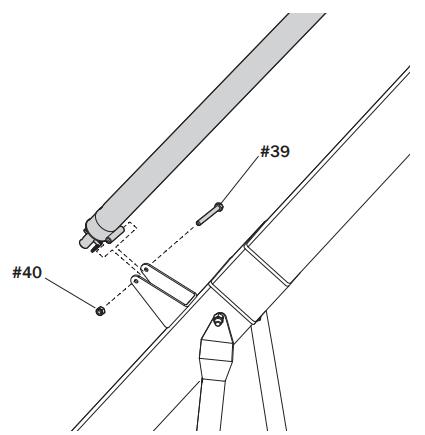
Attach the screw-jack to the pole bracket with the bolt (39) and nut (40).
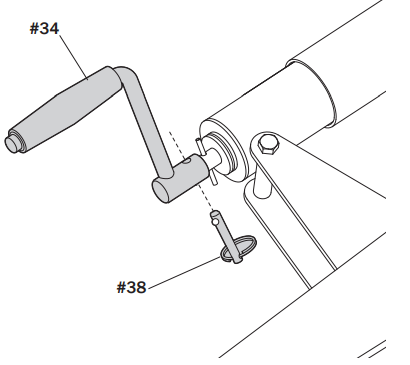
Attach the handle (34) to the screw jack with the pin (38).
Assemble the Upper Elevator
Required Parts
- Kit 5
- 3/4" Socket Wrench or Wrench
- Sawhorse
Completed Backboard Assembly
WARNING
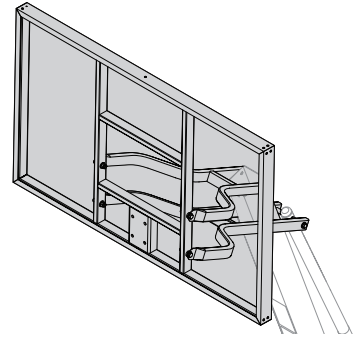
TWO PEOPLE ARE REQUIRED FOR THIS PROCEDURE. FAILURE TO FOLLOW THIS WARNING COULD RESULT IN SERIOUS INJURY AND/OR PROPERTY DAMAGE.- ATTACH THE ELEVATOR TUBE ASSEMBLY
Securely rest the assembly on a sawhorse. Identify the upper (41) and lower (42) elevator tubes.
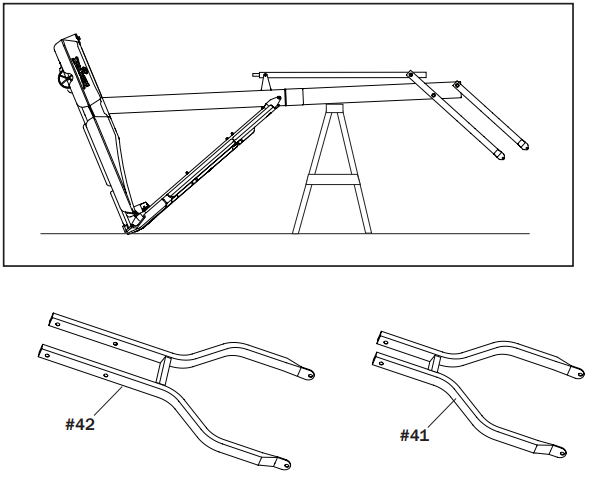
- While the system is securely resting on the sawhorse, install the elevator tubes (41 and 42) to the top pole section (3) using the bolts (46), washers (50), spacers (49), and nuts (10).
Install the pole cover (45).
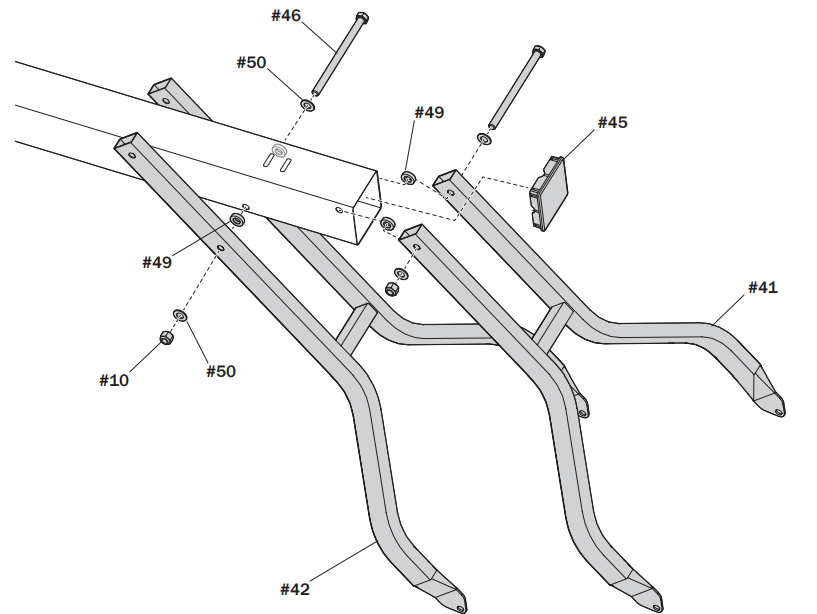
WARNING: TIGHTEN THE BOLTS (46) IN THE LOCK NUTS (10) UNTIL FLUSH (EVEN) WITH THE LOCK NUT’S OUTER EDGE.
NOTE: TEST-FIT THE LARGE BOLTS INTO THE LARGE HOLES OF THE ELEVATOR TUBES AND BACKBOARD BRACKETS. CAREFULLY ROCK THEM IN A CIRCULAR MOTION TO REAM OUT ANY EXCESS PAINT FROM HOLES, IF NECESSARY.- While the system is securely resting on the sawhorse, align the inner metal screw jack (35) bolt holes with the outer plastic screw jack sleeve (36) bolt holes.
- Install the screw jack assembly to the lower elevator tube (42) using the bolt (46), washers (50), spacers (51), and nut (10).
Reinstall the screw jack cap (37).
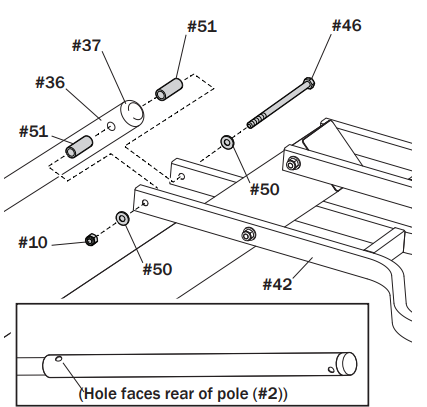
WARNING: TIGHTEN THE BOLT (46) IN THE LOCK NUT (10) UNTIL FLUSH (EVEN) WITH THE LOCK NUT’S OUTER EDGE.
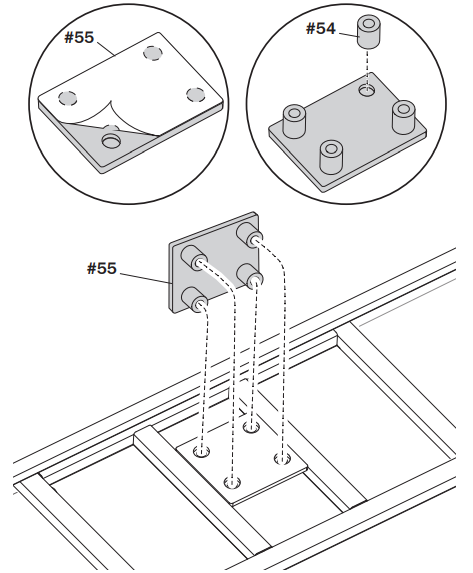
ATTACH THE BACKBOARD
- Place the foam pad (55) on a flat surface with the adhesive side facing up and remove protective film.
- Align each of the steel spacers (54) with the four holes in the foam pad (55) and press the spacers firmly onto the adhesive of the foam pad.
Align the steel spacers on the foam pad assembly into the mounting holes on the backboard and firmly press into position.
- Fill the base halfway with water (approx. 25 gallons (95 Liters) or sand (approx. 295 lbs. (134 kg).
- Insert the cap (44) into the base (1) to close.
Lower the backboard to the lowest setting and roll the completed assembly to the desired location.
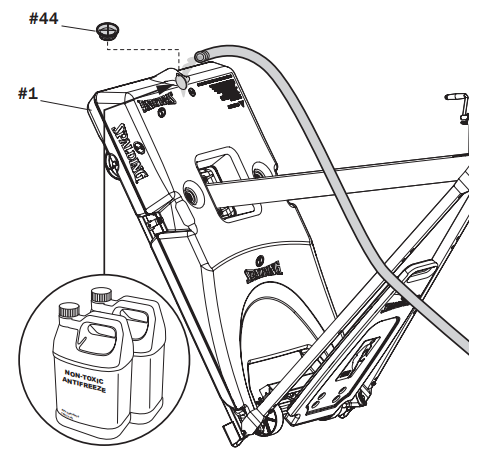
- After system is placed in an upright position, complete the filling process in the base.
- Fill the base completely with water (approx. 49 gallons (186 liters)) or sand (590 lbs. (268 kg)).
Rotate the cap (44) securely into both the top and bottom bases.
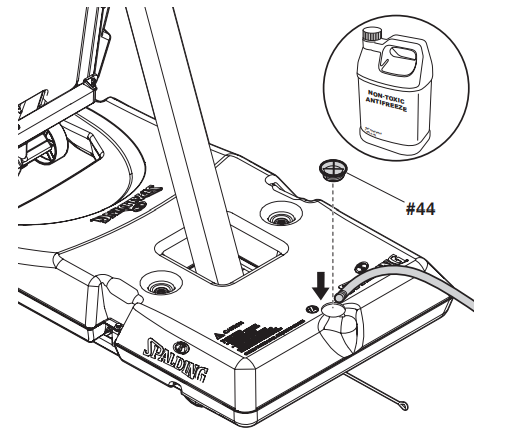
CAUTION: ADD AT LEAST TWO GALLONS (7.6 LITERS) OF NON-TOXIC ANTIFREEZE TO THE WATER OF THE BOTTOM BASE IN SUB-FREEZING CLIMATES. CHECK THE WATER LEVEL BEFORE EACH USE!
NOTE: IF USING SAND: 2 GALLONS OF ANTIFREEZE IS NOT REQUIRED.Attach the backboard (44) to the elevator tubes (41 and 42) using the bolts (47), washers (50), bushings (49), and nuts (10).
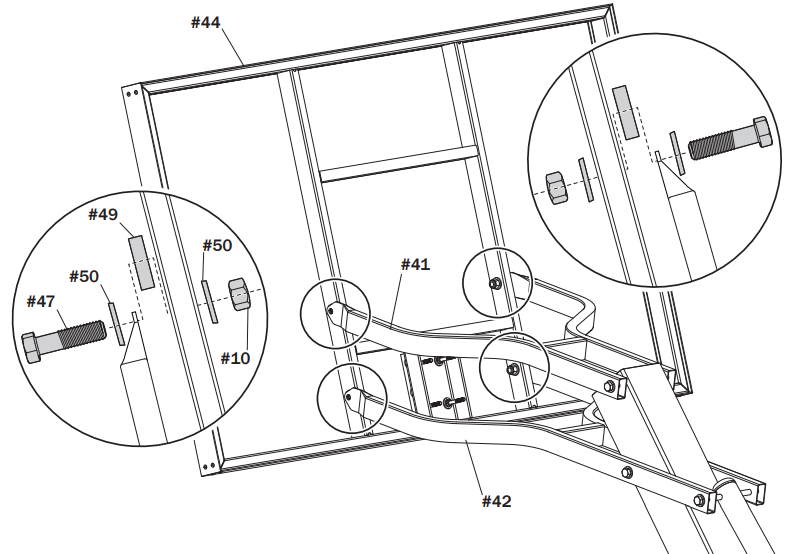
WARNING: TIGHTEN THE BOLT (47) IN THE LOCK NUT (10) UNTIL FLUSH (EVEN) WITH THE LOCK NUT’S OUTER EDGE.
Assemble the Goal
Required Parts
- Kit 6
- Kit 7
- 1/2", 3/4" Socket Wrench or Wrench
- Socket Wrench Extension
- Phillips Screwdriver #3
Completed Goal Assembly
- ASSEMBLE THE GOAL
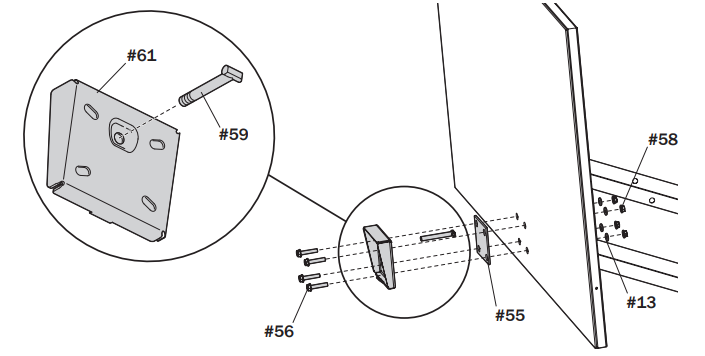
- Insert the t-bolt (59) through the slam jam bracket (61).
Adjust the backboard to the lowest setting and secure the slam jam bracket (61) to the backboard through the foam pad (55) using the bolts (56), washers (13), and nuts (58).
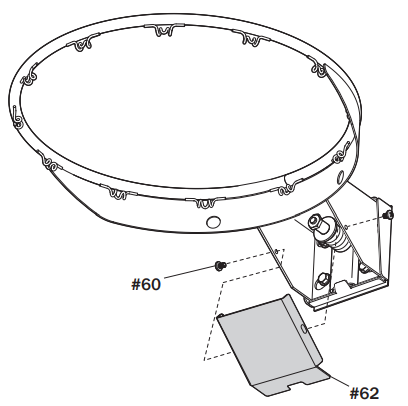
Remove the screws (60) that secure the rim cover (62).
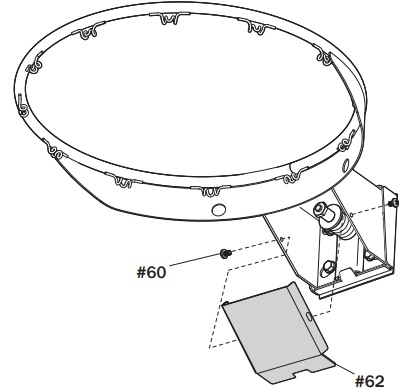
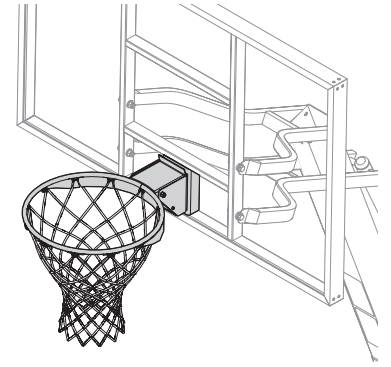
- Insert the rim assembly (52) into the slam jam bracket (61) and allow the t-bolt (59) to pass through the rim.
- Insert the spring bracket (63), spring (64) and washer (65) onto the t-bolt (59).
Thread the hex nut (66) onto the t-bolt (59).

Tighten the nut (66) until 1/8" of the bolt threads onto the exposed end of the t-bolt (59).
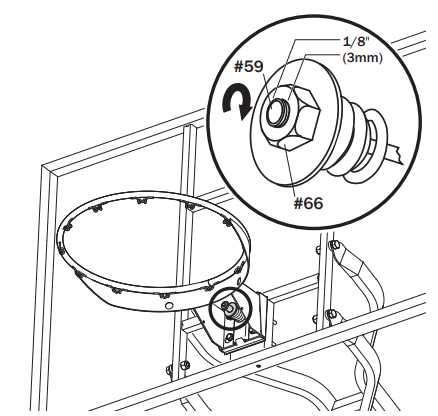
NOTE: If desired, tighten the nut to increase the rim's resistance to movement
Reinstall the rim cover (62) using the cover screws (60).
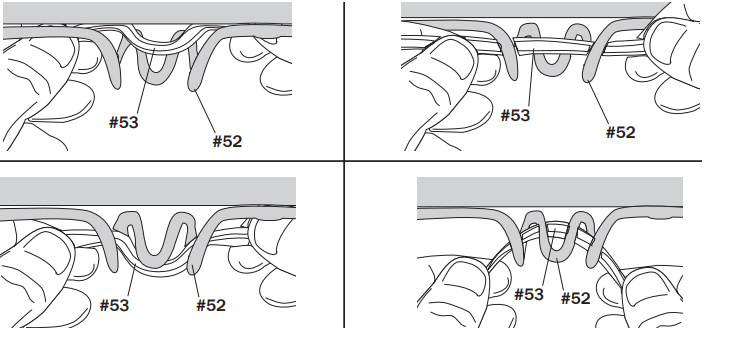
Thread the net (53) onto the rim (52).
APPLY THE LABELS
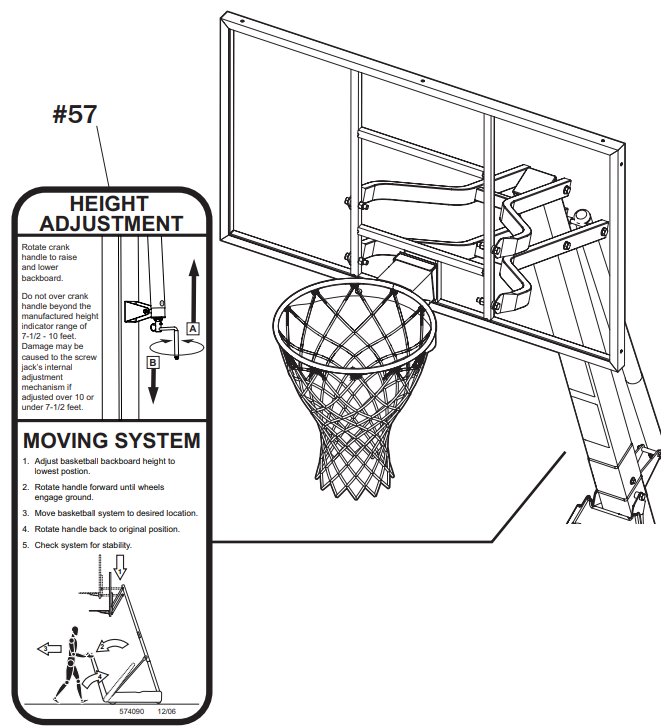
Apply the Height Adjustment and Moving Label (57) to the front of the pole, where it is clearly visible.
- Apply the Height Indicator Labels (48) to the screw jack.
- Adjust the height to 7-1/2 feet (2.3 m) from the top of the rim to the playing surface.
- Place 7-1/2 feet (2.3 m) sticker to the middle of the hole of the screw jack sleeve.
- Repeat for each subsequent height until the last sticker is in place at the 10 foot (3.05 m) height.
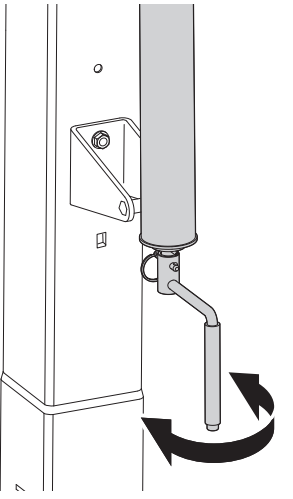
Rotate the crank handle to move the backboard up or down to the desired height.

WARNING
DO NOT ALLOW CHILDREN TO ADJUST THE HEIGHT. DO NOT OVER CRANK THE HANDLE BEYOND THE HEIGHT INDICATOR RANGE OF 7-1/2 TO 10 FEET OR THE ADJUSTMENT MECHANISM MAY BE DAMAGED.
Install The Stadium Pad
Required Parts
- Kit 8
- 9/16" Socket Wrench or Wrench
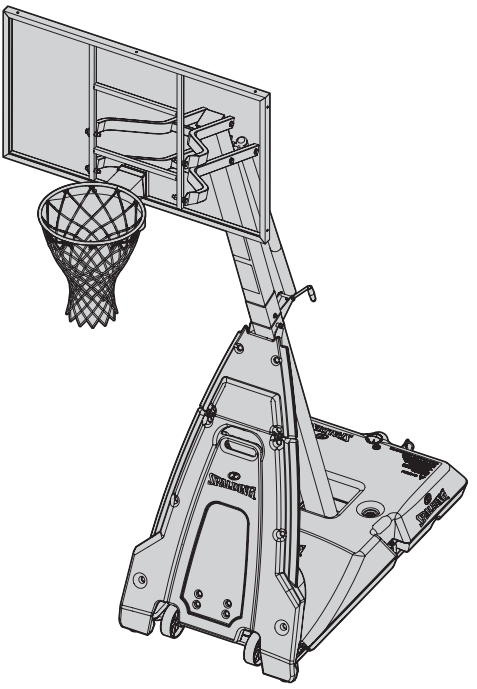
Complete Unit Assembly

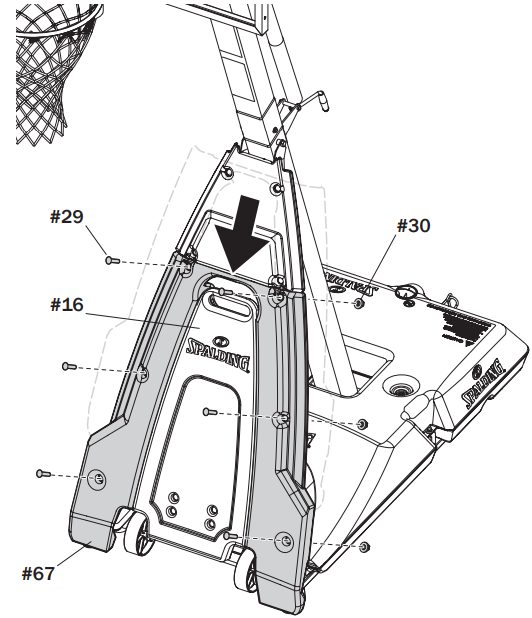
INSTALL THE STADIUM PAD
Attach the top stadium pad (68) to the front strut (4) using the bolts (29) and nuts (30).
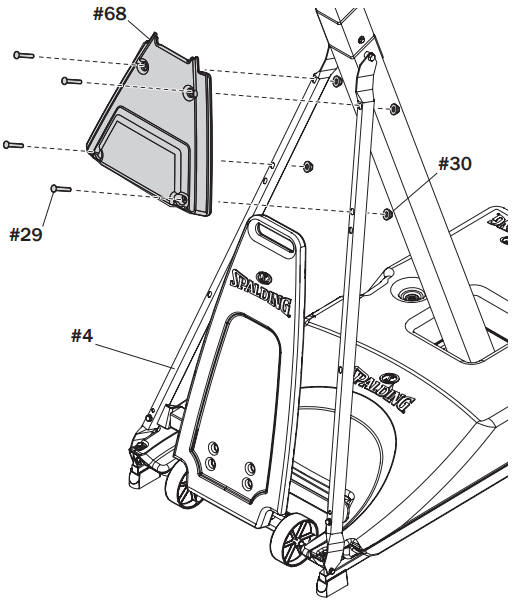
Slide the bottom stadium pad (67) behind the transport handle (16) and secure using the bolts (29) and nuts (30).
Secure The Assembled Unit for Use
Required Parts
- Water
- Sand
Complete Unit Assembly
WARNING
- TWO CAPABLE ADULTS ARE REQUIRED FOR THIS PROCEDURE. FAILURE TO FOLLOW THIS WARNING COULD RESULT IN SERIOUS INJURY.
- DO NOT LEAVE THE ASSEMBLY UNATTENDED WHEN EMPTY; IT MAY TIP OVER.
- FAILURE TO FOLLOW THIS WARNING COULD RESULT IN SERIOUS INJURY AND/OR PROPERTY DAMAGE.
- THE CAP (33) MUST BE TIGHTENED COMPLETELY AND SECURELY TO PREVENT LEAKAGE.
- CONTACT CUSTOMER SERVICE IMMEDIATELY IF THE CAP IS MISSING OR DAMAGED.
- CHECK THE WATER LEVEL BEFORE EACH USE.
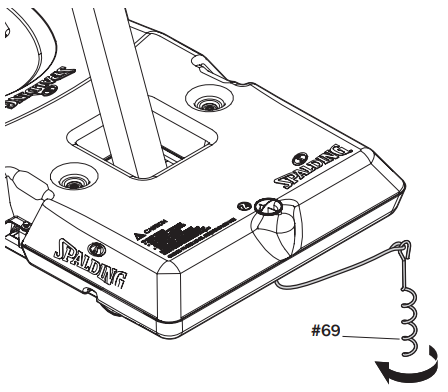
SECURE THE GROUND STAKE
- Place the system in the desired location.
- Stretch the rope tight to determine the ground stake (69) location.
- Install the ground stake (69) into the ground.
Loop the eyelet of the rope onto the eyelet of the ground stake (69).
Operation
- ADJUSTING THE HEIGHT
Rotate the crank handle to move the backboard up or down to the desired height.
WARNING: DO NOT ALLOW CHILDREN TO ADJUST THE HEIGHT. DO NOT OVER CRANK THE HANDLE BEYOND THE HEIGHT INDICATOR RANGE OF 7-1/2 TO 10 FEET OR THE ADJUSTMENT MECHANISM MAY BE DAMAGED.
MOVING THE UNIT
1. Adjust the basketball backboard height to the lowest postion.
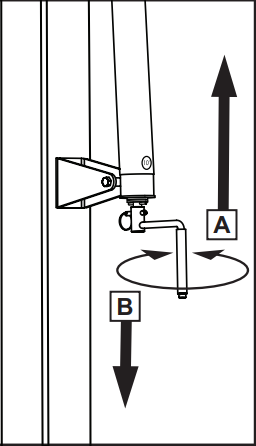
2. Rotate the handle forward until the wheels engage the ground.
3. Move the basketball system to the desired location.
4. Rotate the handle back to its original position.
5. Check the system for stability.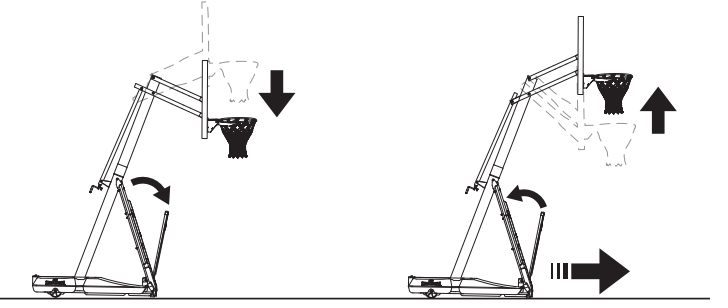
Setup Guide
To set up the Spalding M7B61E00, follow these steps:
- Unpack and Inspect: Carefully unpack all components and inspect for any damage.
- Assemble the Base: Fill the portable base with sand or water according to the manufacturer's instructions.
- Attach the Backboard and Rim: Use the provided hardware to secure the backboard and rim to the pole.
- Adjust the Height: Use the adjustment mechanism to set the desired height.
- Final Check: Ensure all parts are securely attached before use.
SAFETY LABELS
NOTICE
APPLY THE SAFETY LABELS TO THE COMPLETED ASSEMBLY PRIOR TO USE.
HEIGHT ADJUSTMENT
- Rotate crank handle to ra se and lower backboard.
- Do not over crank handle beyond the manufactured height indicator range of 7-1/2 - 10 feet.
- Damage may be caused to the screw jack’s internal adjustment mechanism if adjusted over 10 or under 7-1/2 feet.
MOVING SYSTEM

- Adjust basketball backboard height to lowest position.
- Rotate handle forward until wheels engage ground.
- Move basketball system to desired location.
- Rotate handle back to original position.
- Check system for stability.
WARNING
Read and understand warnings listed below before using this product. Failure to follow these warnings may result in serious injury and/or property damage.
Owner must ensure that all players know and follow these rules for safe operation of the system.
- DO NOT HANG on the rim or any part of the system including backboard, support braces or net.
- During play, especially when performing dunk type activities, keep player's face away from the backboard, rim and net. Serious injury could occur if teeth/face come in contact with backboard, rim or net.
- Do not slide, climb, shake or play on base and/or pole.
- After assembly is complete, fill system completely with water or sand and stake to the ground. Never leave system in an upright position without filling base with weight, as system may tip over causing injuries
- When adjusting height or moving system, keep hands and fingers away from moving parts.
- Do not allow children to move or adjust system.
- During play, do not wear jewelry (rings, watches, necklaces, etc.). Objects may entangle in net.
- Surface beneath the base must be smooth and free of gravel or other sharp objects. Punctures cause leakage and could cause system to tip over.
- Keep organic material away from pole base. Grass, litter, etc. could cause corrosion and/or deterioration.
- Check pole system for signs of corrosion (rust, pitting, chipping) and repaint with exterior enamel paint. If rust has penetrated through the steel anywhere, replace pole immediately.
- Check system before each use for proper ballast, loose hardware, excessive wear and signs corrosion and repair before use.
- Check system before each use for instability.
- Do not use system during windy and/or severe weather conditions; system may tip over. Place system in the storage position and/or in an area protected from the wind and free from personal property and/or overhead wires.
- Never play on damaged equipment.
- See instruction manual for proper installation and maintenance.
- When moving system, use caution to keep mechanism from shifting.
- Keep pole top covered with cap at all times.
- Do not allow water in tank to freeze. During sub-freezing weather add 2 gallons of non-toxic antifreeze, sand or empty tank completely and store. (Do not use salt.)
- While moving system, do not allow anyone to stand or sit on base or have added ballasting on base.
- Do not leave system unsupervised or play on system when wheels are engaged for moving.
- Use Caution when moving system across uneven surfaces. System may tip over.
- Use extreme caution if placing syste
Troubleshooting
Common issues with the Spalding M7B61E00 include:
- Instability: Ensure the base is properly filled with sand or water and that the system is on level ground.
- Loose Parts: Regularly check and tighten all bolts and screws.
- Backboard Damage: Avoid using the hoop in extreme weather conditions; cover it during winter months if necessary.
Important warnings include ensuring proper assembly and regular maintenance to prevent accidents and extend the product's lifespan.
Warranty
For the very latest Basketball System Warranty information, please visit www.Spalding.com.
Pros & Cons
Pros
- Durable Construction: Built to withstand heavy use and various weather conditions.
- Adjustable Height: Suitable for players of all ages and skill levels.
- Professional-Grade Backboard: Provides excellent rebounding and playing experience.
- Portable Design: Easy to move around as needed.
Cons
- Heavy Base When Filled: Requires significant effort to move once the base is filled with sand or water.
- Assembly Required: While relatively easy, the assembly can still be time-consuming for some users.
- Covers May Not Be Included: Users may need to purchase additional covers for protection during off-seasons.
Customer Reviews
Customers generally praise the Spalding M7B61E00 for its durability and ease of use. Many appreciate the professional-grade backboard and rim, which provide an authentic basketball experience. However, some users find the assembly process lengthy and note that the filled base can be quite heavy. Common complaints include minor issues with stability if not set up correctly and occasional rusting if left exposed to harsh weather conditions.
Faqs
What is the recommended height adjustment range for the Spalding?
What type of material is used for the backboard in the Portable Basketball?
How do I ensure stability for the M7B61E00?
Is assembly required for the Basketball System?
Can I use the Spalding in extreme weather conditions?
What are some common issues with the Spalding Portable Basketball System M7B61E00?
How do I maintain my Spalding?
Is this system suitable for kids?
Does this system come with a warranty?
Can I purchase replacement parts for my Spalding Portable Basketball System?
Leave a Comment