Steinel Motion Detector XLED PRO ONE Plus S User Manual | Functions
Content
Introduction
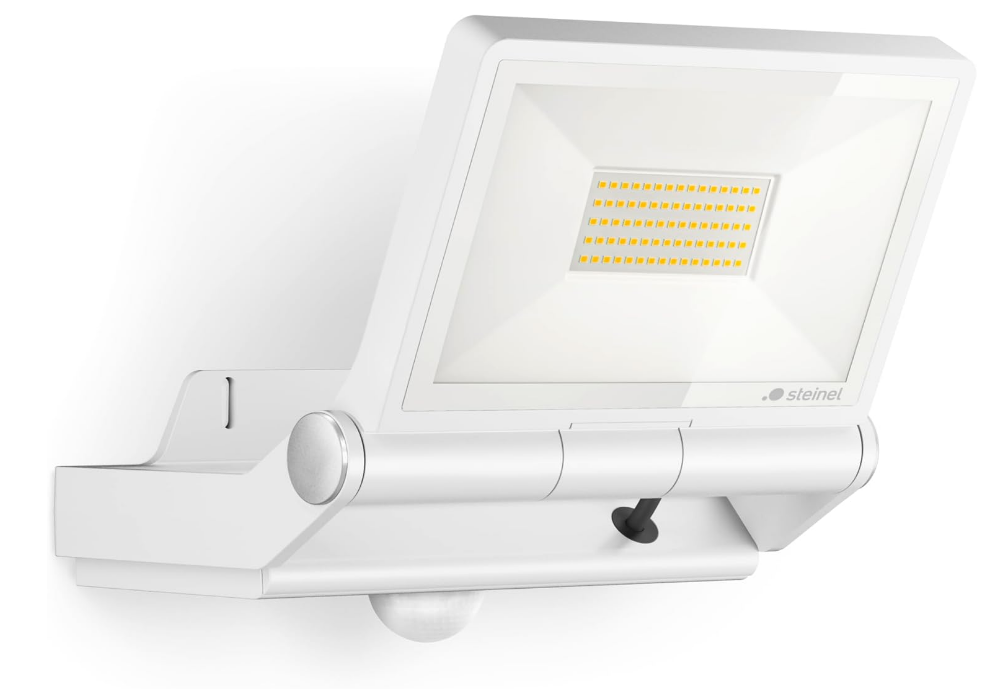
The Steinel Motion Detector XLED PRO ONE Plus S is an advanced outdoor lighting solution designed to enhance security and convenience. Equipped with a high-performance LED light, it features a motion sensor that detects movement up to 12 meters away, ensuring efficient illumination when needed. The device is adjustable, allowing users to customize the detection range and light duration. Priced at approximately $99.99, the XLED PRO ONE Plus S is an excellent choice for those seeking reliable outdoor lighting.
Technical Specifications
Dimensions (H × W × D)
- XLED PRO ONE S: 230 × 229 × 182 mm
- XLED PRO ONE PLUS S/Max S: 250 × 259 × 202 mm
- XLED PRO ONE: 206 × 229 × 182 mm
- XLED PRO ONE PLUS/Max: 226 × 259 × 202 mm
Power Supply
- 220-240 V, 50/60 Hz
Output / Efficiency
- XLED PRO ONE S: 120 lm/W
- XLED PRO ONE PLUS S: 129 lm/W
- XLED PRO ONE Max S: 122 lm/W
- XLED PRO ONE: 126 lm/W
- XLED PRO ONE PLUS: 132 lm/W
- XLED PRO ONE Max: 123 lm/W
Luminous Flux / Brightness
- XLED PRO ONE S: 2,204 lm
- XLED PRO ONE PLUS S: 4,370 lm
- XLED PRO ONE Max S: 6,116 lm
- XLED PRO ONE: 2,236 lm
- XLED PRO ONE PLUS: 4,370 lm
- XLED PRO ONE Max: 6,093 lm
Power Consumption
- XLED PRO ONE S: 18.4 W
- XLED PRO ONE PLUS S: 33.8 W
- XLED PRO ONE Max S: 50.1 W
- XLED PRO ONE: 17.7 W
- XLED PRO ONE PLUS: 33.1 W
- XLED PRO ONE Max: 49.4 W
Projected Floodlight Area
- XLED PRO ONE S: 180 cm²
- XLED PRO ONE PLUS S/Max S: 254 cm²
- XLED PRO ONE: 180 cm²
- XLED PRO ONE PLUS/Max: 254 cm²
Weight
- XLED PRO ONE S: 1.45 kg
- XLED PRO ONE PLUS S: 1.7 kg
- XLED PRO ONE Max S: 1.72 kg
- XLED PRO ONE: 1.4 kg
- XLED PRO ONE PLUS: 1.7 kg
- XLED PRO ONE Max: 1.72 kg
Mains Current
- XLED PRO ONE S: 86.73 mA
- XLED PRO ONE PLUS S: 233.1 mA
- XLED PRO ONE Max S: 158.4 mA
- XLED PRO ONE: 88.28 mA
- XLED PRO ONE PLUS: 233.3 mA
- XLED PRO ONE Max: 160.7 mA
Power Factor
- XLED PRO ONE S: 0.86
- XLED PRO ONE PLUS S: 0.92
- XLED PRO ONE Max S: 0.95
- XLED PRO ONE: 0.86
- XLED PRO ONE PLUS: 0.92
- XLED PRO ONE Max: 0.95
Light Colour
- 3,000 K (warm white)
Colour Rendering Index
- Ra ≥ 80
Sensor Technology
- XLED PRO ONE S/PLUS S/Max S: Passive infrared
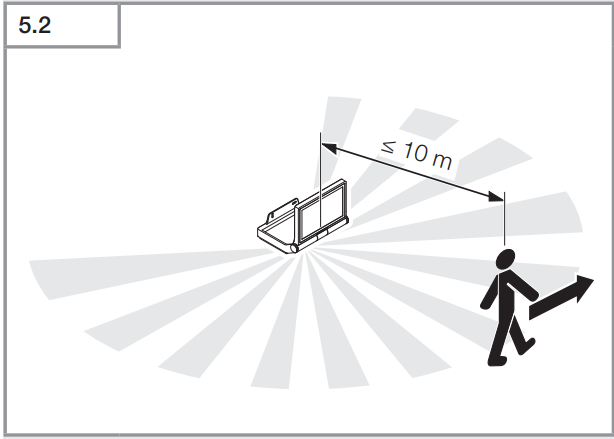
Reach
- XLED PRO ONE S/PLUS S/Max S: Max. 10 m
Angle of Coverage
- XLED PRO ONE S/PLUS S/Max S: 240°
Time Setting
- XLED PRO ONE S/PLUS S/Max S: 8 s - 35 min
Twilight Setting
- XLED PRO ONE S/PLUS S/Max S: 2-2,000 lux
IP Protection Rating
- IP44/I
Additional Switching Capacity
XLED PRO ONE S/PLUS S/Max S:
- Incandescent/halogen lamp load: 1,500 W
- Fluorescent lamps, electronic ballasts: 430 W
- Fluorescent lamps, uncorrected: 500 VA
- Fluorescent lamps, series-corrected: 900 VA
- Fluorescent lamps, parallel-corrected: 500 VA
- Low-voltage halogen lamps: 1,500 VA
- LED lamps < 2 W: 16 W
- 2 W < LED lamps < 8 W: 64 W
- LED lamps > 8 W: 64 W
- Capacitive load: 88 μF
Package Contents
XLED PRO ONE S
XLED PRO ONE Plus S
XLED PRO ONE Max S
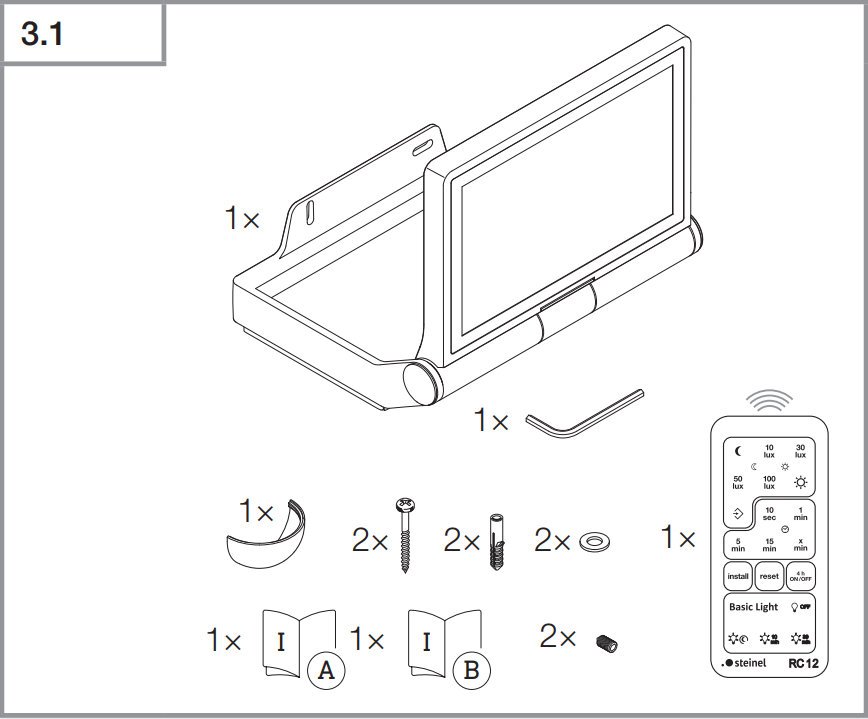
- 1 LED floodlight with infrared motion sensor.
- 1 Allen key.
- 1 shroud.
- 2 screws.
- 2 wall plugs.
- 2 washers.
- 2 grub screws.
- 1 remote control RC 12.
- 1 safety data sheet.
- 1 quick-start guide.
XLED PRO ONE
XLED PRO ONE Plus
XLED PRO ONE Max

- 1 LED floodlight.
- 1 Allen key.
- 2 grub screws.
- 2 screws.
- 2 wall plugs.
- 2 washers.
- 1 safety data sheet.
- 1 quick-start guide.
XLED PRO ONE S Product Dimensions
- XLED PRO ONE S (a).
- XLED PRO ONE Plus S (b).
- XLED PRO ONE Max S (c).

XLED PRO ONE Product Dimensions
- XLED PRO ONE (a).
- XLED PRO ONE Plus (b).
- XLED PRO ONE Max (c).

XLED PRO ONE S/Plus S/Max S Product Components

- A LED floodlight head.
- B Mounting bracket.
- C Control dial.
- D Connecting terminal.
- E Terminal cover.
- F Sensor unit.
- G Cover.
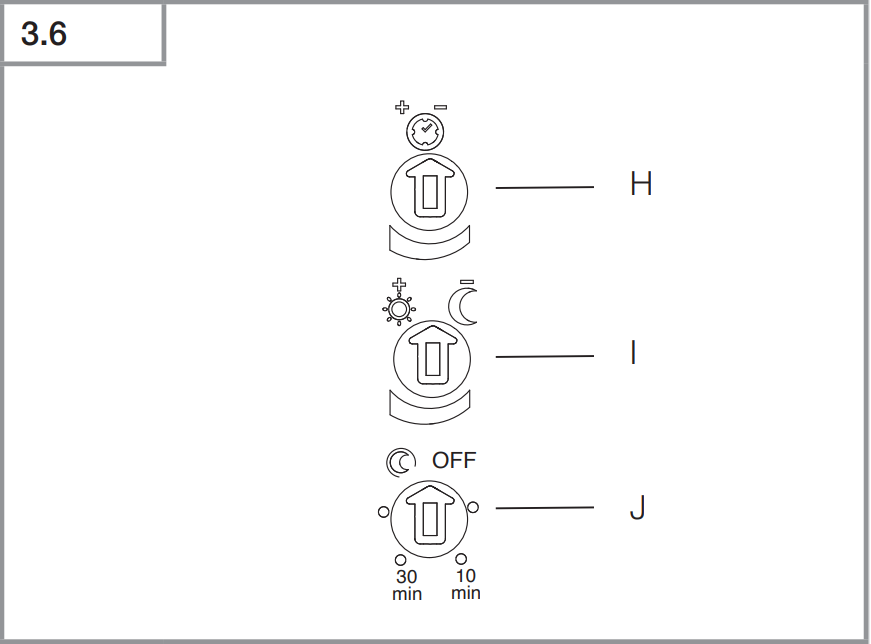
- H Time setting.
- I Twilight setting.
J Basic light level.
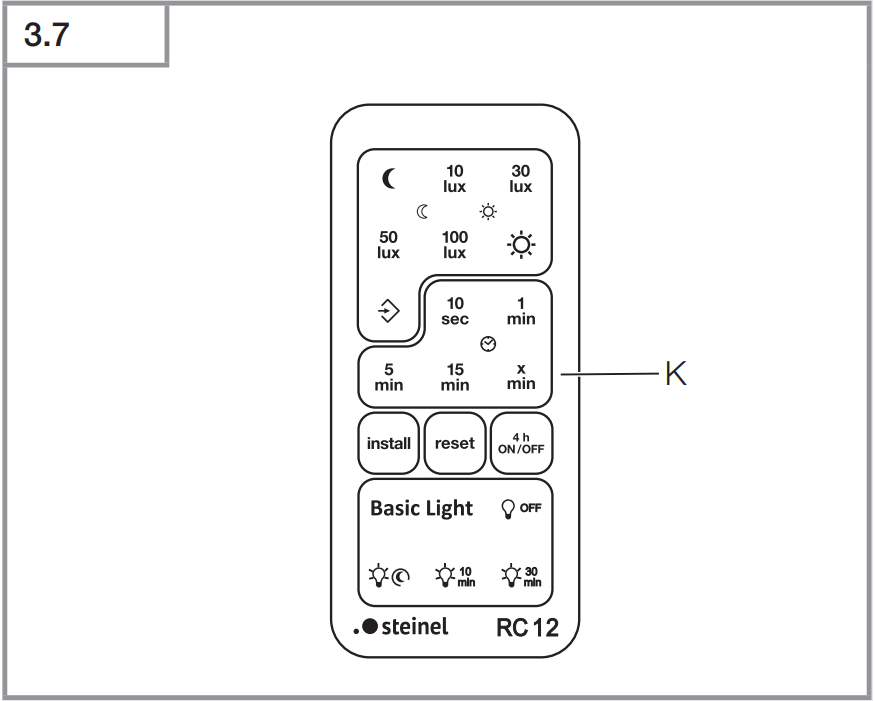
K Remote control RC 12
XLED PRO ONE/Plus/Max Product Components

- A LED floodlight head.
- B Mounting bracket.
- C Connecting terminal.
- D Terminal cover.
- E Cover.
Electrical Connection
XLED PRO ONE S/Plus S/Max S Wiring Diagrams
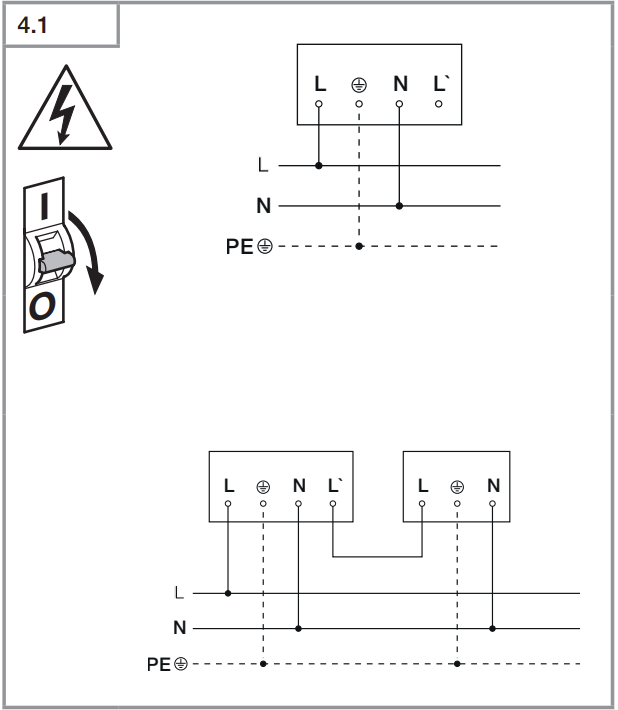
XLED PRO ONE/Plus/Max Wiring Diagrams

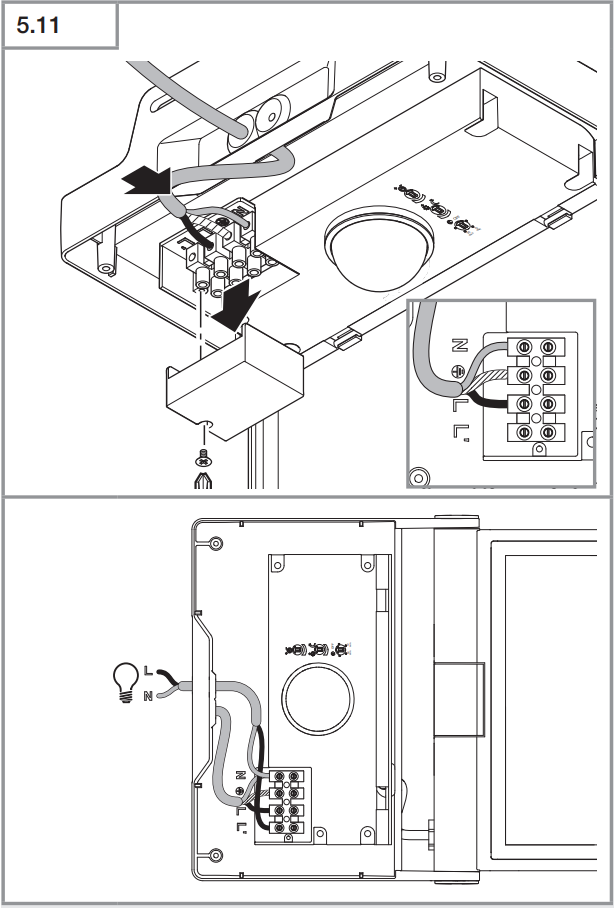
The mains power supply lead is a 3-core cable:
- L = phase conductor (usually black, brown, or grey).
- N = neutral conductor (usually blue).
- PE = protective-earth conductor (green/yellow).
The floodlight can also be connected to the power supply downstream of a mains switch if it is ensured that the mains switch is left ON all the time.
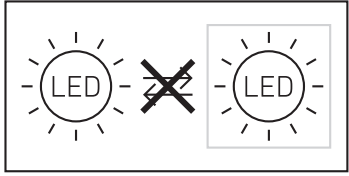
The LEDs in this floodlight cannot be replaced. In the event of LED failure, the entire product must be replaced.
The light source of this light cannot be replaced. If the light source needs to be replaced (e.g., at the end of its service life), the complete light must be replaced.
About This Document
- Under copyright. Reproduction either in whole or in part only with our consent.
- Subject to change in the interest of technical progress.
Hazard warning!
Warning of hazards from electricity!
Warning of hazards from water!
General Safety Precautions
Failure to observe these operating instructions presents hazards!
These instructions contain important information on the safe use of this product. Particular attention is drawn to potential hazards. Failure to observe this information may lead to death or serious injuries.
- Read instructions carefully.
- Follow safety advice.
- Keep instructions within easy reach.
- Working with electrical current may produce hazardous situations. Touching live parts can result in electrical shock, burns, or death.
- Work on mains voltage must only be performed by qualified, skilled personnel.
- National wiring regulations and electrical operating conditions must be observed (e.g., DE: VDE 0100, AT: ÖVE-ÖNORM E8001-1, CH: SEV 1000).
- Only use genuine replacement parts.
- Repairs must only be carried out by companies qualified to do so.
System Description
Proper Use
XLED PRO ONE S/Plus S/Max S
- LED floodlight with infrared motion sensor.
- For indoor and outdoor wall mounting.
- Not suitable for connecting to a dimmer.
Operating Principle
- The integrated infrared sensor detects the heat radiated from moving objects (e.g., people, animals). The heat detected in this way is converted electronically into a signal that switches the LED floodlight ON automatically.
- The most reliable way of detecting motion is to install the unit with the sensor aimed across the direction in which a person would walk.
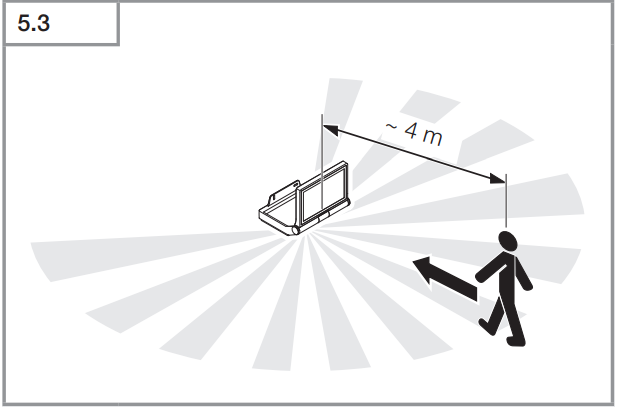
- Motion detection reach is restricted when the unit is approached head-on.
- Obstacles (such as trees, walls, or panes of glass) may restrict or prevent the detection of movement.
- Sudden fluctuations in temperature as a result of changes in weather are not distinguished from sources of heat.
Proper Use
XLED PRO ONE/Plus/Max
- LED floodlight.
- For indoor and outdoor wall mounting.
- Not suitable for connecting to a dimmer.
Non-Intended Use
- The LED floodlight cannot be dimmed.

Installation
Hazard from electrical power:
Touching live parts can result in electrical shock, burns, or death.
- Switch OFF power and interrupt the power supply.
- Using a voltage tester, check to make sure that the power supply is disconnected.
- Make sure the power supply remains interrupted.
Risk of damage to property:
Mixing up connection leads may produce a short circuit.
- Identify connection leads.
- Connect the leads correctly.
Preparing for Installation
Check all components for damage. Do not use the floodlight if it is damaged.
Select an appropriate site to install the product.
- Take reach into consideration.
- Take motion detection into consideration.
- Vibration-free.
- No obstacles in the detection zone.
- Not in explosive atmospheres.
- Not on normally flammable surfaces.
- Do not look into the light source from a short distance (< 30 cm).
- Ensure spacing of at least 50 cm from other LED floodlights.
XLED PRO ONE S/Plus S/Max S Reach

Detecting motion across the direction in which a person walks.
Detecting motion in the direction in which a person walks.
Aiming the Floodlight
- Correctly aim the floodlight.

Mounting Procedure
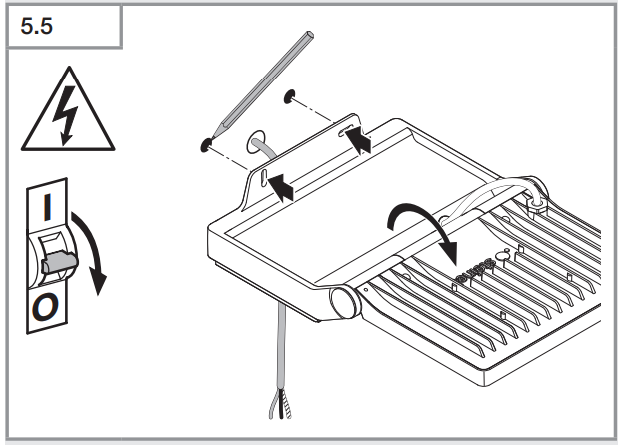
- Check to make sure the power supply is switched OFF.
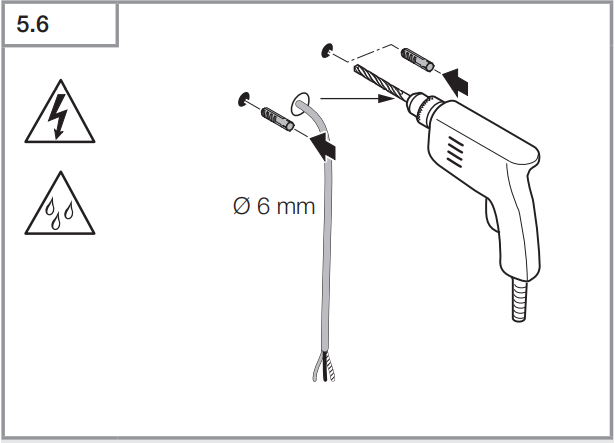
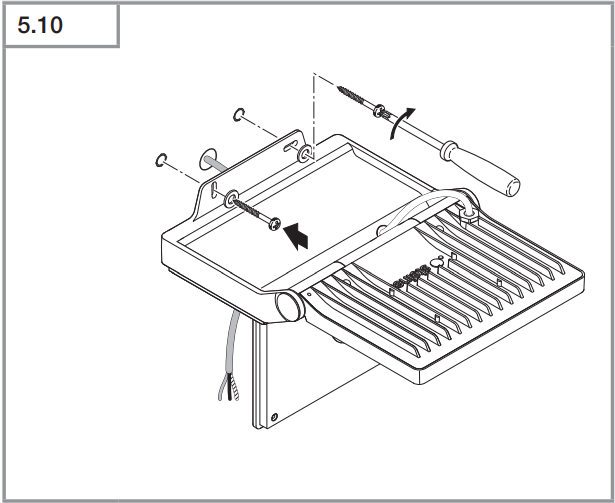
Mark drill holes.
Drill holes (ø 6 mm) and fit wall plugs.
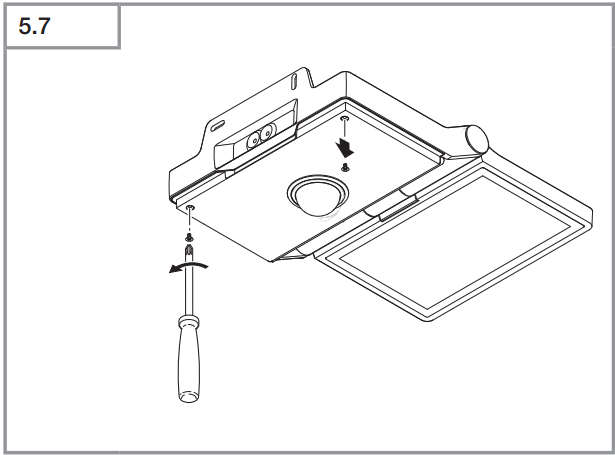
Unscrew cover.
Open the cover.
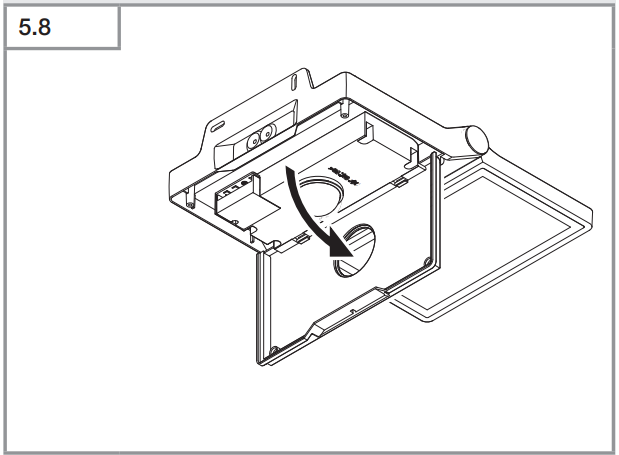
Pull cable through the opening.

Screw bracket to the mounting surface.
- Unscrew terminal cover.
Connect mains power supply lead as shown in the wiring diagram.
Screw terminal cover in place.
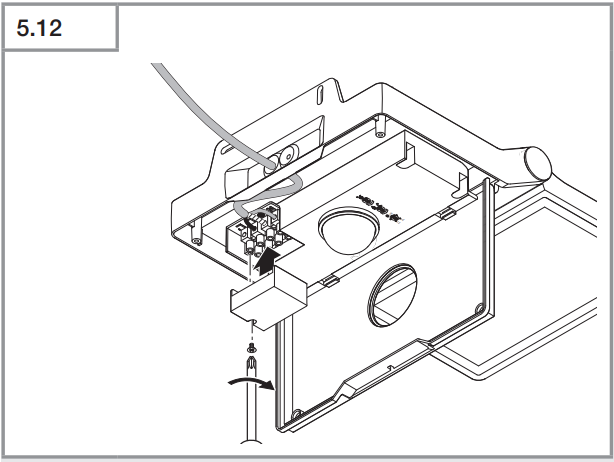
- Close the cover.
Screw in retaining screws.
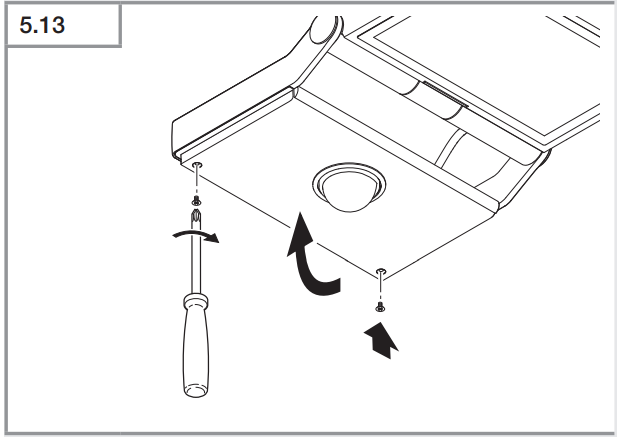
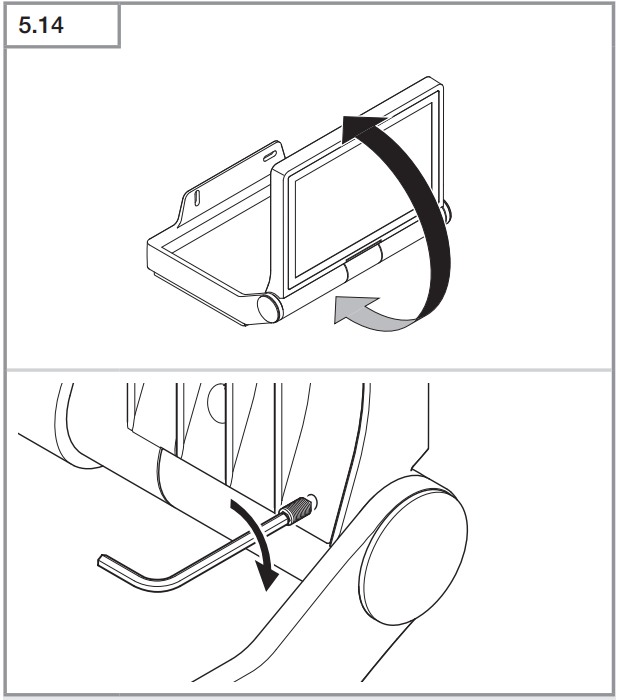
- Aim the floodlight head and fix it in place with grub screws.
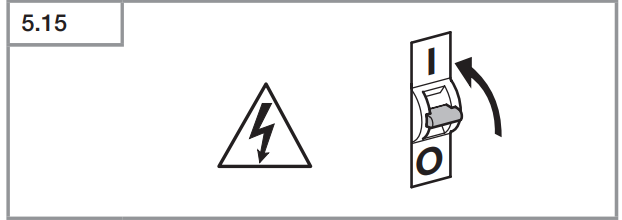
Switch ON the power supply.
Set the functions.
Setup Guide
- To set up the Steinel Motion Detector XLED PRO ONE Plus S, begin by selecting a suitable location with optimal coverage.
- Ensure the surface is clean and dry before mounting the device. Follow the included instructions for screwing the mount into place and securing the detector.
- Connect the device to a power source and adjust the sensitivity and time settings according to your preferences.
- The device comes with a user-friendly interface that allows easy configuration. For pairing with other smart devices, refer to the specific instructions provided in the manual or manufacturer's website.
Steinel Motion Detector XLED PRO ONE Plus S Function
XLED PRO ONE S/Plus S/Max S
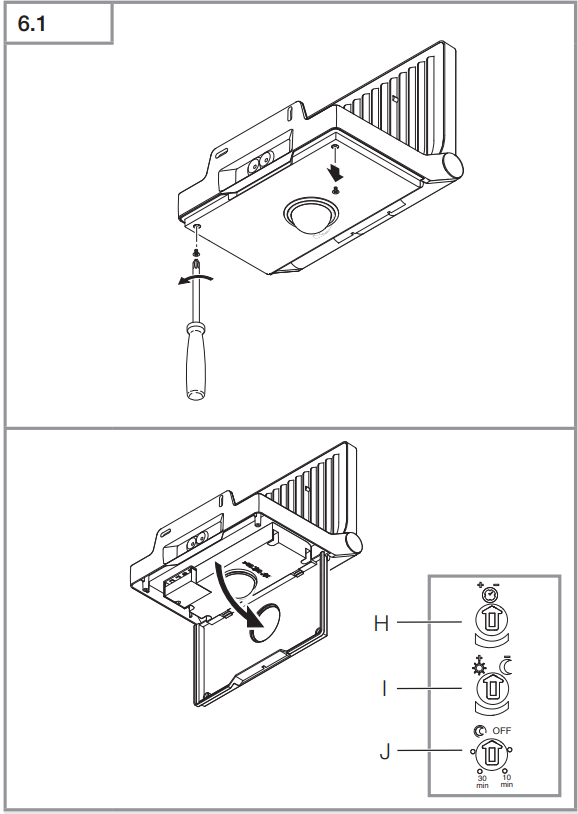
- Remove screws to open the cover.
• Make settings.
Factory Settings
- Time setting: 8 seconds
- Twilight setting: Daylight mode 1,000 lux
- Basic light level: OFF
Time Setting (H)
The stay-ON time can be set to any period from approx. 8 seconds to a maximum of 35 minutes. Every movement detected re-activates the light.
Note: After the LED floodlight switches OFF, it takes approx. 1 second before it is able to start detecting movement again. The LED floodlight can then switch ON again in response to movement.
The shortest time setting is recommended when adjusting the detection zone and performing the functional test.
Twilight Setting (I)
The response threshold (twilight) can be infinitely varied from approx. 2 to 2,000 lux.
 = Daylight mode (depending on ambient light level)
 = Night-time operation (approx. 2 lux)
The control dial must be turned to when adjusting the detection zone and performing the functional test in daylight.
Basic Light Level (J)
The basic level of lighting from basic light LEDs provides a low level of illumination. The main light is only switched ON for the preset time in response to movement within the detection zone. The light then switches to the selected basic brightness.
- OFF = No basic light
- 10 min = Basic light for 10 minutes upon expiry of the stay-ON time selected.
- 30 min = Basic light for 30 minutes upon expiry of the stay-ON time selected.
 = Basic light all night. Basic lighting comes back on again as soon as the ambient light level falls below the selected response threshold.
Manual Override
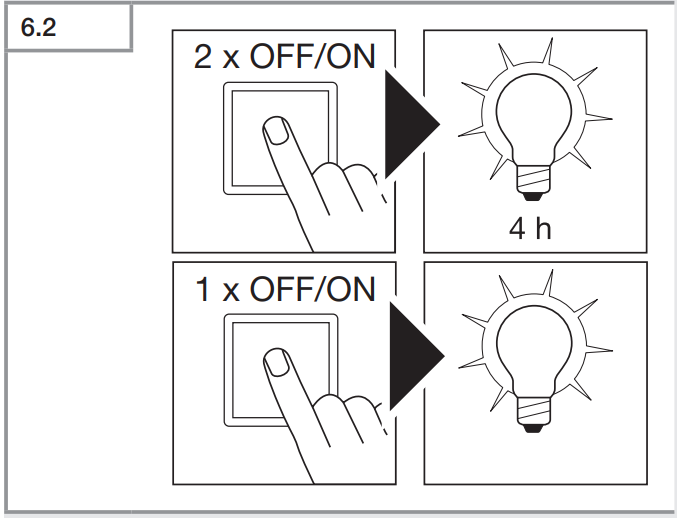
- Activate manual override:
Switch OFF and ON twice.
The LED floodlight is set to manual override for 4 hours. Then it returns automatically to sensor mode. - Deactivate manual override:
Switch OFF and ON once.
The light goes out or switches to sensor operation.
Important: Switching must take place within 0.2 to 1 second.
Adjusting the Detection Zone
To rule out inadvertent triggering or to target specific areas, the detection zone can be limited or adjusted with the shroud.

- Fit the shroud on the sensor.
- Fix the shroud in place by closing the cover.
Remote Control Accessory
Remote control RC 12
(EAN 4007841079000)

- Makes it easier to install larger-scale lighting systems. The LED floodlights can be set in any chosen way once they have been installed.
- Any number of LED floodlights can be controlled via the remote control unit.
- A status LED acknowledges each valid press of a button on the remote control unit.
- The RC 12 remote control uses a CR2032-type battery.
The RC 12 remote control can be used for selecting and setting the following XLED PRO ONE S/Plus S/Max S functions:
- Twilight setting: The chosen response threshold can be set from approx. 2 to 2,000 lux.
➔ Twilight setting (I) - Daylight mode: Depending on ambient light level.
- Night mode: 2 lux.
- Light-level setting via the memory button / teach mode: At the levels of light at which you want the sensor to respond to movement from now on, press the button. The current value is stored.
➔ Light-level setting: 2-2,000 lux. - Time setting: The period of time you want the light to stay ON after the last detected movement can be set to 10 s, 1 min, 5 min, or 15 min by pressing these buttons.
➔ Time setting (H) - Chosen ON time: Sets the light to stay ON for a time of your own choice. Each press of the button increments the current time setting by 1 min (up to 15 min).
- Manual override: Pressing this button in sensor mode switches the LED floodlight ON for 4 hours (status LED lights up permanently). Pressing this button in 4-hour ON mode switches the floodlight OFF for 4 hours (status LED lights up permanently). The 4-hour mode is terminated after the time elapses, by pressing the reset button or, in the 4-hour OFF mode, by pressing the 4-hour button.
- Install mode (test mode): Install mode has the purpose of checking for proper working order as well as for testing the detection zone. Irrespective of light level, the floodlight switches ON for 10 seconds in response to movement. Movement is signaled by the status LED. Install mode has priority over all other settings.
Install mode ends automatically after 10 minutes. Install mode ends immediately after pressing reset.
Note: Teach mode and Install mode cannot be used at the same time. - Reset: Resets all settings to the values manually selected on the floodlight or to the factory settings.
- Basic light level: The basic level of lighting from basic light LEDs provides a low level of illumination. The main light is only switched ON for the preset time in response to movement within the detection zone. The light then switches to the selected basic brightness.
➔ Basic light level (J)
Intelligent Remote Control (Optional)
- (EAN 4007841009151)
- Control via smartphone or tablet.
- Replaces the remote control.
- Load the appropriate app and connect via Bluetooth.
Cleaning and Maintenance
The tool requires no maintenance.
Hazard from electrical power
Contact between water and live parts can result in electrical shock, burns, or death.
- Only clean the tool in a dry state.
Risk of damage to property
Using the wrong cleaning product can damage the light.

- Clean the tool with a moist cloth without detergent.
Important note: The control gear cannot be replaced.
Disposal
- Electrical and electronic equipment, batteries, accessories, and packaging must be recycled in an environmentally compatible manner.
- Do not dispose of batteries or electrical and electronic equipment as domestic waste.
- The remote control contains a battery of type CR 2032 (lithium manganese dioxide/organic electrolyte).
EU countries only:
Under the current European Directive on Waste Electrical and Electronic Equipment and its implementation in national law, batteries and electrical and electronic equipment no longer suitable for use must be collected separately and recycled in an environmentally compatible manner.
Manufacturer's Warranty
As the purchaser, you are entitled to your statutory rights against the vendor. If these rights exist in your country, they are neither curtailed nor restricted by our Warranty Declaration.
We guarantee that your STEINEL Professional sensor product will remain in perfect condition and proper working order for a period of 5 years. We guarantee that this product is free from material, manufacturing, and design flaws. In addition, we guarantee that all electronic components and cables function in the proper manner and that all materials used and their surfaces are without defects.
Troubleshooting
Unit Without Power
- Fuse not switched ON or faulty.
- Switch ON fuse.
- Change faulty fuse.
- Break in wiring.
- Check wiring with voltage tester.
- Short circuit in mains power supply lead.
- Check connections.
- Any mains switch OFF.
- Switch ON mains switch.
Unit Does Not Switch ON
- Wrong twilight setting selected.
- Reset twilight setting.
- Mains switch OFF.
- Turn on mains switch.
- Fuse not switched ON or faulty.
- Switch ON fuse.
- Change faulty fuse.
- Rapid movements being suppressed to minimise malfunctioning, or detection zone too small or incorrectly defined.
- Check and adjust detection zone.
- Light source faulty.
- The light source cannot be changed. Completely replace unit.
Unit Does Not Switch OFF
- Continued movement within the detection zone.
- Check detection zone.
- If necessary, limit or change detection zone.
Unit Switches ON When It Should Not
- Floodlight not mounted for detecting movement reliably.
- Securely mount floodlight.
- Movement occurred but not identified by the observer (movement behind wall, small object moving in immediate proximity of lamp, etc.).
- Check detection zone.
- If necessary, limit or change detection zone.
Pros & Cons
Pros
- Advanced Motion Detection: High accuracy and wide detection range.
- Bright LED Lights: High-intensity illumination for improved visibility and security.
- Adjustable Settings: Customizable sensitivity and time settings.
- Energy Efficiency: Low power consumption with long-lasting LED lights.
- Durable Design: Weather-resistant and robust construction.
Cons
- Higher Cost: Pricier compared to basic motion detectors.
- Complex Installation: May require professional assistance for optimal placement.
- Sensitivity Issues: Potential for false triggering if not properly adjusted.
- May not be compatible with all smart home systems.
Customer Reviews
Customer reviews for the Steinel Motion Detector XLED PRO ONE Plus S have been largely positive, with many users praising its reliability and brightness. Some users have noted the need for careful adjustment of sensitivity settings to avoid false triggering, but overall, the product has been well-received for its performance and durability.
Common complaints include the higher cost compared to other motion detectors on the market and the complexity of installation for some users.
Faqs
What is the detection range of the Steinel Motion Detector?
How many lumens of brightness does the Steinel Motion Detector provide?
Is the Steinel Motion suitable for outdoor use?
How do I adjust the sensitivity settings on the Steinel Motion Detector XLED PRO ONE Plus S?
What is the estimated lifespan of the LED lights in the Steinel Motion Detector?
Can I pair the Steinel Motion Detector XLED PRO ONE Plus S with smart home systems?
How do I troubleshoot issues with the Steinel Motion Detector Plus S?
What is the operating temperature range of the Steinel?
Is the Steinel Motion Detector XLED PRO ONE Plus S energy-efficient?
How do I install the Steinel Motion Detector XLED PRO ONE Plus S?
Leave a Comment