Surecall Cellular signal booster kit and indoor antenna User Guide
Content
Surecall Flare Booster and Indoor Antenna Introduction
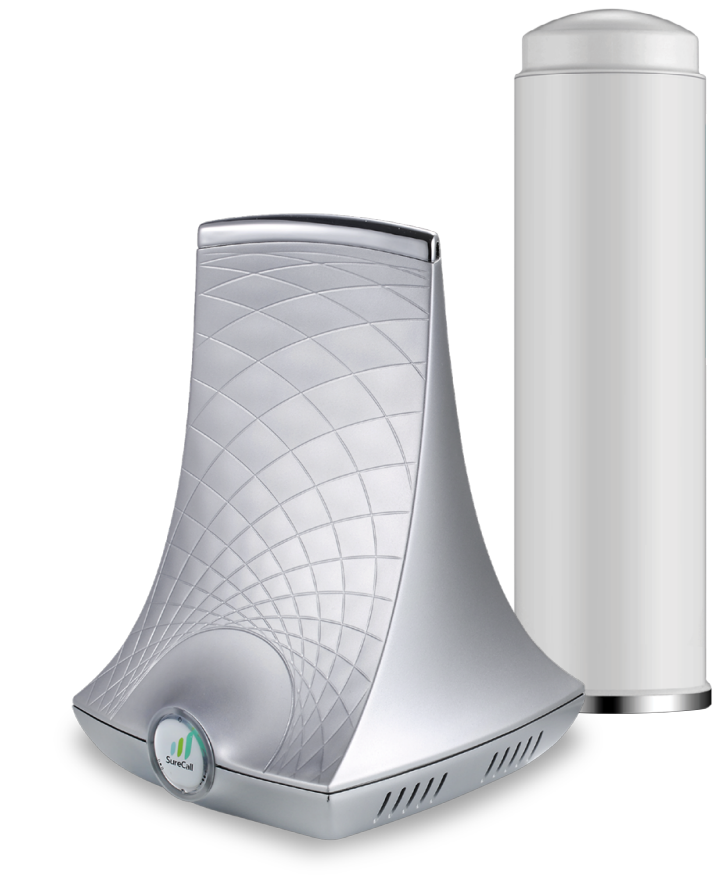
The Surecall Flare Booster and Indoor Antenna is a powerful cell phone signal booster designed to enhance connectivity in homes and small offices. Capable of covering up to 3,500 square feet, it utilizes advanced 2XP technology to double uplink power, ensuring reliable 5G and 4G LTE signals for multiple users. The sleek, integrated design combines the booster and indoor antenna into one unit, making installation straightforward and aesthetically pleasing. The Surecall Flare Booster is priced at $329.99.
PACKAGE CONTENTS
Unpack all package contents. For missing or damaged items, contact your reseller. Turn over the signal booster and record the model and serial number for reference:
Serial #: ________________________________________________________________ Purchase Date: __________________________________________________________
Keep the carton and packing material to store the product in case you need to return. Your Flare signal booster package includes the following items:
- SureCall Flare signal booster
- Power supply
- Cable for connecting the outside antenna to the booster
- Outside Omni antenna

Specifications
n | Flare 3.0 (U.S.) ; Flare 3.0 CA (Canada) |
| Uplink Frequency Range (MHz): | 698–716 / 776–787 / 824–849 / 1850–1915 / 1710–1755 |
| Downlink Frequency Range (MHz): | 728–746 / 746–757 / 869–894 / 1930–1995 / 2110–2155 |
| Donor/Server Port Impedance: | 75 ohm / 50 ohm |
| Maximum Gain: | 72 dB |
| Noise Figure: | 7 dB |
| VSWR: | ≤2.0 |
| Supported Standards: | CDMA, WCDMA, GSM, EDGE,HSPA+, EVDO 4G andallcellular standards |
| AC Input: | Input: AC 110 – 240 V, 60 Hz ; Output: DC 5V / 3A |
| Maximum Output Power: | 1 Watt EIRP |
| Cable: | RG6 (50 ft.) |
| RF Connectors: | Donor port: F Female, Serverport: Integral |
| Power Consumption: | <12W |
| Weight: | 1. 8125 lb. |
| Dimensions: | 5.125 × 7.25 × 5.625 inches |
| Certifications: | FCC ID: RSNFLARE-3 ; IC :7784A-FLARE3 |
Description
The Surecall Flare booster and indoor antenna features a sleek, omnidirectional design that blends well with any interior. The booster supports multiple users and devices, covering an area of up to 2,500 square feet. The package includes an outdoor yagi antenna, a 50-feet RG-6 cable, and a 2-feet RG-6 paddle cable. Additionally, Flare requires no technical expertise for installation, allowing users to enjoy enhanced reception effortlessly.
How It Works
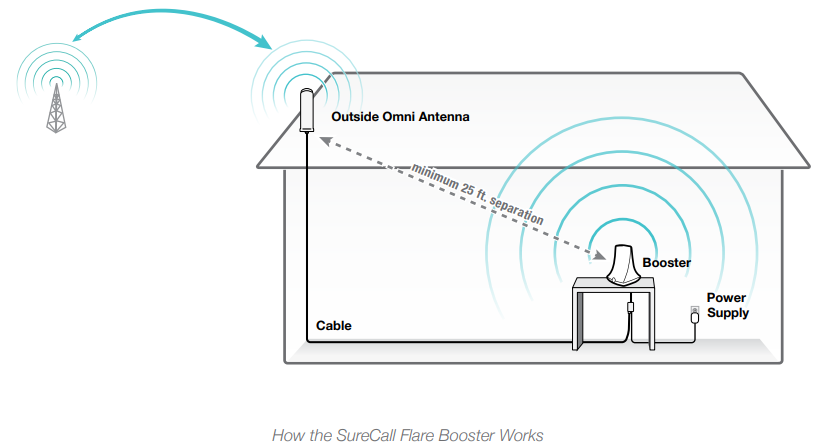
- An outside antenna collects a signal from the cell tower.
- The outside antenna sends the signal to the booster through a coax cable.
- The booster amplifies the cell signal and rebroadcasts the signal indoors to all mobile devices within range.
- The booster amplifies the outgoing cell signal back to the tower.
BEFORE INSTALLATION
- Prior to securing the location of any booster parts, a “soft install” is recommended as adjustments may be needed to optimize performance.
- Your planned location for the booster (central to where signal is needed) should be near an existing electrical outlet.
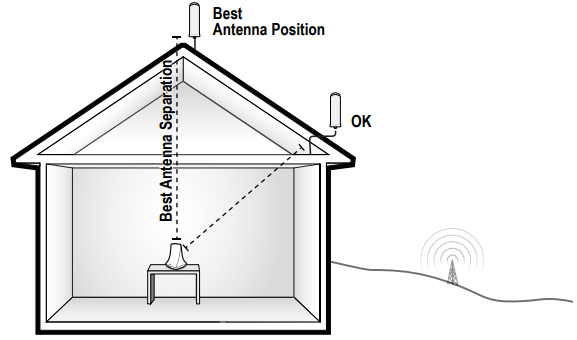
- Ensure adequate separation between the planned locations of the booster and outside antenna (at least 25 ft.).
- Ensure sufficient cable length between the outside antenna location and booster location. The length of the provided cable is 50 ft.
Installation Overview
- Step 1. Find the outside area with the strongest signal.
- Step 2. Install the outside antenna
- Step 3. Place the Flare on a table or desktop, center of the area where signal is needed.
- Step 4. Connect the booster to an AC power source.
Installation of Surecall Flare Booster and Indoor Antenna
Step 1. Find the Area With the Strongest Signal
- Using your phone, identify the outside location with the strongest signal for placement of your outside antenna. Generally, this is found above the roofline on the side facing your nearest cell tower and as high as possible – where the antenna can ‘see’ your cell tower.
- The coverage area that the booster provides is directly related to the strength of incoming signal received by the outdoor antenna. Mounting the outside antenna where the signal is the strongest will provide the best results. Please note, as seen in the table below, if signal is extremely weak where the outside antenna is installed, indoor coverage will be limited.
- Note that Bars are not always a reliable measure of signal. The best way to confirm signal coverage is the ability to place and hold a call. Putting your phone in Field Test mode will, however, indicate what level of decibels (dB) your phone is currently receiving.
Estimated Coverage
| Outdoor signal strength (dB) | 1-2 Bars (-85 to -95) | 3-4 Bars (-75 to -84) | 5 Bars (-65 to -74) |
|---|---|---|---|
| Flare with Omni antenna estimated coverage (sq. ft.) | 1000 | 2,000 | 4,000 |
Decibels are measured in the negatives, and a score closer to zero indicates you have a better signal. A signal of -120 dB indicates you have no service, while a score of about -50 dB means you have excellent signal strength Websites like Cell Reception and Antenna Search or applications like OpenSignal (Android | iPhone) and Network Signal Info (Android) are easy ways to find towers and get a general reading of your cell phone signal. The approach we suggest is field test mode.
How to Enter Field Test Mode for iPhones
- Check your iOS
- For iOS 11 and later go to Settings / Cellular / Cellular Data Options / Enable LTE / Turn Off LTE
- If not running iOS 11 Go into your Settings / WiFi / Turn Off WiFi
- For iOS 9.3 and later go to Settings > Cellular > Cellular Data Options > Enable LTE > Turn Off LTE For iOS 9.2 and earlier Settings > Cellular > Enable LTE > Turn Off LTE
- Make a phone call to *3001#12345#* and press call
- Select Serving Cell Measurements and refer to the top item named Measured RSSI
How to Enter Field Test Mode for Android
- Settings > More Options or More Settings
- Tap on About Phone > Mobile Networks > Signal Strength
- Under Signal Strength, you will see your dB reading. If you do not see it there you will see it under Network Type or SIM Status.

Step 2. Install the Outside Antenna
After identifying the area of the strongest signal, choose the surface where you will mount the outside antenna.
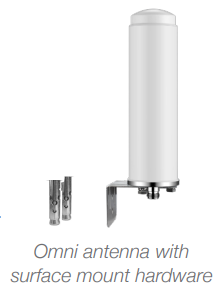
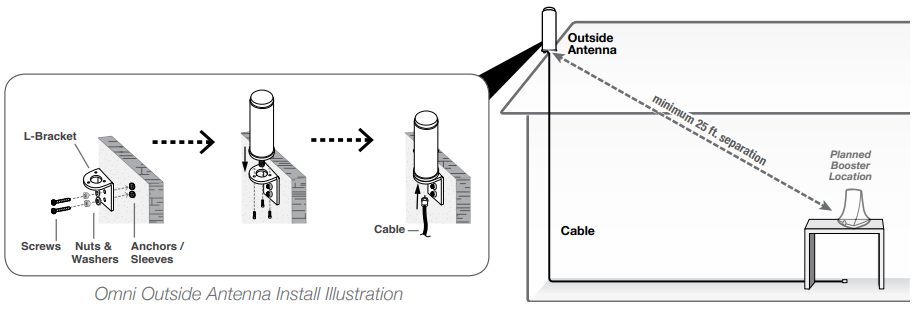
- Using the provided hardware, mount the outside antenna at the highest possible elevation, allowing a minimum separation of 25 feet from the planned location of the booster.
The Omni antenna is omnidirectional, which receives and sends signals in a 360º radius. The provided hardware allows for either a surface mount or pole mount.
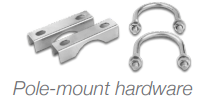
Mount antenna to a vertical surface:- Using a vertical plate of the bracket, mark the positionthe a of desired placement. The Omni antenna should be mounted in an upright position (See “Omni Outside Antenna Install Illustration” on page 9)
- Unscrew the nut from the end of the stucco screw and remove it along with the lock washer and regular washer.
- Place the vertical plate into the desired location and tap the screws, head first, along with the sleeve, into stucco 1/2 to 5/8 inches deep into place.
- In this order, place the washer, lock the washer and nut on each screw,, and tighten until secure. When tightening the screw, the sleeve will expand to secure the plate.
- Remove screws from the antenna base and use them to secure the antenna onto a horizontal plate.
- Connect the antenna to one end of the provided RG6 cable and tighten the connection. Run the cable along the route to the planned location of your booster.
Note: Alternate screws may be required for differing surfaces such as wood or concrete.
Do not collocate antennas or operate the outdoor antenna with any other antenna or signal booster.
Step 3. Place the Booster
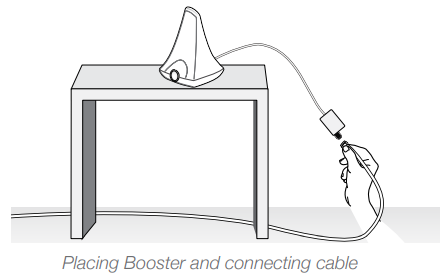
Place the booster in a central location where the signal is needed and at least 25 ft. from the outdoor antenna location. When placing the booster, note that further separation between the booster and the outside antenna will increase booster performance. Connect the open end of the RG6 cable from the outside antenna to the booster and tighten the connection.
Please note that the performance and range of your booster depends on three factors:
- Signal strength at the location of the outside antenna.
- Interior building materials between the booster and your mobile device.
- Distance between the outside antenna and booster (while at least 25 ft. separation is recommended, further separation will increase performance).
Note: This booster should not be used near open fire or flame. Storage and transportation: Store and place in a non-extreme room-temperature and dry environment.
Step 4: Connect to Power
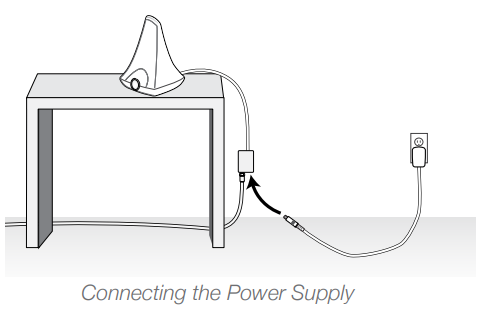
Once the booster and outside antenna are connected and in place, connect the power cord to the signal booster and plug it into a power outlet.
Enjoy Boosted Signal
Place a call in the room where the booster is located to confirm that your phone is receiving a boosted signal. Remember: Bars are not always a reliable measure of signal. The best way to confirm signal coverage is the ability to place and hold a call.
IF YOU WANT TO IMPROVE PERFORMANCE
- Identify a location outside that receives a stronger signal and move the outside antenna to that location (higher is usually better).
- Increase the distance between the booster and the outside antenna.
- Consider upgrading your outside antenna to a directional outside antenna that can be aimed at your nearest cell tower.
- See more tips and tricks or contact us at www.SureCall.com/support
LED INDICATORS
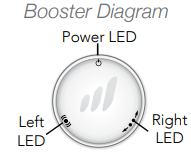
| LED Position | Condition | Indication |
|---|---|---|
| Left or Right | OFF -OR- Solid Yellow | Normal active operation. |
| Left | Yellow Flashing | Normal operation. Automatic Gain Control (AGC) is self-adjusting. |
| Left | Red Flashing | The booster is receiving too strong of a signal which could cause the booster to automatically shut down. |
| If this happens, relocate the outside antenna to a location where the signal is weaker. Move in small increments away from the cell tower until the Red flashing stops. | ||
| Right | Yellow Flashing | Automatic Gain Control (AGC) is preventing oscillation. Increased separation between outside antenna and booster is recommended to optimize performance. |
| Right | Red/Yellow Alternately Flashing | The booster has shut down to prevent oscillation. Increased separation between the outside antenna and booster is required to continue operation. |
TROUBLESHOOTING
If you have any questions during setup, please reach out to our US-based experienced support technicians: Call: 1-888-365-6283, Email: [email protected], or Visit: https://www.surecall.com/support
Here signal is the table written exactly as it appears in the image:
| Problem | Resolution |
|---|---|
| Signal booster has no power | - Connect the power supply to an alternate power source. - Be sure the power source is not controlled by a switch that can remove power from the outlet. - Check the POWER LED (🔌) on the signal booster. If it is OFF |
| After installing your signal booster system, you have no signal or reception | - Verify that cable connections are tightly fitted to the booster and antenna. - Try further separating the booster and antenna. - Verify that there is usable signal where the antenna is placed. - Remember: Bars are not always a reliable measure of signal. The best way to confirm signal coverage is the ability to place and hold a call. |
Kitting Information
| Component | Product number | Gain/Loss | Note | ||||
|
| LTE-A 707 MHz | LTE-V 731 MHz | Cellular 800 MHz | PCS 1900 MHz | AWS 1700 / 2100 MHz |
|
| Outdoor Antenna* | SC-289W | 3 dBi | 3 dBi | 3 dBi | 4 dBi | 4 dBi / 4 dBi |
|
| SC-231W | 8 dBi | 8 dBi | 8 dBi | 10 dBi | 10 dBi / 10 dBi |
| |
| Outdoor Cable* | SC-RG6-50 | 3.32 dB | 3.32 dB | 3.95 dB | 6.42 dB | 6.22 dB / 6.68 dB | 50 Feet or longer |
| Indoor Antenna | SC-322W | 2.5 dBi | 2.5 dBi | 3 dBi | 5 dBi | 4 dBi / 5 dBi |
|
| SC-302W | 2.5 dBi | 2.5 dBi | 3 dBi | 5 dBi | 4 dBi / 5 dBi |
| |
WARRANTY
Three-Year Product Warranty
Activate your three-year manufacturer’s warranty at www.SureCall.com/activate SureCall warrants its products for three years from the date of purchase against defects in workmanship and/or materials. Specifications are subject to change. The three-year warranty only applies to products meeting the latest FCC Certification Guidelines stated on 2/20/2013 and going into effect on April 30, 2014. A two-year warranty applies to any products manufactured before May 1, 2014.
Pros & Cons
Pros
- Supports all major US carriers: Verizon, AT&T, Sprint, T-Mobile, and more.
- Easy installation with no technical expertise required.
- Sleek and unobtrusive design.
- Boosts signal in areas up to 2,500 sq ft.
- Five-year manufacturer's warranty.
Cons
- More expensive compared to some competitors.
- May not work optimally with poorly located outdoor antenna placements.
Customer Reviews
Customers have praised the Surecall Flare booster for its ease of installation and noticeable improvement in signal strength. They appreciate the device's compatibility with multiple carriers and its impact on their daily lives. However, a few users have noted that the booster's performance heavily relies on the outdoor antenna's location, requiring strategic placement for optimal results.
Faqs
What is the coverage area of the Surecall Flare booster?
Is the Surecall Flare compatible with all major US carriers?
Does the Surecall Flare booster require technical installation expertise?
What is included in the Surecall Flare booster package?
How long is the warranty on the Surecall Flare booster?
What is the maximum number of devices the Surecall Flare booster can support?
How does the Surecall Flare booster improve cell signal strength?
How high should the Surecall Flare booster's outdoor antenna be installed?
Can the Surecall Flare booster be mounted on a wall?
Leave a Comment
