
Setting up: Samsung SM-R323 Gear VR User Manual | Installing and wearing
Content
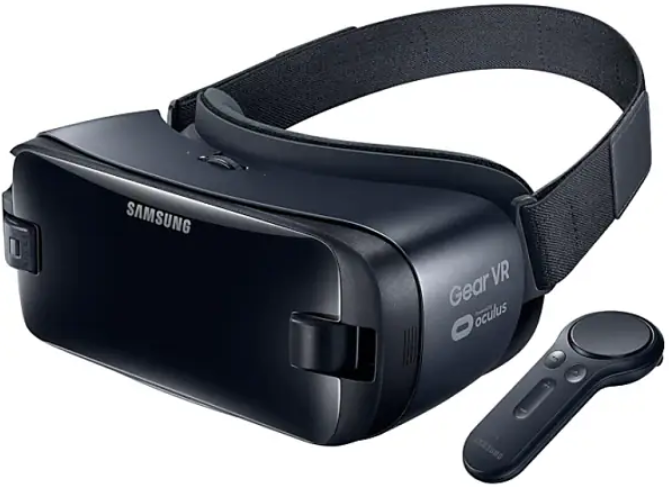
Samsung SM-R323 Gear VR
Introduction
The Samsung SM-R323 Gear VR is a virtual reality headset that allows users to experience immersive virtual reality content on their compatible Samsung smartphones.
Specifications
- Compatible Devices: Samsung smartphones
- Field of View: 101 degrees
- Connectivity: Micro USB
- Sensors: Accelerometer, Gyro Sensor, Proximity Sensor
- Controls: Touchpad, Back button, Volume key
- Weight: 318g
Instructions
- Connect your Samsung smartphone to the Gear VR using the Micro USB connector.
- Adjust the straps to ensure a comfortable fit on your head.
- Put on the Gear VR and adjust the focus wheel for optimal clarity.
- Use the touchpad and buttons on the side of the Gear VR to navigate and interact with virtual reality content.
- When you are done, disconnect your smartphone and store the Gear VR in a cool, dry place.
Device Functions
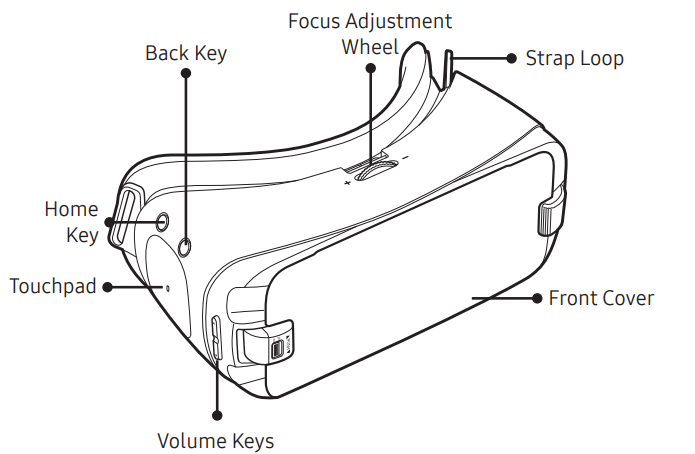
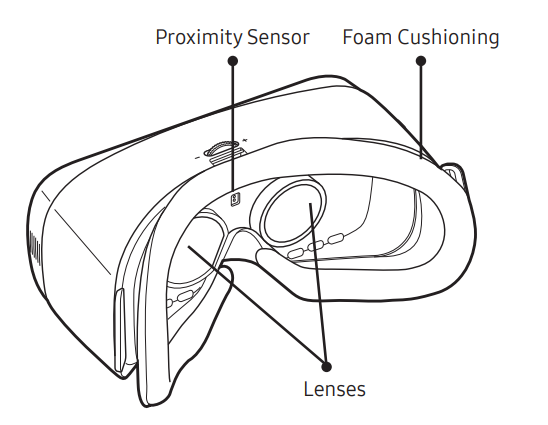
Note: Factory lens protectors are pre-installed on the Gear VR. Remove the lens protectors before you use the Gear VR.
Controls
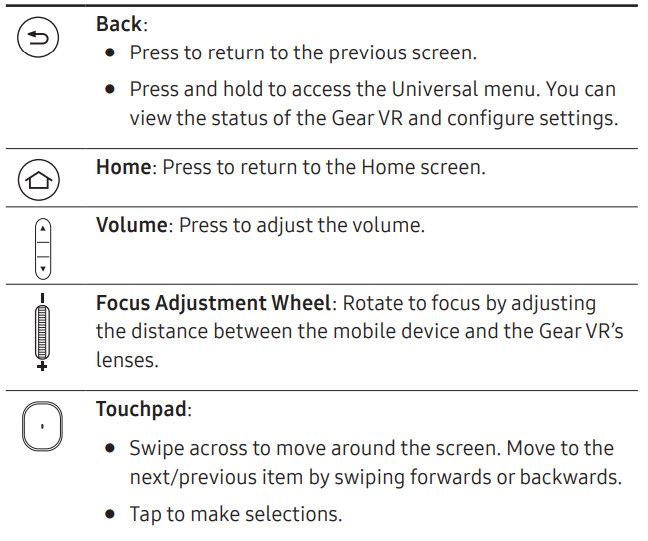
Setting Up the Device
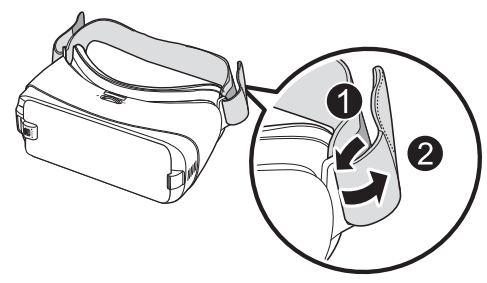
Installing the straps
Insert each end of the strap through the main strap loop on the Gear VR (1) and use the velcro to fasten each end (2).
Carefully insert the hook (from the top head strap) into the front bar of the Gear VR (3), then pull it upward until it locks in place (4). The hook snaps when secured.
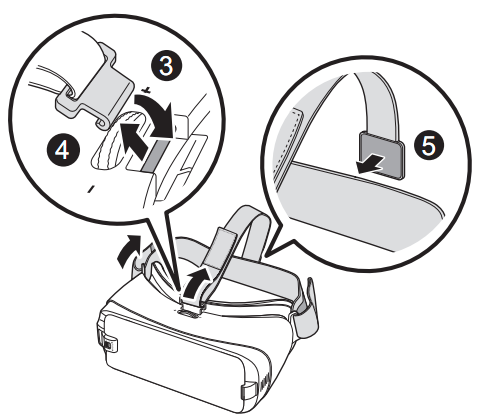
- Slide the top head strap through the loop and use the velcro to fasten it (5).
Note: The head strap contains a longer velcro strip and is used to secure the front of the Gear VR frame.
Caution: Do not put on the Gear VR when you are wearing glasses. Doing so may cause facial injuries. If you need corrective lenses, it is recommended that you wear contact lenses when using the Gear VR. If you are farsighted or there is a big difference between your left and right eyes’ vision, wear corrective lenses before using the Gear VR.
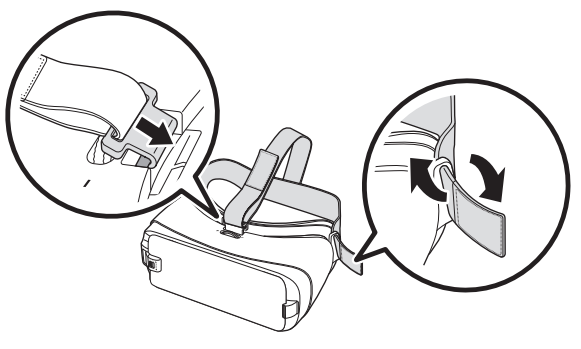
Removing the straps
Remove the top strap by pulling its loop towards the foam cushioning. Then, remove the main strap.
Installing the Mobile Device
This section outlines the process for removing the cover, replacing the device holder, and then installing the desired device type.
Removing the Cover
Gently pull the right device holder outwards, then gently remove the protective front cover.
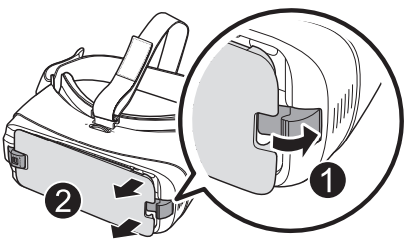
Note: Keep the lenses clean and protect them from getting scratched. If the lenses get dirty or steam up, clean them with the lens cleaning cloth. When you are not wearing the Gear VR, do not place objects on the proximity sensor inside the Gear VR. Doing so may cause the proximity sensor to remain on and drain the mobile device’s battery.
Connecting the Mobile Device
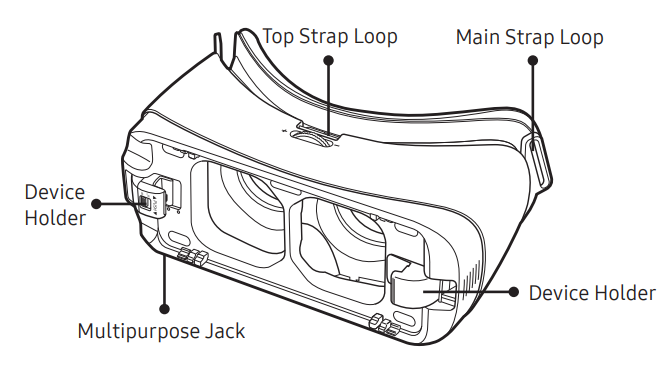
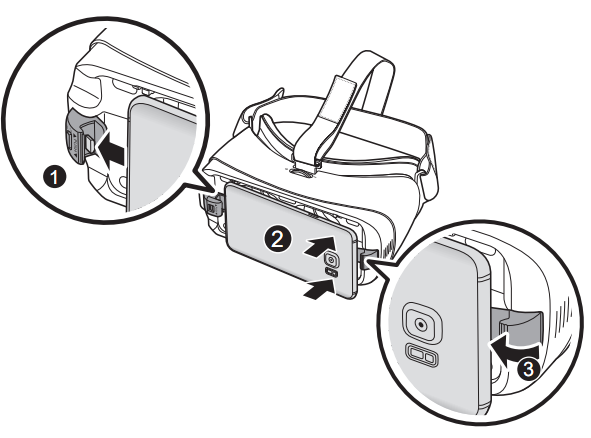
- Pull the device holder (right) to the right (1), verify the Lock Switch is in the correct “locked” position (2), and gently push the device holder into either position A or B (3),, depending on the size of the mobile device screen you want to use.
- Verify that your device volume is on and not set to silent.
- Carefully insert the mobile device (face down) at an angle into the center of the Gear VR, and then insert the Gear VR connector (1) into the mobile device’s USB port.
Note: Ensure that the connector is fully inserted into the mobile device’s USB port. The device makes a sound when properly connected.
Caution: Do not forcefully insert the connector into the mobile device, as this may damage the connector. Improper installation can scratch the mobile device. - Insert the mobile device into the center of the Gear VR and gently push the mobile device until it locks into place (2). The device holder (right) will return to the previous position and hold the mobile device (3). The mobile device will emit a sound when it is connected to the Gear VR properly.
Caution: If the mobile device is not securely locked, the mobile device may accidentally separate from the Gear VR and be damaged. Do not twist or bend the Gear VR’s connector when you connect or disconnect the mobile device. Doing so may damage the connector. - Verify the orientation of the mobile device.
Caution: If you insert the mobile device tilted to one side, it may cause discomfort. In this case, the mobile device screen will not be aligned properly with the lenses.
Note: Verify that your device volume is not set to silent. If the sound is not emitted when you insert the connector into the mobile device, the Gear VR did not recognize the connection. Carefully reconnect the mobile device until you hear the sound.
Caution: Do not leave the Gear VR in direct sunlight. Exposure to direct sunlight can damage the Gear VR and the connected mobile device.
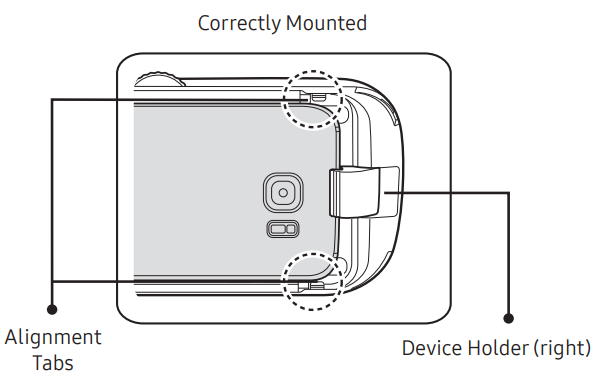
- Position A: is used for larger devices.
- Position B: is used for smaller devices.
Installing Gear VR Software
You must install the Gear VR software in order to use the Gear VR. When you connect the mobile device to the Gear VR for the first time, the setup process automatically begins.
Note: Connect your mobile device to an active cellular network or Wi-Fi connection before performing the setup process.
- If using the device for the first time, go to www.oculus.com to create an account and follow the onscreen prompts.
- Unlock your mobile device and turn up the volume.
- Carefully install the compatible mobile device into the Gear VR compartment.
Important: If the mobile device is not connected properly, you are not prompted to continue with the setup process. - At the voice prompt, separate the mobile device from the Gear VR.
- Tap START on the Welcome! Screen and follow the prompts.
- Read and agree to the health and safety warnings, and the terms and conditions in the End User License Agreement (EULA), and then tap NEXT > INSTALL.
Note: During this initial process, you might be prompted to install additional software or update your mobile device firmware. - When prompted, tap Sign In and enter your previously created email and password.
- Follow the onscreen prompts to configure your account.
- When the software is installed, the Oculus app will appear on the Apps screen of the mobile device.
- Reconnect your mobile device to the Gear VR and place the Gear VR on your head.
Note: If the screen appears tilted or skewed while using the Gear VR, take it off and then place the Gear VR on a flat surface. Wait 5-7 seconds before using it again.
Completing the Set Up Process
- Confirm the mobile device is securely mounted in the Gear VR.
- Read the displayed Health & Safety Warning! Information a,,n d then use your head to position the onscreen Pointer (crosshair) into the Oculus logo area to continue.
- Follow the prompts to learn how to:
- Position the cursor at desired locations.
- Use the Touchpad to make selections.
- Swipe forward and backward using the Touchpad.
- Swipe up and down.
- Use the VR’s
 Back key to return to a previous selection.
 - Press and hold the Back key to access the Universal menu.
- Press the Back key again to exit.
This menu contains items such as: Oculus Home, Passthrough Camera, Reorient, Volume, and Brightness.
- A proximity sensor inside the Gear VR detects the position of your face. When you wear the Gear VR, the screen will unlock, and you can then use the touchpad.
- The 3D viewing experience may vary depending on your visual acuity.
- Unlock your mobile device before using the Gear VR.
- If the screen appears tilted or skewed while using the Gear VR, take it off. Then, place the Gear VR on a flat surface with the lenses facing forward and the Focus adjustment wheel at the top. Wait 5–7 seconds before using it again.
Using the Charger
You can connect the charger to the multipurpose jack on the bottom of the Gear VR.
Note: Use only Samsung-approved USB cables and power adapters.
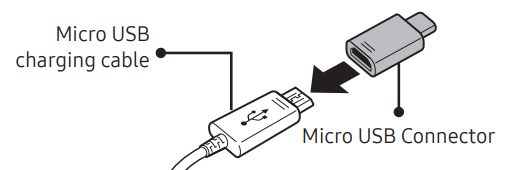
- When connected to the charger, it is the connected mobile device that is being charged and not the Gear VR.
- If using the Gear VR while the charger is connected to the Gear VR’s multipurpose jack :
- It is powered by the charger and does not use the mobile device’s battery. When using content that has high power demands (more than 1.5A) while the charger is connected, the Gear VR uses two power sources.
- In high-power demand situations, the Gear VR draws power from both the charger and the mobile device’s battery at the same time.
If the Gear VR is disconnected from the charger while it is being used:
- The image on the screen may be briefly inactive.
- During this period, the screen recalibrates, and the Gear VR may not recognize your head movements.
If the Gear VR is not used while the charger is connected:
- The mobile device’s battery will be charged.
- To save energy, unplug the charger when not in use. The charger does not have a power switch, so you must unplug the charger from the electric socket when not in use to avoid wasting power.
- The charger should remain close to the electric socket and easily accessible while charging.
- Replace the front cover once you have finished using the Gear VR.
Know Your Device
Learn some of the key features of your device, including the screens and icons, as well as how to navigate the device.
Navigation - Home Screen
Any time the Gear VR application restarts, you are prompted to read the displayed Health and Safety information and tap the touchpad to accept the terms before proceeding.
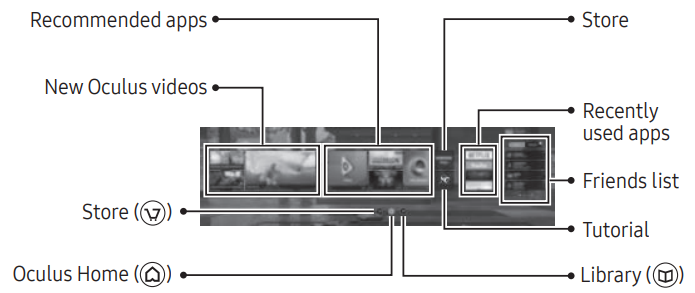
The Oculus Home screen is the starting point for accessing Apps, files, features, and connecting with others.
From this Home screen,, you can navigate to any of the these screens:
- STORE screen: Provides access to VR applications. Swipe through to view the available downloads.
- HOME screen : Provides access to the main home screen.
- LIBRARY screen : Provides access to all currently installed VR content and applications. Swipe through your available selections and tap the touchpad to activate an app.
Additional options available on this screen are:
- Samsung Gear VR: Provides access to VR-related applications
- Tutorial: Provides an on-screen tutorial on device use
- Recent: Displays a list of recently used apps.
- Available Apps: Displays available and recommended applications.
- Friends/Requests: Provides an area to track your current Friends and pending requests.
Troubleshooting
Common Issues & How to Fix Them
| Symptom | Possible Cause(s) | Solution |
|---|---|---|
| Phone won’t plug into headset / doesn’t recognise | – Wrong adapter (USB-C vs microUSB) – Phone case blocking connector – Connector not fully inserted – Cover still on headset holder | Remove case, verify correct version (SM-R323 uses appropriate connector for your phone) & gently insert until click. |
| Screen stays black or app fails to launch | – Outdated Oculus/Gear VR service apps – Software conflict – Phone not properly locked or recognised – Cover or phone mis-aligned | Update apps, reboot phone, reinsert into headset. Disable interfering “cleaner” apps that might remove VR files. |
| Image is blurry / out of focus | – Lens focus not adjusted – Protective film over lenses – Lenses scratched or dirty – Phone not aligned properly | Rotate the focus wheel on top of the headset until image sharp. Clean lenses with cloth. Remove any protective film. |
| Headset or phone gets very hot quickly | – Charging while using VR – High performance app running long time – Phone cover restricting airflow – Brightness too high | Don’t use while charging. Close background apps. Remove phone cover or use in cool environment. Decrease phone brightness. |
| Trackpad / Touchpad not responding | – Software glitch – Excessive pressure on touchpad – Faulty hardware | Restart headset, ensure simple light taps rather than heavy presses. If still non‐responsive, may need hardware service. |
| “Network error” or similar message | – Phone’s network or WiFi disconnected – VR app requires network but offline | Ensure phone connected to WiFi or cellular network when first using VR apps |
Additional Tips & Considerations
- Breaks are important: Prolonged VR use can cause fatigue, eye strain,, or motion discomfort. The manual recommends taking at least 10-15-minute breaks every ~30 minutes.
- Proximity sensor caution: Don’t cover the internal proximity sensor when not using the headset (for example, placing objects inside) because it may stay “on” and drain the battery.
- Brightness & comfort: Very bright screens not only contribute to heat, but may also cause discomfort. Adjust brightness to a comfortable level.
- Use a compatible device: Using an unsupported phone may lead to unpredictable behaviour, everything from display misalignment to app failures.
- Lens care: Even small scratches or fingerprints can worsen the VR viewing experience. Use a microfiber cloth; avoid liquids unless specifically allowed.
- Environment: VR blocks external vision; ensure you’re seated and in a safe environment without obstacles to avoid injury.
Faqs
Is the Samsung SM-R323 Gear VR compatible with all Samsung smartphones?
What is the field of view of the Samsung SM-R323 Gear VR?
How do I connect my smartphone to the Gear VR?
What sensors does the Samsung SM-R323 Gear VR have?
How do I navigate and interact with virtual reality content?
Can I adjust the focus of the Samsung SM-R323 Gear VR?
Is the Gear VR comfortable to wear?
What can I do with the Samsung SM-R323 Gear VR?
How should I store the Gear VR when not in use?
Is the Samsung SM-R323 Gear VR wireless?
More samsung manuals
- Samsung J3 Orbit S367VL User Manual | Features & Setting
- Samsung S20 FE G781U User Manual | Features & Settings
- Samsung MU6300 TV User Manual | Connection & Features
- Initial Set-up: Samsung 6 Series Smart LED User Manual
- How to Connect: Samsung Soundbar HW-R650 User Manual
- How to Pair: Samsung SM-R322 Gear VR User Manual | Functions
Leave a Comment