How to Connect: Thermos HYDRATION BOTTLE WITH SMART LID PRODUCT
Content

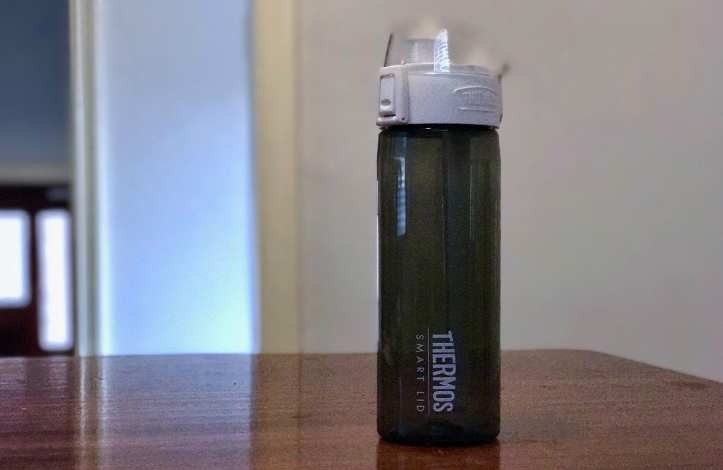
Introduction of Thermos Hydration Bottle with Smart Lid
The Thermos Hydration Bottle with Smart Lid is the perfect companion for active individuals who value both hydration and technology. This innovative product is designed to keep your drinks hot or cold for up to 12 hours, with a functional smart lid that allows one-handed operation. The estimated price of this product is around $40, and it is set to launch in the coming months.
Detailed Specifications
Here are the key features of the Thermos Hydration Bottle with Smart Lid:
- Capacity: 24 oz
- Vacuum insulation technology
- Smart lid with one-handed operation
- Durable stainless steel construction
- Leak-proof design
- Color options: black, silver, and red
- Dishwasher safe
GETTING STARTED
Thermos Smart Lid App
The Thermos Smart Lid app is user friendly and customizable in order to help you get the most use out of your connected hydration bottle. The Thermos Smart Lid app is compatible with the following devices:
- iPhone device (4S and later)
- iPad device (3rd generation and later)
- iPad mini device (all generations)
- iPod touch device (5th generation and later)
- Android devices (4.3 or later). Requires Bluetooth Low Energy.
List of Android Compatible Devices:
- Samsung: Galaxy Note 3, Galaxy Note 4, Galaxy S3, Galaxy S3, Galaxy S5, Galaxy S6, Galaxy S7, Galaxy Tab 4
- Google: Nexus 5, Nexus %X, Nexus 6, Nexus 9
- HTC: HTC One (M7), HTC One (M8), HTC One (M9), HTC10
- LG: G3, G4, G5, V10
- Sony: Xperia Z, Xperia Z Ultra
- Motorola: Moto G, Moto X
Note: Many other devices may work that run on Android 4.3 or later and use Bluetooth Low Energy
You must be running iOS 7+ on your device to use the Thermos Smart Lid app. Please visit the App Store or Google Play Store and search “Thermos” to download the free Thermos Smart Lid app. Follow the instructions within the app to connect to your Thermos Connected Hydration Bottle with Smart Lid and get started!
Internal Lid Data Storage
Your SP400 smart lid has a built-in data storage feature allowing you to keep track of your liquid consumption without having your device in range.
- Your SP400 smart lid records data internally and syncs that data to the Thermos Smart Lid app once the device is connected.
- Your SP400 smart lid can store up to a week’s worth of data before previous data is overwritten.
Battery Information
Your SP400 smart lid has a Lithium-ion battery installed in it.
- Battery level and charging indication can be found within the Thermos Smart Lid app under “Device Settings”.
- To charge, plug the USB cable into the back of the lid and connect to a power supply. Approximate full recharge time is 3 hours.
- Battery life can be up to 12 days based on usage and connection time.
- Your battery does not need to be fully charged before the first use, however, it is suggested. Please refer to section 1.5 on how to turn the SP400 smart lid on for the first time.
Battery Warning
- Do not dispose of unit in a fire. Do not puncture. The battery could explode causing injury or death.
- Dispose in accordance with local laws and regulations.
- Only charge the battery with the included cord connected to a 5VDC USB power supply.
- Do not attempt to disassemble the SP400 smart lid as this may result in electric shock.
- If USB receptacle has been exposed to moisture, allow adequate drying time before charging.
- Do not use or charge SP400 smart lid in extremely high or low temperatures.
- Do not expose SP400 smart lid to moisture while charging.
Powering On & Off
To turn on your SP400 smart lid, simply plug the USB cable into the back of the lid while the other end plugs in to an appropriate power supply.
- After charging the first time, your SP400 smart lid is always on and ready to connect to your compatible device.
- SP400 smart lid is always active and cannot be turned off.
- If the battery is too low, the SP400 smart lid will not appear in the available Bluetooth device list. Connect the USB cable into the back of the lid while the other end plugs in to an appropriate power supply for 3 hours.
Connecting
To connect your SP400 smart lid to your compatible device, follow these steps:
- Download the Thermos Smart Lid app from the App Store or Google Play Store on one of the following compatible devices:
- iPhone device (4S and later)
- iPad device (3rd generation and later)
- iPad mini device (all generations)
- iPod touch device (5th generation and later)
- Android devices (4.3 or later). Requires Bluetooth Low Energy. For complete list, go to https://thermos.com/smartlid
CARING FOR YOUR SP400 SMART LID
- Enable Bluetooth wireless technology on your smart device under ‘Settings’. The Bluetooth line of sight range is up to 75 ft. Make sure your bottle is within this range whenever trying to connect to the Thermos Smart Lid app.
- Plug the USB cable into the back of your SP400 smart lid and into a power supply to wake up the smart lid. Note: The smart lid will not appear in your app until you plug USB power into the lid for the first time.
- Open the Thermos Smart Lid app to connect to your SP400 smart lid.
- You are ready to use your SP400 smart lid!
- Unplug the USB cord from the lid before washing.
- Wash and rinse the lid and bottle thoroughly before first use and after each use. Hand washing is required. The product is NOT dishwasher safe.
- DO NOT submerge the lid under water.
- DO NOT use bleach or cleaners containing chlorine on any parts of the product.
- DO NOT use harsh or abrasive scrubbing pads to wash the lid or bottle. Simply use a soft dish cloth for cleaning.
- Dry off the USB port as much as you can before using.
- For best results, dry off sensor tube after each use.
Warnings
- NOT FOR USE WITH HOT LIQUIDS: For cold liquids only. Hot liquids may burn or scald user.
- Dairy or other liquids that spoil easily should not be kept in product for prolonged periods. Proceed with caution when using the product with quick spoiling contents. If beverages are left in the container longer than 24 hours, or you suspect spoilage, use caution when opening the container. Spoilage can cause pressure inside the container to build, possibly leading to the forceful ejection of the stopper or contents. In such circumstances, before attempting to open the container, ENSURE THE OPENING IS POINTED AWAY FROM THE USER OR OTHER PERSONS TO AVOID INJURY.
- DO NOT use to store or carry carbonated drinks or dry ice. This may cause the lid, stopper, and contents to eject forcefully or leak.
- DO NOT use product in microwave, on stove top, or in any type of oven.
- DO NOT overfill the bottle: Leave space at top of bottle for lid, straw (if present) and stopper (if present), to avoid overflow.
- DO NOT use tools or devices to force the container to open.
- If you are unable to open the container by hand, do not open it and dispose of it at your local waste facility.
USEFUL OPERATIONAL NOTES
- NOT RECOMMENDED FOR USE BY CHILDREN UNDER AGE 13. Children 13 and older should only use with adult supervision.
- The sensor tube will measure the water level when the bottle is placed upright and level is stable.
- That level will take approximately 3 seconds to update when a sip is taken.
- The app includes a representation showing the approximate level of water in the bottle.
- The app organizes your water intake into sessions. Filling the bottle will start a new session and will take approximately 10 seconds to update in the app.
- A new session will start at midnight if any water is left in the bottle at that time and that session will show 12:00 am as the start time.
- The sensor tube can also measure the temperature of the liquid in the bottle. Temperature may take approximately 5 minutes to stabilize depending on change in temperature, this is due to the sensing tube temperature normalizing.
- If you pour out any water, the app will record this as water you consumed.
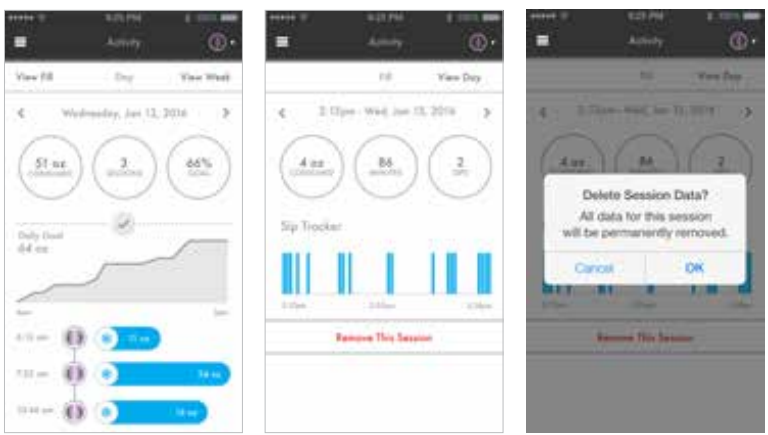
- If you do not want poured out water recorded, you are able to utilize the “Remove This Session” from the activity view. It will remove the entire session from your dashboard and in your activity view..
THERMOS SMART LID APP FEATURES
Initial Set Up
Connecting To Your SP400 Smart Lid: As you get started and launch the Thermos Smart Lid app, you will tap the “Get Started” center circle. It will bring you to the “Set Up User Profile” page. There are 2 ways to continue with the initial set up process:
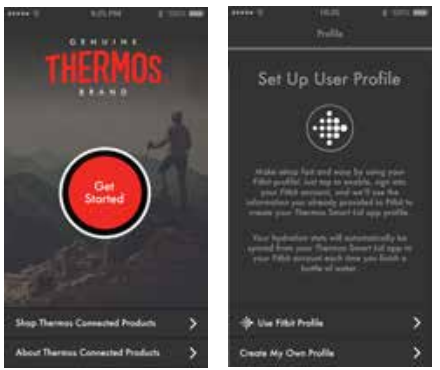
Create My Own Profile
Tap the arrow next to the “Create My Own Profile” text. You can input your name, add a photo, and enter an email address. Tapping “Next” moves you forward through the set up screens.

Use Fitbit Profile
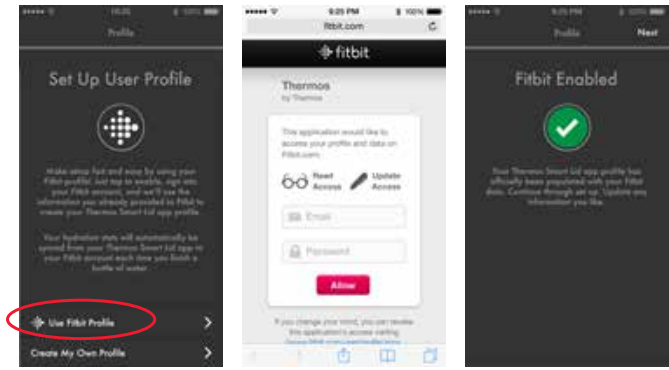
Tap the arrow next to the “Use Fitbit® Profile” text. You will be directed to the Fitbit website to login with your credentials. When the correct credentials have been entered, you will be brought back to the Thermos Smart Lid app and a “Fitbit Enabled” screen will appear. Your Thermos Smart Lid app has officially been populated with your Fitbit profile data!
Hydration Stats
Your hydration stats will automatically be synced from your Thermos Smart Lid app to your Fitbit® account each time you finish a bottle of water.
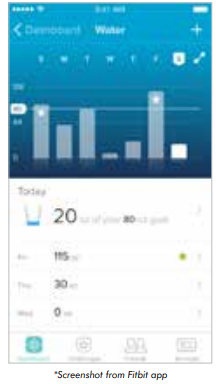
Important Note: The hydration data is sent to your Fitbit account once the bottle is refilled again. If you do not fill up your bottle again, your last hydration session will populate to your Fitbit account at 12:00 am the next day.
Wake Up Smart Lid
The initial set up is easy and the Thermos Smart Lid app will walk you through the process step by step. To wake up the bottle from it’s dormant state, you will need to plug the USB cord that was included in the box when purchasing your product and then plug it in to an appropriate power source.
Note: If connecting for the 1st time, it is best to fully charge your lid beforehand. Charge your lid for approximately 2-3 hours for a full charge.

Bluetooth Pairing
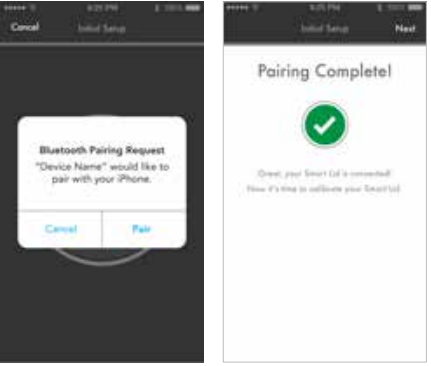
If the app is able to find your smart lid, a pair request pop-up appears. Click on “Pair” or “Ok”. You should then receive confirmation that your smart lid connected successfully.
Hydration Goal Set Up General Baseline
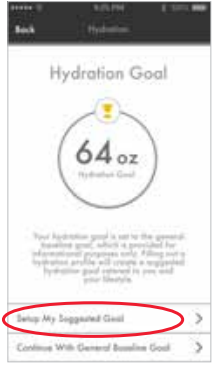
You can set your daily hydration goal as a general baseline goal. The general daily baseline goal is 64 oz. If you choose the general baseline goal, you will be presented with a confirmation and directions on how to adjust if needed for the future.

Suggested Goal
You can set your daily hydration goal with a suggested goal. The suggested goal set up will walk you through a detailed step by step process. A profile set up is created using the integrated hydration calculator.
Hydration Calculator
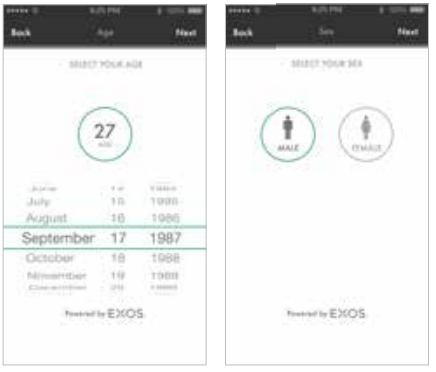
Personal Information: The hydration calculator will ask you to select your age and sex. These steps are required in order to set a suggested daily hydration goal.
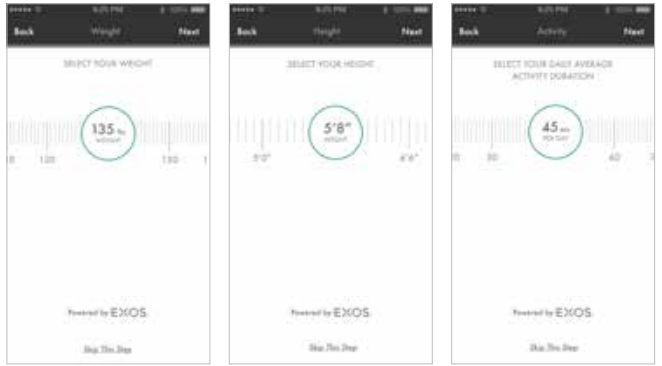
The hydration calculator will also ask you to select your weight, height and activity duration. These steps are not required in order to set a suggested daily hydration goal, but are recommended in order to achieve the most accurate goal.
Note: If you have synced your Fitbit® account during the initial set up stage, your age, height, weight, and sex will pre-populate with the information that is in your Fitbit profile. This is a one-time process. Your Thermos Smart Lid account will not automatically update these stats if you make any changes in your Fitbit account after initial set-up. You will need to manually update your stats in the Thermos Smart Lid app.
Activity Intensity
The hydration calculator will ask your activity intensity. You are able to swipe through the lower band to choose the appropriate intensity level that fits your lifestyle. This step is not required in order to set a suggested daily hydration goal, but is recommended in order to achieve the most accurate goal.
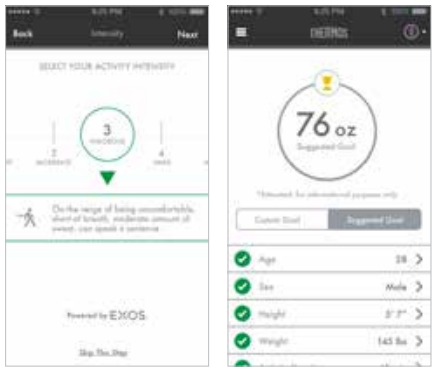
- Could maintain for hours, easy to breathe, no sweat, can carry a conversation
- Could maintain for hours, breathing heavy, low amount of sweat, can hold a short conversation
- On the verge of being uncomfortable, short of breath, moderate amount of sweat, can speak a sentence
- Very difficult to maintain exercise, can barely breathe and speak, heavy amount of sweat
- Feels almost impossible to keep going, out of breath, unable to talk, extremely heavy amount of sweat
Device Calibration
The calibration process is easy! When initially setting up your smart lid, the calibration screen will automatically pop up during the initial set-up process. Remove your lid from the bottle and the app will walk you through the step by step process. Make sure to dry the sensor tube well before calibrating to ensure your lid will read properly.
If your Activity Dashboard statistics are not accurately reading while using your bottle, try re-calibrating your lid. This can be done at any time while using your SP400 smart lid. To access the calibration screen, go to Device Settings and tap on the Device Calibration topic. Follow the steps shown on your app.
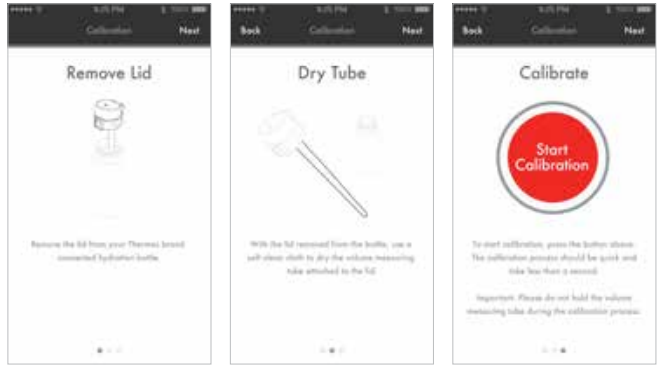
Important Note: DO NOT hold the sensor tube during the calibration process. This will affect the proper calibration. You must hold the lid at the top, near the mouthpiece.
Main Menu
Options
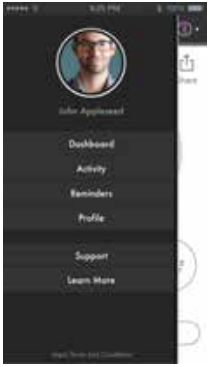
By tapping on the menu icon on the top left corner, you will be presented with a list of options to view including Dashboard, Activity, Reminders, Profile, Support, and Learn More. This menu shelf will push the active screen to the right and will slide closed when tapped again.
Activity Dashboard
The activity dashboard displays information about the current liquid level in your bottle, temperature of the liquid, and the progress you are making towards your daily hydration goal.
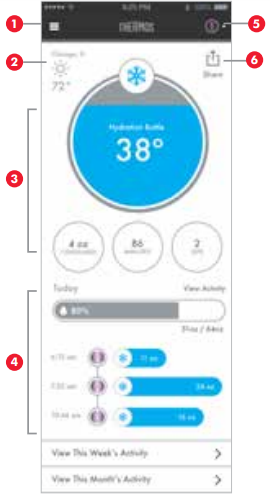
- Menu Icon
- Weather Basic weather data will be displayed if the location services are turned on
- Current Fill This main portion of the dashboard will display information about the current liquid in the bottle including liquid level, session duration and number of sips.
- Daily Summary This portion of the dashboard provides you with a summary of your daily hydration data per session. (A session is a bottle fill.) Tapping on each session will provide additional information including the sip tracker and amount of minutes within that session. (A new “session” is posted each time a bottle of liquid is consumed and the bottle is refilled.)
- Device Setting Locate device setting information here
- Share Stay social by sharing your data with friends, family, trainer or health care provider
Activity Preview
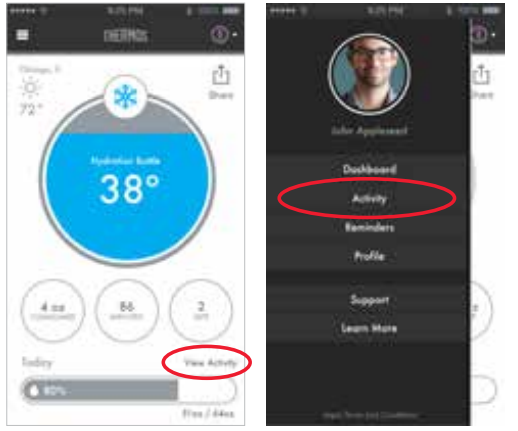
- Tapping the View Activity arrow for the current session or the session summaries on the Activity Dashboard bring you to a preview detail of that activity. To see activity from other time periods, you can tap All Activity. You are able to return to the dashboard by tapping on the “Back” option.
Tapping on a single session of the day view will show the details of that individual session. From this view, you have the option of removing that session data. Tap on “Remove This Session”. A pop-up will appear to confirm the permanent removal of the session. Tap “Ok” if you would like to continue with the deletion.
There are 2 ways to access the activity history. You can view from the Activity Dashboard or through the Main Menu.
Activity History
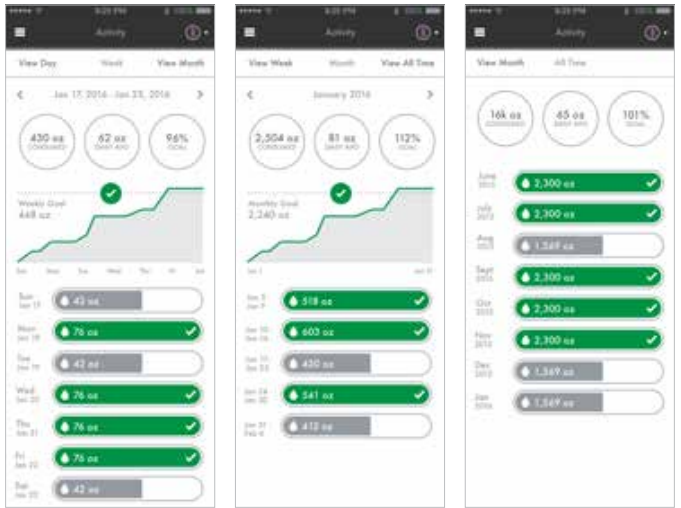
- Week Summary
The week view will display aggregate information for the individual days within a week. The days are listed with the total consumption and goal progression bars. - Monthly Summary
The month view will display aggregate information for the individual weeks within the current month. The weeks are listed with the total consumption and goal progression bars. - All Time Summary
The all time view will display aggregate information for all individual months. The months are listed with the total consumption and goal progression bars.
Creating Reminders
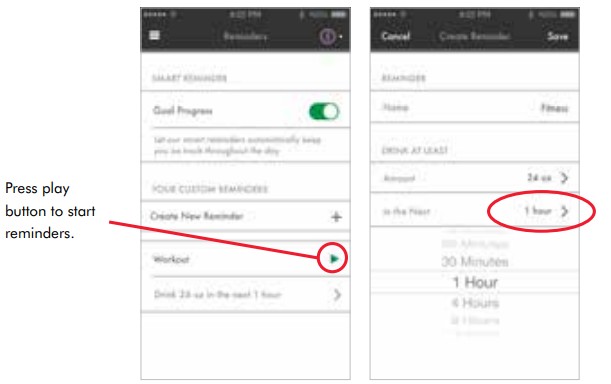
- You are able to set up goal progression reminders to keep you on track with your hydration goal throughout the day. In the main menu screen, tap on the “Reminders” topic. Then simply slide the goal progress button to green or on and reminders will be sent to you if you are not on track to meet your daily hydration goal.
You are also able create a custom reminder that can specify the amount of liquid you would like to consume in a specific amount of time. Click the “+” icon, and you will be able to create a custom name for the reminder. By using the selector wheels that rotate, you can select an amount of water to be consumed within a specific amount of time. Once the reminder is created, press the green “play” icon to start reminders.
Deleting a Reminder
To delete a custom reminder, simply click on the reminder that you created. It will bring you to the screen on the left. You can revise the reminder you have created or delete it by tapping the red “delete reminder” text.
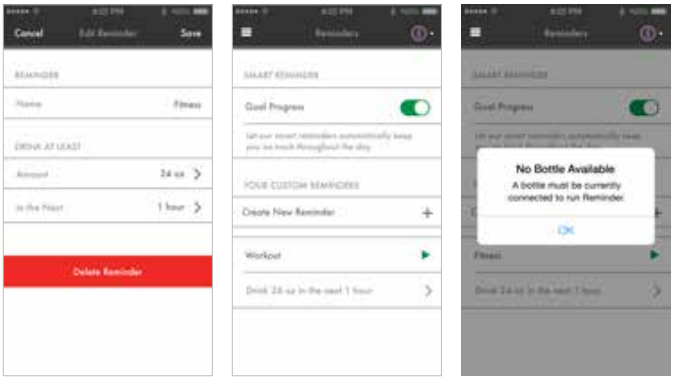
Important Note: When a SP400 smart lid bottle cannot be found by the app, the custom reminder button will be grayed out and a pop-up will show up, indicating the need for a bottle to be connected.
Profile
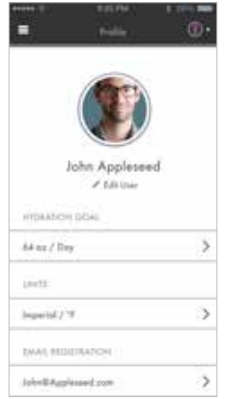
You have the option to edit your name or photo as well as adjust your hydration goal at any time. Through this screen, you can also change the units of measure from imperial to metric. You also have the option to set up an email address if you have skipped this step during the initial set up. If you tap on your current email, you also have the ability to edit the current email address that was previously saved.
Enabling your Fitbit Account
If you decide to sync your Fitbit account to your Thermos Smart Lid app after the initial set up process, you can tap on your Menu bar, proceed by tapping on the Profile setting, and swiping the button right to enable your Fitbit account. You will be directed to the Fitbit website to login with your credentials. When the correct credentials have been entered, you will be brought back to the Thermos Smart Lid app and a “Fitbit Enabled” screen will appear. If you decide you would like to disable your Fitbit account, simply swipe the button to the left position.

Support
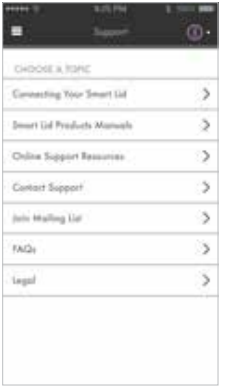
If you need additional support, you can find it under the Online Support Resources section in the Main Menu. Just tap on a topic that you would like more information about and it will guide you to the proper link.
Device Manager
Device Manager and Settings
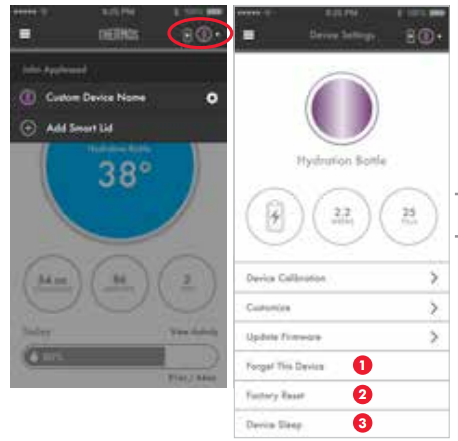
The Device Manger and Settings icon is shown in the upper right hand corner of the app. The Device Manager shows the Thermos products that are currently active. Tapping on one will switch to that device’s dashboard. If you tap on the gear icon, you will jump to the device settings for that connected device.
This screen will allow you to see high level usage data about the device and choose specific device action items.
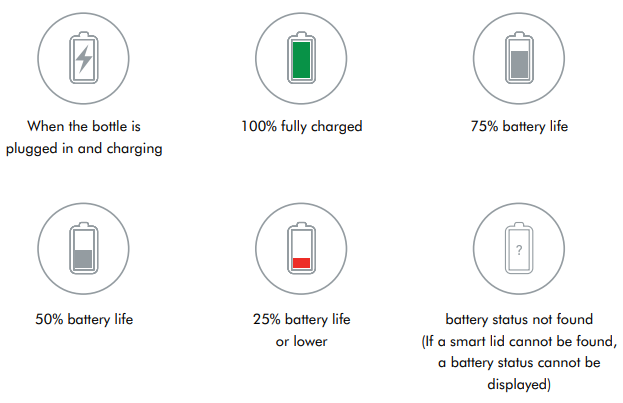
Battery Levels
Below are examples of battery states your Thermos® Connected Hydration Bottle with Smart Lid.
Customizing
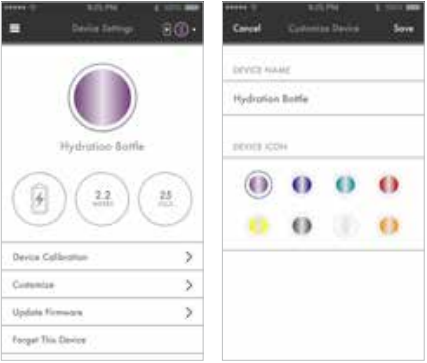
You can customize your device and it’s associated indicator icon. Just tap on the device name and type in a new name that you would like to use. Change the device icon color by tapping on the color you prefer to use. Tap “Save” in the upper right hand corner.
Firmware Update
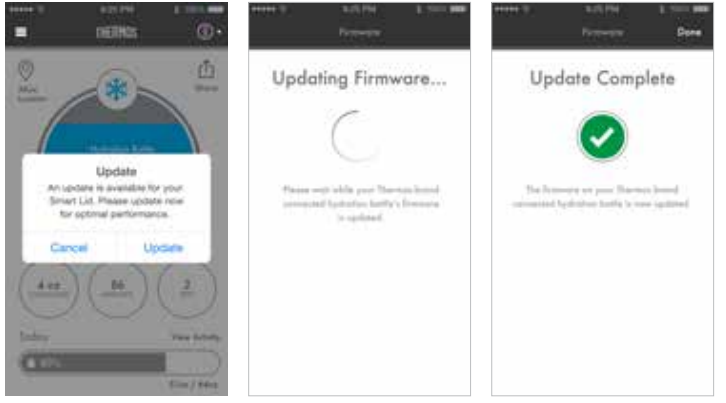
A pop-up will appear when new firmware is available. The update option will lead you to the firmware update screen. The cancel option will dismiss the alert. The alert will appear once a day until the update is complete.
After tapping the update button, and updating screen will inform you that the firmware is being updated. An “Update Complete” screen will be displayed when completed.
All Devices Forgotten
You are able to “forget” all of your connected devices in the Device Settings Portion of the app. If you purposely forget all of your connected devices, you will be presented with a dashboard that will feature a strong call to action to add a smart lid. Click on “Add Smart Lid” to have the app walk you through the process of connecting your smart lid.

Dashboard Out of Range
If your device is out of range from your SP400 smart lid, the app will not be able to sync to it. The Bluetooth line of sight range is up to 75 ft. Make sure your SP400 smart lid is within this range whenever trying to connect to the Thermos Smart Lid app.

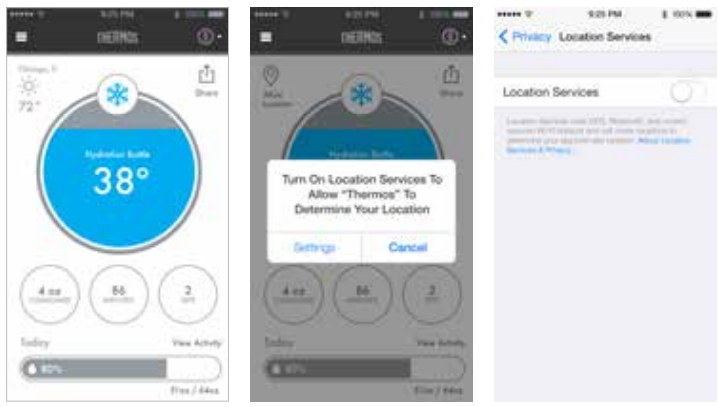
Location Services Off
If you do not have location services turned “on” on your device, the weather icon will be replaced with an “allow locations” call to action with a pop-up reminder. You will be sent to your device setting to turn on and allow location services.
Thermos Description
The Thermos Hydration Bottle with Smart Lid is built with high-quality stainless steel, providing durability and resistance to corrosion. The vacuum insulation technology ensures that your drinks maintain the desired temperature for up to 12 hours. The smart lid is designed for one-handed operation, allowing you to easily open and close the bottle while on-the-go. The leak-proof design provides added protection for your belongings, and the bottle is dishwasher safe for easy cleaning.
Troubleshooting of Thermos Hydration Bottle with Smart Lid
Here are some common problems and solutions:
- Problem: The lid is not closing properly.
Solution: Make sure that the lid is properly aligned and locked into place. If the issue persists, gently clean the lid with warm soapy water and reassemble. - Problem: The bottle is leaking.
Solution: Check the lid and the bottle for any damage. If found, contact Thermos customer support for a replacement. - Problem: The bottle is not keeping my drink hot/cold.
Solution: Make sure that the lid is properly closed and the bottle is not exposed to extreme temperatures. For best results, pre-chill the bottle before adding cold drinks and pre-warm the bottle before adding hot drinks.
Pros & Cons
Pros
- Keeps drinks hot or cold for up to 12 hours
- Smart lid for one-handed operation
- Durable and leak-proof design
- Dishwasher safe
Cons
- May be more expensive than other insulated water bottles
- Some users may find the smart lid difficult to use
Customer Reviews about Thermos Hydration Bottle with Smart Lid
Customers love the Thermos Hydration Bottle with Smart Lid for its high-quality construction and excellent temperature retention. Some common complaints include the higher price point compared to other insulated water bottles and the difficulty in using the smart lid.
Faqs
How to start using your Thermos Hydration Bottle with Smart Lid for tracking hydration?
What steps are needed to connect the Thermos Hydration Bottle with Smart Lid app with your hydration bottle?
How to effectively clean your Thermos Hydration Bottle with Smart Lid for optimal hygiene?
How to track daily hydration goals with the Thermos Hydration Bottle with Smart Lid?
What to do if the Thermos Hydration Bottle’s Smart Lid is not syncing data?
Can the Thermos Hydration Bottle with Smart Lid keep track of beverage temperature?
Is the Thermos Hydration Bottle with Smart Lid dishwasher safe?
How to ensure the Thermos Hydration Bottle with Smart Lid remains odor-free?
How to calibrate the Thermos Hydration Bottle with Smart Lid for accurate hydration tracking?
Does the Thermos Hydration Bottle with Smart Lid come with a warranty?
Leave a Comment
