All Functions: Toshiba Bluetooth Radio TY-CWU500 User Manual
Content
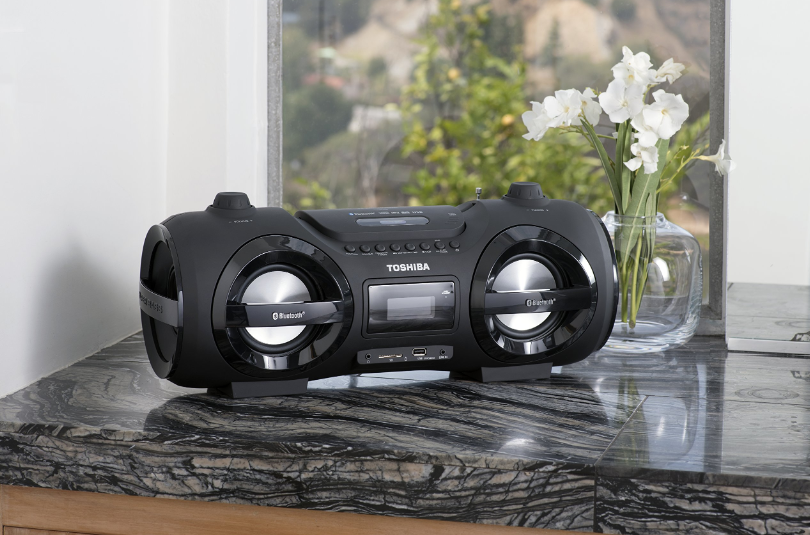
Introducing the Toshiba Bluetooth Radio TY-CWU500: A Modern Take on Classic Sound
The Toshiba Bluetooth Radio TY-CWU500 is a versatile and stylish radio that combines classic design with modern technology. With its Bluetooth connectivity, you can stream music from your smartphone, tablet, or other Bluetooth-enabled devices with ease. The estimated price of this product is around $150, and it is now available in the market. This radio boasts a wooden cabinet that not only looks great but also provides excellent acoustic properties. It has a large and easy-to-read LCD display that shows the station name, time, and other relevant information. The TY-CWU500 also has a dual alarm feature, making it an ideal bedside radio.
Accessories
- Remote control (batteries not included) 1set
- Power cord 1set
- Operation manual 1set
Part names
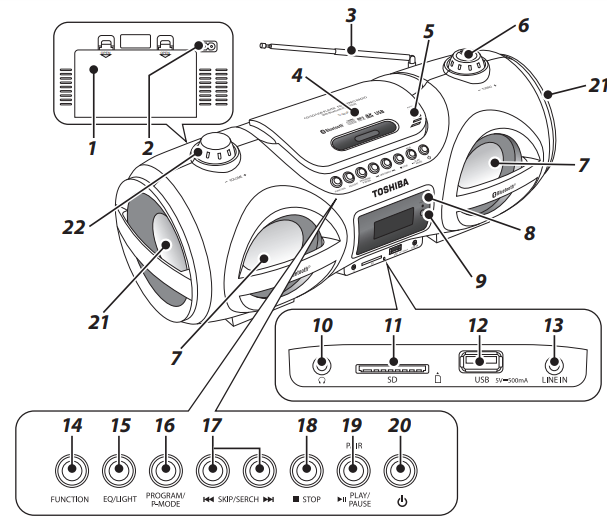
- Battery cover
- Power supply terminal
- FM antenna
- CD cover
- [PUSH OPEN] button
- [TUNING] knob
- Speakers (left/right)/Disco lights
- [PAIR/STANDBY] indicator
- Remote control light infrared receiver
- Headphone ( ) terminal
- [SD] terminal
- [USB] terminal
- [LINE IN] terminal
- [FUNCTION] button
- [EQ/LIGHT] button
- [PROGRAM/P-MODE] button
 [ SKIP/SEARCH ]
 button
 [ STOP] button
 [PAIR/ PLAY/PAUSE] button
- Power ( ) button
- Passive speakers (left/right)
- [VOLUME] knob
Specifications
Bluetooth section | |
| Bluetooth spec. | Bluetooth standard Ver. 3.0+EDR, Class 2 |
| Supported profile | A2DP, AVRCP |
| Frequency range | 2.4GHz (2.402to 2.480GHz) |
| Service distance | Approx. 10m |
CD player unit | |
| Number of channels | 2-channel stereo |
| Playable disk | CD (discs recorded in the CD-DA format) CD-R/RW (discs recorded in the CD- DA and MP3) |
USB memory section | |
| Playback format | MP3 (MPEG-1 AudioLayer3) |
| Supported memory | USB 1.1or USB2.0 |
| Memory | 32MBto 32GB USB memory (sold separately) |
| Playable USB memory | USB-IF certified product |
Radio unit section | |
| Receiving frequency | FM: 87.5 to 108MHz |
Common unit | |
| Power Supply | AC 100-240V 50/60Hz,12V DC R20 batteries ×8 (sold separately) |
| Power consumption | 48W |
Actual maximum output | 12.5W + 12.5W (25W in total) |
| Speaker | 80mm cone type (4 ) × 2, Passive Radiator ×2 |
| Headphone output terminal | 3.5 stereo mini-jack |
| LINE IN input terminal | 3.5 stereo mini-jack |
| Battery Life | When TOSHIBA LR20's(alkaline battery are used) Battery Life 50% volume setting: Radio: Approx.10h CD playback: Approx. 3h |
| Maximum outside | 21.0 (D) × 49.2(W) × 19.8(H) cm |
| Mass | Approx. 3.3kg (without batteries) |
| Accessories | Remote control (batteries not included), Power cord, Operation Manual |
The specifications and appearance may be subject to modification without prior notice. The label is located on the bottom enclosure.
Detailed Specifications
- Bluetooth connectivity for wireless music streaming
- Wooden cabinet for superior sound quality
- Large LCD display
- Dual alarm feature
- AM/FM tuner with 40 presets
- Headphone jack and AUX input
- Remote control included
- AC adaptor included
- Battery operated (4 x AA batteries)
Power supply
When using AC power supply
- Insert the supply plug of the attached power cord fully into the power supply terminal on the back.
- Insert the power plug into an AC receptacle.
Notes
- Before inserting or removing the power cord, press the [ STANDBY/POWER] button to turn off the power.
- The unit is not disconnected from the mains as long as it is connected to the AC outlet, even if the unit itself has been turned off. Using dry batteries (sold separately)
Using dry batteries (sold separately)
Open the battery cover. Insert eight R20 (D size) batteries (sold separately), and close the cover.
- Make sure that the polarity is correct.
- When the power cord is connected to the power supply terminal, the AC power supply is used. To use the device with batteries, remove the power cord.
- If the device will not be used for a long time (1 month or longer) or AC power supply is used, remove the dry batteries.
Replacement period of dry batteries
When the dry batteries are low, phenomena such as low volume, sound distortion, or malfunction of the CD may occur.
Replacing the remote control battery
- Remove the battery compartment cover on the back of the remote control.
Notes: Do not use any battery other - Load two R03 (AAA size) batteries into the battery compartment making than specified. sure that the batteries have been inserted with the correct polarities matching the systems +,- as indicated inside the battery compartment.
- Replace the cover.
Using the remote control
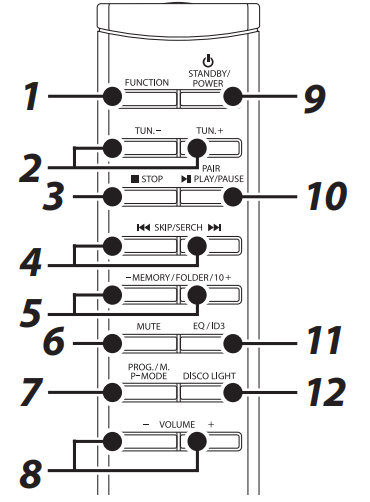
- [FUNCTION] button
- [TUN.] [+/-] buttons
- [ STOP] button
- [ SKIP/SEARCH ] button
- [MEMORY/FOLDER/10] [+/-] buttons
- [MUTE] button
- [PROG./M.P-MODE] button
- [VOLUME] [+/-] buttons
- [ STANDBY/POWER] button
- [PAIR/ PLAY/PAUSE] button
- [EQ/ID3] button
- [DISCO LIGHT] button
Use it within about 6~7 meters and 30 degrees horizontally from the front of the remote control light infrared receiver of the main unit. The remote control may not operate correctly in the following cases.
- An obstacle exists between the main unit and the remote control.
- Strong light such as direct sunlight shines on the remote control light infrared receiver.
Listening to Bluetooth Music
- You can enjoy audio from a Bluetooth® enabled device which connects with wireless, through the speakers of this unit.
- When connecting with Bluetooth® enabled device, it is necessary to register the devices in advance. This registration is called pairing.
- Setting will be maintained even though the power is turned off upon pairing. It will be automatically connected to the device last connected if the power is turned on once again.
- In order to use this unit for music playback through Bluetooth®, the unit must first be paired with the Bluetooth® device.
Notes
- Enable Bluetooth® functions on the connecting Bluetooth® enabled device. In addition, make sure the distance between this unit and the device is within 10 m.
- Since the pairing procedure can vary by device, please consult the user manual of your device.
- Music cannot be transferred from this unit to Bluetooth® enabled device.
- The Bluetooth® enabled device connected to the unit needs to support the follows.
- Bluetooth® specification
- Bluetooth® standard Ver 1.1, 1.2, 2.0+EDR, 2.1+EDR or 3.0+EDR Bluetooth® profile
- Advanced Audio Distribution
- Profile (A2DP), Audio/Video
- Remote Control Profile (AVRCP)
- To save power, remember to turn off the unit when not in use.
- Press the [ STANDBY/POWER] button.
- Press the [FUNCTION] button, and set the Bluetooth® functions of this unit into receiving mode.
“BLUETOOTH” is displayed and the [PAIR/STANDBY] indicator blinks. - Set the Bluetooth® enabled device into outgoing mode.
- Following the instructions on your device’s user manual, activate Bluetooth® on your device and search for devices. Once you have found “TY-CWU500”, pair to the unit. Input the password 0000 if required.
- Once connected, “BLUETOOTH” is displayed, and the [PAIR/STANDBY] indicator are lights.
- If the unit cannot connect to the bluetooth device within 2 minutes, press and hold the [PAIR/PLAY/PAUSE] button to reconnect the unit and device.
- Replay your Bluetooth® device.
You can hear a sound from the speaker of this unit- Operate Playback, Stop, etc. on your Bluetooth® enabled device.
- Adjust the volume level on this unit.
- Disconnect Bluetooth® device when replay is over.
Common operation
How to use the buttons
- Press: means to press the button briefly and then release it (less than 2 seconds).
- Press and hold : means to continue to press the button for a longer period of time (2 seconds or more).
| Volume adjustment | Press the [VOLUME] button on the remote control or turn the [VOLUME] knob on the unit. |
| Using headphones | Plug the stereo headphones with a 3.5 stereo mini-plug (commercially available) into the headphone terminal. While the headphones are plugged in, the sound does not come from the speaker. |
| Turning off the power | Press the [ STANDBY/POWER] button on the remote control or the power button on the unit. |
| Equalizer function | Press the [EQ/ID3] button to select the sound quality from “FLAT”, “CLASSIC”, “ROCK”, “POP”, and “JAZZ”. |
| Mute function | Press the [MUTE] button to mute the sound. Press again to restore the sound. |
Lighting | Press the [DISCOLIGHT] button on the remote control or press and hold the[EQ/LIGHT] button on the unit. The color changes to blue, red, green, light blue, violet, light green, white and them to continuously changing between the7 different colors. Select "LIGHT OFF" to turn the lights off. |
Listening to a CD/USB/SD
About music CDs , MP3 and SD
- Do not use any disc that is not round. If a disc with a special shape (heart, card, etc.) is used, the disc may pop out due to high speed rotation, causing an injury.
- For CD-R and CD-RW discs, commercially available general discs recorded in the music recording standard format (CD-DA* format) and discs recorded in the MP3 audio format can be played.
- A disc with low reflection rate may not be read.
- Nonstandard discs such as copy-control CDs and special-shaped discs cannot be played.
- Do not open the CD door during replay. Doing so may damage the CD.
- If the CD has any scratch, fingerprints, or dust on it, it may not be played. It may skip or stop even if it can be played partially.
- Mount the CD onto the catcher of the disc table firmly. Mounting it incorrectly may damage the CD or cause a failure.
- If the CD is not mounted correctly or the disc is unreadable, “NO DISC” is displayed and the CD cannot be played.
- Store a CD in the dedicated case. Handle a CD carefully not to stain or damage the CD surfaces.
- Do not attach any paper or sticker on the CD surfaces. It may cause decentering or wobbling, making it unreadable.
- Do not place a CD in a place with high temperature such as a place with direct sunlight or near a heater. The CD may be deformed and become unreadable.
- Before inserting a CD, wipe off any dust or fingerprints on the replay surface with a soft cloth.
- Do not use thinner, benzene, or alcohol because they damage the information surface of the CD, making it unreadable.
- After a music CD is loaded, the total number of tracks is displayed. Once replay starts, the track number being played is displayed.
- After an MP3 disc is loaded, the total number of folders and the total number of tracks are displayed. Once replay starts, the folder number and track number being played are displayed.
- The maximum number of folders that can be played is 99. The maximum number of tracks is 999.
- MP3 discs in the MP3 (MPEG Audio Layer-3) format can be played. CD-DA stands for “Compact Disc Digital Audio.” It is a standard for music recording used for general audio CDs.
- TOSHIBA will not be held liable for the loss of data whilst the USB memory or SD card is connected to the audio system.
- Files compressed in MP3 format only can be played back when connected to the USB memory or SD card terminal.
- This USB memory's or SD card format supports FAT 16 or FAT 32.
- TOSHIBA cannot guarantee that all USB memory devices will work on this audio system.
- USB cable is not recommended for use in this audio system to connect to USB memory. Use of the USB cable will affect the performance of this audio system.
- This USB memory cannot be operated via USB hub.
- The USB terminal in this unit is not intended for a PC connection and is only intended for use with USB memory.
- External HDD-storage cannot be played back via USB memory terminal.
- If the data inside the USB memory or SD Card is large, it may take longer to read the data.
Normal play
- Press the [ STANDBY/POWER] button. The power will be turned on in the last-used state (CD / TUNER / USB / CARD / BLUETOOTH / LINE IN).
- Press the [FUNCTION] button to switch the source to CD, USB or SD. Select “CARD“ to load an SD card.
- CD: Open the CD cover, mount the CD with its printed face up, and then close the CD cover.
- USB: Insert the USB memory into the [USB] terminal.
- SD: Insert the SD card into the [SD] terminal.
- Commercially available music CD: When loading is complete, the total number of tracks and total play time are displayed.
- MP3: When loading is complete, the total number of folders and the total number of tracks are displayed.
- Press the [PAIR/ PLAY/PAUSE] button. The playback starts from the track number.
- To stop playback, press the [ STOP] button. Replay stops when all the tracks are finished even if the [ STOP] button is not pressed.
Function | Operation |
Pause | Press the [PAIR/ Playback of the CD/USB/SD is paused. The play time blinks while paused. Press it again to resume playback of the CD/USB/SD. |
Track up/down (Cue) | Press the [ [ [ |
Fast forward/rewind | Press and hold the [ |
Folder up/down | Press and hold the [MEMORY/FOLDER/10] [+] or [-] button to move to the next/previous folder. |
Skip forward/backward by 10 tracks | Press the [MEMORY/FOLDER/10] button during playback of the CD/USB/SD or while paused. |
Repeat replay
Press the [PROG./M.P-MODE] button during replay or pause of the CD/USB/SD. One track repeat replay starts. The play mode changes as shown below every time the [PROG./M.P-MODE] button is pressed. During one track repeat, you can change the track by pressing the![]() [ SKIP/SEARCH ]
[ SKIP/SEARCH ]![]() button.
button.
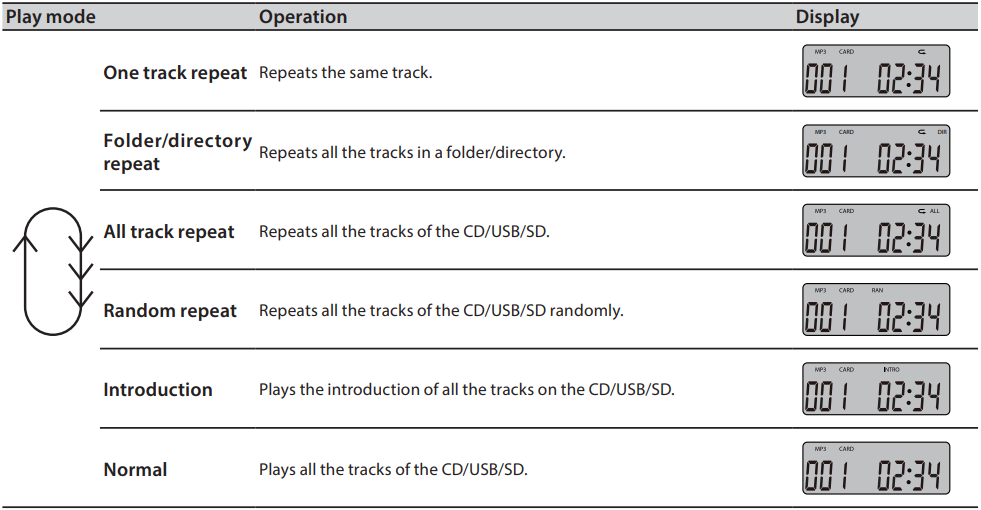
Caution: When you press the [ STOP] button, replay stops and repeat replay is cancelled.
Cancelling repeat replay during repeat replay
Press the [PROG./M.P-MODE] button several times until “RAN” or “INTRO” is not displayed any more. The device returns to normal replay.
Programmed replay
Up to 20 tracks for an Audio CD or 99 tracks for an MP3 can be programmed to play back in any order.
- Press the [PROG./M.P-MODE] button during a stop to start program setting. “P01” and “PROG” are displayed, and “PROG” blinks.
- Press the [ SKIP/SEARCH ] button to select the desired track number you want to program. Press the [ SKIP/SEARCH ] button when program number “P01” is blinking.
- Press the [PROG./M.P-MODE] button to enter the track into setting. Display changes to “P02”.
- To program another track number, repeat steps 2 and 3 .
- You can program up to 20 tracks for an Audio CD or 99 tracks for an MP3 you like.
- If you try to program more than the maximum number of tracks, “FULL” is displayed and the programming is refused. 5 To finish the program setting, press the [PAIR/ PLAY/PAUSE] button.
- Programmed replay of the track selected for Program 1 starts.
- Pressing the [ STOP] button also can finish the program setting.
- If you press the [ SKIP/SEARCH ] button, the previous or next programmed track will be played.
- Pressing the
To erase the program: Turn off the power or select another source while CD/USB/SD playback is stopped.
Repeat programmed replay: Press the [PROG./M.P-MODE] button during programmed replay or pause of the CD/USB/SD. Repeat replay of programmed tracks starts.
Display title, artist, and album name (MP3/USB/SD only)
The unit can display ID3 tag data (title, artist and album name) in an MP3 file. Press and hold the [EQ/ID3] button on the remote control. “ID3 OFF” or “ID3 ON” is shown on the display.
To remove a USB memory or SD card
- Press the [FUNCTION] button to change to another function.
- Remove the USB memory or SD card from the [USB] terminal or [SD] terminal.
Listening to the radio
Normal reception
- Press the [ STANDBY/POWER] button.
- Press the [FUNCTION] button to switch to the FM band. “TUNER” will be shown on the display.
- The device does not support AM broadcast.
- Press the [TUN.] [+/-] button on the remote control or turn the [TUNING] knob on the unit to tune in the station. If you press the [PAIR/ PLAY/PAUSE] button, the device will automatically tune in the radio stations and then stops (automatic tuning).
- Automatic tuning may stop due to reception noise. In such a case, perform the automatic tuning again.
- When stereo broad cast is received, “STEREO” is displayed.
For better reception: Extend the antenna and direct it to the optimal direction where the sound quality is the best.
Presetting radio stations: You can preset up to 30 radio stations.
- Press the [TUN.] [+/-] button to select the desired station.
- Press the [PROG./M.P-MODE] button. “MEM” and “P01” are displayed, and the preset number “P01” starts flashing.
- While the numbers are flashing, press the [MEMORY/ FOLDER/10] button on the remote control or the [ SKIP/ SEARCH ] button on the unit to select the desired preset numbers you want to program. If you do not perform the operation within 5 seconds, the device will automatically return to the normal reception mode.
- While the numbers are flashing, press the [MEMORY/ FOLDER/10] button on the remote control or the
- Press the [PROG./M.P-MODE] button again. “MEM” and preset number are lighting. The preset numbers will be preset.
- If you preset other stations, repeat steps 1 through 3.
Select the preset radio stations
When radio signals are received, press the [MEMORY/FOLDER/10] button on the remote control or the [ SKIP/SEARCH ]![]() button on the unit. Each time you press the button, the frequency of the radio station is displayed.
button on the unit. Each time you press the button, the frequency of the radio station is displayed.
Listening to the external audio device
Use a connection cord with a 3.5 stereo mini-plug (sold separately) for connecting your mobile phone or digital audio player to the device.
- Press the [ STANDBY/POWER] button.
- Press the [FUNCTION] button to switch the source to LINE IN (AUX).
- Connect the audio output terminal (earphone terminal, headphone terminal, or line-out terminal) of the external audio device to the LINE IN (AUX) terminal of the device (connection cord is sold separately).
- Replay the external audio device.
- Adjust the volume with the [VOLUME] button.
Description
The Toshiba Bluetooth Radio TY-CWU500 is a high-quality radio that delivers clear and crisp sound. Its Bluetooth connectivity allows you to stream music from your favorite devices, while the AM/FM tuner lets you listen to your favorite radio stations. The wooden cabinet not only looks great but also enhances the sound quality, providing a rich and full sound. The large LCD display makes it easy to see the station name, time, and other relevant information. The dual alarm feature makes it perfect for use as a bedside radio.
Maintenance
Maintenance of the main unit
- Wipe off stain lightly with a soft cloth. If stain is severe, wipe it off with a cloth damped with neutral detergent solution and wrung tightly, and dry it with a dry cloth.
- Do not use benzene or thinner, etc. Do not spray any volatile chemical such as insecticide on the cabinet.
CD pickup (lens)
If the lens in the CD mount is stained, the CD may skip or cannot be played. Blow the lens a few times with a commercially available blower,and remove the dust using the tip of a brush. To remove stains such as fingerprints, damp a cotton swab with commercially available lens cleaner, and wipe the lens lightly with it by drawing circles outward from the center.
When you suspect a failure
| Phenomenon | Cause | Remedy |
|---|---|---|
| Common unit | ||
| No sound is output. | - The power plug is disconnected. The batteries are low. The volume level is low. Headphones are plugged in. The source is not switched properly. | - Insert the plug fully.- Replace the batteries. Adjust the volume level.- Remove the headphones. Switch the device to the proper source. |
| CD player/USB memory/SD card section | ||
| Replay does not start. | - The CD is upside down. The CD is stained. The MP3 file is not playable. | - Insert the CD with the label facing up.- Wipe off the dirt.- Make sure the file is a playable MP3 file. |
| Sound skips. | - The CD has large scratches or warp. The device is in a location with vibrations. The lens of the CD mount is stained. | - Replace the CD. Place it in a location where there is no vibration. Clean the lens. |
| Device cannot be detected. | - The device is not connected properly. | - Connect the device properly. |
| Radio section | ||
| Hard to listen because of a lot of noises. | - The device is affected by power supply noise.The device is affected by noise due to a motor, electric appliance such as fluorescent lights, or TV. The radio wave is weak. | - Remove the power plug and insert it again.- Keep the device away from the noise source.- Turn off the TV.- Adjust the antenna. |
Notes
- If the device does not operate or display properly while the CD/USB/SD is played back, press the [ STANDBY/POWER] button once to turn off the power, and remove the power cord and connect it again. Then, set the device back to the CD, USB or SD mode and play back the CD/ USB/SD.
- The cabinet becomes slightly hot in some parts when the device has been used for a long period of time, it is not a failure.
Setup Guide
Setting up the Toshiba Bluetooth Radio TY-CWU500 is easy. Here are the steps:
- Place the radio in a location with a clear Bluetooth signal.
- Turn on the radio and put it in Bluetooth mode.
- Go to your device's Bluetooth settings and select "TY-CWU500" from the list of available devices.
- Once connected, you can start streaming music from your device to the radio.
- To set the alarm, press the "Alarm" button on the radio and use the arrow buttons to set the time and alarm source.
Safety precautions
The information you need to prevent danger to the user and other people as well as property damage is described below. “Description of signs” shows different levels of danger or damage that may occur due to wrong handling.
Description of signs
WARNING: Indicates that there is a risk of death or serious injury.
CAUTION: Indicates that there is a risk of minor injury or property damage.
Installation
To reduce the risk of fire, electric shock or product damage,
- Place the unit on a flat surface away from sources of direct sunlight or excessive heat.
- Do not install the device in a confined or build-in space such as a book case or similar area, and keep it under a well-ventilated condition. The ventilation should not be impeded by covering the ventilation openings with items such as newspaper, table-cloths, curtains, etc.
- Do not expose the device to rain, moisture, dripping, or splashing.
- Do not place objects filled with liquids, such as vases, on the device.
Batter
- Danger of explosion if battery is incorrectly replaced. Replace only with the same or equivalent type.
- Observe the following when handling dry batteries.
- Do not use any battery other than specified.
- Do not insert the batteries in a wrong direction.
- Do not charge, heat, disassemble, or short-circuit the battery.
- Do not throw it into fire.
Usage
To reduce the risk of fire, electric shock or product damage,
- Do not disassemble, repair, or modify the device.
- Do not insert any foreign object into the device.
- In case of lightning, do not touch the antenna and power cord.
Power cord and power plug
To reduce the risk of fire, electric shock or product damage,
- Insert the power plug fully into an AC receptacle.
- If you find dust on the power plug pin or pin installation surface, remove the power plug and remove the dust.
- The mains plug or an appliance coupler is used as a disconnecting device, the disconnecting device shall remain readily operable.
- Do not insert or remove the power plug with a wet hand.
What to do in the case of an abnormality
- Stop using the device immediately in the case of an abnormality or failure.
- Remove the power plug from the receptacle immediately when water or any foreign object enters the interior of the device.
Pros & Cons
Pros
- Bluetooth connectivity for wireless music streaming
- Wooden cabinet for superior sound quality
- Large and easy-to-read LCD display
- Dual alarm feature
- AM/FM tuner with 40 presets
Cons
- Battery life could be better
- No USB charging port
Customer Reviews
Customers love the Toshiba Bluetooth Radio TY-CWU500 for its sound quality, Bluetooth connectivity, and classic design. The dual alarm feature is also a big hit, making it an ideal bedside radio. However, some customers have complained about the battery life and the lack of a USB charging port.
Faqs
What is supported by the Toshiba Bluetooth Radio TY-CWU500 ?
Can I pair multiple devices simultaneously with the Toshiba Bluetooth Radio TY-CWU500?
Does the Toshiba Bluetooth Radio TY-CWU500 come with a remote control?
Does the Toshiba Bluetooth Radio TY-CWU500 come with an antenna or is one built in for FM reception?
What is the range of the FM tuner in the Toshiba Bluetooth Radio TY-CWU500?
How do I preset radio stations on the Toshiba Bluetooth Radio TY-CWU500?
Can the Toshiba Bluetooth Radio TY-CWU500 be used as an alarm clock?
What power sources can be used with the Toshiba Bluetooth Radio TY-CWU500?
How durable is the Toshiba Bluetooth Radio TY-CWU500 for outdoor use?
How can I clean my Toshiba Bluetooth Radio TY-CWU500?
Leave a Comment