How to Set: Ultrean Air Fryer 4.2 User Manual

Content
Introducing the Ultrean Air Fryer 4.2
The Ultrean Air Fryer 4.2 Quart is a versatile kitchen appliance designed for health-conscious cooking. With its innovative rapid air technology, it allows users to enjoy crispy fried foods with significantly less oil, making it a healthier alternative to traditional frying methods. The air fryer features a user-friendly LCD digital screen, adjustable temperature settings ranging from 180°F to 400°F, and a convenient auto switch-off timer. Its nonstick frying pot and detachable dishwasher-safe basket simplify cleanup, while the sleek black design complements any kitchen decor. Priced at $69.99, the Ultrean Air Fryer is an excellent investment for those seeking to enhance their culinary experience.
Detailed Specifications
| Special Feature | Dishwasher Safe |
|---|---|
| Product Dimensions | 11.26"D x 13.21"W x 12.42"H |
| Color | Black |
| Capacity | 4.2 Quarts |
| Material | Plastic |
| Recommended Uses For Product | Roast, Bake |
| Output Wattage | 1500 Watts |
| Item Weight | 9.97 Pounds |
| Brand | Ultrean |
| Wattage | 1500 watts |
| Voltage | 120 Volts (AC) |
| Control Method | Touch |
| Model Name | AF01 |
| Has Nonstick Coating | Yes |
| Min Temperature Setting | 82 Degrees Celsius |
Polarization instruction
This appliance has a polarized plug (one blade is wider than the other). To reduce the risk of electric shock, this plug is intended to fit into a polarized outlet only one way. If the plug does not fit fully into the outlet, reverse the plug. If it still does not fit, contact a qualified electrician. Do not attempt to modify the plug in any way.
General description
(Fig.1)
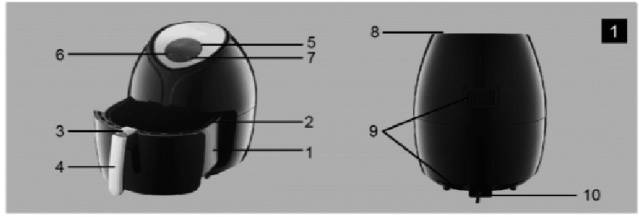
- Pan
- Basket
- Basket release button
- Basket handle
- LED touchscreen panel
- Timer control (0-30 mins)
- Temperature control ( 180-400"F)
- Air inlet
- Air outlet openings
- Mains cord
Automatic switch-off
The appliance has a built-in timer, it will automatically shut down when the countdown reaches zero. You can manually switch off the appliance by knobbing down the cancel knob; it will automatically shut down the appliance in 20 seconds.
Electromagnetic fields (EMF)
The appliance complies with all standards regarding electromagnetic fields (EMF). If used and handled properly, it will not harm the human body based on available scientific evidence.
Before first use
- Initial start-up operation may produce a smell and smoke (For about 15 mins.). This is normal. It is due to the protective substance on heating elements which protects them while they are stored. Cook slices of lemon at 300° F for 10 minutes to minimize the smell.
- Remove all packaging materials and stickers or labels.
- Clean the basket and pan with hot water. You may use a liquid or dishwashing soap and a nonabrasive sponge. These parts are safe to be cleaned in a dishwasher.
- Wipe inside and outside of the appliance with a clean cloth. There is no need to fill the pan with oil and frying fat as the appliance works on hot air.
- Put a sliced lemon inside the pan and cook this first to clear the smell before the 1st cooking.
Using the appliance
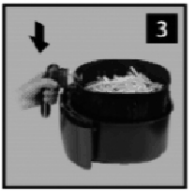
- Place the appliance on a stable, horizontal, and even surface.
Do not place the appliance on a non-heat-resistant surface. Put the basket in the pan. (fig3)
Do not fill the pan with oil or any other liquid.Preheat the appliance for 3 minutes when it is cold. Press the power on/off icon first, and adjust the time to 3 minutes, then press the power on/off icon again to start to warm it up gradually. After warming up, carefully pull the pan out of the air fryer. (fig.4)

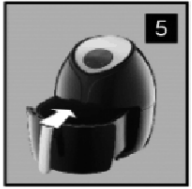
Caution: The appliance will stop heating after the pan is pushed out, the air blower will stop in 5 seconds.Place the ingredients in the basket, and then push the basket into the appliance. (fig.5)
- Select the proper function and temperature for the ingredients. See section 'settings' in this chapter to determine the right temperature.
- Preset Cooking functions are provided: CHIP, CHICKEN, STEAK, SHRIMP, MEAT, CAKE, and FISH. Press the function knob to select the proper function according to the ingredients. If the ingredients need more time, adjustments can be made directly by pressing the corresponding knobs. There are two knobs (TIME '+' & '-') in the control panel which can adjust the time setting -Increase/Decrease by 1 minute per press or increase/decrease rapidly by long press.
There are two knobs for the temperature setting (TEMP '+' &'-') in the control panel which can adjust the temperature setting - Increase/Decrease by 5 degrees per a press or increase/decrease rapidly by long press.
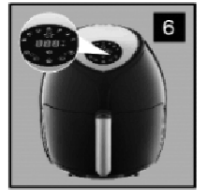
Select the proper function and temperature for the ingredients. 7 functions are provided: CHIP, CHICKEN, STEAK, SHRIMP, MEAT, CAKE, and FISH. Press the function knob to select the proper function based on the ingredients and then press the Start knob, and the appliance will run and heat the ingredients. Press"M"(Menu ICON) to change and choose the cooking function.
Notes: Adjustments can be made directly by pressing the corresponding knobs. There are two knobs (TIME '+' & '-') in the control panel, which can adjust the time setting - Increase/Decrease 1 minute per press or increase/decrease rapidly by long press. There are two knobs(TEMP '+' &' - ') in the control panel which can adjust the temperature setting - Increase/Decrease by 5 degrees per press or increase/decrease rapidly by long press. The heat icon and blower icon will be blinking during the operation. (Fig. 6)
Caution: During the hot air frying process, the heating-up icon blinks and goes out from time to time. This indicates that the heating component is switched on (temperature will rise according to the set requirements and will only stop once the required temperature is reached.)- To switch on the appliance, turn the timer knob to the required preparation time. The timer
begins to run. - Oil from the ingredients will gather in the bottom of the pan. Please do not shake or tilt the pan.
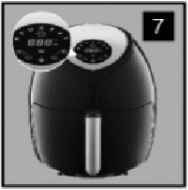
Some ingredients require shaking halfway during the preparation time ( see section 'settings' in this chapter) To do this, pull the pan out of the appliance by the handle and shake it. Then slide the pan back into the air fryer. ( Fig. 7)
Caution: Do not press the button of the handle during shaking (fig.8)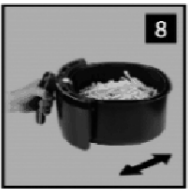
Tip: You can remove the basket from the pan and shake the basket only to reduce the weight. To do this, pull the pan out of the appliance, place it on the heat-resistant holder,, and press the button on the handle. ( Fig.9)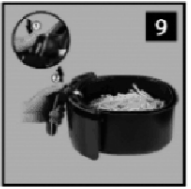
- When you hear the timer ring for 5 times, the set preparation time has elapsed. Pull the pan out of the appliance and place it on the heat-resistant holder. Note: After the timer rings for 5 times, the air blower will stop in 20 seconds.
- Check if the ingredients are ready.
Note: If the ingredients are not ready yet, simply slide the pan back into the appliance and adjust the settings of TIME&TEMP.
If the ingredients are not ready yet, simply slide the pan back into the appliance. Press the temperature control knob to adjust the Temperature setting, and press the Timer control knob to adjust the time setting. And then press the Start knob to run the appliance. To remove ingredients, press the basket release button and lift the basket out of the pan ( fig.10)

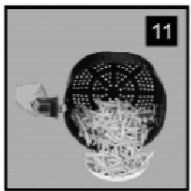
Note: Do not turn the pan over, the oil collected on the bottom of the pan will leak onto the ingredients.Empty the basket into a bowl or onto a plate. ( fig.11)
Tip: To remove large or fragile ingredients, lift the ingredients out of the basket with a pair of tongs.- When a batch of ingredients is ready, the fryer is instantly ready for another batch.
Ultrean Air Fryer 4.2 Settings
The table below will help you select the basic settings for the ingredients.
Note: Keep in mind that these settings are estimated settings only. As ingredients differ in origin, size, shape,, and brand, we cannot guarantee the best setting for your ingredients.
Because the Rapid Air technology reheats the air inside the appliance instantly. Pulling the pan briefly out of the appliance during hot air frying barely disturbs the process .•
Tips
- Small ingredients usually require a slightly shorter preparation time than larger Ingredients.
- A larger amount of ingredients only requires a slightly longer preparation time, and a smaller amount of ingredients requires a slightly shorter preparation time.
- Shaking smaller ingredients halfway during the preparation me optimizes the end result and can help prevent uneven fried ingredients.
- Add some oil to fresh potatoes and fry your ingredients for another few minutes for a crispy result.
- Do not prepare extremely greasy ingredients such as sausages in the air fryer.
- Snacks that can be prepared in an oven can also be prepared in the air fryer.
- The optimal amount for frying crispy fries is 500 grams.
- Use pre-made dough to cook snacks quickly and easily. Pre-made dough also requires a shorter homemaden time than home-made dough.
- Place a baking tin or oven dish in the fryer basket if you want to bake a cake or quiche or if you want to fry fragile ingredients or filled ingredients.
- You can also use the air fryer to heat ingredients. To heat ingredients, set the temperature to 300"F for up to 10 minutes.
Making home-made fries
To make home-made fries, follow the steps below:
- Peel and slice the potatoes.
- Wash the potato sticks thoroughly and dry them with kitchen paper.
- Pour 1/2 tablespoon of olive oil into a bowl, put the sticks on top,, and mix until the sticks are coated with oil.
- Remove the sticks from the bowl with your fingers or a kitchen utensil so that the excess oil stays behind in the bowl. Put the sticks in the basket.
- Fry the potato sticks according to the instructions in this chapter.
Programming Chart
| Category | Min-max Amount (g) | Time (min) | Temperature (°F) | Shake | Extra Information |
|---|---|---|---|---|---|
| Potatoes & fries | |||||
| Thin frozen fries | 300-700 | 9-16 | 400 | shake | |
| Thick frozen fries | 300-700 | 11-20 | 400 | shake | |
| Home-made fries (8x8mm) | 300-800 | 16-10 | 400 | shake | Add 1/2 tbsp of oil |
| Home-made potato wedges | 300-800 | 18-22 | 360 | shake | Add 1/2 tbsp of oil |
| Home-made potato cubes | 300-750 | 12-18 | 360 | shake | Add 1/2 tbsp of oil |
| Rosti | 250 | 15-18 | 360 | shake | |
| Potato gratin | 500 | 15-18 | 400 | shake | |
| Meat & Poultry | |||||
| Steak | 100-500 | 8-12 | 360 | ||
| Pork chops | 100-500 | 10-14 | 360 | ||
| Hamburger | 100-500 | 7-14 | 360 | ||
| Sausage roll | 100-500 | 13-15 | 400 | ||
| Drumsticks | 100-500 | 18-22 | 360 | ||
| Chicken breast | 100-500 | 10-15 | 360 | ||
| Snacks | |||||
| Spring rolls | 100-400 | 8-10 | 400 | shake | Use oven-ready |
| Frozen chicken nuggets | 100-500 | 6-10 | 400 | shake | Use oven-ready |
| Frozen fish fingers | 100-400 | 6-10 | 400 | Use oven-ready | |
| Frozen breadcrumbed | |||||
| cheese snacks | 100-400 | 8-10 | 360 | Use oven-ready | |
| Stuffed vegetables | 100-400 | 10 | 320 | ||
| Baking | |||||
| Cake | 300 | 20-25 | 320 | Use baking tin | |
| Quiche | 400 | 20-22 | 360 | Use baking tin/oven dish | |
| Muffins | 300 | 15-18 | 400 | Use baking tin | |
| Sweet snacks | 400 | 20 | 320 | Use baking tin/oven dish |
Cleaning
Clean the appliance after every use.
Do not clean the pan, basket,, and the inside of the appliance with metal kitchen utensils or abrasive cleaning materials, as this may damage the non-stick coating.
- Remove the plug frcompletelyyll the socket to completey turn it off and let it cool down.
Note: Remove the pan to let the fryer cool down more quickly. - Wipe the outside of the appliance with a moist cloth.
- Clean the pan and basket with hot water, and use some dishwashing liquid soap and a non-abrasive sponge.
You can remove any remaining dirt by using a degreasing soap.
Note: The pan and basket are dishwasher-proof.
Tip: If dirt is stuck to the basket or the bottom of the pan, fill the pan with hot water with some liquid soap. Put the basket in the pan and let the pan and the basket soak for about 10 minutes. - Clean the inside of the appliance with hot water and a non-abrasive sponge.
- Clean the heating components with a cleaning brush to remove any food residues.
Storage
- Unplug the appliance and let it cool down thoroughly.
- Make sure all parts are clean and dry.
Environment
Do not throw away the appliance with the normal household waste when it is damaged but bring it to the nearest local center for recycling. By doing this, you can contribute to environmental protection. (fig.12)
Important safeguards
Read all instructions
Danger
- Do not touch hot surfaces. Use handles or knobs.
- To protect against electrical shock do not immerse the cord, plugs, or (state-specific part or parts in question) in water or other liquid.
- Close supervision is necessary when any appliance is used by or near children.
- Unplug from the outlet when not in use and before cleaning. Allow to cool before putting on or taking off parts.
Warning
- Check if the voltage indicated on the appliance fits the local power voltage.
- Do not use the appliance if there is any damage to the plug, main cord,, or other parts.
- Do not go to any unauthorized person to replace or fix the damaged main cord.
- Keep the appliance and its power cord out of children's reach.
- Keep the power cord away from hot surfaces.
- Do not plug the appliance or operate the control panel with wet hands.
- Make sure that the appliance should be plugged into an earthed wall socket. Always make sure that the plug is inserted into the wall socket properly.
- Do not connect the appliance to an external timer switch.
- Do not place the appliance on or near combustible materials such as a tablecloth or curtain.
- Do not place the appliance against a wall or against other appliances. Leave at least 10cm free space on the back and sides and 10cm free space above the appliance.
- Do not place anything on top of the appliance.
- Do not use the appliance for any other purpose than described in this manual.
- Do not let the appliance operate unattended.
During hot air frying, hot steam is released through the air outlet openings. Keep your hands and face at a safe distance from the steam and from the air outlet openings. Also please be careful of hot steam and air when you remove the pan from the appliance. Surfaces may become hot during use. ( Fig.2)
- Immediately unplug the dark smoke you see a dark smoke coming out of the appliance. Wait for the smoke emission to stop before you remove the pan from the appliance.
- Do not operate any appliance with a damaged cord or plug or after the appliance malfunctions or has been damaged in any manner. Return the appliance to the nearest authorized service facility for examination, repair, or adjustment.
- The use of accessory attachments not recommended by the appliance manufacturer may cause injuries.
- Do not use outdoors.
- Do not let the cord hang over the edge of the table or counter, or touch hot surfaces.
- Do not place on or near a hot gas or electric burner, or in a heated oven.
- Extreme caution must be used when moving an appliance containing hot oil or other hot liquids.
- Always attach the plug to the appliance first, then plug the cord into the wall outlet. To disconnect, turn any control to "off', then remove the plug from the wall outlet.
- Do not use the appliance for other than intended use.
Caution
- issure that the appliance in placed on a horizontal, even,, and stable surface.
- This appliance is designed for household use only. It is not suitable to be used commercially such as for kitchens, farms , motels, and other non-residential environments.
- The warranty is invalid if the appliance is used for professional or commercial purposes, or if it is not used according to instructions. ( Never use the appliance when the plug is damaged.)
- The appliance needs approximately 30 minutes to cool down before it is safe to handle or clean.
- Save these Instructions.
Guarantee and service
If you need service, or information or if you have any problems, please visit our website or contact your distributor.
Troubleshooting
Problem | Possible cause | Solution |
The AirFRYER does not work | The appliance is not pluggedin | Putthe mains plug inan earthed wall socket |
You have not set the Timer | Tum the timer knob to the required preparation time time to switch on the appliance | |
The ingredients fried with the AirFRYER are not done | The amount of ingredients in the basket is too big. | Put smaller batches of ingredients in thebasket. Smaller batches are fried move evenly |
The set temperature is too low. | Turn the temperature control knob to the required Temperature settina (see section 'settings' in chapter' smg the appliance'). | |
The ingredients are fried unevenly in the AirFRYER | Certain types of ingredients need to be shaken halfway through the preparation time | Ingredients that lie on top of or across each other (e,g, fries) need to be shaken halfway through the preparation time. See section'Settings' in chapter 'Using the appliance' |
Fried snacks are not crispy when they come out of the AirFRYER | You used a typeof snacks meant to be prepared in a traditional deep fryer. | Use oven snacks or lightly brush some oil onto the snacks for a crisper result. |
I cannot slidethe pan into the appliance properly | There are too much ingredientsin the basket. | Donot fill the basket beyondthe MAX indication |
The basketis not placedin the pan correctly. | Push the basket down into the pan until you hear a Click, | |
White smokeComes out fromthe Appliance. | You are preparing greasy ingredients. | When you fry greasyingredients in the fryer., a large amount of oil will leak into the pan. The oil procluces while smoke and the pan may heat up More than usual. This does not afect the appliance Or the end result. |
The pan still contains grease residues from orevious use | White smokeis caused by grease heating up in the pan. Make sure you clean the pan properly after each use. | |
Fresh fries are fried Unevenly in the iFRYER | You did not use theright potato type. | Use fresh potatoes and make sure that they stay firm duringfrying. |
You did not rinse the potato sticks properly before you fried them. | Rinse the potato sticks properly to removestarch from the outside of the sticks. | |
Fresh fries are not crispy when they come out of the iFRYER | The crispiness of the fries depends on the amount of oil and waterin the fries. |
Make sure you dry the £otato sticks properly before you ad the oil. |
Cut the potatosticks smaller for a crispier result | ||
Addslightly more oil for a crisperresult. | ||
El: Malfunction or short circuit in the internal wire, please take a picture and contact us E2: Malfunction or short circuit in the internalwire, please take a pictureand contact us | ||
the the
Faqs
What is the cooking capacity of the Ultrean Air Fryer 4.2?
What is the temperature range of the Ultrean Air Fryer 4.2?
What are the exterior dimensions of the Ultrean Air Fryer 4.2?
What is the weight of the Ultrean Air Fryer 4.2?
What is the warranty of the Ultrean Air Fryer 4.2?
What is the voltage of the Ultrean Air Fryer 4.2?
What is the power consumption of the Ultrean Air Fryer 4.2?
Leave a Comment