Usha Food Processor FP-3811 Instruction Guide | Operations
Content
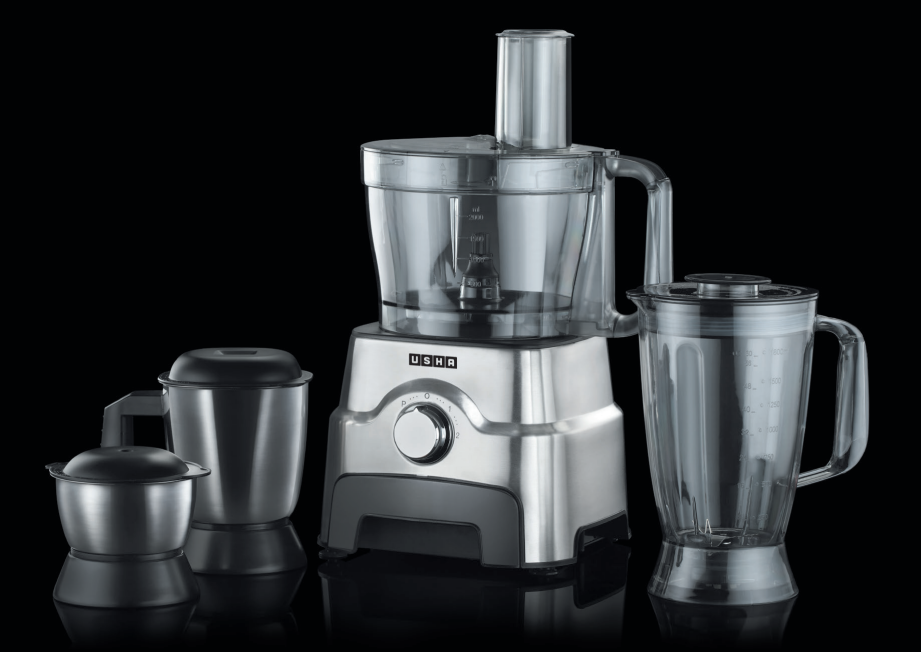
Introducing the Usha Food Processor FP-3811
The Usha Food Processor FP-3811 is a versatile kitchen appliance designed to simplify food preparation tasks. It features a powerful 550-watt motor and a 1.5-liter bowl capacity, making it suitable for a variety of chopping, slicing, shredding, and mixing needs. The food processor comes with multiple attachments, including a stainless steel blade, a reversible slicing and shredding disc, and a whipping attachment. The Usha Food Processor FP-3811 is available for approximately $59.99.
TECHNICAL SPECIFICATION
- Model: FP 3811
- Voltage: 230V~50/60 Hz
- Rated power: 1000W
- Motor Type : Universal
- Speed Control Switch : Rotary Type, 2 speed + pulse
- Blender jar capacity: 1.8L
- Processing bowl working capacity: 3.5L
Due to continuous effort for product upgradation, specifications are subject to change without prior notice.
KNOW YOUR USHA FOOD PROCESSOR
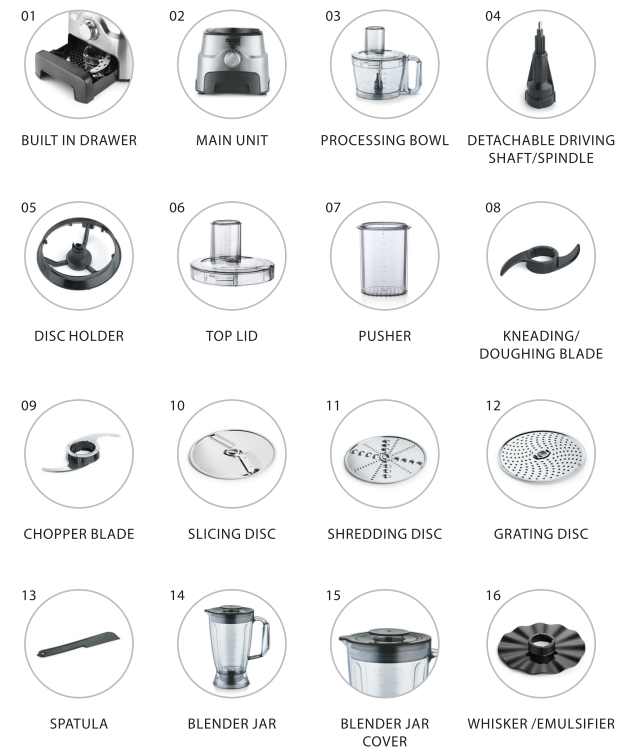
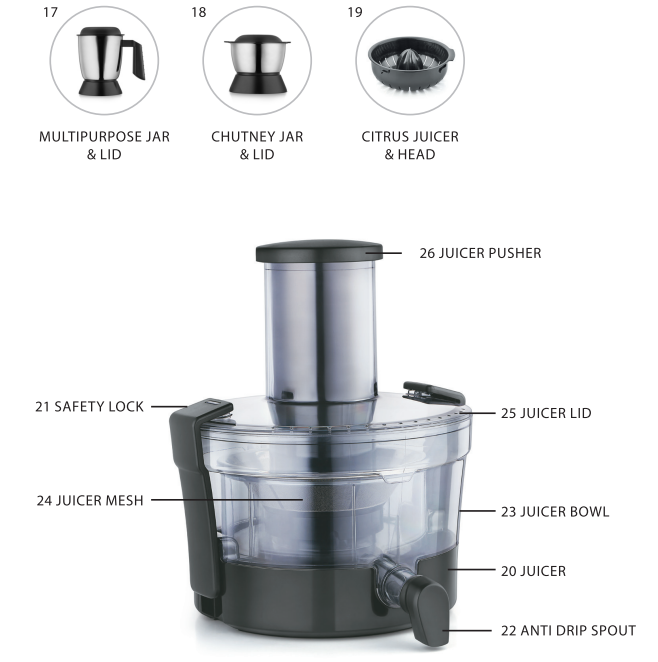
Note: Parts illustrated in the manual are indicative only, parts provided with the product may differ with illustration.
Using the Inbuilt Storage space
- Your food processor comes with built in storage drawer to safely preserve the processing blades.
- Place the Stainless steel blades inside the drawer until your next use.
ASSEMBLING THE FOOD PROCESSOR
BEFORE USING YOUR FOOD PROCESSOR FOR THE FIRST TIME, WASH ALL PARTS AND ACCESSORIES EITHER BY HAND OR IN THE DISHWASHER (SEE "CLEANING THE FOOD PROCESSOR" SECTION).
FOOD PROCESSOR BOWL ASSEMBLY (NO 3)
- Place the Food Processor on a dry, level countertop with the controls facing forward. Do not plug in the Food Processor until it is completely assembled.
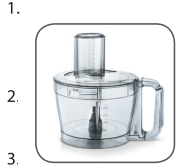
- Position the processing bowl(3) onto motor base, turn it clockwise to make it fixed firmly.
Fit the detachable drive shaft onto the rotor inside the bowl - push down lightly to ensure the drive shaft is fully engaged.
- Open the built in drawer(1) of motor base and take the blade you want. For example, when using the chopper blade(9) or dough blade(8), just seat it in detachable driving shaft(4).
NOTE: WHEN USING SLICING, SHREDDING OR GRATING BLADE, PLEASE FIX IT ON DISC HOLDER(5) FIRST, THEN SEAT THE BLADE DISC(10, 11, 12) IN DETACHABLE DRIVING SHAFT(4). ATTENTION; ONLY ONE BLADE CAN BE USED EVERY TIME. - Put the food into the processing bowl(3) and then close the top lid(6) while using the chopper blade(9) or kneading blade(8). When using slicing, shredding or grating disc, make sure to lock the top lid(6) first, ingredients should be filled through feed chute after the machine is ready.
Lock the top lid(6), the safety lock is active now.

NOTE: THE SWITCH SHOULD BE IN 0 SPEED; CONNECT THE PLUG WITH SOCKET, USING PULSE FUNCTION TO CONFIRM WHETHER THE MACHINE IS ASSEMBLED WELL. IF THERE IS ANYTHING ABNORMAL, UNPLUG THE MACHINE AND RE- ASSEMBLE IT AS ABOVE.
Description
The Usha Food Processor FP-3811 boasts a sleek and compact design that fits well in modern kitchens. The appliance is built with high-quality materials, ensuring it withstands heavy use over time. The stainless steel blades are sharp and durable, capable of handling tough ingredients with ease. The BPA-free plastic jars are safe for use with hot and cold foods, making them versatile for various recipes.
The control panel is intuitive, featuring three-speed settings and an overload protector to prevent motor burnout. This food processor also includes several attachments like a dough kneader and citrus juicer, enhancing its functionality beyond basic food processing tasks.
OPERATING YOUR USHA FOOD PROCESSOR
Before First use:
Before using your Food Processor for the first time, wash all parts and accessories either by hand or in the dishwasher (see "Cleaning the Food Processor" section).
NOTE: THIS APPLIANCE IS EQUIPPED WITH A PROTECTIVE DEVICE AGAINST HIGH TEMPERATURE. IF THE TEMPERATURE BECOMES TOO HIGH, THE UNIT WILL TURN OFF AUTOMATICALLY AND RESUME OPERATION AFTER THE MOTOR HAS COOLED DOWN SUFFICIENTLY (AFTER ABOUT 30 MINUTES).
KNEADING BLADE ASSEMBLY AND APPLICATION (NO 8)
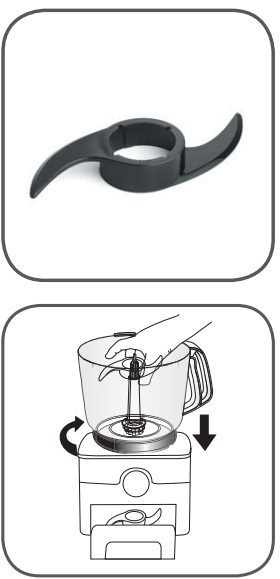
- Place the Spindle inside the processing bowl.
Select the Kneading Blade and put it into the food processor. Latch the lid and the bowl onto the processor, enabling the machine to operate.
Suggested quantity for kneading dough application
Indicative volume per one batch
| Ingredient | Volume |
|---|---|
| Flour & soft cheese | ≤400g |
Tips and warning:
The ratio of flour to water while doughing is 1:0.6, means 100g flour needs 60g water to make best effect; The standard of processing time is within 30sec, that's because the flour will become sticky and stick to the blade adapter if the time lasts too long. Then it will make the machine shake, and work abnormally.
CHOPPING BLADE ASSEMBLY AND APPLICATION
(NO 9)

Suggested quantity for kneading dough application
Indicative volume per one batch
| Ingredient | Volume |
|---|---|
| Chocolate | ≤200g |
| Cheese | ≤350g |
| Meat | ≤800g |
| Vegetable & Spice | 100~150g |
| Fruit | 300~500g |
| Onion | ≤800g |
- Place the Spindle inside the processing bowl.
- Select the Chopping Blade and put it into the food processor. Latch the lid and the bowl onto the processor, enabling the machine to operate.
- Standard processing time may vary from 20sec to 30sec Suggested quantity for chopping blade application Indicative volume per one batch :
SLICING AND SHREDDING DISC ASSEMBLY AND APPLICATION
(NO 10-11)
Choose the blade disc according to ingredients and the shape you want. Put the blade disc you choose into the plastic disc holder (5), then seat it in the detachable driving shaft(4), close the processing top lid (6), making sure the safety switch is switched on.
Notes (Slicing and Shredding Disc):
Once the processing is done, carefully take out all the attachments, and detach the bowl by turning anti clockwise.
NOTE: PLEASE INSERT THE INGREDIENTS SMOOTHLY INSIDE THE FEEDING TUBE. IT'S BETTER TO CHOP LARGE SHAPE INGREDIENTS INTO SMALLER ONE TO FIT THE FEED CHUTE SIZE. LOWER SPEED IS RECOMMENDED WHILE SLICING SOFT INGREDIENTS TO PREVENT IT FROM BECOMING PASTY.
Standard processing time is 1 minute.

GRATING DISC ASSEMBLY AND APPLICATION
(NO 12)
Follow the same procedure for installing shredding & slicing disc. Grating disc is used for softer ingredients, such as garlic, ginger etc. Insert garlic, or ginger into the feeding chute and switch on the machine, then use pusher to press ingredients downward.
Notes (Grating Disc):
Once the processing is done, carefully take out all the attachments, and detach the bowl by turning anti clockwise.

CITRUS JUICER ASSEMBLY AND APPLICATION
(NO 19)
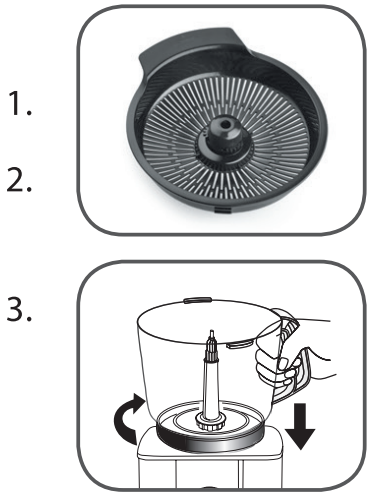
- Position disc driver on motor base.
- Position processing bowl into the disc driver and turn clockwise to seat firmly on motor base.
- Place citrus juicing plate on the bowl and turn 30 degrees clockwise.
Notes (Citrus Juicer):
- Lower speed should be chosen for citrus juicer
- Once the processing is done, carefully take out all the attachments, and detach the bowl by turning anti clockwise.
WHISKER DISC ASSEMBLY AND APPLICATION
(NO 16)
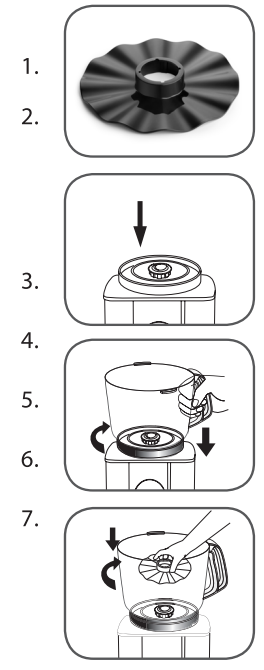
- Position disc driver on motor base.
- Position processing bowl into the disc driver and turn clockwise to seat firmly on motor base.
- Place blade adaptor onto the disc driver.
- Place Emulsifying/Whisker disc onto the blade adaptor.
- Turn the Emulsifying/Whisker disc to the right position.
- Place cover on bowl, turn clockwise until cover locks on bowl.
- Place pusher into feeding chute
Notes (Whisker Disc):
- Once the processing is done, carefully take out all the attachments, and detach the bowl by turning anti clockwise.
Tips during Usage
- To avoid damage to the blade or motor, do not process food that is so hard or firmly frozen that it cannot be pierced with the tip of a sharp knife. If a piece of hard food, such as a carrot, becomes wedged or stuck on the blade, stop the processor and remove the blade. Gently remove food from the blade.
- To capitalize on the speed of the processor, drop ingredients to be chopped through the feed tube while the processor is running.
- Different foods require varying degrees of pressure for best shredding and slicing results. In general, use light pressure for soft, delicate foods (strawberries, tomatoes, etc.), moderate pressure for medium foods (zucchini, potatoes, etc.), and firmer pressure for harder foods (carrots, apples, hard cheeses, partially frozen meats, etc.).
- Sometimes slender foods, such as carrots or celery, fall over in the feed tube, resulting in an uneven slice. To minimize this, cut food in several pieces and pack the feed tube with the food.
- When preparing a cake or cookie batter or quick bread, use the multipurpose blade to cream fat and sugar first. Add dry ingredients last. Place nuts and fruit on top of flour mixture to prevent overchopping. Process nuts and fruits, using short pulses, until blended with other ingredients. Do not overprocess.
- When shredded or sliced food piles up on one side of the bowl, stop the processor and redistribute the food using a spatula.
- A few larger pieces of food may remain on top of the disc after slicing or shredding. If desired, cut these by hand and add to mixture
- Use a spatula or other kitchen utensil to remove ingredients from the processing bowl.
- Organize processing tasks to minimize bowl cleanup. Process dry or firm ingredients before liquid ingredient.
- To clean ingredients from the multipurpose blade easily, just empty the work bowl, replace the lid, and pulse 1 to 2 seconds to spin the blade clean.
- After removing the work bowl cover, place it upside down on the counter. This will help keep the counter clean.
CENTRIFUGAL JUICE EXTRACTOR ASSEMBLY AND APPLICATION
(NO 20-26)
Set the juicer attachment as the pictures above show.

- Position the motor base on a dry and flat broad.
- Turn the juicer base clockwise, make the juicer fix in the motor base firmly.
- Set the juice beaker, juice mesh, juicer.
- Buckle up the safety lock, the juice attachment is ready. The appliance only works when it has been set up correctly.
- Please check that switch should be in "0" speed, plug in and use pulse 1-2 times as pre-blending. For abnormal situation, pull off the plug, re-install the machine following the steps above.
- You can choose the suitable speed according to the hardness of the fruit, choose low speed for soft fruit and vegetable (like watermelon or cucumber), choose high speed for hard fruit and vegetable (like apple and carrot), the performance would be better. Set up the machine and choose the right speed, put the beaker under the juice spout, put the prepared fruit and vegetable into the feeding mouth and use the pusher to push down gently.
- After juicing turn the switch to"O"speed, turn off the power, wait until the juice mesh stop working, turn to the opposite direction take the machine apart for cleaning.
NOTE
- Do not put your finger or other object into the feeding mouth while the machine is operating.
- For better performance, do not push too hard.
- Turn off the machine first if you want to clean the juicer.
- Do not use the machine constantly more for than 1 minut
- Clean the juicer in time, otherwise it may cause blockage or the motor will stop working.
- After using, clean the juice mesh carefully (you can use professional brush to clean). Otherwise it may affect next time usage
BLENDER JAR ASSEMBLY AND APPLICATION
(NO 14-15)
- Standard processing time is 1 minute. Prepare the ingredients and put them in the blender jar (14), mount the blender jar cover (15) well.
- Position the blender jar (14, 15) on motor base; turn clockwise to make it fixed firmly. That switch should be in "O" speed, plug in and use pulse 2-3 times as pre-blending.
- Then choose "1" or"2" speed for processing. During the operation, you can take out the small lid on blender jar cover (15) and add water or any other ingredients you want through the feeding hole.
- DO NOT open the blender jar cover(15) for adding ingredients during operation! Always add in some water when using the blender for ice crushing

MULTIPURPOSE JAR ASSEMBLY AND APPLICATION
(NO 17)
- Make sure the blade base is fixed tightly.
- Put food into the jar and cover it.
- Put the SS jar onto motor base vertically, and then rotate the jar clockwise to fix it.
Notes (Multipurpose jar)
- Take ingredients and put them into the jar, working capacity on suggestion: less then 2/3 of the full capacity.
- Use "Pulse" 2 or 3 times at first, then choose the related speed to start the unit with running time 1 minute then rotate back to speed OFF on 3 minutes.
Disconnect the plug then clean and dry the blender jar after using.
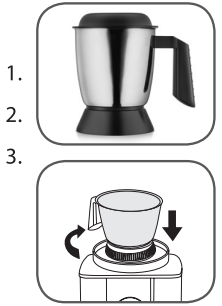
Once the processing is done, carefully take out all the attachments, and detach the jar by turning anti clockwise
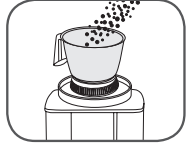
.
Remove the jar cover. Pour the ingredients into cup.
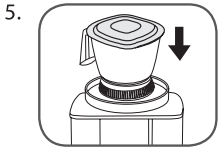
Food and ingredients recommend: rice, coffee beans, soya bean, peanut, herb.
Notes (Chutney jar)
_usha_food_processor_fp-3811.png)
- Take ingredients and put them into the jar, working capacity on suggestion: less then 120g;
- Use "Pulse" 2 or 3 times at first, then choose the related speed to start the unit with running time 1 minute then rotate back to speed OFF on 3 minutes.
- Disconnect the plug then clean and dry the blender jar after using.
- Once the processing is done, carefully take out all the attachments, and detach the jar by turning anti clockwise.
- Remove the jar cover. Pour the ingredients into cup. Food and ingredients suggested: Ginger, chili, garlic, Coconut.
Setup Guide
To operate the Usha Food Processor FP-3811, start by assembling the unit according to the user manual.
- Ensure all jars and blades are securely locked into place before use.
- Plug in the appliance and select the desired speed setting based on your task. For example, use the lowest speed for kneading dough and the highest speed for chopping hard vegetables.
- For configuration, refer to the manual for specific instructions on how to attach different blades and jars.
- Always follow safety guidelines, such as keeping the appliance out of reach of children and ensuring all parts are securely locked before operation.
CLEANING AND MAINTENANCE
- Please unplug the power cord to protect from electric shock while cleaning the machine, do not immerse motor base and power cord it in water.
- All removable accessories can be cleaned in water except motor base, dry the wet parts after cleaning.
- For easy cleaning, you can put in some warm water and detergent and let it run for a while when cleaning blender jar.
- Always place the machine in dry and flow place.
- DO NOT use hard(solid) detergent to avoid scratch on product.
- DO NOT operate the appliance for more than 1 minute at a stretch.
- ONE minute ON and THREE minutes OFF, max. 5 circles, then turn off the machine and let it cool down to room temperature.
Usha Food Processor FP-3811 Troubleshooting
| Problem | Solution |
|---|---|
| Machine doesn’t work. | - Make sure that the bowl and lid are properly aligned and locked in place. |
| - Make sure the power plug is plugged in properly. | |
| - Check if the mains have tripped, or if there is a power outage. | |
| Machine stops running suddenly. | - Processing bowl may loosen during vigorous processing. Please re-install the bowl cover. |
| Motor is running, while components do not run. | - Make sure the driving shaft is installed correctly. |
| Food Processor not shredding or slicing properly: | - Make sure the raised-blade side of the disc is positioned face up on the common adapter. |
| - If using the adjustable slicing blade, make sure it is set to the correct thickness. | |
| - Make sure ingredients are suitable for slicing or shredding. See "Tips for Great Results" section. |
WARRANTY CARD
This appliance is warranted for 2 years on the product and 5 years on the motor against all manufacturing defects from the date of sale.
Pros & Cons
Pros
- High Power Motor for Efficient Processing
- Multifunctional with Various Attachments
- Durable Stainless Steel Blades
- Easy to Clean and Maintain
- Affordable Price Point Compared to Similar Models
Cons
- Noisy Operation at High Speeds
- Large Footprint May Not Suit Compact Kitchens
- Some Users Report Difficulty in Assembling Parts
- Limited Warranty Period Compared to Other Brands
Customer Reviews
Customers generally praise the Usha Food Processor FP-3811 for its robust performance and versatility in handling various kitchen tasks. Many users appreciate the ease of cleaning and the durable construction of the appliance. However, some users have noted that it can be quite loud during operation and that assembling the parts can be a bit tricky.
Common complaints include issues with customer service and occasional difficulties with the motor overload protection feature. Despite these minor drawbacks, the majority of users find this food processor to be a valuable addition to their kitchen arsenal.
Faqs
What is the power consumption of the Usha Food Processor FP-3811?
How many speed settings does the Usha Food Processor FP-3811 have?
What materials are used for the blades and jars in this food processor?
Does the Usha Food Processor FP-3811 come with additional attachments?
How do I troubleshoot if the motor gets overloaded?
Is the Usha Food Processor FP-3811 easy to clean?
What is the capacity of each jar in this food processor?
Can I use hot foods in this food processor?
What should I do if my blades get jammed during use?
Where can I find detailed instructions for assembling this food processor?
Leave a Comment
