Sunny MAGNETIC ELLIPTICAL BIKE SF-E905 | User Manual
Content
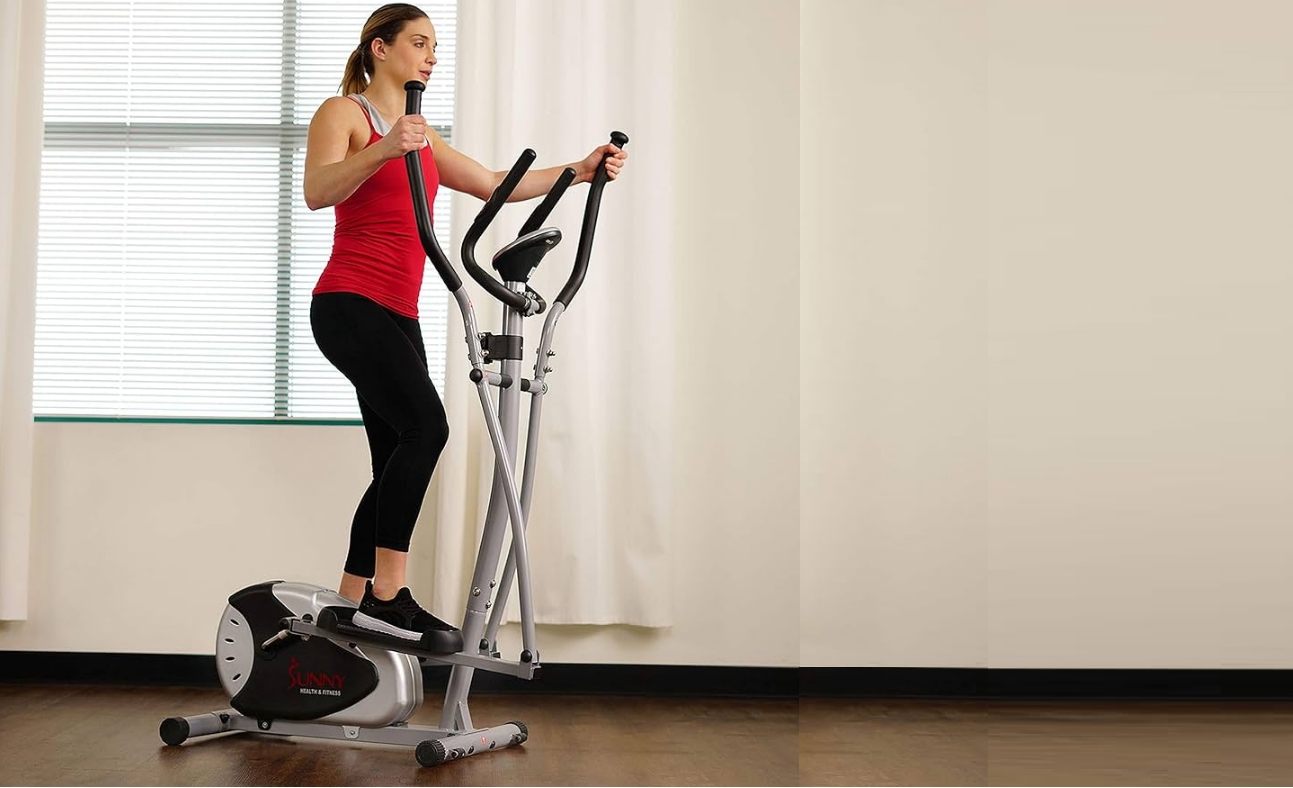
Introducing the sunny MAGNETIC ELLIPTICAL BIKE SF-E905
The sunny MAGNETIC ELLIPTICAL BIKE SF-E905 is a versatile and durable piece of exercise equipment that is perfect for home use. This elliptical bike offers a low-impact, full-body workout that is easy on the joints, making it a great option for people of all fitness levels. The bike is equipped with a magnetic resistance system that allows for smooth and quiet operation, and it has a sturdy steel frame that can support up to 220 pounds. The estimated price of the sunny MAGNETIC ELLIPTICAL BIKE SF-E905 is $299.99, and it is now available for purchase.
Detailed Specifications
Here are some of the key features of the MAGNETIC ELLIPTICAL BIKE
- Magnetic resistance system for smooth and quiet operation
- Sturdy steel frame that supports up to 220 pounds
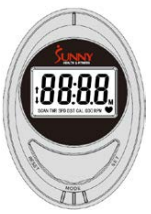
- LCD display that tracks time, speed, distance, calories, and heart rate
- 12 preset workout programs to choose from
- Adjustable, padded seat for comfort
- Transport wheels for easy mobility
- Dimensions: 49L x 24W x 64H inches
- Product weight: 88 pounds
FUNCTION |
Auto Scan |
Every 6 seconds |
Running Time |
00:00 ~ 99:59(Minute: Second) | |
Current Speed | The max pick-upsignal is 999.9MILE/H (or 1500RPM) | |
Trip Distance |
0.00 ~ 99.99MILE | |
Calories | 0 ~ 999.9 Kcal | |
Total Distance | 0 ~ 999.9MILE | |
Pulse Rate | 40-240BPM | |
Battery Type |
2 pcs of SIZE-AA | |
Operating Temperature |
0 C ~ 40°C (32°F~ 104°F) | |
Storage Temperature |
-10C ~ 60C (14°F ~ 140°F) | |
Description
The sunny MAGNETIC ELLIPTICAL BIKE is a high-quality piece of exercise equipment that offers a wide range of features to help you reach your fitness goals. The bike is easy to assemble and is equipped with a magnetic resistance system that allows for a smooth and quiet workout. The LCD display tracks all of the important metrics, and the adjustable seat ensures that you can find a comfortable position. With 12 preset workout programs to choose from, you can vary your routine and keep your workouts interesting. The transport wheels make it easy to move the bike out of the way when you're finished using it.
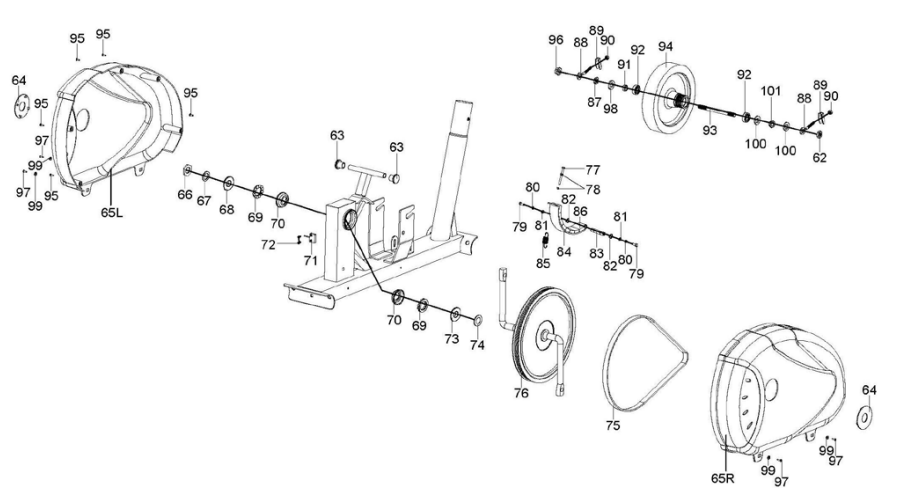
EXPLODED DIAGRAM

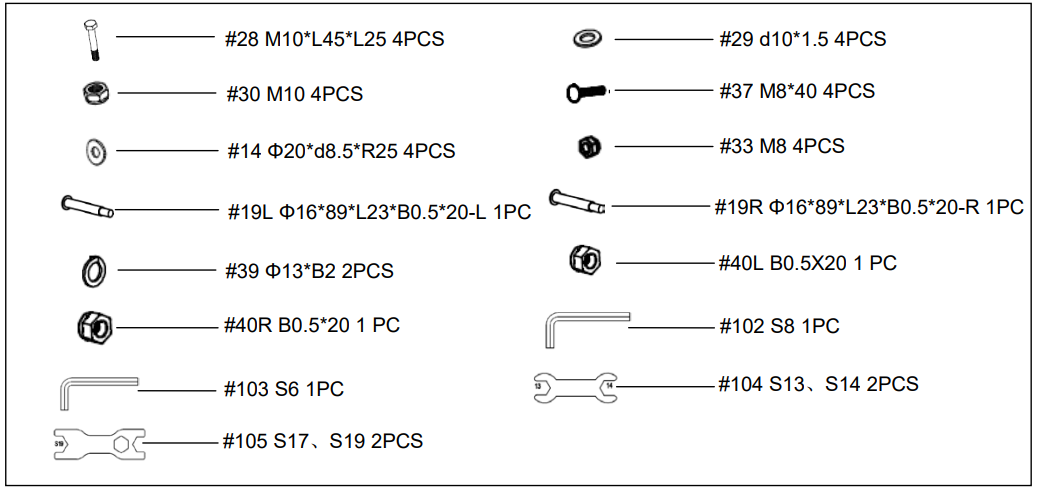
HARDWARE PACKAGE
PARTS LIST
No. | Description | Spec. | Qty. | No. | Description | Spec. | Qty. | |
1 | Main Frame | 1 | 39 | Spring Washer | Φ13XB2 | 2 | ||
2 | Front Stabilizer | 1 | 40L/R | Nylon Nut | B0.5X20 | 1pr. | ||
3 | Rear Stabilizer | 1 | 41 | Nut Cap | S17 | 4 | ||
4 | Roller Cap | 2 | 42 | Square End Cap | 2 | |||
5 | Leveler Cap | 2 | 43 | Foam Grip | 2 | |||
6 | Carriage Bolt | M10XL57 | 4 | 44 | Foam Grip | 2 | ||
7 | Arc Washer | Φ10X1.5XΦ 25XR28 | 4 | 45 | Round End Cap | 2 | ||
8 | Domed Nut | M10 | 4 | 46 | Pulse Sensor Wire | 2 | ||
9 | HandlebarPost | 1 | 47 | SphericalCap | 2 | |||
10a | Tension Controller | 1 | 48 | MushroomCap | 2 | |||
10b | Tension Cable | 1 | 49 | Crank Arm | 1 | |||
11 | Phillips Screw | 1 | 50 | Tension Controller Cover | 1 | |||
12 | Flat Washer | 1 | 51 | Hex Bolt | M10X50 | 2 | ||
13 | Allen Bolt | M8X20 | 4 | 52 | ConnectingJoint | 2 | ||
14 | Arc Washer | Φ20Xd8.5XR25 | 8 | 53 | Axle Bushing 1 | 4 | ||
15 | Upper Senor Wire | 1 | 54 | Flat Washer | d10X1.5 | 2 | ||
16 | Lower Sensor Wire | 1 | 55 | Alloy Bushing | 4 | |||
17 | Tension Hook | 1 | 56 | Nylon Nut | M10 | 2 | ||
18L/R | Pedal Support Tube | 1pr. | 57 | Nut Cap | S19 | 2 | ||
19L/R | Hinge Bolt | Φ16X89 | 1pr. | 58 | Nut Cap | S14 | 4 | |
20 | Nut Cap | S13 | 2 | 59 | Spacer | Φ32X59 | 2 | |
21 | Hex Bolt | M8X55 | 2 | 60 | Axle Bushing 2 | 4 | ||
22 | Flat Washer | d8X15 | 2 | 61 | Wave Washer | Φ17.1XΦ23 X 0.3 | 2 | |
23 | Nylon Nut | M8(Black color) | 2 | 62 | Nylon Nut | 1 | ||
24L/R | Swing Bar (L/R) | 1pr. | 63 | Plug | 2 | |||
25 | Hex Bolt | M8X15 | 2 | 64 | Crank Cover | 2 | ||
26 | Flat Washer | Φ8.2XΦ32X2 | 2 | 65L/R | Chain Cover | 1pr. | ||
27L/R | Pedal | 1pr. | 66 | Nut | 1 | |||
28 | Hex Bolt | M10XL45 | 4 | 67 | Washer | 1 | ||
29 | Flat Washer | d10X1.5 | 4 | 68 | Two-slotNut | 1 | ||
30 | Nylon Nut | M10 (White color) | 4 | 69 | Ball Bearings | 2 | ||
31 | Armrest | 1 | 70 | Bearing Housing | 2 | |||
32L/R | Handlebar | 1pr. | 71 | Sensor | 1 | |||
33 | Domed Nut | M8 | 4 | 72 | Bolt | ST3X10 | 2 | |
34 | Spring Washer | d8X1.5 | 2 | 73 | Three-slotNut | 1 | ||
35 | Hex Bolt | 2 | 74 | Big Washer | 1 | |||
36 | DecorativeCover | 1 | 75 | Belt | 1 | |||
37 | Carriage Bolt | M8X40 | 4 | 76 | Belt Pulley | 1 | ||
38 | Meter | 1 | 77 | Hex Bolt | M5XL60 | 1 |
78 | Hex Nut | M5 | 2 | 92 | Bearing | 6000z | 2 | |
79 | Hex Bolt | M6XL15 | 2 | 93 | Flywheel Axle | 1 | ||
80 | Spring Washer | d6 | 2 | 94 | Flywheel | 1 | ||
81 | Flat Washer | D6 | 2 | 95 | Bolt | ST4.3X20 | 5 | |
82 | Axle Stop Ring | 2 | 96 | Flange Nut | 1 | |||
83 | MagneticBoard Axle | 1 | 97 | Bolt | ST5X20 | 4 | ||
84 | Magnetic Board | 1 | 98 | Flat Washer | d10X20X1.5 | 1 | ||
85 | Spring | 1 | 99 | Flat Washer | d5X1 | 4 | ||
86 | Square Magnet | 8 | 100 | Flat Washer | d8X19X1.5 | 2 | ||
87 | Hex Thin Nut | M10X1 | 1 | 101 | Alloy Sleeve | 1 | ||
88 | AdjustingChain Bolt | M6X50 | 2 | 102 | Wrench | S=8 | 1 | |
89 | AdjustingU Washer | 2 | 103 | Wrench | S=6 | 1 | ||
90 | Hex Nut | M6 | 2 | 104 | Spanner | S=13、14 | 2 | |
91 | Spacer | 1 | 105 | Spanner | S=17、19 | 2 |
ASSEMBLY INSTRUCTION
STEP 1
Attach the Front Stabilizer (No. 2) and Rear Stabilizer (No. 3) onto the Main Frame (No. 1), secure with 4 Carriage Bolts (No. 6), 4 Arc Washers (No. 7) and 4 Domed Nuts (No. 8) which are pre-attached to the stabilizer, tighten with the Spanner (No. 105).
Ensure that all bolts and washers are in place and partially threaded in before completely tightening any of them.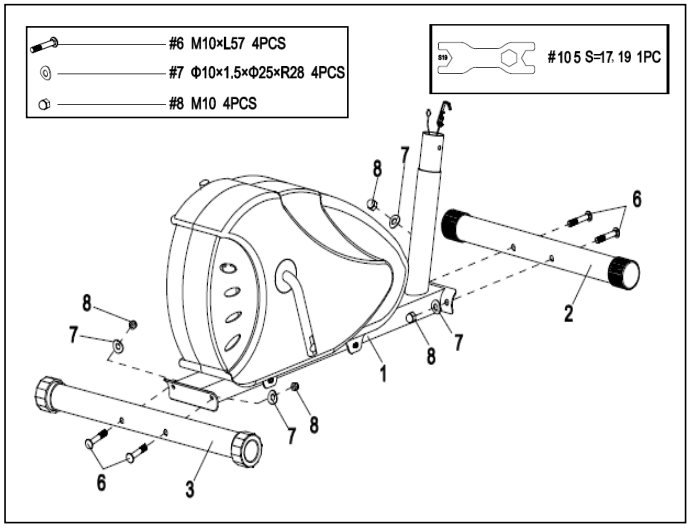
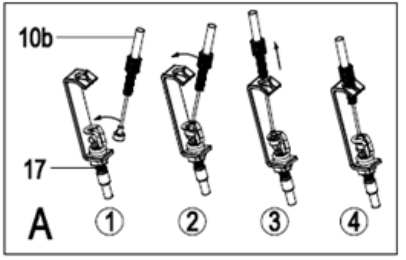
- STEP 2
- Connect the Lower Sensor Wire (No. 16) to the Upper Senor Wire (No. 15), and then connect Tension Hook (No. 17) with Tension Cable (No. 10b) as shown in Picture A.
Note: Make sure the Tension Controller (No. 10a) is at the lowest level before you connect the Tension Control Cable. This ensures the wires are at their longest point. We recommend the assistance of a second person to help hold the Handlebar Post (No. 9). This will make the connection easier when you are attaching Tension Hook (No. 17) to Tension Cable (No. 10b). Remove the preassembled 4 Allen Bolts (No. 13) and 4 Arc Washers (No. 14) from the Main Section. Insert the Handlebar Post (No. 9) into the post of the Main Frame (No. 1); secure in place with 4 Allen Bolts (No. 13) and 4 Arc Washers (No. 14) with the Wrench (No. 103).
Ensure that all bolts and washers are in place and partially threaded in before completely tightening any of them.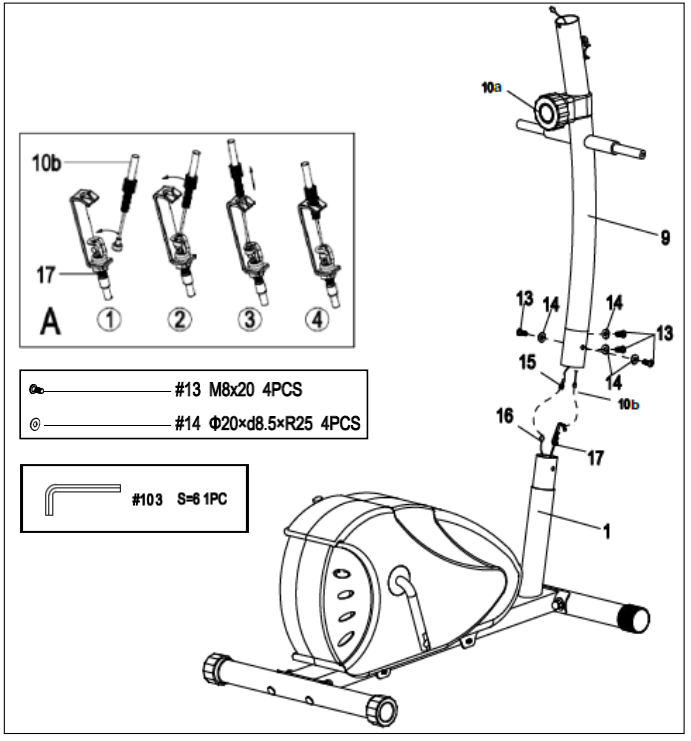
- Connect the Lower Sensor Wire (No. 16) to the Upper Senor Wire (No. 15), and then connect Tension Hook (No. 17) with Tension Cable (No. 10b) as shown in Picture A.
- STEP 3
- Attach the Swing Bar (No. 24L/R) to the long axle of the Handlebar Post (No. 9) with Hex Bolt (No. 25) and Flat Washer (No. 26) with 2 Spanners (No. 104).
Note: Please do not fully tighten at this time. - Attach the 2 Pedal Support Tubes (No. 18L/R) to the Crank Arm (No. 49) with 2 Hinge Bolts (No. 19L/R), 2 Wave Washers (No. 61), then put on 2 Spring Washers (No. 39) and 2 Nylon Nuts (No. 40L/R) to the end of 2 Hinge Bolts (No. 19L/R) using Wrench (No. 102) and Spanner (No. 105). (Note: The end of LEFT Nylon Nut (No. 40L) is Blue, while the RIGHT Nylon Nut (No. 40R) is White. Note: Please do not fully tighten at this time.
- Fasten the 2 Swing Bars (No. 24L/R) and the 2 Pedal Support Tubes (No. 18L/R) tightly with 2 Hex Bolts (No. 21), 2 Flat Washers (No. 22) and 2 Nylon Nuts (No. 23) using 2 Spanners (No. 104).
Fasten 2 Hex Bolts (No. 25) and 2 Nylon Nuts (No. 40L/R) tightly now. Then cover with the 8 Nut Caps (No. 20) (No. 58) (No. 57).
Ensure that all bolts and washers are in place and partially threaded in before completely tightening any of them.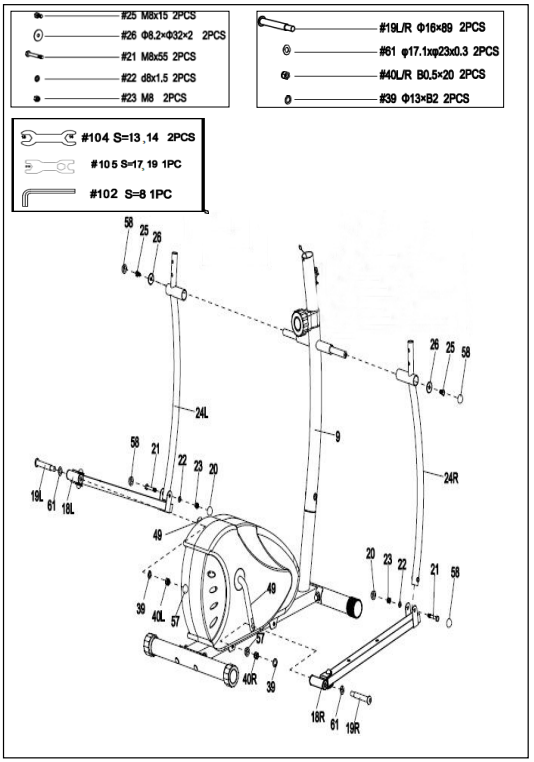
IMPORTANT: Hinge Bolt (No. 19L/R) is labeled L for LEFT and R for RIGHT. Please make sure to turn Left Hinge Bolt (No. 19L) counterclockwise and Right Hinge Bolt (No. 19R) clockwise.
The Hinge Bolt (No. 19L/R) must fully penetrate the nylon ring of the Nylon Nut (No. 40L/R). This will ensure the stability and durability of your Elliptical Trainer.
In order to install the hinge bolt properly, it must go through the Connecting Joint (No. 52L/R) and then screw into the hole of the Crank Arm (No. 49L/R). Then attach Spring Washer (No. 39) and Nylon Nut (No. 40L/R) to the end of Hinge Bolt (No. 19L/R). If the hinge bolt is connected to the crank arm at an angle, damage to both the hinge thread and the crank arm may occur.Disconnect the Connecting Joint (No. 52L/R) from the Pedal Support Tube (No. 18L/R).
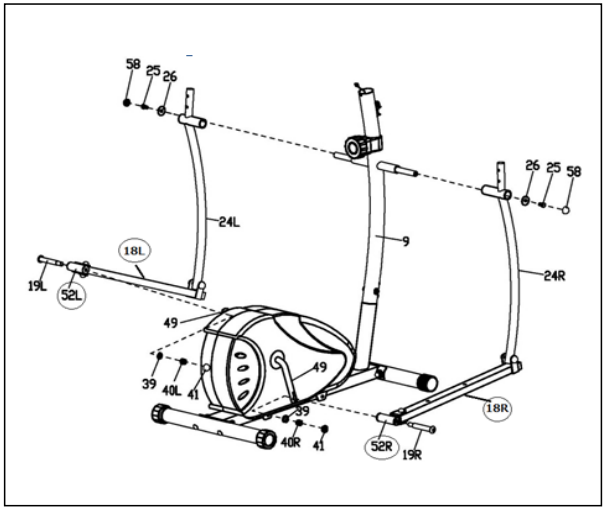
Insert the Locking Bolt (No. 19L/R) through the hole of the Connecting Joint (No. 52L/R), then screw the Locking Bolt (No. 19L/R) in the Crank Arm (No. 49).
Remember when assembling the left side, you must screw counter-clockwise to tighten. Connect the Spring Washer (No.39) and Nylon Nut (No. 40L/R) and attach the End Cap (No. 41). You can now reattach the Connecting Joint (No. 52L/R) to the Support Tube (No.18L/R).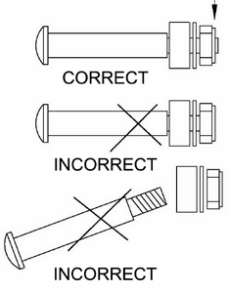
- Attach the Swing Bar (No. 24L/R) to the long axle of the Handlebar Post (No. 9) with Hex Bolt (No. 25) and Flat Washer (No. 26) with 2 Spanners (No. 104).
STEP 4
Secure the 2 Pedals (No. 27L/R) to the 2 Pedal Support Tubes (No. 18L/R) respectively using 4 Hex Bolts (No. 28), 4 Flat Washers (No. 29) and 4 Nylon Nuts (No. 30) using Spanner (No. 105).
CAUTION: Both pedals are labeled; L for LEFT and R for RIGHT.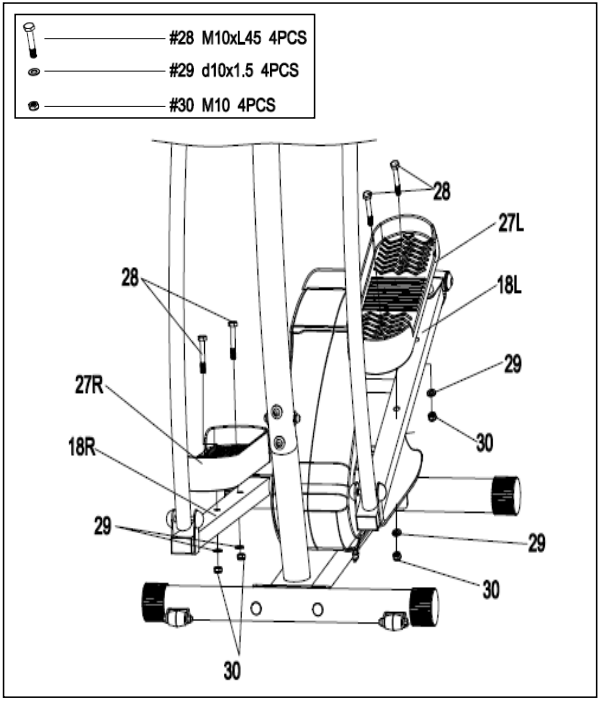
- STEP 5
- Remove the preassembled 2 Spring Washers (No. 34) and 2 Hex Bolts (No. 35) from the Handlebar Post (No. 9). Attach Armrest (No. 31) to the Handlebar Post (No. 9) in place. Secure it with 2 Spring Washers (No. 34) and 2 Hex Bolts (No. 35) that just removed using Wrench (No. 103), and then pull the Pulse Sensor Wire (No. 46) out of the Handlebar Post (No. 9). Finally attach the Decorative Cover (No. 36) onto the Armrest (No. 31).
Attach the 2 Handlebars (No. 32L/R) on the 2 Swing Bars (No. 24L/R) with 4 Carriage Bolts (No. 37), 4 Arc Washers (No. 14) and 4 Domed Nuts (No. 33) using Spanner (No. 104).
Note: If the Handlebar (No. 32L/R) rubs against the Armrest (No. 31) during the workout please confirm you assembled the correct parts to the correct side. You should attach Handlebar (No. 32L) to Swing Bar (No. 24L) according to the label marked with L or R. while assembling the left side.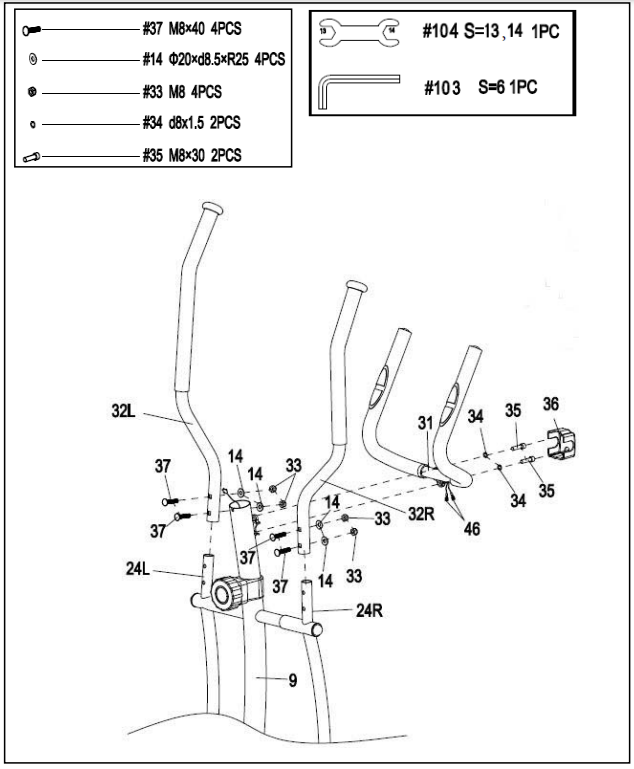
STEP 6
Connect the 2 Pulse Sensor Wires (No. 46) and Upper Sensor Wire (No. 15) to the Meter (No. 38) respectively. Align the slot of the Handlebar Post (No. 9) to the bulge inside the Meter (No. 38) then slide it onto the Handlebar Post (No. 9) slowly.
Note: To avoid damaging the wires please push them into the Handlebar Post (No. 9) before sliding the Meter (No. 38) onto it.
ASSEMBLY IS COMPLETE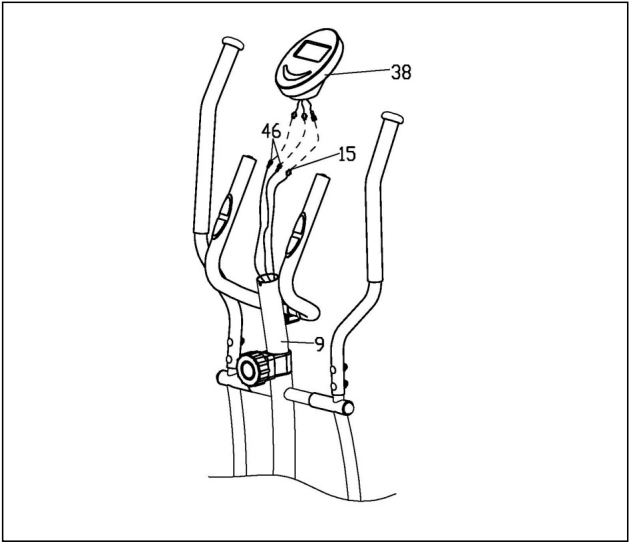
ADJUSTMENTS & USAGE
If you find there is no difference between tension level 1 to level 8, please check the connection of the tension cable. Please see Diagram A under Step 2.
- If the meter does not show numbers correctly, please check the batteries. If the meter does not count the speed and time, please check the connections of Upper Sensor Wire (No. 15) to the Meter (No. 38) and Upper Sensor Wire (No. 15) to Lower Sensor Wire (No. 16).
- If you have difficulty putting Hinge Bolts (No. 19L/R) into the Crank Arm (No. 49), please try moving the Crank Arm (No. 49) to a different angle. Keep in mind the Left Locking Bolt (No. 19L) has reversed threading and must be installed by turning counter-clockwise.
- If you hear any noise when using the machine, please check if Hinge Bolts (No. 19L/R), Hex Bolt (No. 21), Flat Washer (No. 26) and Connecting Joint (No. 52) are loose. You may remove these parts and add some lubricant oil to eliminate all noise possibilities, remember to tighten all the parts securely.
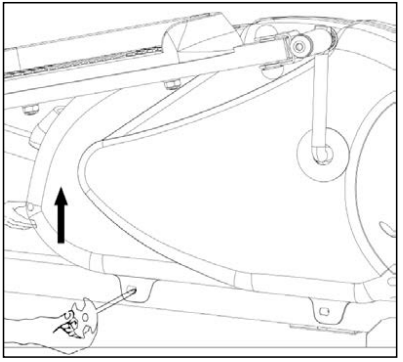
When you first use the machine, if you hear any unusual noises from the inside of the Chain Cover (No. 65L/R), please loosen the screws on the chain cover about two rotations, then push the Chain Cover (No. 65L/R) up a little bit; finally, fasten the screws you loosened before. See the following diagram. (During shipping, the Chain Cover (No. 65L/R) can be dislocated, and the Flywheel (No. 94) may rub on the Chain Cover (No. 65L/R)
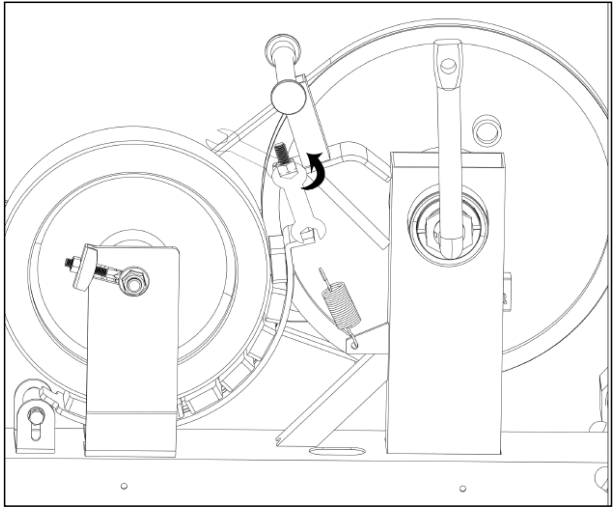
If it is very hard to pedal on the higher tension levels, or you hear rubbing noises, please remove the Chain Cover (No. 65L/R), and adjust the screw seen in the following diagram. You will need to lower the position of the screw by turning counter-clockwise; this will keep the Magnet Board (No. 84) from contacting the magnetic flywheel. Before re-installing the Chain Cover (No. 65L/R), test the tension level 8 to ensure the magnets do not touch the flywheel.
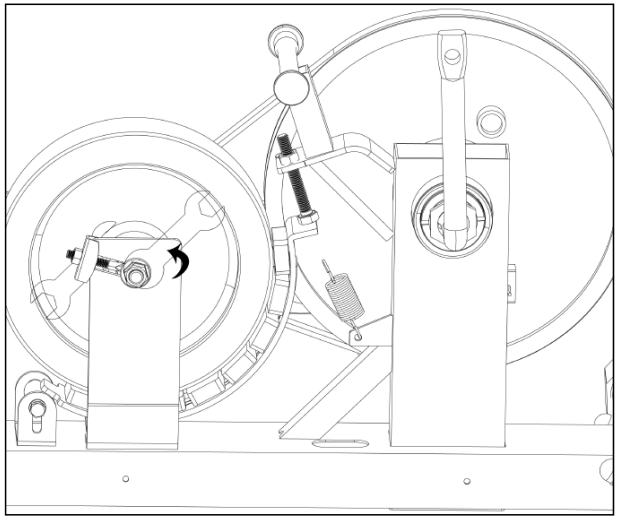
If you still hear noises after you did Step 5 and Step 6, please remove the Chain Cover (No. 65L/R); loosen the screws for the Flywheel (No. 94) about a half of a rotation. See the following diagram.
- If you feel the machine is uneven, please adjust the Leveler Cap (No. 5) on Real Stabilizer (No. 3) by turning it. If the machine is wobbly when you use it, please consider adding an exercise mat under it.
BATTERY INSTRUCTION

- BATTERY INSTALLATION
The meter uses 2 AA batteries. Open the battery cover from the back of meter, then put 2 batteries into the battery compartment. Make sure the (+) and (-) ends of the batteries are in the correct position. Put the battery cover back. - BATTERY REPLACEMENT
If there is a problem with the display, try changing the batteries first. Open the battery cover, remove the old batteries, and replace with new batteries. Make sure the (+) and (-) ends of the batteries are in the correct position. Put the battery cover back.
When changing batteries, always replace both with new batteries. Do not mix old and new batteries.
EXERCISE COMPUTER
FUNCTION KEYS
- MODE: Press to select functions. Press and hold the MODE button for 6 seconds to reset time, distance and calories.
- SET: Press to set values of time, pulse, distance and calories when not in scan mode. Press the MODE button to cycle through functions: time, distance and calories to select desired function. Use the SET button to set a value for time, distance or calories. The value of a function will be set on a countdown Press the MODE button once more, to save the function value you've created.
- RESET: Press to reset time, pulse, distance and calories to zero when not in scan mode.
FUNCTIONS
- SCAN: Press MODE button until "▼" appears at SCAN position (or until "SCAN" appears), the computer will rotate through all 5 functions: Time, Speed, Distance, Calories and Total Distance. Each display will be held for 6 seconds.
- TIME: Counts the total time of the exercise from start to finish.
- SPEED: Displays the current speed.
- DISTANCE (DIST): Counts the distance of an exercise from start to finish.
- CALORIES (CAL): Counts the amount of total calories burned during an exercise from start to finish
- TOTAL DISTANCE (ODO): Counts the total distance after installing the batteries.
- AUTO ON/OFF & AUTO START/STOP: If the wheel is put into motion, or any button is pressed the computer will become active, and shall remain active while either of these two things continue to be done, however without any signal for 4 minutes, the power (computer), will turn off automatically.
- PULSE RATE (If Available): Press MODE button until "▼" appears at PULSE position, (or until " V " appears). In order properly measure your pulse rate, you must place both your palms on the contact pads located on the handlebar next to the seat, once you have done this the computer will show your current heart beat rate in beats per minute (BPM) on the LCD after 3~4 seconds. Note: During the process of "pulse measurement", as a result of the contact jamming, the measurement value may be higher than virtual pulse rate during the first 2~3 seconds, after which it will return to normal level. To ensure testing accuracy, it is suggested that user test pulse during stop/pause exercise to avoid any possible influence.
The measurement value cannot be regarded as the basis of medical treatment. - ALARM: The functions of time, distance and calorie can be set to countdown, if any of the above value goes to zero, the computer will alarm for 15 seconds.
Press MODE to select the function, then press SET to adjust the value.
Note- The computer containing only the "MODE" button does not have ALARM function.
- If you find "M" in left side of monitor screen, it's an Imperial system and the unit will be expressed as mile.
IMPORTANT SAFETY INFORMATION
- Before starting any exercise program, you should consult your physician to determine if you have any medical or physical conditions that could put your health and safety at risk, or prevent you from using the equipment properly. Your physician’s advice is essential if you are taking medication that affects your heart rate, blood pressure or cholesterol level.
- Be aware of your body’s signals. Incorrect or excessive exercise can damage your health. Stop exercising if you experience any of the following symptoms: pain, tightness in your chest, irregular heartbeat, shortness of breath, lightheadedness, dizziness or feelings of nausea. If you do experience any of these conditions, you should consult your physician before continuing with your exercise program.
- Keep children and pets away from the equipment. The equipment is designed for adult use only.
- Use the equipment on a solid, flat level surface with a protective cover for your floor or carpet. To ensure safety, the equipment should have at least 4 feet (1.2 M) of free space all around it.
- Ensure that all nuts and bolts are securely tightened before using the equipment. The safety of the equipment can only be maintained if it is regularly examined for damage and/or wear and tear.
- Always use the equipment as indicated. If you find any defective components while assembling or checking the equipment, or if you hear any unusual noises coming from the equipment during exercise, discontinue use of the equipment immediately and do not use until the problem has been rectified.
- Wear suitable clothing while using the equipment. Avoid wearing loose clothing that may become entangled in the equipment.
- Do not place fingers or objects into the moving parts of the equipment.
- The maximum weight capacity of this unit is 220 pounds (100 KG).
- The equipment is not suitable for therapeutic use.
- To avoid bodily injury and/or damage to the product or property, proper lifting and moving is required.
- Your product is intended for use in cool, dry conditions. You should avoid storage in extreme cold, hot or damp areas as this may lead to corrosion and other related problems.
- This equipment is designed for indoor and home use only, it is not intended for commercial use!
Troubleshooting
If you are having trouble with the sunny MAGNETIC ELLIPTICAL BIKE , here are some common problems and solutions
- The bike is making a loud noise: Check to make sure that all of the bolts and screws are tight and that the bike is level. If the problem persists, contact Sunny customer service.
- The LCD display is not working: Make sure that the bike is plugged in and that the power switch is turned on. If the problem persists, contact Sunny customer service.
- The resistance is not working: Make sure that the resistance knob is turned all the way to the right. If the problem persists, contact Sunny customer service.
Pros & Cons
Pros
- Low-impact, full-body workout
- Magnetic resistance system for smooth and quiet operation
- Sturdy steel frame
- LCD display and 12 preset workout programs
Cons
- Some users may find the bike to be heavy and difficult to move
- The LCD display may be difficult to read in low-light conditions
Customer Reviews of sunny MAGNETIC ELLIPTICAL BIKE SF-E905
Customers love the sunny MAGNETIC ELLIPTICAL BIKE SF-E905 for its smooth and quiet operation, as well as its sturdy construction. Some users have noted that the bike is a bit heavy and difficult to move, but overall, customers are very happy with their purchase. The most common complaint is that the LCD display can be difficult to read in low light conditions.
Faqs
How does the Sunny SF-E905 Elliptical Bike's magnetic resistance improve my workout?
Is it possible to track my fitness progress using the inbuilt computer of the Sunny SF-E905 Elliptical Bike?
Will the Sunny SF-E905 Magnetic Elliptical Bike fit in my room? What are its dimensions?
How many different safety elements are incorporated into the design of the Sunny SF-E905 Elliptical Bike?"
What is the maximum weight that the Sunny Magnetic Elliptical SF-E905 was designed to support?
Is there a selection of different workout programmes available for the Sunny SF-E905 Magnetic Elliptical?
To accommodate my current level of fitness, is it possible to adjust the pedal resistance on the Sunny SF-E905?
Would it be possible to ride the Sunny Magnetic Elliptical Bike SF-E905 in an apartment situation without it being too noisy?
When it comes to the Sunny SF-E905 Elliptical, what kind of power source is necessary for the computer to function properly
What kind of warranty does the Sunny SF-E905 Magnetic Elliptical come with from the manufacturer?
Leave a Comment