How to Operate: Wahl Animal Grooming Kit Instruction Manual
Content
Introduction of Wahl Animal Grooming Kit
The Wahl Animal Grooming Kit is a must-have for pet owners who want to keep their furry friends looking and feeling their best. This professional-grade grooming kit includes a powerful motor and high-carbon steel blades that can handle even the thickest fur with ease. The kit includes a variety of attachments, making it suitable for grooming a wide range of pets, from small dogs to large horses. The Wahl Animal Grooming Kit is available for purchase online and in pet stores, with an estimated price range of $50 to $100. The exact price may vary depending on the retailer and any current promotions or discounts.
Detailed Specifications
The Wahl Animal Grooming Kit features a powerful motor that operates at 5,500 strokes per minute, ensuring a smooth and efficient grooming experience. The high-carbon steel blades are self-sharpening and can be adjusted to different lengths, providing ultimate precision and control. The kit includes a variety of attachments, such as a wide-tooth comb, fine-tooth comb, shears, and a brush. These attachments are easy to attach and remove, making it quick and convenient to switch between different grooming tasks. The Wahl Animal Grooming Kit is lightweight and ergonomically designed, making it easy to handle and reducing fatigue during long grooming sessions. It also comes with a convenient storage case, keeping all of the attachments organized and within reach.
Description of Animal Grooming Kit
The Wahl Animal Grooming Kit is a versatile and reliable grooming tool for pets of all shapes and sizes. Its powerful motor and high-carbon steel blades make it an excellent choice for grooming thick and matted fur, while the various attachments allow for a wide range of grooming tasks. The lightweight and ergonomic design of the kit makes it comfortable to use, even during long grooming sessions. The storage case is also a nice touch, keeping all of the attachments organized and within reach.
Setup Guide of Animal Grooming Kit
Setting up the Wahl Animal Grooming Kit is quick and easy. Simply choose the desired attachment and slide it onto the blades. Make sure the attachment is securely in place before turning on the groomer. Plug in the groomer and adjust the length of the blades to the desired setting.
To clean the groomer, remove the attachment and brush away any excess fur. Wipe the blades and the exterior of the groomer with a damp cloth. Make sure the groomer is unplugged before cleaning.
IMPORTANT SAFEGUARDS
READ ALL INSTRUCTIONS AND SAFEGUARDS BEFORE USING
THIS APPLIANCE. When using an electrical appliance, basic precautions should always be followed, including the following
DANGER: To reduce the risk of electrical shock.
- Do not reach for appliance that has fallen into water. Unplug immediately.
- Do not use while bathing or in a shower, tub or sink.
- Do not place or store appliance where it can fall or be pulled into a tub or sink. Do not place in or drop into water or other liquid.
- Always unplug this appliance from electrical outlet immediately after using.
- Unplug this appliance before cleaning.
WARNING: To reduce the risk of burns, fire, electrical shock, or injury to person.
- An appliance should never be left unattended when plugged in.
- This appliance is not intended for use by children and other persons whose physical, sensory, or mental capabilities or lack of experience and knowledge prevents them from using the appliance safely without supervision or instruction by a responsible person to ensure that they can use the appliance safely. Children should be supervised by the responsible person to ensure that they do not play with the appliance.
- Use this appliance only for its intended use as described in this manual. Do not use attachments not recommended by manufacturer.
- Never operate this appliance if it has a damaged cord or plug if it is not working properly, if it has been damaged or dropped in water. Return the appliance to Wahl Clipper Corporation for examination and repair.
- Keep the cord away from heated surface.
- Never operate this appliance with the air opening blocked or while on a soft surface, such as a bed or a couch, where the air openings may be blocked. Keep the air openings free of lint, hair and the like.
- Never drop or insert any object into any opening.
- Do not operate where aerosol (spray) products are being used, where oxygen is being administered or near flammable liquids, such as certain flammable blade lubricants or cleaning agents.
- Do not use this appliance with damaged or broken comb, as injury may occur.
- During use, do not place or leave appliance where it may be damaged by an animal or exposed to weather.
- Certain sanitizing solutions and spray lubricants may cause stress crack damage to clippers. We recommend blade lubrication and cleaning with WAHL CLIPPER OIL ONLY.
- To disconnect, turn all controls to "off," then remove plug from outlet.
- If your clipper is supplied with a 3-prong plug, you will need to connect to a properly grounded outlet only. See Grounding Instructions
SAVE THESE INSTRUCTIONS
This clipper has been designed for household use.
The appliance is intended for trimming purposes only.
CORD CARE
The cord should not be used to pull the clipper. Since freedom of movement needs to be maintained, care should be used to keep the cord untwisted and unobstructed. For an appliance that is equipped with a polarized plug To reduce the risk of electric shock, this appliance has a polarized plug (one blade is wider than the other). This plug fits in a polarized outlet only one way. In the event the plug does not fit fully in the outlet, reverse the plug. In the event it still does not fit, contact a qualified electrician to install the proper outlet. Do not change the plug in any way.
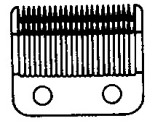
FACTS ABOUT BLADES & CUTTING
- The blades are the single most important part of this clipper.
- Blades do not become dulled from cutting hair – they are dulled by the abrasive particles on the hair: dirt, sand, etc.
- Clipper blades should be oiled BEFORE, DURING, AND AFTER clipping; most clipper problems are due to a lack of oil to lubricate and cool.
- Blades will not cut if abrasive particles are picked up and carried by the oil film between the blades. These particles tend to hold the blades apart and cause chewing and pulling instead of clean cutting.
- Oiling the blades performs two, distinct functions:
- Provides a low friction, very thin film lubricant between the cutting blades so that they can take a full cutting stroke without becoming hot from frictional heat.
- Flushes abrasive particles and hairs out from between the blades. NOTE: If you cut into dirt, immediately wash the blades with oil to flush it out. Working the tapering lever back and forth will assist in removing the dirt particles.
HOW TO OPERATE YOUR WAHL CLIPPER
By following these simple steps, your Wahl quality Pet Clipper will provide years of satisfactory service.
- OIL For maximum efficiency, your clipper blades MUST be oiled with each haircut. Place one or two drops of oil on blades while clipper is running. If clipper is brand new or hasn’t been used your clipper blades are dry—they require oiling. DO NOT use a heavy oil use only Wahl Clipper Oil.
POWER SCREW (Not found on all models of Wahl Clippers) If your clipper has a power screw, it has been adjusted for peak efficiency before leaving the factory. However, if voltage in your home is low, you may need to re adjust it. To adjust power screw,
use the plastic brush, a screwdriver or a thin coin to turn power screw in a clockwise direction until the arm strikes the coil, making a noise. Then, slowly turn power screw out (counterclockwise), just until noise stops. This is the maximum power setting.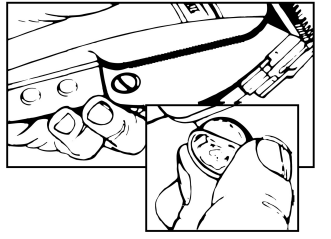
- BLADES Do not try to sharpen the clipper blades. Once they become dull, special equipment is needed to resharpen the blades. Also, never wash the blades in water. When the blades do not cut, they may need oiling or resharpening. If you determine the blades need resharpening, you can return them to Wahl Clipper Corp. for resharpening. If you decide to do so, remove the blades from the clipper, pack each blade individually in soft wrapping paper, enclose both blades in a durable container and send to Wahl
the hair. Clipper Corp., 3001 Locust Street, Sterling, IL 61081 ATTN: Service Dept. A nominal fee will be charged for resharpening. To remove cutting blades for sharpening or replacement, loosen and remove the 2 screws on bottom blade. Replace same and retighten. - BLADE ALIGNMENT Blades must be realigned if they have been removed for cleaning or replacement.
- If your clipper has a taper lever - position the taper lever in the close cut position.
- End of top blade teeth should be approximately 1/32" (.64mm) back from bottom blade.
- This is important so that the clipper does not cut too close or allow the moving cutter to touch the skin.
- Extreme left-hand tooth of top blade must be covering or to the left of the first small tooth of bottom blade.
- Extreme right-hand tooth of top blade must be touching the big tooth on the bottom blade.
- If blade alignment is incorrect, add a few drops of oil to the blades, turn clipper "ON" for a few moments, turn "OFF" and unplug. Loosen screws slightly and adjust. Tighten screws after blades are aligned.
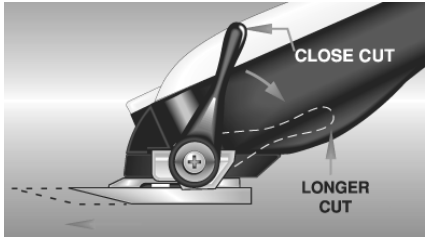
- TAPER LEVER Some Wahl Clippers are equipped with an adjustable taper lever. The taper lever is conveniently located near your thumb (if you're right-handed), so it can easily be adjusted while the clipper is in your hand. The taper lever adds versatility to your clipper by allowing you to gradually change the closeness of your cut without a guide comb. When the lever is in the uppermost position, Pushing the lever downward gradually increases the cutting length. In its lowest position, the taper lever will leave the hair approximately the same length as the 1/8" guide comb. The taper lever will also extend the use of your blades since a different cutting edge is used in each setting. In addition, if extremely heavy haircutting has jammed the blades, it will help you remove hair that has become wedged between the two blades without removing the blades. While the clipper is running, rapidly move the lever from "close cut" to "longer cut" a couple of times. Doing this each time you've finished using your clipper will help keep the blades clear of cut hair. If your clipper stops cutting and this does not help, your cutting blades may be dull. Either replace them or return them to Wahl for sharpening.
CLIPPER CARE AND SERVICE
- To clean the unit, use either a clean, dry or dampened cloth. DO NOT USE benzine or thinner to clean the unit.
- Do not store the clipper in a wet or moist environment.
- Do not touch any of the internal mechanisms. If the unit should need repair, do not repair it yourself. Return it to Wahl Clipper Corporation.
- When stored, make sure cord is not nicked, twisted or obstructed. It should be coiled and the unit placed in a dry place, away from children.
- Only use the specified electric power source shown on the rating plate.
- The cutting blades furnished with Wahl Pet Clippers are made of a special high carbon steel scientifically heat treated for correct hardness. Years of experience have created a special process for grinding these blades to a super sharpness.
- Be careful not to drop your clipper or to “nick” the blades.
- Always replace the blade guard when the clipper is not in use. This will help prevent accidental damage and blade dulling.
- Periodically dip the teeth of the blade in a shallow pan of Wahl Clipper Oil (with clipper running) to flush out dirt and hair.
- Run the clipper through the hair only as fast as it is able to completely cut. Operating it too fast wedges hair clippings between the blades and they become unable to cut properly.
- Avoid pressing the blades strongly against the skin, being especially careful around the ears
- Keep your clipper blades sharp. Clip only clean animals. FOREIGN PARTICLES are the major cause of dull blades.
- Sharp clipper blades cut better and faster. FOR GENUINE FACTORY BLADE SHARPENING, remove and return the blades to: Wahl Clipper Corp., 3001 N. Locust St., Sterling, IL. 61081, Attn: Service Dept. Blades will be resharpened for a nominal charge.
NEW REPLACEMENT BLADES are available from your Wahl products outlet. It is recommended that you order an extra Wahl Regular Blade as a “spare” so that you will always have a sharp clipper blade on hand.
TO ATTACH BLADE COMB
- Shut clipper off and put Blade Adjustment Lever in the “Fine” position.
- Holding Blade Attachment in palm of hand, snap side spring clips on bottom blade.
- Slide Blade Attachment into place.
- BE SURE Blade Attachment is in correct installed position before operating clipper. The blades can be severely damaged if the Blade Attachment is allowed to enter the operating clipper blade teeth
TO REMOVE
- Shut clipper off and slide Blade Adjustment forward.
- Pivot Blade Attachment away from blade teeth and off.
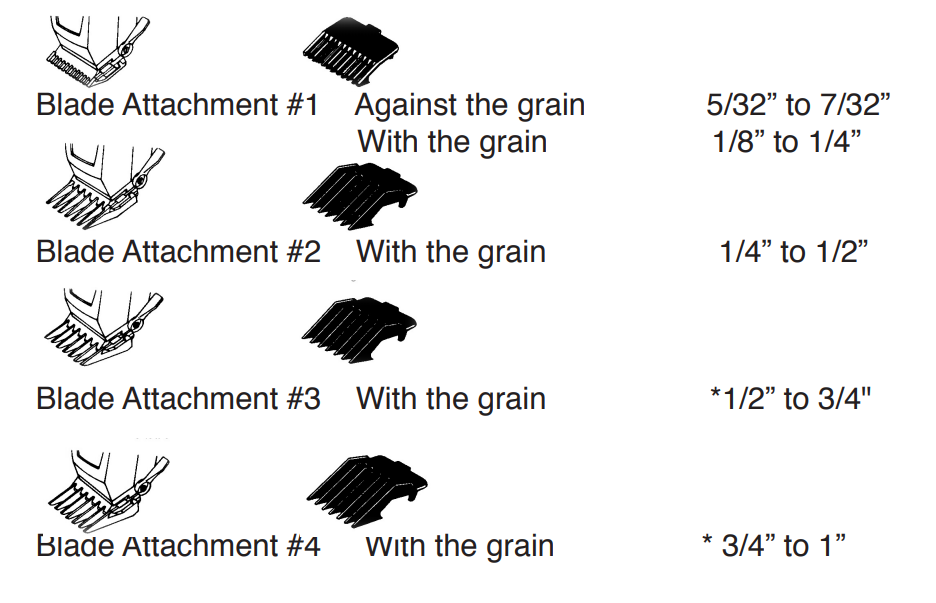
BLADE SELECTION GUIDE
The convenient, thumb-adjustable, multi-cut lever found on most Wahl Clippers provides for increased cutting variations with fewer blades. In the uppermost position, cut is very fine and becomes gradually coarser as the lever is moved downward. The following
chart illustrates the cutting range of each set of blades according to accepted pet industry grooming standards
CLIPPING LENGTH GUIDE: plastic blade attachment. The Blade Attachment Lever should always be in the “fine” position when the Blade Attachments are being used.
- TYPE OF BLADE AND BLADE ATTACHMENT
- DIRECTION OF CLIPPING
- LENGTH OF CUT (approximate) FINE COARSE
- Wahl Regular Against the grain 1/32” to 1/8”
- Blade Without with the grain 1/16 “ to 3/16”
The variables affecting length of cut are greater at these heights even though clipping is normally done with the grain.
STAINLESS STEEL BLADE ATTACHMENTS
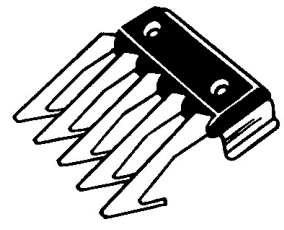
With the STAINLESS STEEL BLADE ATTACHMENTS, Wahl brings you another fine time-saving development in pet grooming. Three sizes to give you the widest range of cutting heights WITH NO BLADE CHANGING.
- Improved Feed since it goes through most thick and matted hair easily.
- Improved cutting since it lifts and guides hair OVER the Clipper teeth without snagging.
- Polished Tips that won’t scratch even delicate skin.
- Designed to quickly attach and lock securely in place.
- Fits all models of Wahl Adjustable Blade Clippers.
- These attachments enable you to increase the cutting range of any Wahl Adjustable Blade Set in 1/4” increments, allowing for a longer cut without the purchase of additional blade sets.
- NOTE: These attachment combs are not compatible with the Model 1037-600 extra wide blade set.
GROOMING HORSES
When clipping large animals, care should be taken as some animals may be nervous around the noise and vibration of the clipper.
BEFORE YOU CUT
- Make sure clipper is clean and in perfect working condition.
- Sponge down your horse with clean water and towel dry. Then comb and brush the longer mane and tail.
CUTTING HAIR
- Start with the front legs. Clipping with the grain (or lay) of the hair will give a slightly longer cut. The leg can be clipped while the hoof is on the ground or with the leg in your hand. Clip the fetlocks, being careful around joints and projections. Proceed with all four legs
- Clip the hair around the muzzle, chin and ears. All the hair on the outside of the ears can be clipped, but avoid clipping the hair on the inside. Be careful, also, when clipping the hair on the edges of the ears; do not hold the clipper with the blades pointing toward the edges, but parallel to the edges.
- If you wish to shorten the hair on the mane and tail, hold the hair between your index and middle fingers with the amount of hair you wish to cut protruding above your fingers. Then cut that hair off with a parallel stroke across the fingers
- To thin the hair on the tail and mane, hold your clipper upside down with the blades pointed in toward the hair. Then, starting at the top of the hair and lightly stroking downward in a combing-like manner remove just a little hair at a time.
- Hair on the body of the horse can either be cut or left longer for weather protection and additional padding. Remember when clipping, that less hair is removed when cutting with the grain; more hair is removed when cutting against the grain of
- When you are finished, clean the clipper and oil the blades before packing it away.
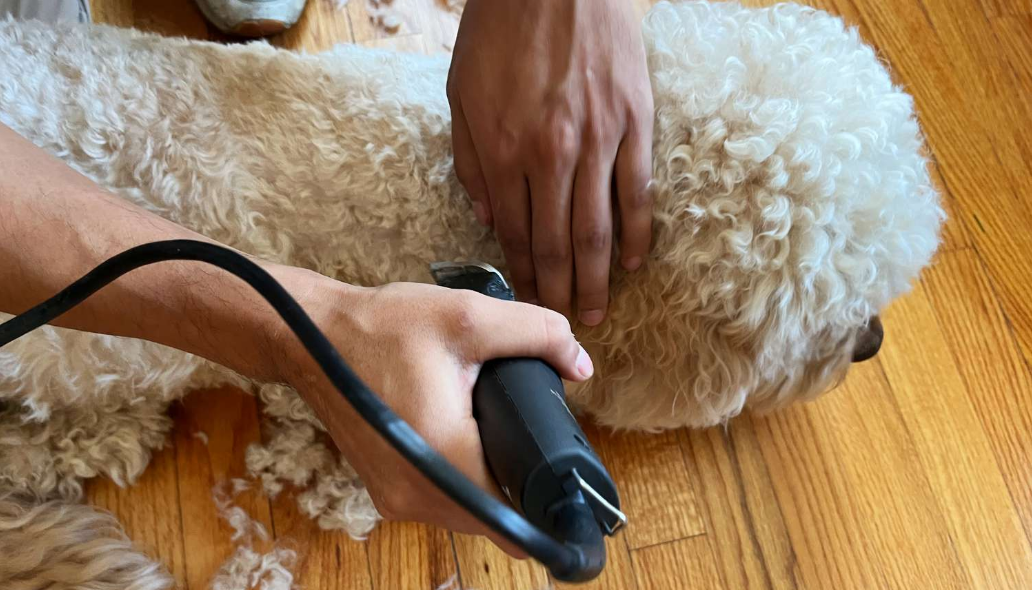
GROOMING AND STYLING YOUR DOG
Assemble your supplies
Clipper, oil, blades, screwdriver, slicker brush, attachment combs and comb, scissors, tear-free shampoo, dryer, rubber bath mat, nail cutters.
Be sure all your equipment is in good working condition and easy to reach Grooming should be done on a solid table (about 30” high) with a non-slip surface to give your dog a steady and secure footing. A grooming post to secure the dog would be of considerable aid. Good lighting is essential. The light should be adequately bright and evenly distributed; there should be no shadows.
Steps in Grooming
- Brush out coat thoroughly
- Remove all snarls, knots, tangles and mats.
- Part the hair and brush on 1” sections from the skin out.
- Bath Time
- Soak the dog thoroughly.
- Apply shampoo and work into a good lather.
- Pay particular attention to the rectum and pads (bottom of the paws)
- Be careful also not to get soap in the dog’s eyes (for safety use a “tear-free" shampoo).
- Rinse very thoroughly.
- Squeeze legs, ears and tail.
- Towel dr
- Fluff dry or brush and dry.
- Start with the legs using a wire brush and moving up to the body.
- Direct dryer to the area you are brushing. Do one spot at a time.
- Use light, fluffing strokes.
- There should be no snags or tangles when you are done.
POODLE
Because their hair grows so rapidly, poodles need to be groomed much more often than other breeds.
Clipping the Feet
- The feet are cut with a Wahl Regular Blade #1037-400.
- The adjustment lever is in the Coarse Position (#10 position)
- Clipping is done “Against the grain" (Fig. #6)
- Sit the dog on the table facing you.
- Bring rear leg forward near front leg (Fig. #7)
- Clip sides of foot from NAIL to end of toes.
- Clip hair on top of toes using the natural stop at the ankle joint-do not trim up the ankle. NOW—Set Blade Adjustment Lever in middle between COARSE and FINE (#15 Position). Use Wahl Regular Blade #1037-400.
- Being careful not to nick the foot webbing, use your free hand with the thumb on top (Fig. #8) and your forefinger, underneath to spread the toes apart. Cut the hair between the toes.
- Follow the same step and do the other 3 feet.
- Again grasp the rear leg and bring it toward you.
- Spread bottom pads with your thumb (Fig. #9) and cut hair between the toes and pads. Again, DO NOT NICK the webbing.
- Do the other three feet.
- Check feet for any stray hair.
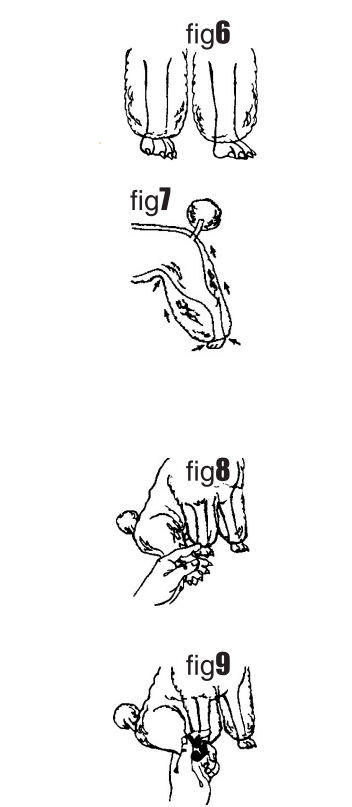
Clipping the Tail
- Clipping the TOP of the tail is done AGAINST the GRAIN.
- Clipping the BOTTOM of the tail is done WITH the GRAIN.
Use Wahl Regular Blade #1037-400 with Blade Adjustment lever in #15 position.
- Stand dog with his tail toward you.
- Hold tail with free hand and cut the top and sides from the middle toward the body.
Clip bottom from the body toward the middle (Fig. #10).
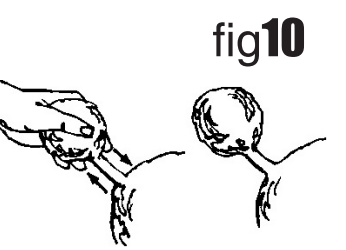
- Comb out pompom (ball at end of tail).
- Use SCISSORS-Trim around pompom to make the largest ball possible (Fig. #11)
- With SCISSORS- CAREFULLY clip around the anal opening.
Clipping Face and Throat
BLADE-WAHL REGULAR #1037-400 ADJ. LEVER SETTING-#15 POSITION DIRECTION OF CUT-AGAINST THE GRAIN
CAUTION: This is a very sensitive area, too close of cut may cause razor burns.
SUGGESTION: You may want to “rough trim” the face and throat by first clipping WITH THE GRAIN.
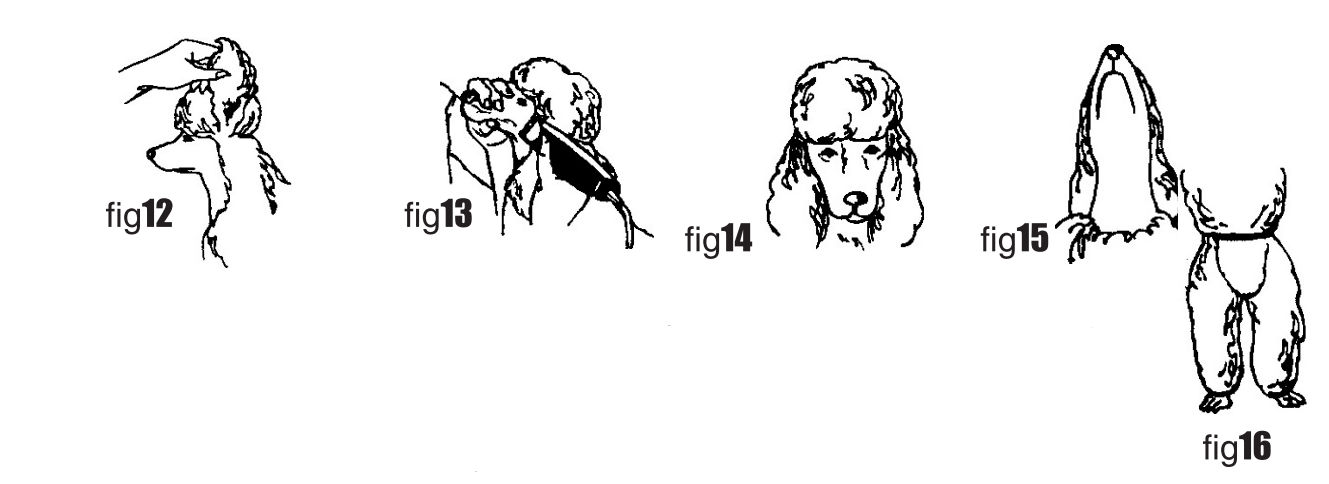
BEFORE YOU START CUTTING read these points
- The area to be clipped (Figure 12 to 15).
- Turn the ears back or place a rubber band behind the head.
- Figure #12 shows the boundary of the area to be clipped.
- The clipper is NOT used above the eyes.
- Use a RUBBER BAND or CLOTH BAND to keep the topknot (bangs) out of the clipping area.
CLIPPING
- Sit dog on table facing you.
- Hold muzzle (upper jaw and nose area) shut with your free hand.
- Begin your cut from left ear to the outside of the left eye in a STRAIGHT LINE.
- With your left hand, stretch the skin at the outside corner of left eye upward and backward. Clip CAREFULLY under the eye. USE Figure #12 as your guide.
- Do the same thing on the right side. Hold the clipper with your left hand and the muzzle with your right. USE Figure #13 as your guide.
- Using the thumb of your free hand, keep the skin stretched at the corner of the mouth and your hand itself to hold the mouth closed.
- Clip around the mouth and lips.
- Clip the cheek and side of face.
- REVERSE the procedure on the other side
- With your free hand, hold the muzzle and clip the area looking like an upside-down “V” between the eyes and down the nose. DO NOT cut above the eyes.
- Clip the muzzle-clip away from the eyes toward the nose.
- Hold your dog’s head and clip the bottom of the muzzle (Figure #15). The Adam’s apple area is usually the stopping point of cut but you may clip lower.
- Clip the rest of the throat area toward the muzzle. The face and throat look like the outline in Figure #12 through #15.
Clipping the Stomach
Use Regular blade in position #15 (use position #10 if the dog has sensitive skin)
- Stand dog facing you.
- Lift front legs and begin clipping from a point above the testicles or vulva and clip in a straight line to the end of the rib cage. DO NOT clip up the leg.
- DO NOT NICK or cut the vulva, penis, testicles or nipple. Cover them with your free hand while clipping. Use light pressure.
- Clip the hair on the penis WITH the grain.
- The clipped part of the stomach should resemble a rectangle.
Clipping the Body
BLADE-Use Wahl Regular Blade #1037-400 with a #3 attachment comb.
- Clip along the back starting at the base of the skull, and cut down the middle of the back to the tail (Figure #17).
- Shorten all hair as shown in Figure #17 by using the clipper in the same direction. Start from the neck and go to the back. DO NOT USE CLIPPER BELOW THE SHOULDERS AND HIPS.
- Figure #18-Clip the hair between shoulders and hips.
- Clip hair under the chest from behind the front legs to the end of the ribs.
Rear Legs
- Stand dog up and brush the hair on the back of the legs in an upward and outward motion to fluff the hair.
- You can now shape the legs as full or tapered as you wish.
Start by trimming any hair that falls over the foot (Figure #19).
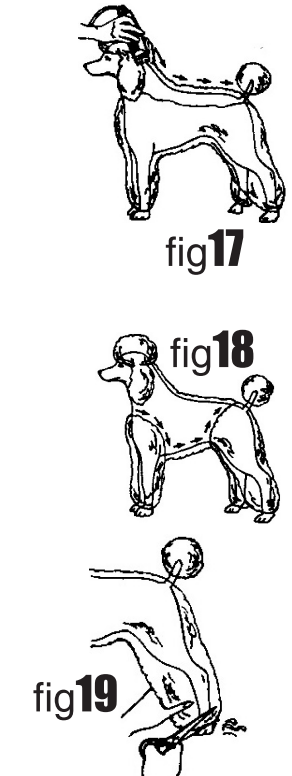
- Then start at the ankle and cut up to the hip (Figure #20). Cut just a little hair at a time.
- Once you get up to the hip, start blending the hair so that it is tapered into the shorter body hair.
- Scissor cut the other back leg, making it the same size as the other leg.

Front Legs (using scissors)
- Have dog face you.
- Comb the hair UP and OUT.
- Scissor cut the front legs so they are the same size and shape as the rear legs.
- Comb the hair at the shoulders up and blend it with the shorter body hair
- Comb the hair on the chest and between the front legs and trim the hair to the length of the shoulder and body hair.
Head
- Have the dog face you.
- Comb the hair on the top of the head (topknot) upward and forward. (Figure #21 and Figure #22).
- Scissor cut a square or round topknot.
- Blend the lower topknot hair with the shorter neck hair. Use a Regular Blade #1037-400 with a #3 attachment comb.
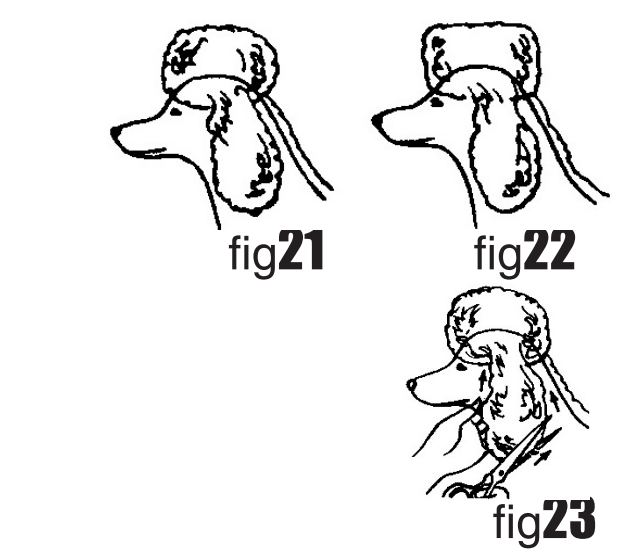
Ears
- Have the dog face you.
- Start clipping at the top of the ear downward. NEVER turn the clipper in the other direction.
- Lay the ear in the palm of your hand (Figure #23).
- Clip the inside of the ear first, and then the outside.
- Hold the ear with your free hand and scissor cut the sides. Be careful not to cut the ear itself. (Figure #24).
- Clip the other ear.
- With scissors, touch up any stray hairs.
SCHNAUZER
Use the Wahl Regular Blade with the Blade Adjustment Lever in the “Coarse” position; use Blade Attachment #1 if a longer trim is desired. With the Schnauzer, it is most important that it is trimmed at least once before the ear cropping is done, usually completed at 12 weeks of age. Otherwise, your schnauzer will probably associate clipping with cropping and the next few grooming sessions will be most difficult.
- Stand dog on grooming table. Clip the top of the back from the base of the skull to the base of the tail. Clip the throat, front and sides of the body and the tail. Clip all the areas with the grain. Clip sides and back of rear legs toward the hock; curve the sides into the hock and do not clip the front of the rear legs. Remove Blade Attachment #1.
- Clip stomach area from the rear to the front; clip penis carefully with the grain. Clip skull from a point above the eyebrows to the base of the skull and to the ears. Clip from the outside corner of the eyes to the base of the ears and to the corner of the mouth.
- Set the Blade Adjustment Lever midway between “fine” and “coarse”, #15 position, and clip both sides of the ears from the base to the tip.
- Scissor and trim front legs to gain a rounded and straight appearance. Scissor and trim body and rear legs; do the same with eyebrows, muzzle and mustache. The purpose is to achieve a straight and square look.
AIREDALE, IRISH, LAKELAND, WELSH & WIRE FOX TERRIERS
If you plan to show your terrier and he has wire coat, stripping, not clipping is required. However, clipping is a far easier method of grooming for both pet and groomer. These terriers are clipped in much the same manner as the Schnauzer except for the rear legs. Use the Wahl Regular blade with the Blade Adjustment Lever in the “coarse”, #10 position and install Blade Attachment #1. Do not clip the rear legs; blend the clipping of the sides into the hips. Scissor and trim the eyebrows, muzzle and mustache to the recognized standard of the
particular breed.
COCKERS-SETTERS-SPANIELS
Sporting dogs generally require little clipping. However, all longhaired Sporting Dogs can be more effective in the field when properly groomed. The hunting dog with long, silky hair needs to have his coat kept brushed, clean and free of burrs and tangles. Clipping your dog several weeks in advance of the hunting season will facilitate better hunting, offer greater comfort to the dog and provide easier coat care. Clipping allows the growth of the shorter, denser coat that is both warmer and more resistant to burrs and stickers. Checking your dog’s diet to assure a prime coat is also very important.
- Stand dog on grooming table. With the Wahl regular Blade and the Blade Adjustment Lever in the “coarse” position, clip the skull, base of the ears and the throat. Clip “With the Grain” and blend hair.
- Clipping With the Grain, clip the neck, shoulders and chest, using the same blade, with the Blade Adjustment Lever in the “Fine” position and Blade Attachment #1 installed. Blend the hair into the body and lower chest. Clip the legs and tail.
- If it is needed, clip the body. Blade Attachment #5 is suggested-it will leave the hair about 1/2” to 3/4” long. This type of clipping, even though it may detract from the dog’s “looks” is a sensible approach for a dog used in hunting.
After a day in the field, go over your dog with a medium comb. A“tangle-remover” spray will help in getting rid of burrs. Check for and treat cuts and injured paws
GROUNDING INSTRUCTIONS
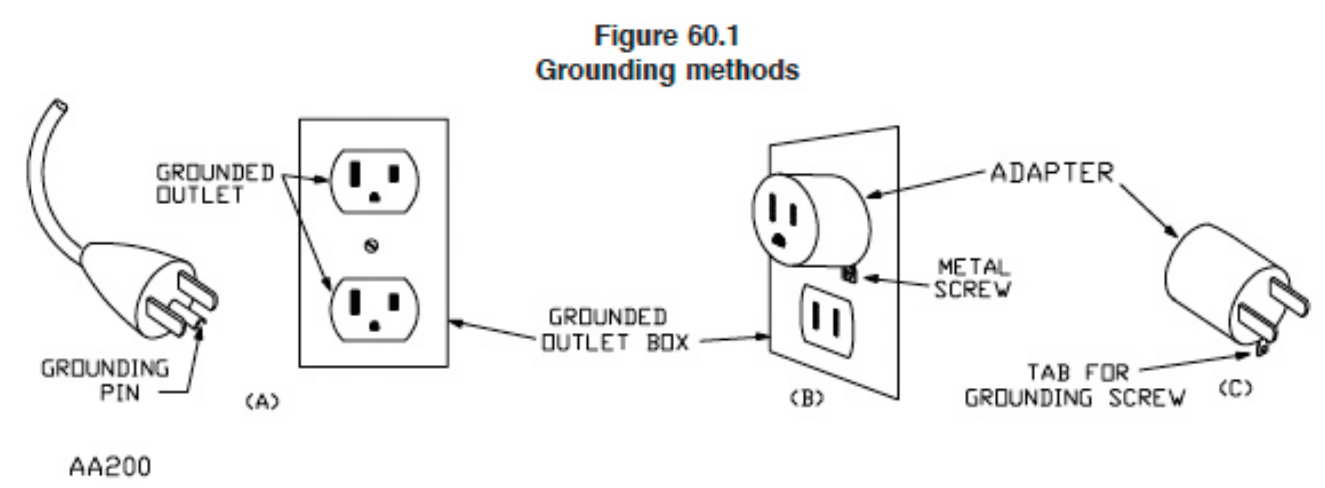
This appliance should be grounded. In the event of an electrical short circuit, grounding reduces the risk of electric shock by providing an escape wire for the electric current. This appliance is equipped with a cord having a grounding wire with an appropriate grounding plug. The plug must be plugged into an outlet that is properly installed and grounded in accordance with all local codes and ordinances
DANGER : Improper use of the grounding plug can result in a risk of electric shock. If repair or replacement of the cord or plug is necessary, do not connect the grounding wire to either flat-blade terminal. The wire with insulation having an outer surface that is green with or without yellow stripes is the grounding wire.
Check with a qualified electrician or serviceman if the grounding instructions are not completely understood, or if in doubt as to whether the appliance is properly grounded. Do not modify the plug provided; if it will not fit the outlet, have the proper outlet installed by a qualified electrician. This appliance is for use on a nominal 120-V circuit, and has a grounding plug that looks like the plug illustrated in sketch A in Figure 60.1. A temporary adapter, which looks like the adapter illustrated in sketches B and C, may be used to connect this plug to a 2-pole receptacle as shown in sketch B if a properly grounded outlet is not available. The temporary adapter should be used only until a properly grounded outlet (sketch A) can be installed by a qualified electrician. The green-colored rigid ear, lug, or the like extending from the adapter must be connected to a permanent ground such as a properly grounded outlet-box cover. Whenever the adapter is used, it must be held in place by a metal screw.
WARRANTY of Wahl Animal Grooming Kit
This warranty valid only for sales in the Continental United States. For sales outside of the Continental United States contact local distributor for warranty and terms. If your Wahl product fails to operate satisfactorily within one(1) year from the date of original purchase or receipt as a gift, Wahl will at our option repair or replace it and return it to you FREE OF CHARGE. Our warranty does not cover blades, which are wear out parts. Please mail your product prepaid to Wahl Clipper Corporation, Sterling, Illinois 61081,
Pros & Cons
Pros
- Powerful motor and high-carbon steel blades for efficient grooming
- Variety of attachments for a wide range of grooming tasks
- Lightweight and ergonomic design for comfortable use
- Convenient storage case for keeping attachments organized
Cons
- May be too loud for some pets
- May not be suitable for grooming very small pets
Customer Reviews about Wahl Animal Grooming Kit
Customers have praised the Wahl Animal Grooming Kit for its powerful motor and high-quality blades, stating that it makes grooming their pets quick and easy. The variety of attachments has also been a hit, with many customers noting that they appreciate the versatility of the kit.
However, some customers have noted that the groomer can be too loud for their pets, causing them to become anxious or agitated. Others have stated that the groomer may not be suitable for grooming very small pets, as the attachments may be too large or bulky.
Faqs
What comes with the Wahl Grooming Kit for Animals?
What is the initial procedure for using Wahl Animal Grooming Clippers?
Can I groom all kinds of animals with the Wahl Grooming Kit?
What should I do if my clippers no longer cut well?
What should I do if the clipper blades pull my pet’s hair?
Can I use the guide combs included in the Wahl Grooming Kit with other models?
How often should I use the Wahl Animal Grooming Kit to groom my pet?
How can I make sure my pet is safe while being groomed?
Is it usual for the Wahl Clippers to get warm during use?
What warranty does the Wahl Animal Grooming Kit come with?
Leave a Comment