Westinghouse Portable Room Air Conditioner WPAC10000
Content
Introduction
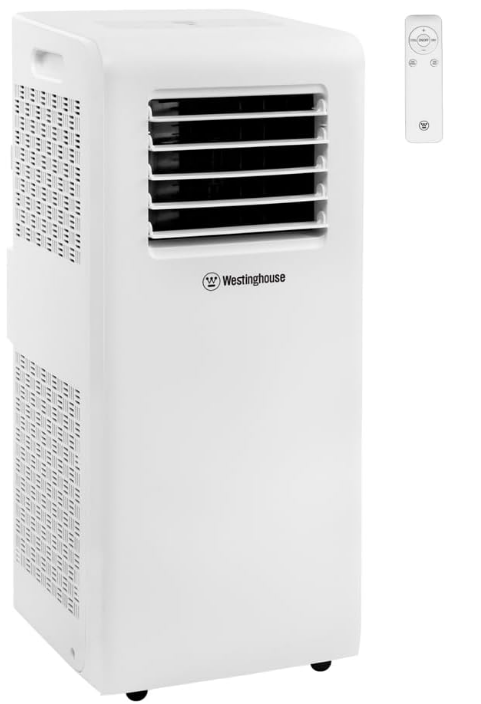
The Westinghouse Portable Room Air Conditioner WPAC10000 is a powerful and versatile cooling solution designed to efficiently cool spaces up to 300 square feet. With a cooling capacity of 10,000 BTUs, it features three operational modes: air conditioning, fan, and dehumidifier, ensuring optimal comfort in various conditions. The unit is equipped with a user-friendly control panel and includes a remote for added convenience. The cost of the Westinghouse WPAC10000 is approximately $349.99, making it an excellent choice for portable climate control.
Specifications
- Cooling Capacity: 10,000 BTUs
- Coverage Area: Up to 300 square feet
- Dehumidifying Capacity: Up to 70 pints per day
- Energy Efficiency: Energy Star Certified
- Noise Level: 52 dBA (low), 56 dBA (high)
- Air Filter: Washable mesh filter
- Remote Control: Included for easy operation
- Dimensions: 31.5 x 14.5 x 15.5 inches
- Weight: Approximately 63 pounds
Description
The Westinghouse Portable Room Air Conditioner WPAC10000 is built with a sleek and modern design that fits seamlessly into any room decor. The unit features a digital display and touch controls, making it easy to adjust settings and monitor the temperature. It also comes with a remote control, allowing users to adjust settings from across the room.
The air conditioner includes multiple fan speeds and a sleep mode, which helps in saving energy while ensuring continuous comfort. The washable mesh filter is easy to clean and maintain, ensuring optimal performance over time.
INSTALLATION
UNIT OVERVIEW
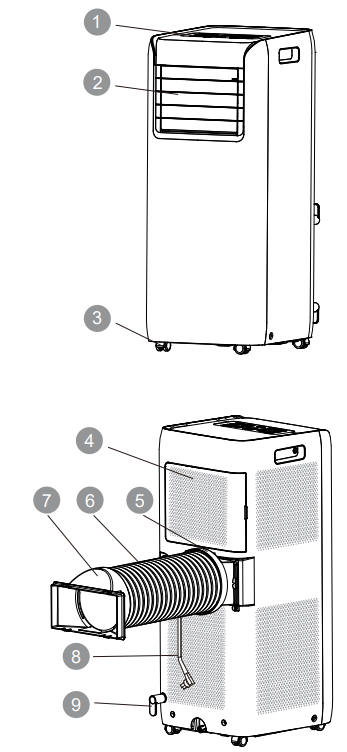
- Control panel
- Louver vent
- Caster
- Filter
- Exhaust connector
- Exhaust duct
- Window clip
- Power cord
- Cord hook
Remote control

SELECTION OF INSTALLATION LOCATION
WARNING
- Observe all governing codes and ordinances.
- Do not use damaged or non-standard power cord.
- Be cautious during installation and maintenance.
- Prohibit incorrect operation to prevent electric shock, casualty and other accidents.
BASIC REQUIREMENTS
Installing the unit in the following locations may cause malfunction. If it is unavoidable, please consult the local dealer:
- Near high heat sources, vapors, flammable or explosive gases,or volatile objects.
- Near high-frequency devices (such as a welding machine or medical equipment).
- On an unstable or moving structure (such as a truck) or in a corrosive environment (such as chemical factory).
AIR CONDITIONER REQUIREMENTS
- Air inlet and exhaust should be unobstructed for optimum performance.
- Select a location where the noise and exhaust air will not affect the surroundings.
- Locate as far away as possible from fluorescent lighting.
- Do not install in laundry area.
POWER REQUIREMENTS
- Follow all electrical safety regulations when installing the unit.
- Use a qualified power supply circuit per local regulations.
- If the supply cord is damaged,it must be replaced by the manufacturer, its service agent or similarly qualified persons in order to avoid a hazard.
- Unplug the unit before proceeding with any work related to electricity and safety.
- Do not plug the unit in before finishing installation.
- For safe operation, the air conditioner must be properly grounded. Do not modify the grounding plug; otherwise it may cause electric shock.
- The grounding resistance should comply with national electric safety regulations.
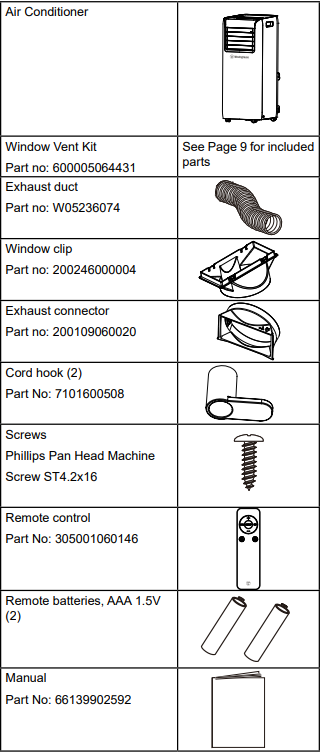
INSTALL CORD HOOKS
Install the cord hooks at the back of the unit with 2 screws. The top cord hooks should face upward, and the bottom cord hooks should face downward.

SELECT LOCATION
Use the following guidelines to select a location for the unit:
- The air conditioner must be operated within the temperature range 61°F(16°C)-95°F(35°C).
- The appliance is for indoor use only.
- The appliance must be positioned so that the plug is accessible.
- This air conditioner is intended for home use only.
- Do not operate the air conditioner in a humid environment.
- Keep air inlet and air outlet clean and free of obstacles.
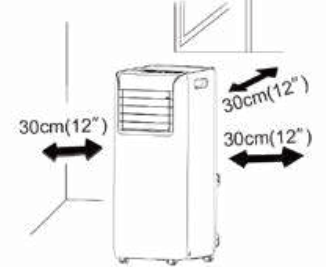
Reserved space around the air conditioner: 30cm (12 inches)
INSTALL EXHAUST DUCT
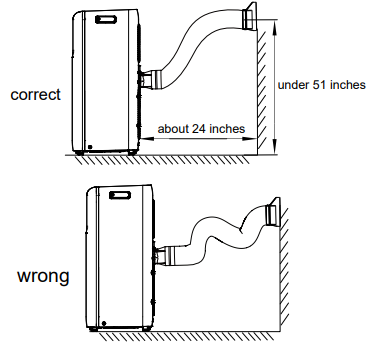
When installing, the exhaust duct should be as flat as possible. Do not extend the duct or connect it with another exhaust duct. The length of the exhaust duct is less than 40 inches. Keep the length as short as possible
- Rotate exhaust connector and window clip clockwise into the two ends of exhaust duct.
Insert exhaust connector into the groove of the exhaust vent on the back of the unit until it clicks into place.
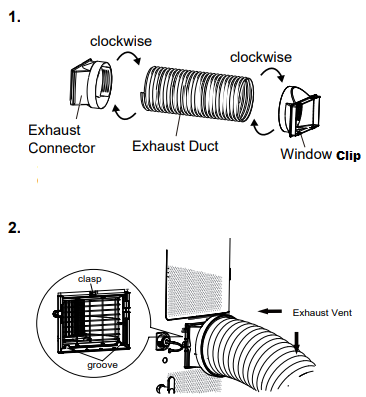
Run the exhaust duct outdoors.

- If using a window vent, install it following the instructions below.
INSTALL THE WINDOW VENT KIT
INCLUDED PARTS
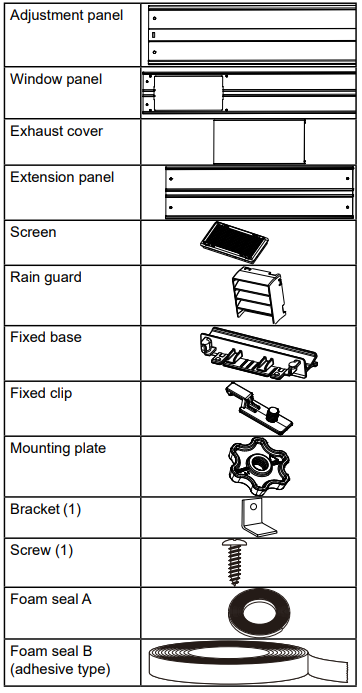
SUGGESTED TOOLS
- Screwdriver (medium size Phillips)
- Tape measure or ruler
- Knife or scissors
- Saw (In the event that the window panel needs to be cut down in size because the window is too narrow for direct installation.)
INSTALL WINDOW PANEL
- Open the window and measure the width or height inside the window frame. Cut the foam seal B to the proper length and attach it to your horizontal (or vertical) sliding window.
- Attach the screen to the back side of the window panel. Push the screen securely into the window panel to ensure that is firmly installed.
Insert the exhaust cover to the window panel
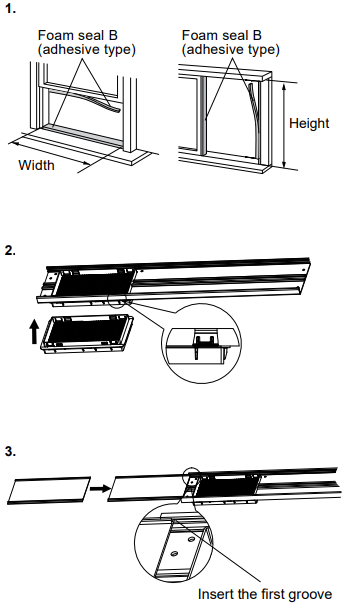
- Push the fixed base to the end of window panel.
Connect the rain guards to the Screen. Insert all three projections on each rain guard into the holes in the Screen. Side “A” will now be at the top, as indicated in the diagram.

- The window panel adapts to different window sizes that open horizontally or vertically.
- For the window is too narrow for direct installation, the window panel needs to be cut down in size.
- If the width of window is larger than the length of window panel, please use the adjustment panel to make sure you can span the entire length of your window. Otherwise, you can add an extension panel to prolong the length of the windows panel assembly.
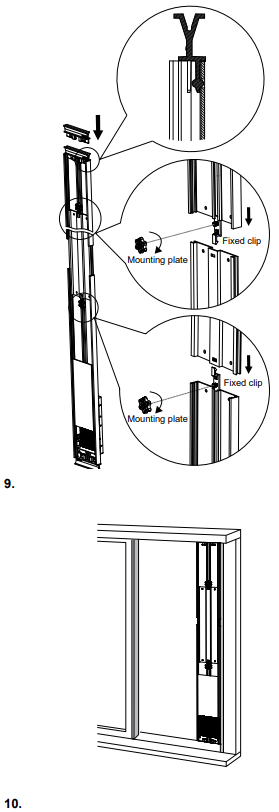
- Push fixed base to the end of the window panel assembly.
- After the length is set, secure the panels with a fixed clip and mounting plate. For certain windows, such as a casement window, you will need to improvise several steps of the installation.
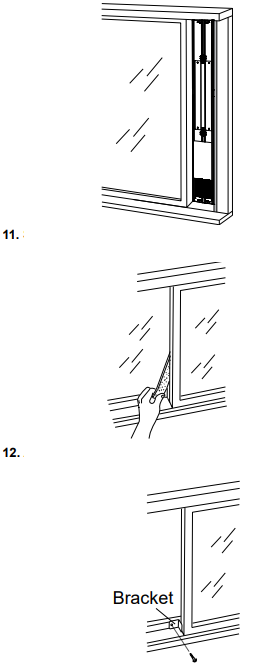
Note: Insert the fixed clip into the groove of the adjustment panel and screw down the mounting plates. - Install the window panel into the window frame. Make sure that the exhaust cover is attached to the window panel.
Close the window sash securely against the window panel.
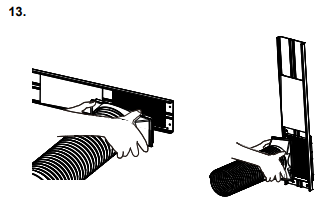
- Stuff the foam seal A between the glass and the window to prevent air and insects from getting into the room.
Attach the bracket with a screw. (Recommended)
Slide and open the exhaust cover on the window panel, and attach the window clip/exhaust duct.
CONNECT CONTINUOUS DRAIN (OPTIONAL)
Note: If not using the continuous drain option, the unit must be emptied periodically. See Care and Maintenance for instructions.
NOTICE
When using the continuous drainage option, place unit on a level surface and make sure the hose is clear of any obstructions and directed downward. Placing unit on an uneven surface or improper hose installation may result in water filling up the chassis and causing the unit to shut off. Empty water in the chassis if shut off occurs, then check unit location and hose for proper setup.
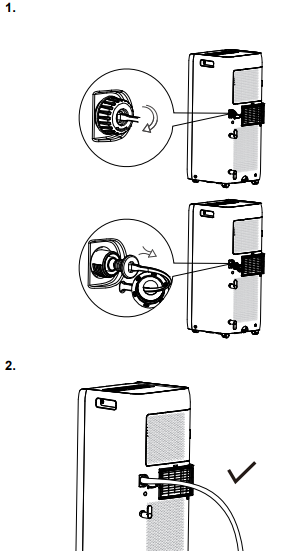
Water can be automatically emptied into a floor drain by attaching a 13.5mm (0.53”) inner diameter hose or garden hose (not included). If using the continuous drain option, use the following steps to install:
- Remove the continuous drain cap by turning it counterclockwise, then remove the rubber plug from the spout.
- Insert the drainage hose into drain connector.
Route drainage hose to drain.
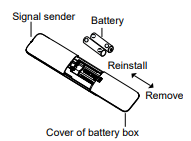
INSTALL BATTERIES IN REMOTE
- Press the back side of remote control and then push out the cover of battery box along the arrow direction.
- Insert two AAA 1.5V dry batteries.
Reinstall the cover of battery box.
TEST OPERATION
- Plug in the power supply.
- Press ON/OFF button on remote control to start the unit.
- Press mode button to select auto, cooling, drying, fan or heating function, and then check if the unit operates normally.
Note: If ambient temperature is below 61°F(16°C), the unit cannot operate in cooling mode.
CONTROL PANEL
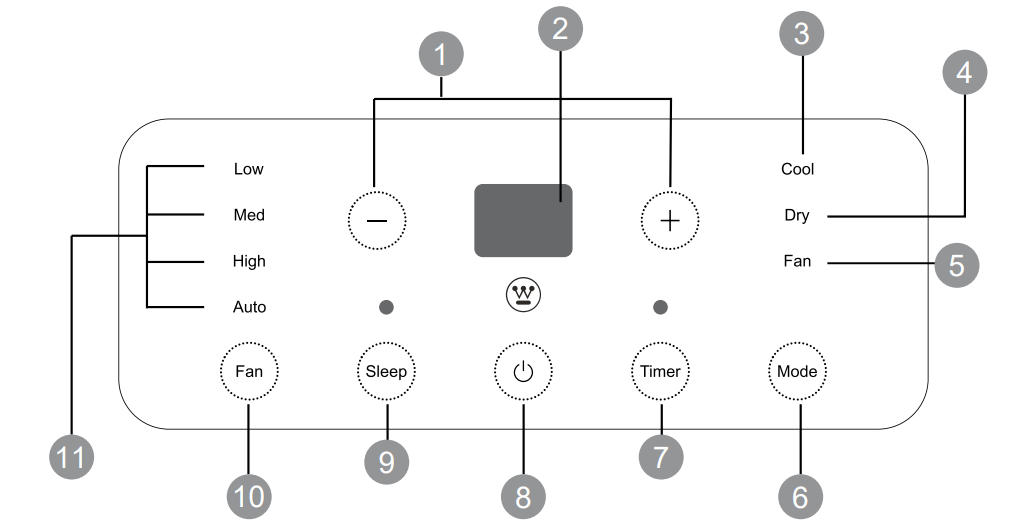
- +/- Buttons: In cooling mode, press “+” or “-” button to increase or decrease set temperature by 1°F (°C). Set temperature range is 61°F (16°C)~86°F(30°C). In dry or fan mode, this button is invalid.
- Display: Shows the set temperature in cooling mode.
- Cool Mode Indicator: When lit, unit is operating in cool mode. The display shows set temperature. Temperature setting range is 61°F (16°C)~86°F(30°C).
- Dry Mode Indicator: When lit, unit is operating in dry mode. Display will be blank.
- Fan Mode Indicator: When lit, unit is operating in fan mode. Display will be blank.
- Mode Button: Press this button to change modes (Cool > Dry > Fan)
- Timer Button: Press this button and the mode will circulate according to below sequence: Press timer button to enter into timer setting mode. Under this mode, press “+” or “-“ button to adjust the timer setting. Timer setting will increase or decrease 0.5 hour by pressing “ + “ or “ -“ button within 10 hours, while timer setting will increase or decrease 1 hour by pressing “+” or “ “ button beyond 10 hours. After timer setting is finished, the unit will display temperature if there’s no operation for 5s. If timer function is started up, the upper indicator will keep the display status. Others, it won’t be displayed. In timer mode, press timer button again to cancel timer mode
- ON/OFF Button: Use to turn the air conditioner on or off.
- Sleep Button: Press sleep button to enter into sleep mode. If the controller operates at cooling mode, after sleep mode is started up, preset temperature will increase by 2°F(1°C) within 1 hour; preset temperature will increase by 4°F (2°C) within 2 hours and then the unit will operate at this temperature all the time; Sleep function is not available for fan mode or drying mode. If sleep function is started up, the upper indicator will keep the display status. Others, it won’t be displayed.
- Fan Button: Press to move through fan modes (Low speed > Medium speed > High speed > Auto)
- Fan Speed Indicator: Lights to show current fan speed.
REMOTE CONTROL
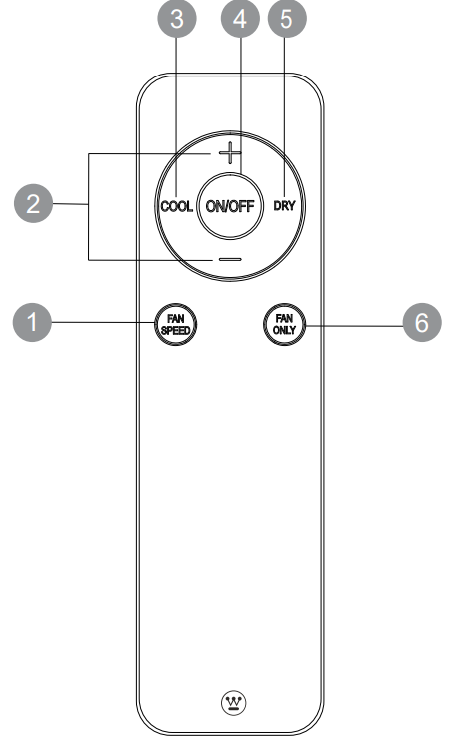
- Fan Speed: Press this button to set the fan speed at Auto, Low, Med or High..
- +/Buttons: In cooling mode, press “+” or “-” button to increase or decrease set temperature by 1°F(°C).
- Cool Mode: Press to change operation to Cool mode.
- ON/OFF: Press this button to turn on or turn off the air conditioner.
- Dry Mode: Press to change operation to dry mode.
- Fan Only: Press to change operation to fan only mode.
OPERATE THE UNIT
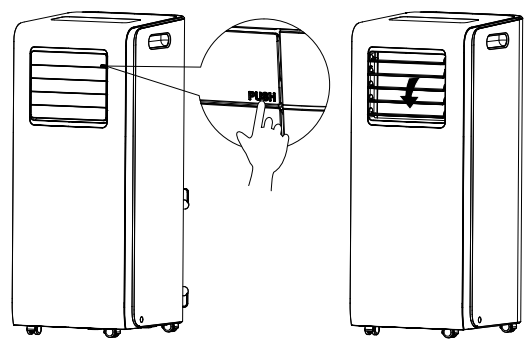
- Open the louver by pressing the area marked PUSH on the front of the unit. Adjust this louver to direct air flow.
- Press the ON/OFF button from the remote or from the control panel to start the unit.
- Select operating mode (Cool, Fan, or Dry)
- In cooling mode, use the +/buttons to adjust the temperature.
- Use the FAN SPEED button to adjust fan speed as required.
Setup Guide
To set up the Westinghouse Portable Room Air Conditioner WPAC10000,
- Start by placing the unit on a level surface near a window.
- Connect the exhaust hose to the back of the unit and extend it through the window using the provided window kit.
- Plug in the air conditioner and turn it on using the power button.
- Use the remote control or the touch controls on the unit to set your desired temperature and fan speed.
- Ensure that the air filter is clean and properly installed for optimal performance.
CARE AND MAINTENANCE
WARNING
ELECTRIC SHOCK HAZARDS
- Before cleaning the air conditioner, turn off the unit and disconnect power.
- Do not spray or splash water or other liquids onto the unit; this may cause electric shock.
- Do not use corrosive detergents to clean the appliance; this may damage the plastic components, and cause electric shock.
- Do not use volatile liquids (such as paint thinner or gas) to clean the air conditioner. This may damage the appearance of air conditioner.
CLEAN OUTER CASE AND GRILLE
If there’s dust on the surface of an outer case, use a soft towel to wipe it. If the outer case is very dirty or greasy, use a soft cloth dampened with mild detergent and water. Do NOT allow water to drip in to the unit. Use cleaner or soft brush to clean the grille.
CLEANING THE FILTER
- Press the clasp as shown below, and then remove the filter.
Use cleaner or water to clean the filter. If the filter is very dirty (such as grease), use warm water 104°F(40°C) mixed with mild detergent to clean it and then put it in a shady place to dry it.

- After the filter is cleaned and dried, reinstall it.
CLEAN EXHAUST DUCT
- Remove the exhaust duct from air conditioner, clean and dry it, and then reinstall it.
EMPTY WATER FROM CHASSIS
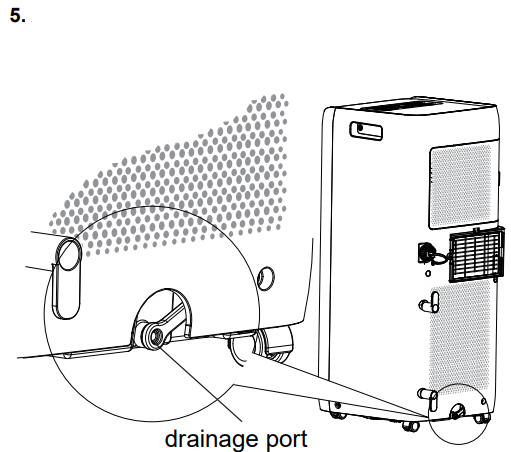
If continuous discharge isn’t possible, the unit must be periodically emptied. During Cool mode or Auto mode, it is not recommended to remove the collected water. Leaving the water will improve performance and save energy. During Dry mode, it is recommended to use the middle hole to drain outlet.
- When the chassis is full of water, the unit will buzz 8 times and the display will show “H8.”
- Move the unit to a suitable place for discharging water.
Note: Do not tilt the unit--keep it vertical while moving. - Remove the rubber plug from the drainage port and allow the water to drain.
- Replace the rubber plug on the drainage port.
After water has been emptied and the compressor has been stopped for 3 minutes, the unit will resume operation.
CHECKING BEFORE USE-SEASON
- Check whether air inlets and air outlets are blocked.
- Check whether plug and socket are in good condition.
- Check whether filter is clean.
- Check whether batteries are installed in remote control.
- Ensure that exhaust connector, window bracket and exhaust duct are installed tightly.
- Check whether exhaust duct is damaged.
CHECKING AFTER USE-SEASON
- Disconnect power supply.
- Clean filter and outer case.
- Eliminate accumulated water in chassis.
- Check whether window bracket is damaged or not. If yes, please contact dealer.
LONG-TERM STORAGE
If you don’t use the air conditioner for a long time, please maintain it by following steps for good performance:
- Make sure there’s no accumulated water in chassis and the exhaust duct is disassembled.
- Pull out the plug and wrap the power cord.
- Clean the air conditioner and pack it well to prevent dust.
NOTICE FOR RECOVERY
- Many packing materials are recyclable materials. Please deal with them through local recycle bin.
- If you want to throw away the air conditioner, please contact local hazardous waste disposal for the correct disposal method.
Troubleshooting
Problem | Possible Cause | Solution |
Air conditioner not oper- ating | Power failure | Wait after power recovery. |
| Loose plug | Reinsert the plug. | |
| Air switch is trippedor fuse is burnt | Have unit serviced to replace air switch or fuse. | |
| Is there malfunction for the circuit? | Have unit serviced to replacecircuit. | |
| Unit is restarted too quickly after stopping | Wait for 3 minutes, and then turn on the unit again. | |
Evaporator needs to be defrosted (observe it by pulling out thefilter) | Normal phenomenon. Air conditioner is defrosting. After de- frosting is finished, it will resumeoperation. | |
Poor cooling(heating) | Is an extension cordbeing used? (Cancause low input power.) | Move unitcloser to powersource, or usea shorter, heavier gauge extension cord. |
Air filter is too dirty | Clean the air filter. | |
Set temperature is too low/high | Adjust the temperature. | |
A door or window is open. | Close door and window. | |
| Air conditioner can’t receive signal from remote control or remote control is not sensible | The unit is interfered with seriously (suchas static pressure, unstable voltage) | Unplug the unit wait three (3) minutes, plug in again,and then turn on the unit. |
| Remote control is not within receiving range. | The receiving range of remotecontrol is 8 meters. Do not exceed this range. | |
| The receiver on the air conditioner is blocked. | Remove the obstacles. | |
Sensitivity of the remote control is low | Check the batteriesof remotecontrol.If the poweris low, replace the batteries. | |
There is a fluorescent lamp in theroom. | Move the remote control close to air conditioner. Turn off the fluorescent lamp and try it again. | |
The unit is makinga crack- ling sound. | Unit was recently turned off/on. | Heat expansion or shrinkage due to change of temperature. |
| Abnormal soundduring operation | Interference fromradio, thunderstorm, or other elec- trical activity. | Disconnect power,wait 3 minutes, then reconnect and turn on the unit again. |
Unpleasant odorin the room | There is some odor source nearby(cigarettes, dirty rug, etc.) | Eliminate the source of the odor. Clean the filter. |
| No air blowing from air con- ditioner | Air outlet or air inlet is blocked | Eliminate the obstacles. |
| Set temperature can’t be adjusted. | The required temperature exceedsthe temperature setting range. | Temperature setting range: 61°F(16°C) 86°F(30°C). |
You can heard water-flow- ing sound | The unit was just turned on or turned off. | Sound of refrigerant insidethe air conditioner, which is nor- mal. |
ERROR CODES
Code | Solution |
F1, F2, F4, F0 | Please contact qualified professionals for service. |
E8,H3 | Check if the unit is under high-temperature and high-humidity environment; if ambient temperature is too high, pow- er off the unit and then energize it for operation after the ambient temperature drops to 95°F(35°C) below. |
Check if the evaporator and condenser are blocked by some objects; if yes, take away the objects, power off the unit andthen energize it for operation. | |
| If themalfunction still occur,please contact ourafter-sales service center. | |
H8 | Pour out the water inside chassis. If “H8” still exist, please contact professional person to maintain the unit |
Warranty
1 year (12 months) for labor/1 year (12 months) for parts (manufacturing defects only)/and a total of 5 years (60 months) for compressor part only.
PRODUCT REGISTRATION
For trouble-free warranty coverage, it is important to register your Westinghouse generator.
You can register by:
- Completing and mailing the product registration card included in the carton.
- Registering your product on-line at: https://westinghouseoutdoorpower.com/pages/warranty-registration
Pros & Cons
Pros
- Portable and easy to move around
- Energy Star Certified for energy efficiency
- Dehumidifying function for enhanced air quality
- Multiple fan speeds and sleep mode for customizable comfort
- Washable mesh filter for easy maintenance
- Included remote control for convenient operation
Cons
- Noisy operation on high fan speed
- Large and heavy, requiring some effort to move
- Requires proper window installation for effective exhaust
- Higher energy consumption compared to smaller units
Customer Reviews
Customers have generally praised the Westinghouse Portable Room Air Conditioner WPAC10000 for its effective cooling and ease of use. Many have noted its ability to cool larger rooms efficiently and appreciated the dehumidifying function. However, some users have mentioned that it can be noisy on the highest fan setting and that the setup process can be a bit cumbersome.
Common complaints
Include issues with the exhaust hose installation and occasional leaks, but these are generally resolved with proper setup and maintenance.
Faqs
How do I properly install the exhaust hose for the Room Air Conditioner?
Why is my Westinghouse WPAC10000 not cooling effectively?
How do I clean the air filter of the Portable Conditioner?
Can I use the WPAC10000 in a larger room than recommended?
Is the Westinghouse Portable Room Air energy-efficient?
How noisy is the Westinghouse WPAC10000?
Can I use the Westinghouse as a dehumidifier only?
How do I store the Westinghouse Portable Room Air Conditioner WPAC10000 during the off-season?
Does the Westinghouse Portable come with a remote control?
What is the weight and dimensions of the Westinghouse?
Leave a Comment
