Whalen Furniture 3-in-1 TV Stand Console XL-5 Guide
Content
Introduction of Whalen Furniture 3-in-1 TV Stand Console XL-5
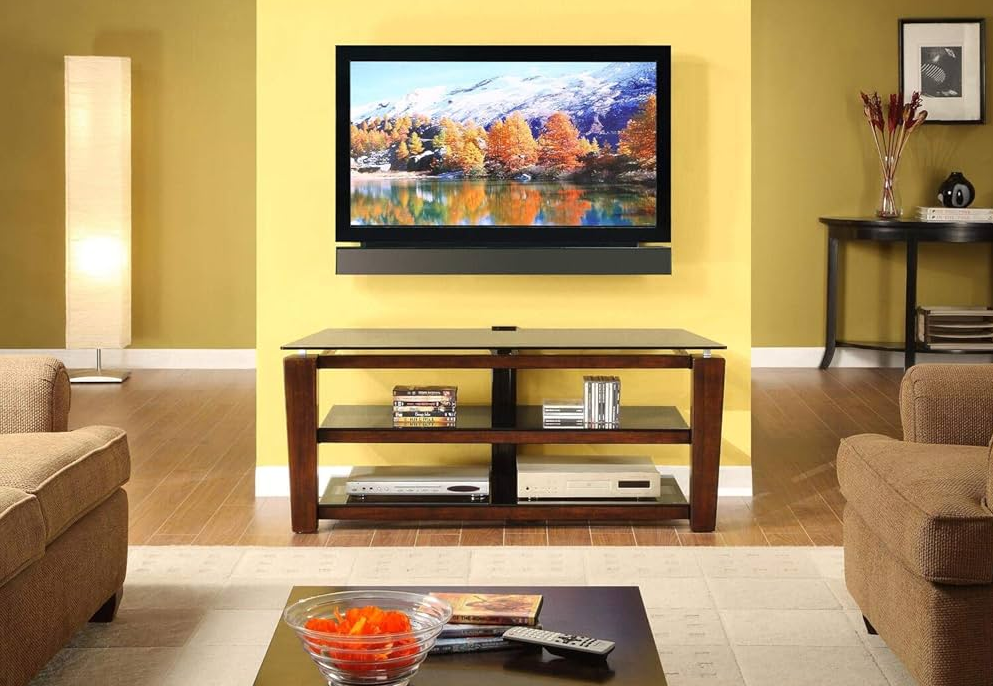
The Whalen Furniture 3-in-1 TV Stand Console XL-5 is a versatile entertainment solution designed to accommodate flat panel TVs up to 58 inches and 135 lbs. This innovative console features a patented 3-in-1 mounting system, allowing for wall-mounted, swivel, or tabletop display options. Constructed with solid Poplar wood legs and black tempered glass shelves, it combines style and functionality. Priced at approximately $149.99, the XL-5 offers an excellent balance of quality and value for any living space.
Accessories
IF YOU NEED TO ORDER PARTS PLEASE USE THE LIST BELOW 52" 3-in-1 Console (XL-5)
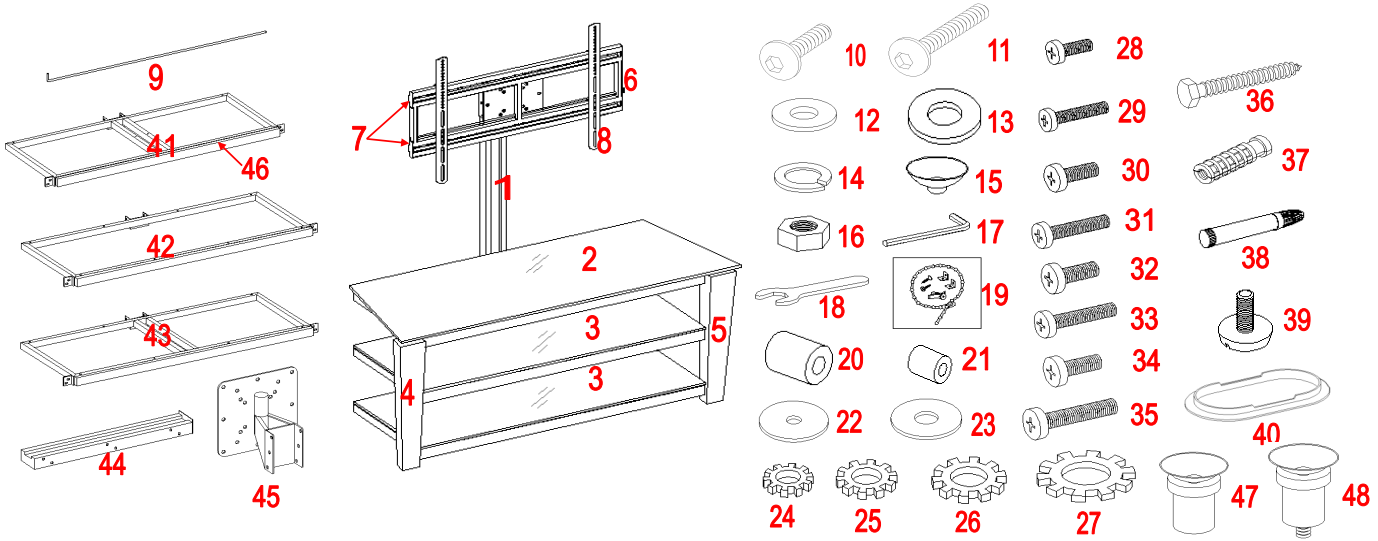
- XL-5-1-LS - Long Spine
- XL-5-2-TG - Top Glass
- XL-5-3-GS - Glass Shelf
- XL-5-4-LL - Left Leg
- XL-5-5-RL - Right Leg
- XL-5-6-MF - Mounting Frame
- XL-5-7-PC - Plastic Cover
- XL-5-8-MB - Monitor Bracket
- XL-5-9-SB - Safety Bar
- XL-5-10-3/4B - 3/4" Bolt
- XL-5-11-1 1/2B - 1 1/2" Bolt
- XL-5-12-FW - Flat Washer
- XL-5-13-LFW - Large Flat Washer
- XL-5-14-LW - Lock Washer
- XL-5-15-SC - Suction Cup
- XL-5-16-N - Nut
- XL-5-17-AW - Allen Wrench
- XL-5-18-OW - Open Wrench
- XL-5-19-TRHK - Tipping Restraint Hardware Kit
- XL-5-20-LS - Large Spacer
- XL-5-21-SS - Small Spacer
- XL-5-22-M4M5FW - M4/M5 Flat Washer (for TV mounting)
- XL-5-23-M6M8FW - M6/M8 Flat Washer (for TV mounting)
- XL-5-24-M4LW - M4 Lock Washer
- XL-5-25-M5LW - M5 Lock Washer
- XL-5-26-M6LW - M6 Lock Washer
- XL-5-27-M8LW - M8 Lock Washer
- XL-5-28-M4x12B - M4 x 12 Bolt
- XL-5-29-M4x30B - M4 x 30 Bolt
- XL-5-30-M5x12B - M5 x 12 Bolt
- XL-5-31-M5x30B - M5 x 30 Bolt
- XL-5-32-M6x12B - M6 x 12 Bolt
- XL-5-33-M6x35B - M6 x 35 Bolt
- XL-5-34-M8x16B - M8 x 16 Bolt
- XL-5-35-M8x40B - M8 x 40 Bolt
- XL-5-36-2 1/2LB - 2 1/2" Lag Bolt
- XL-5-37-1 3/4CA - 1 3/4" Concrete Anchor
- XL-5-38-TUP - Touch-up Pen
- XL-5-39-FL - Floor Leveler
- XL-5-40-OPG - Oval Plastic Grommet
- XL-5-41-TSF - Top Shelf Frame
- XL-5-42-MSF - Middle Shelf Frame
- XL-5-43-BSF - Bottom Shelf Frame
- XL-5-44-SS - Short Spine
- XL-5-45-DBWP - Deluxe Bracket with Mounting Plate
- XL-5-46-DR - Decorative Rail (for Shelf Frame)
- XL-5-47-GR - Glass Raiser
- XL-5-48-GRTP - Glass Raiser with Threaded Pin
- XL-5-49-CH - Complete Hardware
Parts and Hardware List
Please read completely through the instructions and verify that all parts listed are present before beginning assembly.

Parts and Hardware Master List

TV Mounting Kit
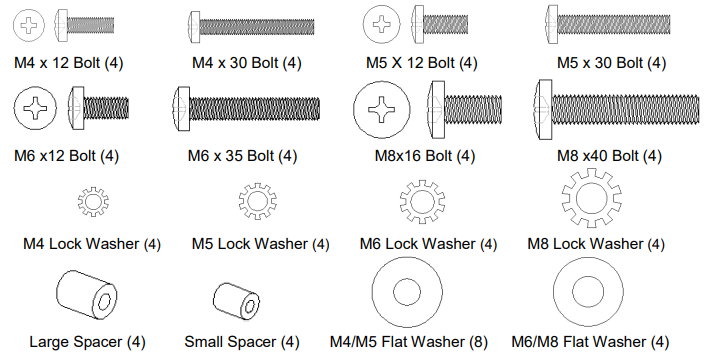
52” 3-in-1 Console (XL-5)
This item is designed to be 3-in-1 configuration. Please choose which of the 3 options suits your needs. DO NOT discard any of the hardware or parts that you will not use on your set option, this will give you the opportunity to use this TV Console for different configurations in case you decide to upgrade your TV set in the future.
.png)
ADULT ASSEMBLY REQUIRED
If you have any questions regarding assembly or if you are missing parts, do not return this item to the Retailer Store. Please call our toll free customer service number and have your instructions and parts list ready to provide the model name, part name or factory number:
- MAXIMUM RECOMMENDED WEIGHT LOADS
- MANUFACTURER: Whalen Furniture
- CATALOG: 52” 3-in-1 Console (XL-5)
- DATE OF MANUFACTURE: August 2010 MADE IN CHINA

WARNING: THIS UNIT IS INTENDED FOR USE ONLY WITH THE PRODUCTS AND MAXIMUM WEIGHTS INDICATED. USE WITH OTHER PRODUCTS OR PRODUCTS HEAVIER THAN THE MAXIMUM WEIGHTS INDICATED MAY RESULT IN INSTABILITY CAUSING POSSIBLE INJURY. THE BASE OF THE TELEVISION MUST BE PLACED SQUARELY IN THE CENTER OF THE STAND WITH NO OVERHANGING ON EITHER SIDE.
GENERAL INFORMATION, TIPS & TRICKS
- Please read the Assembly Instructions prior to assembling this product.
- Remove all hardware from box and sort by size.
- Check to see that all hardware and parts are present BEFORE assembling.
- Ask a friend to assist you with the assembly of this furniture.
- To avoid damage, assemble the product on a sturdy, level and protective surface.
- Please wait until all steps are completed before tightening bolts.
- Make sure all bolts are tightly fastened before the unit is used.
Th is product is sold with Tip Restraint Hardware kit. You must install the Tipping Restraint Hard ware between the wall and the TV stand to prevent any accidents or damages. When p roperly installed, this restraint can provide protection against the unexpected tipping of the un it due to small tremors, bumps or climbing. The restraint is only a deterrent and is not a substitute for proper adult supervision. Use of tip-over restraints may only reduce, but not eliminate, the risk of tip-over.
Detailed Specifications
The 3-in-1 TV Stand Console XL-5 is packed with features that make it a top choice for TV stands. Here are some of its key specifications
- Accommodates TVs up to 70 inches
- Can support up to 125 pounds
- Three storage compartments with adjustable shelves
- Cable management system to keep cords organized
- Tempered glass top for durability and scratch resistance
- Modern design with open shelving and clean lines
Description of Whalen Furniture 3-in-1 TV Stand Console XL-5
The Whalen Furniture 3-in-1 TV Stand Console XL-5 is a stylish and functional TV stand that is perfect for any home theater setup. With its modern design and open shelving, this TV stand is both practical and aesthetically pleasing. The three storage compartments with adjustable shelves provide ample space for storing media components, games, and other entertainment accessories. The tempered glass top adds durability and scratch resistance, ensuring that your TV stand looks great for years to come. And with its cable management system, you can keep cords organized and out of sight, creating a clean and clutter-free entertainment space.
Assembly Instructions
Note: Please do not fully tighten all bolts until you finish assembling all parts. Once assembled, go back and fully tighten all bolts. This will make it easier during assembly of unit.
- Unpack the unit and confirm that you have all the hardware and parts required.
- Choose the option suits your needs. Locate Long Spine (D) or Short Spine (D1) and set back face down on a scratch free surface as shown in detail #1.
Align the “U” shape plate holes of 3 Shelf Frames (A, B & C) with the threaded inserts on the Long Spine (D) in place, insert and screw 3/4” Bolts (1) with Washers (4 & 5) through the “U” shape plate holes into the Spine. Fasten all bolts with Allen Wrench provided. See detail #1.
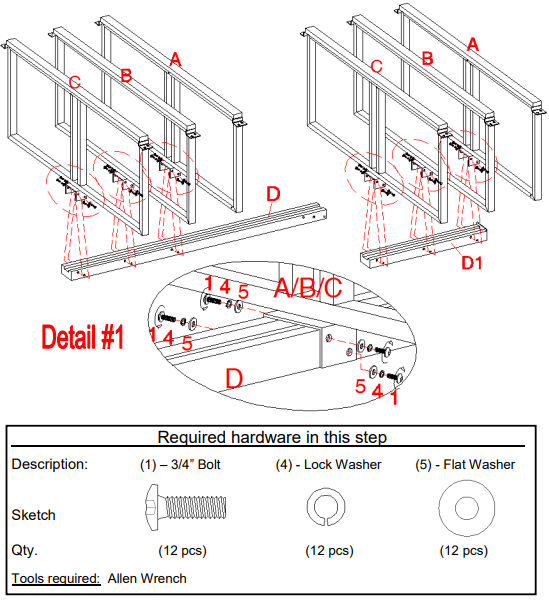
Align and attach Left and Right Leg (E & F) to the front ends of Shelf Frames in place, using 3/4” Bolts (1) with Washers (4 & 5) through the end bracket holes into the threaded inserts located on the legs, 6 Bolts per Leg. See detail #2.
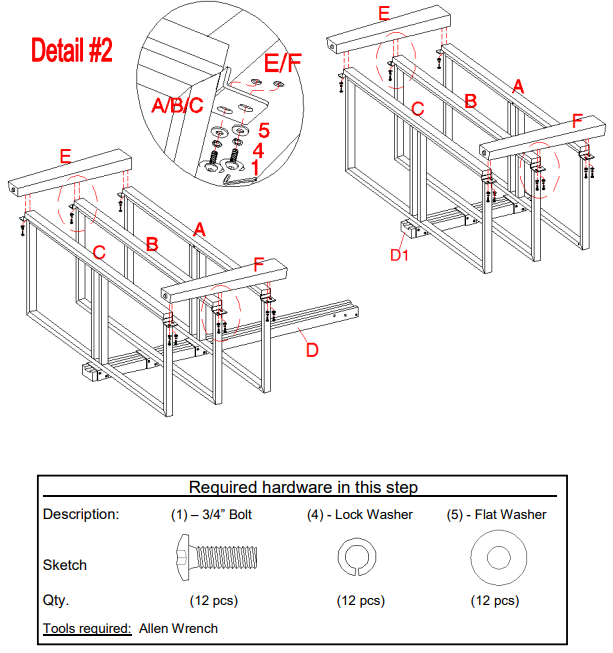
- Stand the unit upright. Now go back and fully tighten all the bolts.
In case of uneven floors, Floor Levelers are provided at the bottom of Left & Right Legs (E & F). Simply tilt the unit back and raise or lower floor leveler by hand to correct tilting as shown in detail #3.
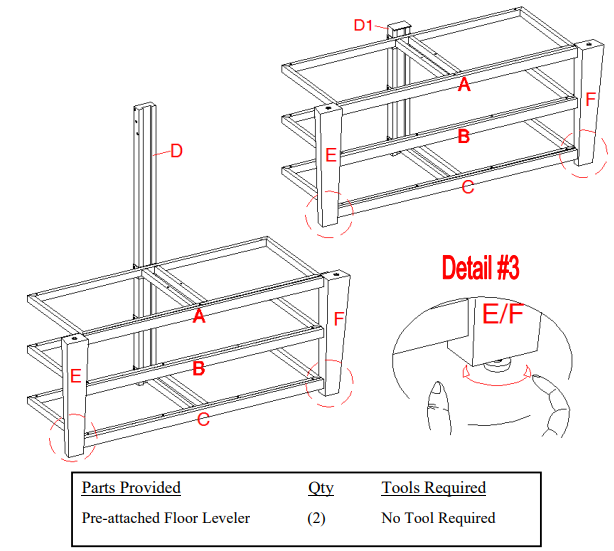
STOP: If you choose Table-top configuration, continue to STEP 10. If mounting TV with the Swinging Floater, skip ahead to PAGE 10.Assembly Instructions for Table Top
Put the Suction Cups (6) into top holes of Middle & Bottom Shelf Frames (B & C) into place. Insert the Glass Shelves (H) onto the Suction Cups as shown in detail #4.
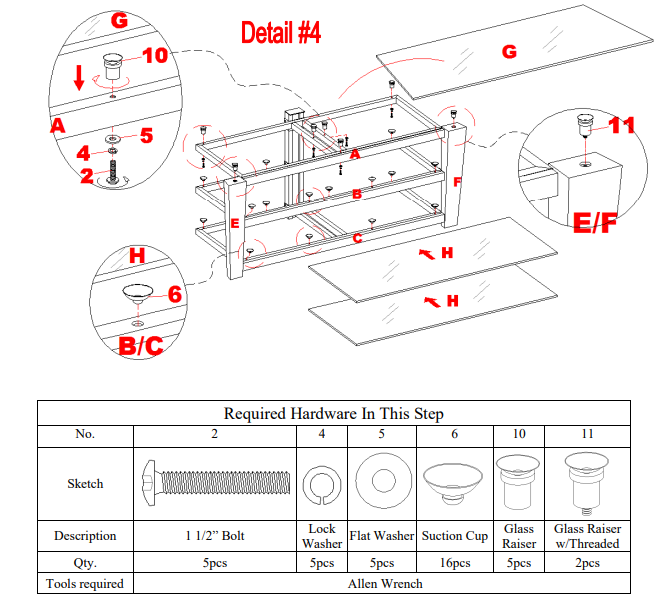
- Attach 5 Glass Raisers (10) onto the top holes of Top Shelf Frame (A) using the 1 1/2” Bolts (2) with Washers (4 & 5) through the pre-drilled holes into the Glass Raisers. Screw the Glass Raisers with Threaded Pin (11) onto top hole of Left & Right Leg (E & F) as shown in detail #4. Proceed to center the Top Glass (G) onto the Top Shelf Frame (A).
Note: Make sure the Glass sits securely on the top of Suction Cups. If glass is scratched you can repair by using a BLACK marker and filling in scratched area from underneath. Position the assembled Table Top in the desired location against the wall. Now follow the instructions printed on the plastic white bag in order to mount the Tipping Restraint Hardware Kit to the Spine (D1) properly. As shown in detail #5.

NOTE: YOU MUST USE THIS TIPPING RESTRAINT TO ATTACH THIS UNIT TO THE WALL, TO PREVENT ACCIDENTS AND/OR INJURIES.The Table Top is ready for use now. Be sure to position your TV in center of console with no overhang on either side.
Tools required: Allen Wrench (provided), Phillips Screwdriver, Mallet, Power Drill, and 3/8” Drill Bit.Console with Swinging Floater
Assembly Instructions to attach Deluxe Bracket w/ Mounting Plate
Attach Deluxe Bracket w/Mounting Plate (I) to the top of Long Spine (D) using six 3/4” Bolts (1) with Lock Washers & Flat Washers (4 & 5) as shown in detail #6.

Note: There are two mounting options included in this 3-in-1 system TV console:- Mounting Plate.
- YZ Mounting Frame to accommodate random hole patterns.
For the television with VESA hole patterns, you can mount your LCD directly to the Deluxe Bracket with Mounting Plate (I), using the appropriate Bolts through the Lock Washers and Flat Washers through the proper holes of Mounting Plate and then into the TV. See detail #7
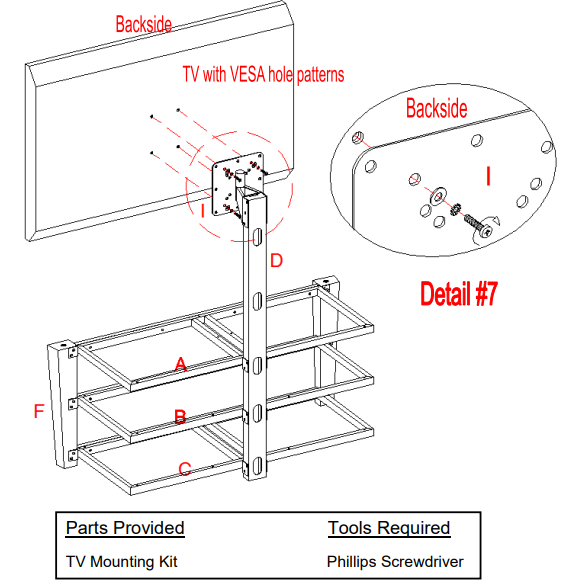
Note: Hand threading the bolt in the TV Mounting Kit included into the threaded insert on the back of the TV to determine correct size bolt you will require. If you are unable to find the correct one, consult a local hardware store.
Note: For Plasma and LCD TVs larger than 32”, you must use the XYZ Mounting Frame (J) provided. The XYZ Mounting Frame will accommodate large LCD without VESA Hole Patterns and Plasma TV’s with Random Hole Patterns.Attach XYZ Mounting Frame (J) to the Deluxe Bracket with Mounting Plate (I) with the back hook is bottom, thread six 3/4” Bolts (1) with Large Flat Washers (7) through the appropriate slots of XYZ Mounting Frame and the top & bottom hole set on Mounting Plate, through the other Large Flat Washers (7) and Lock Washers (4) then secure with Nuts (3). Tighten with provided Open Wrench. See detail #8.
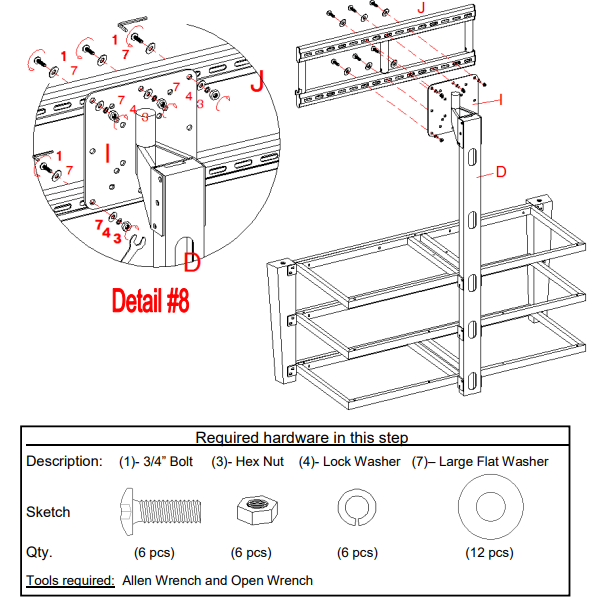
Note: Make sure the Mounting Frame is centered on the Mounting Plate for added security.Mounting Monitor Bracket to a television with a flat back
Note: For televisions with a curved back or recessed back proceed directly to step #17
- Determine the correct diameter of the bolt your TV requires by hand threading them into the threaded insert on the back of the TV. If you encounter any resistance, stop immediately. If you are unable to find the correct bolt consult a local hardware store.
- Once you have determined the correct diameter Bolt, follow the appropriate Diagram below, thread the short Bolt through the appropriate Lock Washer, the Large Flat Washer, the Monitor Bracket (K), and into the upper threaded inserts of TV. As shown in detail #9.
Note: Lean the TV up against a wall or other solid surface when attaching with the Monitor Brackets. DO NOT place the TV face down on the glass this may cause permanent damage. Proceed to insert the long Bolt through the appropriate Lock Washer, the Large Flat Washer, the slot of Monitor Bracket (K), a second Large Flat Washer (M4/M5 Diameter Bolts only), appropriate Spacer, and into the bottom threaded inserts of TV. As shown in detail #9 Make sure the Monitor Brackets (K) are centered and level with each other. Tighten the bolts securing the Monitor Brackets to the TV.
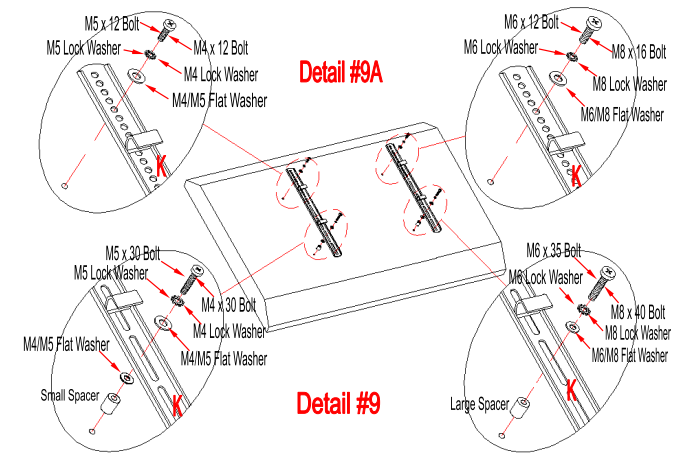
Mounting Monitor Bracket to a television with a curved / recess back
- Determine the correct diameter of the bolt your TV requires by hand threading them into the threaded insert on the back of the TV. If you encounter any resistance, stop immediately. If you are unable to find the correct bolt consult a local hardware store.
Once you have determined the correct diameter Bolt, follow the appropriate Diagram below, thread the Bolt through the appropriate Lock Washer, the Large Flat Washer, the Monitor Bracket (K), a second Large Flat Washer (M4/M5 Diameter Bolts only), appropriate Spacer and into the threaded inserts of TV. See detail #10.

- Make sure the Monitor Brackets (K) are vertically centered and level with each other. Tighten the bolts securing the Monitor Brackets (K) to the TV.
NOTE: If mounting your TV to a wall, proceed to STEP 25 once you complete installation of the Monitor Brackets (K).
MAKE SURE ALL BOLTS ARE TIGHT AND SPINE IS AT A 90 DEGREE ANGLE AND USING A QUALITY LEVEL TO VERIFY THE MOUNTING FRAME IS LEVEL PRIOR TO INSTALLATION OF TV. - Once the Monitor Brackets (K) are attached onto the back of television, ask for assistance to lift the television up to the XYZ Mounting Frame (J). Place the hooks on Monitor Brackets over the Mounting Frame then lower them onto the bars of Mounting Frame. Proceed to center the television.
Insert the Safety Bar (L) into the bottom holes on the side of XYZ Mounting Frame (J) by sliding it all the way across the frame. Secure the Safety Bar by rotating the bent end into the slot of hook so that it is facing backward. Make sure it sits over the bottom hook of the Monitor Brackets. See detail #11.
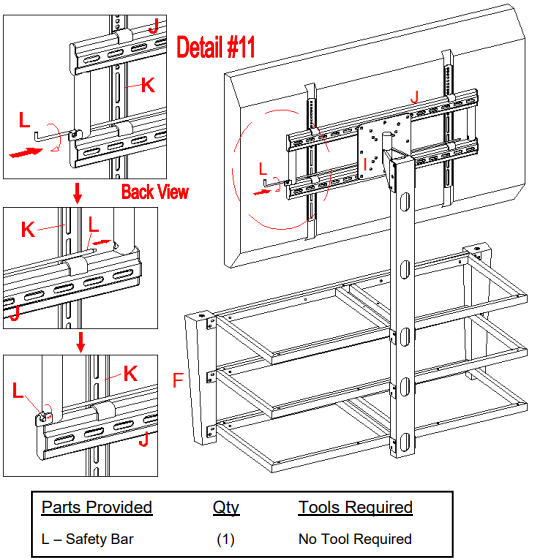
- Repeat steps 7 & 8 to attach the Top Glass and Glass Shelves in place.
Carefully move the console and position in your desired location against the wall. Now follow the instructions printed on the plastic bag in order to mount the Tipping Restraint Hardware Kit to the Spine properly. As shown in detail #12.
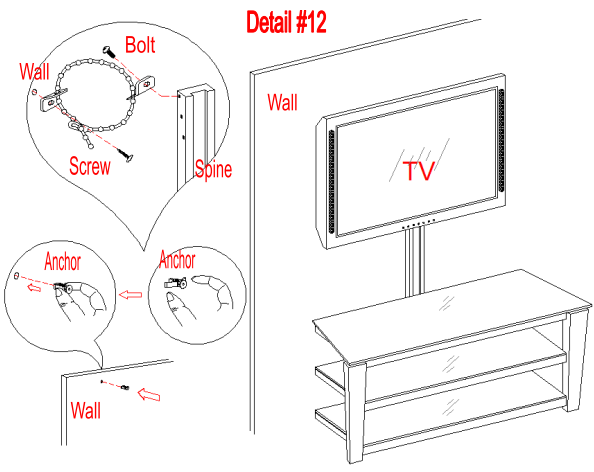
Note: You must install the Tipping Restraint Hardware with the unit in use to prevent any accidents or damage to the unit.You can enjoy your home entertainment center now. Swivel left-or-right for optimum viewing control.
Tools Required: Allen Wrench (provided), Phillips Screwdriver, Mallet, Power Drill, and 3/8” Drill Bit.
STOP: The following steps are only for those who wish to mount their TV directly to the wall. If you have already mounted your TV to the Swinging Floater or plan to display your TV on the top surface of the stand, disregard the following steps.Assembly Instructions for Universal Wall Mount
Installing XYZ Mounting Frame onto WOODEN STUD WALL
- The XYZ Mounting Frame must be mounted to two Wood Studs at least 12” apart, using a high quality stud sensor to locate the two adjacent studs. After you have located the studs, verify with a nail for added security. See detail #13A.
- Pre-drill a 2 1/2" deep hole at the desired height in each stud using a 3/16” drill bit, make sure that the holes are centered in the studs and level with each other. Use the XYZ Mounting Frame (J) as a template to mark the corresponding location for the bottom holes in each stud, drill holes 2 1/2" deep with the 3/16” drill bit at the marked location.
Orient the Mounting Frame with the “C” shape plate against the wall, and using four Lag Bolts (9) with Large Flat Washer (7) through the slots of “C” shape plate on Mounting Frame into the holes in the wall, secure the mounting frame to the wall as shown in detail #13B.

WARNING: Do not over-tighten the Lag Bolts. Tighten Lag Bolts only until the Lag Bolt Washer is pulled firmly against the “C” Plate of Mounting Frame. If there is a layer of drywall or other material, this drywall or other material may not exceed 5/8 inch in thickness. Failure to heed this caution may result property damage and/or personal injury.

Mounting Frame onto BRICK, SOLID CONCRETE OR CONCRETE BLOCK
- Use the XYZ Mounting Frame (J) as a template, mark six holes location on the wall, three in the top row and three in the bottom row of slots. Make sure that the holes are level and there is at least 6” between any two holes, pre-drill these holes with a 1/2” masonry bit to at least 2 1/2” in depth.
- Insert a Concrete Anchor (8) into each of these holes; make sure they are completely seated and flush with the concrete surface, even if there is a layer of drywall or other material in front of the concrete.
Attach the XYZ Mounting Frame (J) to the wall using six Lag Bolts (9) and Large Flat Washers (7) through the slot of “C” Plate on Mounting Frame into the Concrete Anchors (8) in the wall as shown in detail #14. Make sure the back hook of Mount Frame is bottom.

- Once the Monitor Brackets (K) are attached onto the back of television, ask for assistance to lift the television up to the XYZ Mounting Frame (J). Place the hooks on Monitor Brackets over the Mounting Frame then lower them onto the bars of Mounting Frame. Proceed to center the television.
Insert the Safety Bar (L) into the bottom holes on the side of XYZ Mounting Frame (J) by sliding it all the way across the frame. Secure the Safety Bar by rotating the bent end into the slot of hook so that it is facing wall. Make sure it sits over the bottom hook of the Monitor Brackets. See detail #15.

- Place assembled console under your TV set as shown in detail #15A.
Setup of 3-in-1 TV Stand Console XL-5
Setting up the Whalen Furniture 3-in-1 TV Stand Console XL-5 is easy and straightforward. Here are the steps to follow
- Unpack the TV stand and lay it flat on the floor.
- Attach the legs to the base of the TV stand using the screws provided.
- Place the TV stand in the desired location and ensure it is level.
- Place your TV on the TV stand and secure it using the safety strap provided.
- Place your media components and other entertainment accessories in the storage compartments.
- Use the cable management system to keep cords organized and out of sight.
Care and Maintenance
- Use a soft, clean cloth that will not scratch the surface when dusting.
- Use of furniture polish is not necessary. Should you choose to use polish, test in an inconspicuous area first.
- Using solvents of any kind on your furniture may damage the finish.
- Never use water to clean your furniture as it may cause damage to the finish.
- Always use coasters under beverage glasses and flowerpots.
- Liquid spills should be removed immediately. Using a soft clean cloth, blot the spill gently. Avoid rubbing.
- Always use protective pads under hot dishes and plates. Heat can cause chemical changes that may create spotting within the furniture finish.
- Stains or marks from crayons or ink markers will be difficult to remove.
- In the event that your furniture is stained or otherwise damaged during use, we recommend that you call a professional to repair your furniture.
- Check bolts/screws periodically and tighten them if necessary.
Further advice about wood furniture care
- It is best to keep your furniture in a climate-controlled environment. Extreme temperature and humidity changes can cause fading, warping, shrinking and splitting of wood. It is advised to keep furniture away from direct sunlight as sun may damage the finish.
- Proper care and cleaning at home will extend the life of your purchase. Follow these important and helpful tips that will enhance your furniture as it ages.
- A Touch-up Pen has been provided to repair any small nicks or scratches that may occur during assembly or shipping.
- We hope you enjoy your purchase for many years.
Troubleshooting of Whalen Furniture
If you encounter any issues with the Whalen Furniture TV Stand Console XL-5, here are some common problems and solutions to help you troubleshoot:
- The TV stand is wobbling: Ensure that the TV stand is level and that the legs are securely attached.
- The TV is not secure: Use the safety strap provided to secure the TV to the TV stand.
- Cords are not staying organized: Use the cable management system to keep cords organized and out of sight.
QUALITY GUARANTEE
We are confident that you will be delighted with your Whalen Furniture purchase.
Should this product be defective in workmanship or materials or fail under normal use, we will repair or replace it for up to one (1) year from date of purchase. Every Whalen Furniture product is designed to meet your highest expectations. We guarantee that you will immediately see the value of our fine furniture.
https://www.whalenfurniture.com
Pros & Cons
Pros
- Accommodates TVs up to 70 inches
- Can support up to 125 pounds
- Modern design with open shelving and clean lines
- Three storage compartments with adjustable shelves
- Cable management system to keep cords organized
Cons
- May be too large for smaller entertainment spaces
- Assembly can be time-consuming
Customer Reviews of Whalen Furniture 3-in-1 TV Stand Console XL-5
Customers love the Whalen Furniture 3-in-1 TV Stand Console XL-5 for its functionality and modern design. Many customers appreciate the ample storage space and cable management system, which help keep their entertainment spaces clean and organized. However, some customers have noted that assembly can be time-consuming and that the TV stand may be too large for smaller entertainment spaces.
Faqs
How do I put together the Whalen Furniture XL-5 3-in-1 TV Stand Console?
Which tools are required to assemble the TV Stand Console Whalen XL-5?
Can I use my 65-inch TV with the Whalen 3-in-1 TV Stand Console?
Is it possible to change the TV mount's height on the Whalen TV Stand XL-5?
After construction, what should I do if the Whalen TV Stand Console XL-5 feels unsteady?
How should the Whalen Furniture 3-in-1 TV Stand Console be maintained and cleaned?
Regarding the Whalen 3-in-1 TV Stand Console XL-5, what finishes are available?
How can I keep the Whalen Furniture XL-5 TV Stand's glass shelves from getting scratched?
Is it possible to modify the Whalen XL-5 TV Stand's configurations?
Leave a Comment
