
Setup: Gigabyte Aorus Motherboard B450 User Manual
Content
Gigabyte Aorus Motherboard B450
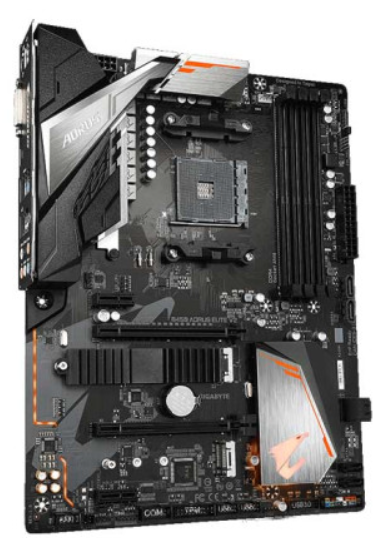
Introduction
The Gigabyte Aorus Motherboard B450 is a high-performance motherboard designed for enthusiasts and gamers who demand top-notch functionality and reliability. Released in 2018, this motherboard is built on the AMD B450 chipset, supporting AMD Ryzen and Ryzen Threadripper processors. It is estimated to be priced around $150-$200, making it a competitive option in the mid-range to high-end motherboard market.
This motherboard is ideal for building powerful gaming PCs, content creation workstations, and other demanding applications. With its robust feature set, including high-quality audio, advanced cooling solutions, and extensive connectivity options, the Aorus B450 offers a comprehensive platform for users to unleash the full potential of their AMD processors.
Product Specifications
CPU
AM4 Socket:
- AMD Ryzen™ 2nd Generation processors
- AMD Ryzen™ with Radeon™ Vega Graphics processors
- AMD Ryzen™ 1st Generation processors (Go to GIGABYTE's website for the latest CPU support list.)
Chipset
- AMD B450
Memory
- 4 x DDR4 DIMM sockets supporting up to 128 GB (32 GB single DIMM capacity) of system memory
- Dual-channel memory architecture
- Support for DDR4 2933/2667/2400/2133 MHz memory modules
- Support for ECC Un-buffered DIMM 1Rx8/2Rx8 memory modules (operate in non-ECC mode)
- Support for non-ECC Un-buffered DIMM 1Rx8/2Rx8/1Rx16 memory modules
- Support for Extreme Memory Profile (XMP) memory modules (Go to GIGABYTE's website for the latest supported memory speeds and memory modules.)
Onboard Graphics (Note)
Integrated Graphics Processor:
- 1 x DVI-D port, supporting a maximum resolution of 1920x1200@60 Hz
- The DVI-D port does not support a D-Sub connection by adapter.
- 1 x HDMI port, supporting a maximum resolution of 4096x2160@60 Hz (Note).. Support for HDMI 2.0 version and HDCP 2.2. (Note)
- Maximum shared memory of 16 GB
Audio
- Realtek® Audio CODEC
- High Definition Audio
- 2/4/5.1/7.1-channel
- Support for S/PDIF Out
LAN
- Realtek® GbE LAN chip (10/100/1000 Mbit)
Expansion Slots
- 1 x PCI Express x16 slot, running at x16 (PCIEX16) (Note)
- For optimum performance, if only one PCI Express graphics card is to be installed, be sure to install it in the PCIEX16 slot. (The PCIEX16 slot conforms to the PCI Express 3.0 standard.)
- 1 x PCI Express x16 slot, running at x4 (PCIEX4)
- 1 x PCI Express x1 slot (The PCIEX4 and PCIEX1 slots conform to PCI Express 2.0 standard.)
Multi-Graphics Technology
- Support for AMD Quad-GPU CrossFire™ and 2-Way AMD CrossFire™ technologies
Storage Interface
- 1 x M.2 connector (Socket 3, M key, type 2242/2260/2280/22110 SATA and PCIe 3.0 x4/x2 SSD support)
- 6 x SATA 6Gb/s connectors
- Support for RAID 0, RAID 1, and RAID 10
- Refer to "1-7 Internal Connectors," for the installation notices for the M.2 and SATA connectors.
I/O Controller
- iTE® I/O Controller Chip
Hardware Monitor
- Voltage detection
- Temperature detection
- Fan speed detection
- Overheating warning
- Fan fail warning
- Fan speed control
- Whether the fan speed control function is supported will depend on the cooler you install.
Operating System
- Support for Windows 10 64-bit
Form Factor
- Micro ATX Form Factor; 24.4cm x 24.4cm
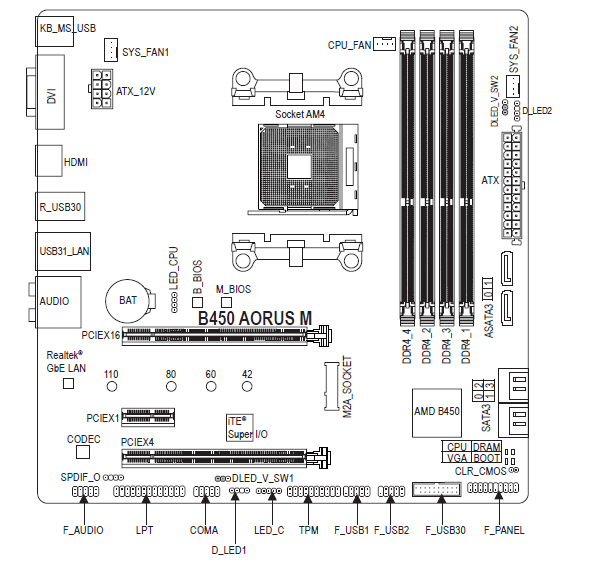
B450 AORUS M Motherboard Layout
Box Contents
- 5 B450 AORUS M
- Motherboard 5 Motherboard driver disc 5
- User's Manual
- Two SATA cables
- I/O Shield
- M.2 screw(s)/M.2 standoff(s)
The box contents above are for reference only,, and the actual items shall depend on the product package you obtain. The box contents are subject to change without notice.
Hardware Installation
Installation Precautions
The motherboard contains numerous delicate electronic circuits and components that can become damaged as a result of electrostatic discharge (ESD). Before installation, carefully read the user's manual and follow these procedures:
- Prior to installation, make sure the chassis is suitable for the motherboard.
- Before installation, do not remove or break the motherboard S/N (Serial Number) sticker or the warranty sticker provided by your dealer. These stickers are required for warranty validation.
- Always remove the AC power by unplugging the power cord from the power outlet before installing or removing the motherboard or other hardware components.
- When connecting hardware components to the internal connectors on the motherboard, make sure they are connected tightly and securely.
- When handling the motherboard, avoid touching any metal leads or connectors.
- It is best to wear an electrostatic discharge (ESD) wrist strap when handling electronic components such as a motherboard, CPU, or memory. If you do not have an ESD wrist strap, keep your hands dry and first touch a metal object to eliminate static electricity.
- Prior to installing the motherboard, please have it on top of an antistatic pad or within an electrostatic shielding container.
- Before connecting or unplugging the power supply cable from the motherboard, make sure the power supply has been turned off.
- Before turning on the power, make sure the power supply voltage has been set according to the local voltage standard.
- Before using the product, please verify that all cables and power connectors of your hardware components are connected.
- To prevent damage to the motherboard, do not allow screws to come in contact with the motherboard circuit or its components.
- Make sure there are no leftover screws or metal components placed on the motherboard or within the computer casing.
- Do not place the computer system on an uneven surface.
- Do not place the computer system in a high-temperature or wet environment.
- Turning on the computer power during the installation process can lead to damage to system components as well as physical harm to the user.
- If you are uncertain about any installation steps or have a problem related to the use of the product, please consult a certified computer technician.
- If you use an adapter, extension power cable, or power strip, ensure to consult with its installation and/or grounding instructions.
Installing the CPU
Read the following guidelines before you begin to install the CPU:
- Make sure that the motherboard supports the CPU. (Go to GIGABYTE's website for the latest CPU support list.)
- Always turn off the computer and unplug the power cord from the power outlet before installing the CPU to prevent hardware damage.
- Locate the pin one on the CPU. The CPU cannot be inserted if oriented incorrectly.
- Apply an even and thin layer of thermal grease on the surface of the CPU.
- Do not turn on the computer if the CPU cooler is not installed; otherwise, overheating and damage to the CPU may occur.
- Set the CPU host frequency in accordance with the CPU specifications. It is not recommended that the system bus frequency be set beyond hardware specifications since it does not meet the standard requirements for the peripherals. If you wish to set the frequency beyond the standard specifications, please do so according to your hardware specifications, including the CPU, graphics card, memory, hard drive, etc.
Installing the CPU
Completely lift up the CPU socket locking lever. Locate the pin one (denoted by a small triangle) of the CPU socket and the CPU. Once the CPU is positioned into its socket, place one finger down on the middle of the CPU, lowering the locking lever and latching it into the fully locked position.
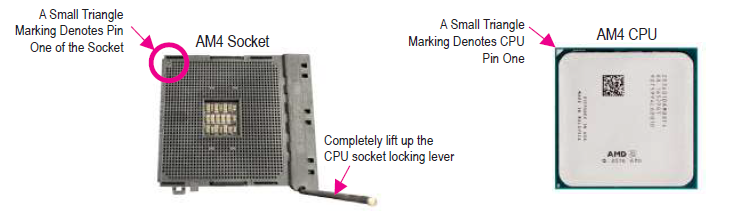
Do not force the CPU into the CPU socket before the CPU socket locking lever is lifted up, or damage to the CPU and CPU socket may occur.
Installing the Memory
Read the following guidelines before you begin to install the memory:
- Make sure that the motherboard supports the memory. It is recommended that memory of the same capacity, brand, speed, and chips be used. (Go to GIGABYTE's website for the latest supported memory speeds and memory modules.)
- Always turn off the computer and unplug the power cord from the power outlet before installing the memory to prevent hardware damage.
- Memory modules have a foolproof design. A memory module can be installed in only one direction. If you are unable to insert the memory, switch the direction.
Dual Channel Memory Configuration
This motherboard provides four memory sockets and supports Dual Channel Technology. After the memory is installed, the BIOS will automatically detect the specifications and capacity of the memory. Enabling Dual Channel memory mode will double the original memory bandwidth.
The four memory sockets are divided into two channels,, and each channel has two memory sockets as follows:
- Channel A: DDR4_2, DDR4_4
- Channel B: DDR4_1, DDR4_3
Dual Channel Memory Configurations Table

(SS=Single-Sided, DS=Double-Sided, "- -"=No Memory)
Due to CPU limitations, read the following guidelines before installing the memory in Dual Channel mode.
- Dual Channel mode cannot be enabled if only one memory module is installed.
- When enabling Dual Channel mode with two or four memory modules, it is recommended that memory of the same capacity, brand, speed, and chips be used. For optimum performance, when enabling Dual Channel mode with two memory modules, we recommend that you install them in the DDR4_1 and DDR4_2 sockets.
Installing an Expansion Card
Read the following guidelines before you begin to install an expansion card:
- Make sure the motherboard supports the expansion card. Carefully read the manual that came with your expansion card.
- Always turn off the computer and unplug the power cord from the power outlet before installing an expansion card to prevent hardware damage.
Installation Notices for the M.2 and SATA Connectors:
Due to the limited number of lanes provided by the Chipset, the availability of the SATA connectors may be affected by the type of devices installed in the M2A_SOCKET connector. Refer to the following table for details.

Drivers Installation
- Before installing the drivers, first install the operating system.
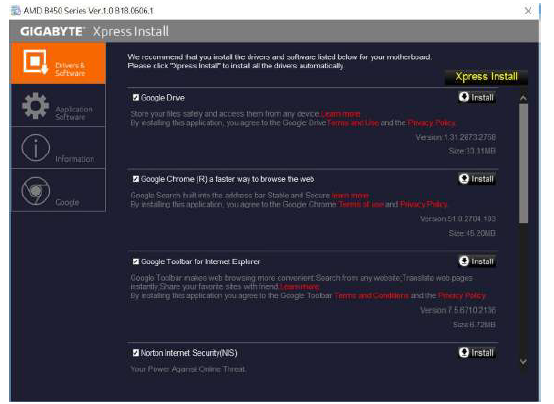
- After installing the operating system, insert the motherboard driver disc into your optical drive. Click on the message "Tap to choose what happens with this disc" in the top-right corner of the screen and select "Run Run.exe." (Or go to My Computer, double-click the optical drive, and execute the Run.exe program.)
"Xpress Install" will automatically scan your system and then list all of the drivers that are recommended to install. You can click the Xpress Install button,, and "Xpress Install" will install all of the selected drivers. Or click the arrow  icon to individually install the drivers you need.
BIOS Setup
BIOS (Basic Input and Output System) records hardware parameters of the system in the CMOS on the motherboard. Its major functions include conducting the Power-On Self-Test (POST) during system startup, saving system parameters,, and loading the operating system, etc. BIOS includes a BIOS Setup program that allows the user to modify basic system configuration settings or to activate certain system features.
When the power is turned off, the battery on the motherboard supplies the necessary power to the CMOS to keep the configuration values in the CMOS.
To access the BIOS Setup program, press the <Delete> key during the POST when the power is turned on. To upgrade the BIOS, use either the GIGABYTE Q-Flash or @BIOS utility.
- Q-Flash allows the user to quickly and easily upgrade or back up BIOS without entering the operating system.
- @BIOS is a Windows-based utility that searches and downloads the latest version of BIOS from the Internet and updates the BIOS.
- Because BIOS flashing is potentially risky, if you do not encounter problems using the current version of BIOS, it is recommended that you not flash the BIOS. To flash the BIOS, do it with caution. Inadequate BIOS flashing may result in system malfunction.
- It is recommended that you not alter the default settings (unless you need to) to prevent system instability or other unexpected results. Inadequately altering the settings may result in the system's failure to boot. If this occurs, try to clear the CMOS values and reset the board to default values. (Refer to the "Load Optimized Defaults" section in this chapter or introductions of the battery/clear CMOS jumper in Chapter 1 for how to clear the CMOS values.)
GIGABYTE eSupport
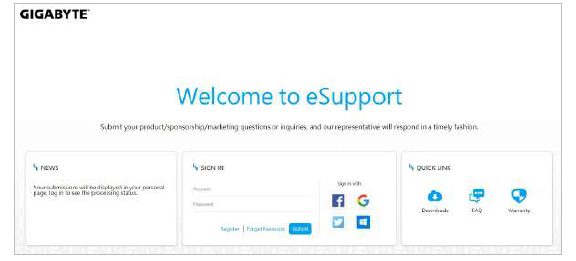
To submit a technical or non-technical (Sales/Marketing) question, please link to: https://esupport.gigabyte.com.
Troubleshooting
Common issues with the Aorus B450 include: - No power on: Check that all cables are connected correctly, especially the power cables from the PSU to the motherboard. - Overheating: Ensure all fans are connected and functioning properly. Adjust fan profiles in the UEFI BIOS or through software tools. - Audio issues: Check that audio cables are connected to the correct ports and that audio drivers are installed. - Boot failures: Verify that the boot order is set correctly in the UEFI BIOS and that the SSD or HDD containing the OS is detected.
Always refer to the user manual for detailed troubleshooting steps and warnings to avoid damaging your components.
Pros & Cons
Pros:
- High-quality components ensure reliability and stability
- Advanced cooling solutions with Smart Fan 5 technology
- Robust connectivity options, including USB 3.2 Gen 2 and SATA 6Gb/s
- RGB Fusion for customizable lighting effects
- Support for high-speed NVMe SSDs
Cons:
- Limited PCIe x16 slots compared to higher-end models
- No built-in Wi-Fi on some variants
- Some users report issues with BIOS updates and stability
Customer Reviews
Customers praise the Aorus B450 for its solid build quality, excellent cooling performance, and comprehensive feature set. Many users appreciate the RGB lighting and the ease of setup. However, some users have reported issues with BIOS stability and the lack of built-in Wi-Fi on certain models.
Common complaints include occasional BIOS update issues and the need for manual configuration of some features. Despite these, the majority of users are satisfied with the motherboard's overall performance and value for money.
Faqs
What processors are supported by the Gigabyte Aorus Motherboard B450?
Does the Aorus B450 support DDR5 memory?
What kind of cooling solutions does the Aorus B450 offer?
Is Wi-Fi included on all variants of the Aorus B450?
How many PCIe x16 slots does the Aorus B450 have?
Can I customize the RGB lighting on the Aorus B450?
What is the maximum speed of SATA ports on the Aorus B450?
Does the Aorus B450 support high-speed NVMe SSDs?
How do I update the BIOS on my Aorus B450 motherboard?
What network connectivity options does the Aorus B450 offer?
More gigabyte manuals
- Setup: Gigabyte Motherboard Aorus Elite X570 User Manual
- Installation: Gigabyte Motherboard GA-Z170-HD3P User Manual
- Setup: Gigabyte X570 AORUS XTREME User Manual
- Installation: Gigabyte Gaming Monitor M27Q P User Guide
- Setup & Features: Gigabyte G27F Gaming Monitor User Manual
- How to Install: Gigabyte Motherboard Gaming Z390
Leave a Comment