
Setup: Gigabyte X570 AORUS XTREME User Manual
Content
Gigabyte X570 AORUS XTREME Motherboard
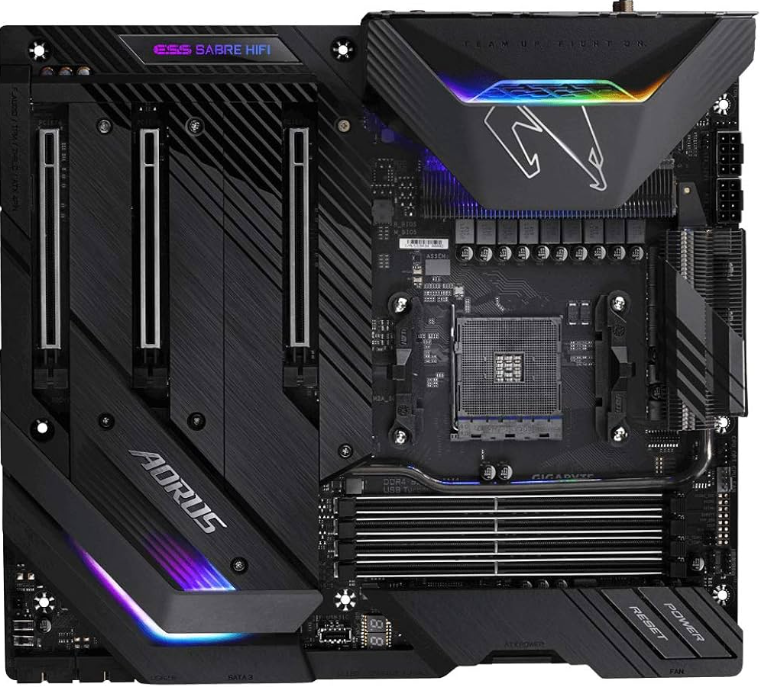
Introduction
The Gigabyte X570 AORUS XTREME stands out as a premium E-ATX motherboard designed for enthusiasts and high-performance PC builders seeking unparalleled power and advanced features. Built around the AMD X570 chipset, it supports the full spectrum of AMD Ryzen processors, including the latest Ryzen 5000 Series, delivering exceptional processing capabilities for gaming, content creation, and workstation applications.
Key benefits include its robust Direct 16-phase Infineon digital VRM with 70A PowIRstage components,, ensuring excellent power delivery and overclocking stability. Thermal management is optimized through the Thermal Reactive Armor featuring a fins-array heatsink, direct touch heatpipe, and nano-carbon baseplate, which facilitates superior heat dissipation in demanding workloads.
This motherboard integrates advanced connectivity options, such as triple PCIe 4.0 M.2 slots with thermal guards, dual Intel and Aquantia 10GbE LAN ports, Intel Wi-Fi 6E with Bluetooth 5.2, and multiple USB 3.2 Gen 2 ports including Type-C. The high-fidelity audio subsystem is powered by an ESS SABRE 9218 DAC and Realtek ALC1220-VB codec, supporting immersive 7.1 channel surround sound.
Targeted at gamers, overclockers, and professional users who demand top-tier networking, storage speed, and system responsiveness, the Gigabyte X570 AORUS XTREME is well-suited for high-end desktop builds. The integrated RGB Fusion lighting system appeals to custom PC builders focused on aesthetics without compromising performance.
Available at an estimated price range of around $800 to $850, this motherboard is positioned at the high end of the market but offers unmatched features and quality for its value. It is widely available through major online retailers and specialty PC hardware stores.
Box Contents
- X570 AORUS XTREME motherboard 5 One AORUS USB flash drive with drivers 5 User's Manual
- Quick Installation Guide
- Six SATA cables
- Two Wi-Fi antennas
- One G Connector
- One front panel extension cable
- Two addressable LED strip adapter cables, one RGB LED strip extension cable.
- One noise detection cable
- One AORUS RGB Fan Commander
- Six Velcro cable ties
- thermistors cables
- M.2 screw(s)/M.2 standoff(s)
Optional Items
- 2-port USB 2.0 bracket (Part No. 12CR1-1UB030-6*R)
- eSATA bracket (Part No. 12CF1-3SATPW-4*R)
- 3.5" Front Panel with 2 USB 3.2 Gen 1 ports (Part No. 12CR1-FPX582-2*R)
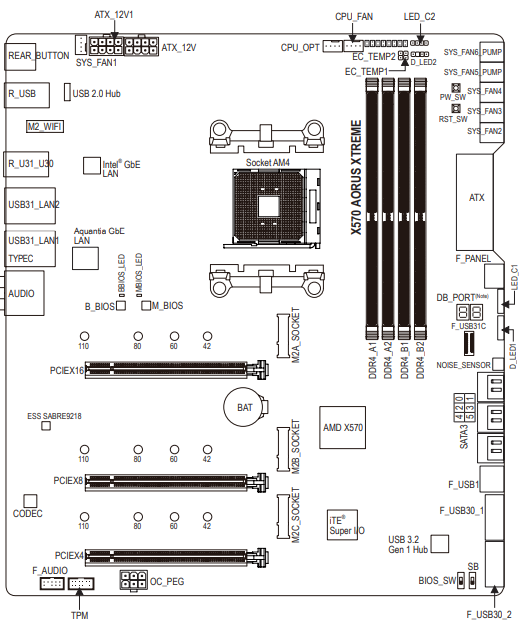
X570 AORUS XTREME Motherboard Layout
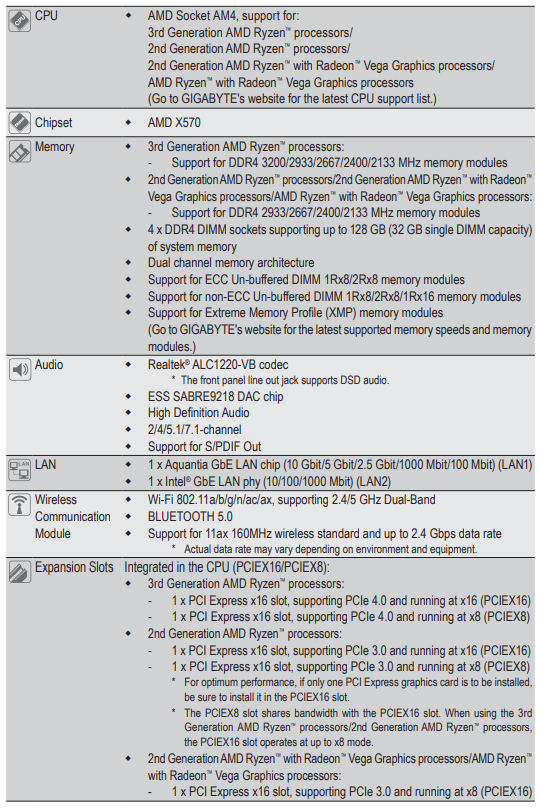
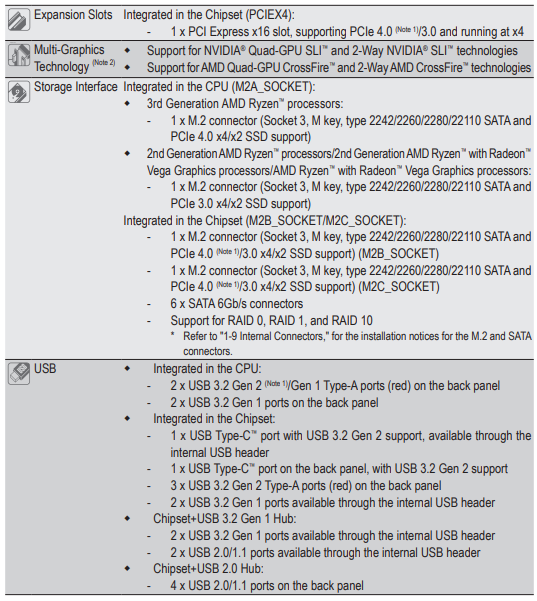
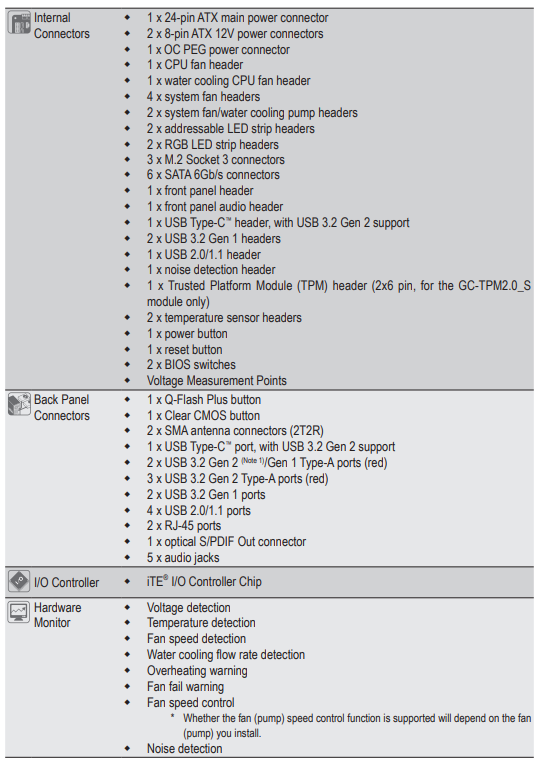
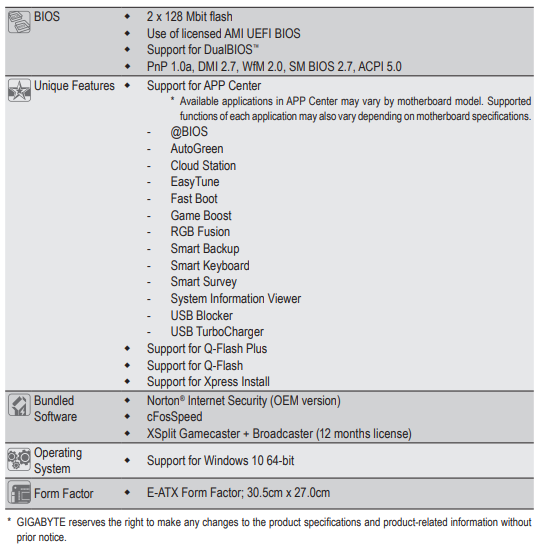
Product Specifications
Installing the CPU and CPU Cooler
- Make sure that the motherboard supports the CPU (Go to GIGABYTE's website for the latest CPU support list.)
- Always turn off the computer and unplug the power cord from the power outlet before installing the CPU to prevent hardware damage.
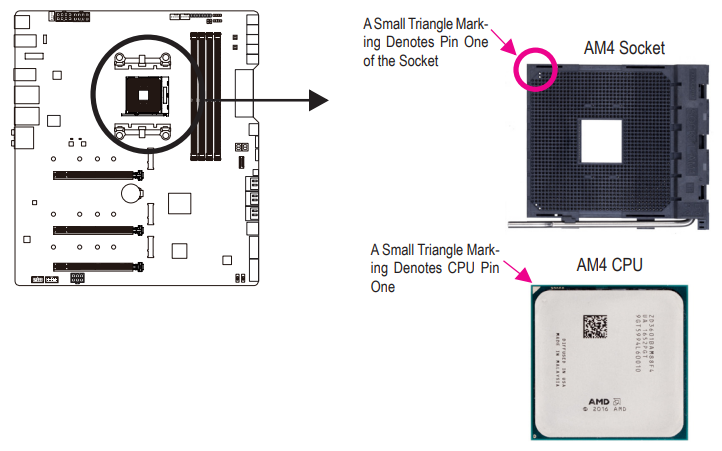
- Locate the pin one of the CPU. The CPU cannot be inserted if oriented incorrectly.
- Apply an even and thin layer of thermal grease on the surface of the CPU.
- Do not turn on the computer if the CPU cooler is not installed, otherwise overheating and damage of the CPU may occur.
- Set the CPU host frequency in accordance with the CPU specifications. It is not recommended that the system bus frequency be set beyond hardware specifications since it does not meet the standard requirements for the peripherals. If you wish to set the frequency beyond the standard specifications, please do so according to your hardware specifications including the CPU, graphics card, memory, hard drive, etc.
Installing the CPU
A. Locate the pin one (denoted by a small triangle) of the CPU socket and the CPU.
B.Follow the steps below to correctly install the CPU into the motherboard CPU socket.
- Before installing the CPU, make sure to turn off the computer and unplug the power cord from the power outlet to prevent damage to the CPU.
- Do not force the CPU into the CPU socket. The CPU cannot fit in if oriented incorrectly. Adjust the CPU orientation if this occurs.
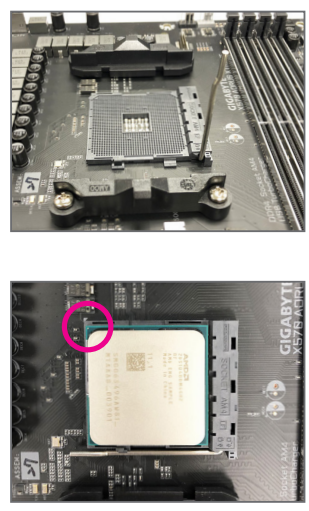
- Step 1:
Completely lift up the CPU socket locking lever. - Step 2:
Align the CPU pin one (small triangle marking) with the triangle mark on the CPU socket and gently insert the CPU into the socket. Make sure that the CPU pins fit perfectly into their holes.
Once the CPU is positioned into its socket, place one finger down on the middle of the CPU, lowering the locking lever and latching it into the fully locked position.
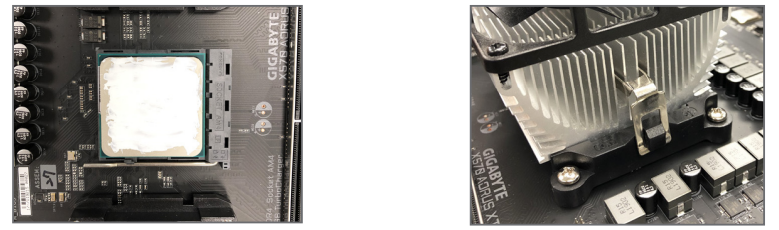
Installing the CPU Cooler
Follow the steps below to correctly install the CPU cooler on the motherboard.
- Step 1:
Apply an even and thin layer of thermal grease on the surface of the installed CPU. - Step 2:
Hook the CPU cooler clip to the mounting lug on one side of the retention frame. On the other side, push straight down on the CPU cooler clip to hook it to the mounting lug on the retention frame. - Step 3:
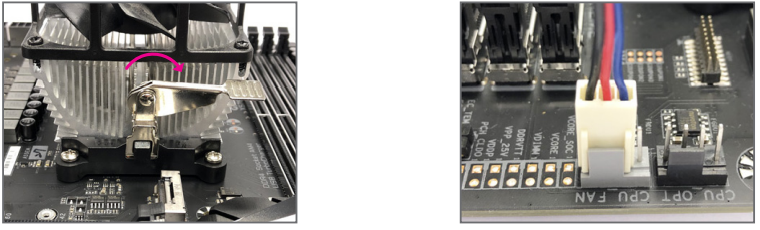
Turn the cam handle from the left side to the right side (as the picture above shows) to lock into place. (Refer to your CPU cooler installation manual for instructions on installing the cooler.) - Step 4:
Finally, attach the power connector of the CPU cooler to the CPU fan header (CPU_FAN) on the motherboard.
Installing the Memory
- Make sure that the motherboard supports the memory. It is recommended that memory of the same capacity, brand, speed, and chips be used.
(Go to GIGABYTE's website for the latest supported memory speeds and memory modules.) - Always turn off the computer and unplug the power cord from the power outlet before installing the memory to prevent hardware damage.
- Memory modules have a foolproof design. A memory module can be installed in only one direction. If you are unable to insert the memory, switch the direction.
Dual Channel Memory Configuration
This motherboard provides four memory sockets and supports Dual Channel Technology. After the memory is installed, the BIOS will automatically detect the specifications and capacity of the memory. Enabling Dual Channel memory mode will double the original memory bandwidth.
The four DDR4 memory sockets are divided into two channels and each channel has two memory sockets as following:
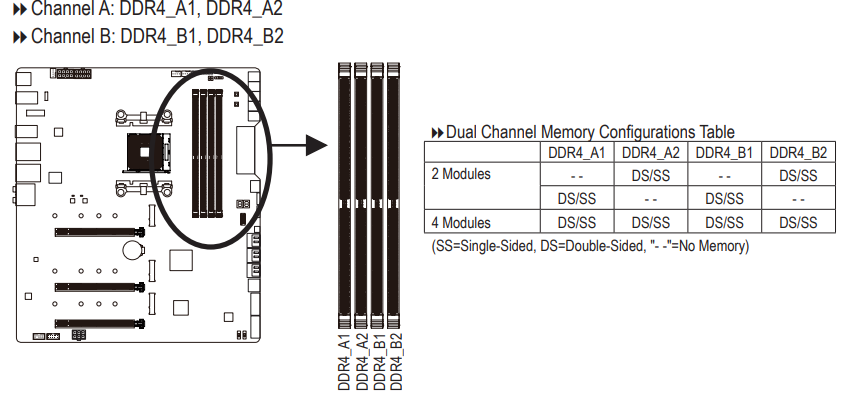
Due to CPU limitations, read the following guidelines before installing the memory in Dual Channel mode.
- Dual Channel mode cannot be enabled if only one memory module is installed.
- When enabling Dual Channel mode with two or four memory modules, it is recommended that memory of the same capacity, brand, speed, and chips be used. For optimum performance, when enabling Dual Channel mode with two memory modules, we recommend that you install them in the DDR4_A2 and DDR4_B2 sockets.
Installing a Memory
- Before installing a memory module, make sure to turn off the computer and unplug the power cord from the power outlet to prevent damage to the memory module. DDR4 and DDR3 DIMMs are not compatible to each other or DDR2 DIMMs. Be sure to install DDR4 DIMMs on this motherboard.
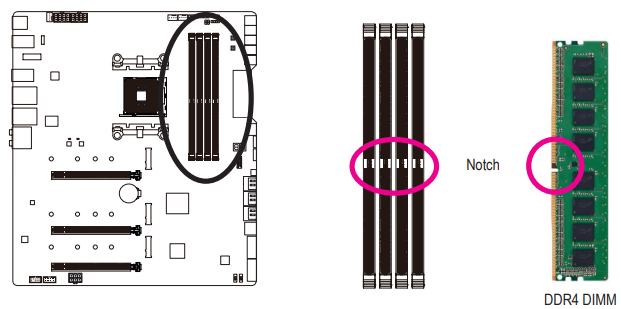
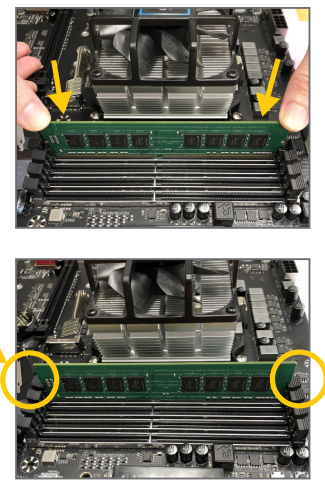
A DDR4 memory module has a notch, so it can only fit in one direction. Follow the steps below to correctly install your memory modules in the memory sockets.
- Step 1:
Note the orientation of the memory module. Spread the retaining clips at both ends of the memory socket. Place the memory module on the socket. As indicated in the picture on the left, place your fingers on the top edge of the memory, push down on the memory and insert it vertically into the memory socket. - Step 2:
The clips at both ends of the socket will snap into place when the memory module is securely inserted.
Installing an Expansion Card
- Make sure the motherboard supports the expansion card. Carefully read the manual that came with your expansion card.
- Always turn off the computer and unplug the power cord from the power outlet before installing an expansion card to prevent hardware damage.
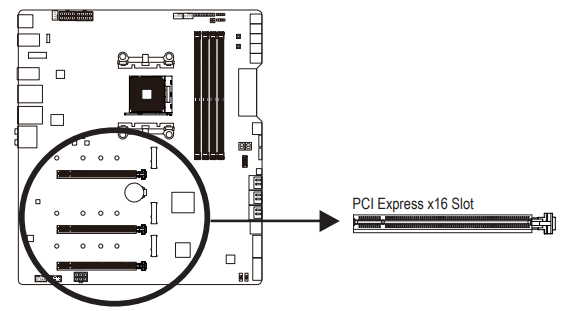
- Locate an expansion slot that supports your card. Remove the metal slot cover from the chassis back panel.
- Align the card with the slot, and press down on the card until it is fully seated in the slot.
- Make sure the metal contacts on the card are completely inserted into the slot.
- Secure the card's metal bracket to the chassis back panel with a screw.
- After installing all expansion cards, replace the chassis cover(s).
- Turn on your computer. If necessary, go to BIOS Setup to make any required BIOS changes for your expan-sion card(s).
- Install the driver provided with the expansion card in your operating system.
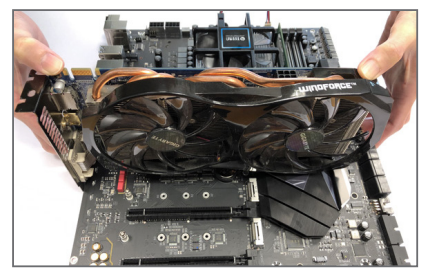
Example: Installing and Removing a PCI Express Graphics Card:- Installing a Graphics Card:
Gently push down on the top edge of the card until it is fully inserted into the PCI Express slot. Make sure the card is securely seated in the slot and does not rock. - Removing the Card:
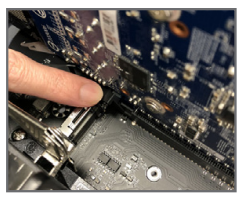
Gently push back on the lever on the slot and then lift the card straight out from the slot.
- Installing a Graphics Card:
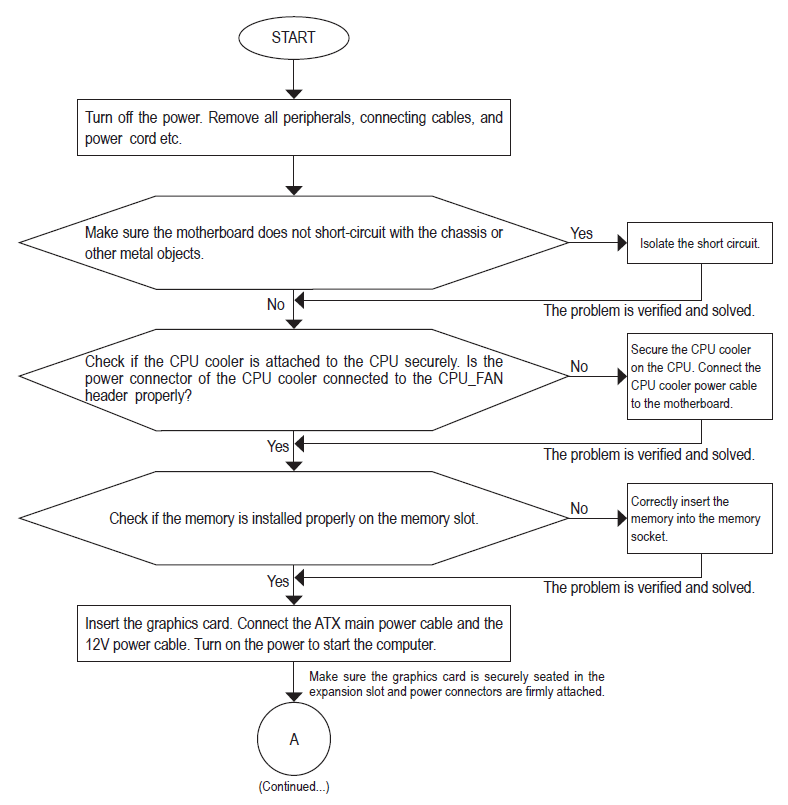
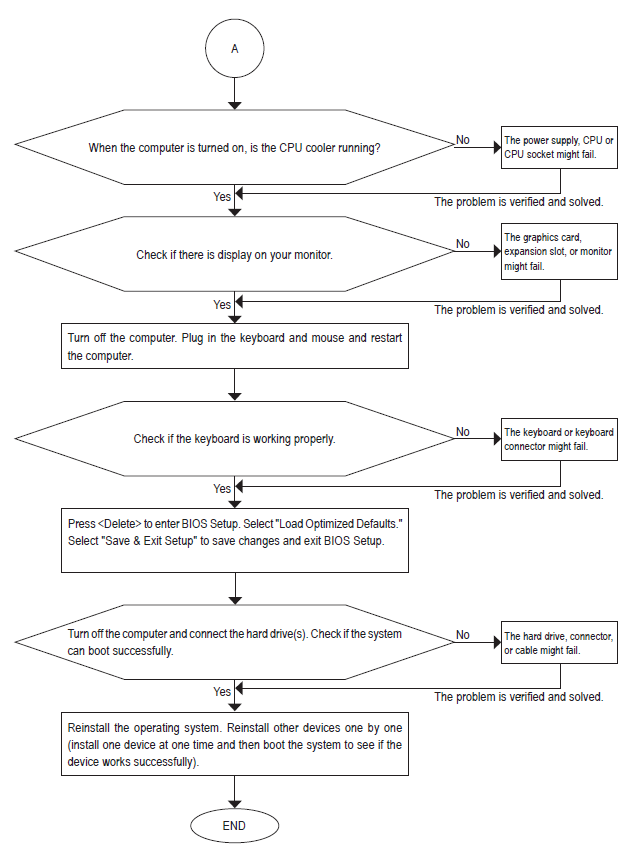
Troubleshooting Procedure
If you encounter any troubles during system startup, follow the troubleshooting procedure below to solve the problem.
Pros & Cons of the Gigabyte X570 AORUS XTREME Motherboard
Pros
- Exceptional Power Delivery: The 16-phase VRM design with 70A PowIRstage supports stable overclocking and ensures consistent performance under heavy CPU loads.
- Advanced Thermal Solution: The Thermal Reactive Armor with fins-array heatsink and nano-carbon baseplate efficiently manages heat, keeping the system cool during extended use.
- Comprehensive Connectivity: Includes triple PCIe 4.0 M.2 slots with thermal guards, dual 10GbE LAN ports (Aquantia & Intel), and Intel Wi-Fi 6E, catering to high-speed networking and storage demands.
- Premium Audio Quality: Features an ESS SABRE 9218 DAC and Realtek ALC1220-VB codec for crystal-clear sound, suitable for audiophiles and gamers.
- Robust Build & Aesthetics: Integrated I/O shield, armor plating, and customizable RGB lighting enhance durability and visual appeal.
- BIOS and User-Friendly Features: Q-Flash Plus allows BIOS updates without CPU or memory, facilitating easy system maintenance.
Cons
- High Price Point: The premium features come at a steep cost, making it less accessible for budget-conscious users compared to alternatives like the X570 AORUS MASTER or other X570 boards.
- E-ATX Form Factor: The larger size may not fit in all PC cases, requiring careful case selection for compatibility.
- Fan Noise Management: Some users report fan noise from chipset cooling, though this is common in active-cooled X570 boards.
- Overkill for Basic Builds: The extensive feature set may be unnecessary for casual users or moderate gaming setups, where more affordable motherboards suffice.
Customer Reviews and Feedback on the Gigabyte X570 AORUS XTREME
Users generally praise the Gigabyte X570 AORUS XTREME for its exceptional build quality, stable performance under overclocking, and comprehensive connectivity options. The triple M.2 slots and dual 10GbE LAN ports receive particular commendation for enabling high-speed storage and networking setups.
Common praises highlight the motherboard's thermal management system and audio quality, emphasizing immersive gaming and multimedia experiences. Many users appreciate the Q-Flash Plus feature, which simplifies BIOS updates.
On the downside, some reviews mention the premium price as a barrier, while a few users note the chipset fan noise during heavy loads as a minor inconvenience. Overall, the motherboard holds a solid average user rating around 4 out of 5 stars, with recommendations strongest from enthusiasts and professional builders who require its high-end features.
Purchase recommendations focus on users who plan to leverage Ryzen 5000 Series CPUs with high-frequency memory and require extensive PCIe 4.0 M.2 storage solutions, alongside advanced networking capabilities.
Faqs
How do I optimize the gigabyte X570 AORUS XTREME BIOS settings for best gaming performance?
What should I do if my gigabyte X570 AORUS XTREME motherboard does not detect my M.2 SSD?
How do I configure RAID on the gigabyte X570 AORUS XTREME for NVMe or SATA drives?
Can the gigabyte X570 AORUS XTREME support both USB 3.2 Gen 2 and Thunderbolt devices at the same time?
Why is my gigabyte X570 AORUS XTREME failing to POST after hardware changes?
How can I control and sync RGB lighting on the gigabyte X570 AORUS XTREME with other components?
What is the best way to maintain the gigabyte X570 AORUS XTREME for long-term reliability?
Are there any known compatibility issues with AMD Ryzen 5000 series CPUs and the gigabyte X570 AORUS XTREME?
More gigabyte manuals
- Setup & Features: Gigabyte G27F Gaming Monitor User Manual
- Setup: Gigabyte Motherboard Aorus Elite X570 User Manual
- Setup: Gigabyte Aorus Motherboard B450 User Manual
- Installation: Gigabyte Motherboard GA-Z170-HD3P User Manual
- Installation: Gigabyte Gaming Monitor M27Q P User Guide
- How to Install: Gigabyte Motherboard Gaming Z390
Leave a Comment