
How to Use: Remington Precision Cut Hair Clipper HC5500 User Manual
Content
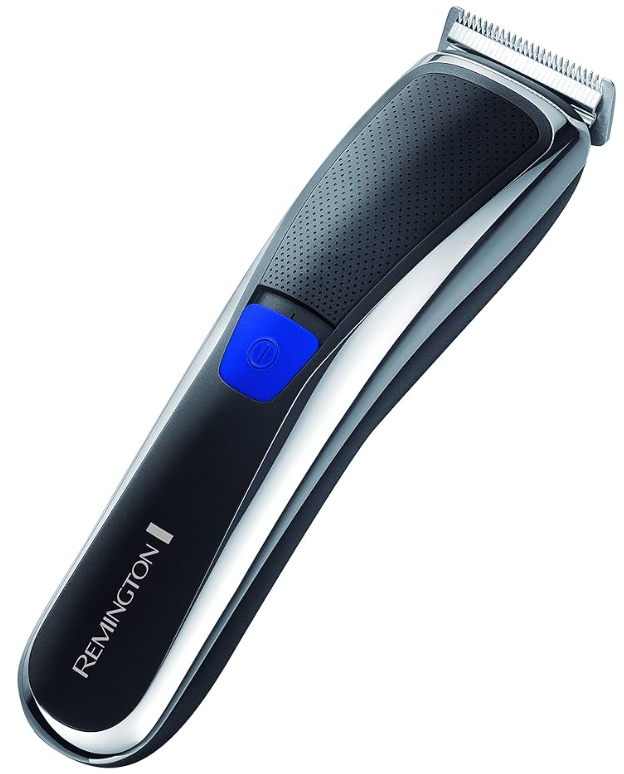
Remington Precision Cut Hair Clipper HC5500
Introduction
The Remington Precision Cut Hair Clipper HC5500 is a premium, cordless grooming tool designed to deliver salon-quality haircuts and beard trims at home. Engineered with advanced AccuAngle titanium-coated blades featuring a precise 42-degree angle, this clipper ensures a sharper, more efficient cut and professional-looking results every time. Its SlideSelect adjustable comb system allows for seamless blending and fading, with 22 to 23 length settings ranging from as short as 0.5 mm up to a versatile 44 mm, making it ideal for a variety of styles and hair types.
Key benefits include a robust 60-minute cordless runtime, removable and washable blade cartridges for easy maintenance, and an auto-lock function for secure length adjustments. The HC5500 is also equipped with a USB charging port and LED indicator, offering modern convenience for today’s user.. This model stands out for its titanium blade durability, advanced geometry for efficient cutting, and ergonomic design that enhances comfort during extended use.
The Remington Precision Cut Hair Clipper HC5500 is perfect for anyone seeking a reliable, high-performance clipper for home grooming, from beginners to experienced stylists. Its versatility makes it suitable for haircuts, beard trims, and even detailed fading work. Available through major online retailers and electronics stores, the HC5500 typically falls in the mid-range price category, offering excellent value for its feature set and build quality.
Detailed Specifications
- Type: Cordless hair clipper with titanium-coated blades
- Blade Material: Titanium, AccuAngle 42° geometry for sharp, precise cuts
- Length Settings: 22–23 adjustable positions (0.5 mm to 44 mm)
- Nozzles/Combs: 2 adjustable combs included
- Battery Life: Up to 60 minutes s cordless use
- Charging: USB charging, 14–16 hours for a full charge, LED indicator
- Blade Maintenance: Removable, washable blade cartridge for easy cleaning
- Warranty: 3+1 years (varies by region)
- Special Features: SlideSelect adjustable comb with auto-lock, comfort tip blades, advanced blade geometry for efficient cutting
Compared to similar models, the Remington Precision Cut Hair Clipper HC5500 offers a wider range of length settings and a more durable titanium blade, outperforming many budget clippers in cutting efficiency and longevity. Its cordless design and USB charging provide added convenience over traditional plug-in models.
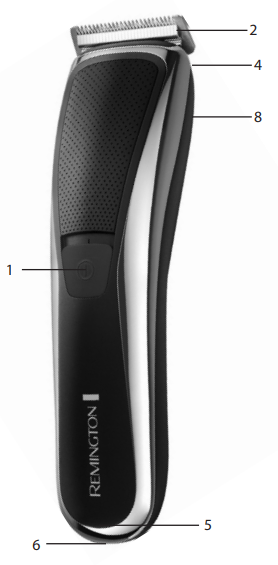
KEY FEATURES
- On/Off/Turbo Switch
- Blade set
- 2 attachment guide combs 1-21mm and 24-44mm (not shown)
- Blade release button
- Charging indicator light
- Micro USB port
- Adaptor (not shown)
- Slide select adjustable comb switch
GETTING STARTED
CHARGING YOUR APPLIANCE
- Before using your hair clippers for the first time, charge for 14-16 hours (HC5500) and 4 hours (HC5700).
- Ensure the product is switched off.
- Connect the charging adaptor to the product and then to the mains.
- If the product is not going to be used for an extended period of time (2 – 3 months), unplug it from the mains and store it.
- Fully recharge your hair clipper when you would like to use it again.
- Allow for 14-16 hours for a full charge for HC5500 and 4 hours for HC5700.
- HC5500: When charging,, the LED indicator will be illuminated and will remain illuminated once the product is fully charged.
- HC5700:Whenn charging, the LED indicator will be illuminated and will turn off once the product is fully charged.
- To preserve the life of your batteries, let them run out every 6 months,, then recharge for 14-16 hours.
- The HC5700 comes with a quick charge function; in, 10 minutes of charging will give an emergency burst of run time.
CHARGING VIA STANDARD ELECTRICAL SOCKET
- Ensure the product is switched off.
- Connect the charging adaptor to the product and then to the mains.
USB
- Connect the Micro USB to the appliance, and the USB connector to any standard USB port or charger.
- The product will only charge through USB and will not run in corded mode.
CORDED USE
- Connect the charging adaptor to the product,, then to the mains.
CAUTION
- Extending only use will result in the reduction of the battery life.
CORDLESS USE
- When the unit is switched on and fully charged, the product can be used in cordless mode for up to 60 minutes for the HC5500 and up to 75 minutes for the HC5700.
BEFORE STARTING THE CUT
- Inspect the clipper, making sure that it is free from hair and dirt.
- Seat the person so that their head is approximately at your eye level.
- Before cutting, always comb the hair so it is tangle-free and dry.
TO ATTACH A COMB
- Hold the comb with its teeth upward.
- To attach a comb, align the legs of the comb with the holes in the top of the clipper on each side of the blade and slide the legs into the trimmer until they click.
- To remove, firmly pull the comb straight up away from the clipper.
HAIR CLIPPER COMB SETTINGS
- The clipper comes with two adjustable combs, a short length adjustable comb (indicated by 1-21mm on the back of the comb) and a longer length adjustable comb (indicated by 24-44mm on the back of the comb).
- Please see the table below for the different cutting lengths available on each comb:
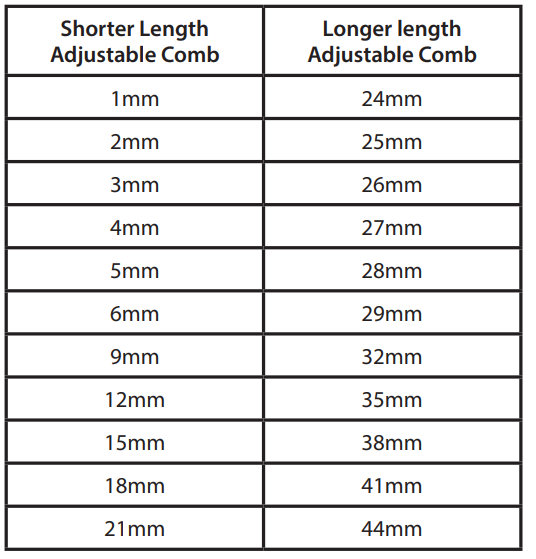
- On the slide select switch, there is a silver indicator which, when the short length adjustable comb is on the product, shows the corresponding length setting on the left of the slide select switch. On the other side of the slide, select switch H. There is another silver indicator that shows the corresponding length setting when the longer length adjustable comb is on the product. On the right side of the slide, select the switch.
- To adjust the length settings, you must press the upper half of the slide select switch to release the locking mechanism, then apply force upwards on the slide select switch to increase the length setting. To decrease the length setting, gs press the upper part of the slide, ide select the switch down, and slide downwards.
- Use the clipper without any fixed combs for trimming hair close to the skin.
- This will trim hair to 1mm. Holding the clipper so the blades are perpendicular to the skin will trim hair to 0.5mm.
INSTRUCTIONS FOR CUTTING HAIR
- To turn the product on or off, slide the switch. To locate the On/Off switch, please refer to the key features section.
- For even cutting, allow the comb attachment/blade to cut its way through the hair. Do not force it through quickly. If you are cutting for the first time, start with the maximum comb attachment.
STEP 1 – Nape of the neck
- Set the comb to 3mm or 6mm.
- Hold the clipper with the blade teeth pointing upwards. Begin starting at the centre of the head at the base of the neck.
- Slowly lift the clipper, working upwards and outwards through the hair, trimming just a little at a time.
STEP 2 – Back of the head
- With the comb set at 12mm or 18mm, cut the hair at the back of the head.
STEP 3 – Side of the head
- With the comb set at 3mm or 6mm, trim sideburns. Then change to the longer 9mm guide comb and continue to cut the top of the head.
STEP 4 – Top of the head
- Use the longer length comb attachment and set it to 24mm or 27mm, then cut hair on top of the head against the direction in which the hair normally grows.
- For longer hair on top, use the longer length comb attachment (24 – 44mm) to achieve the desired style.
- Always work from the back of the head.
STEP 5 – The finishing touches
- Use the clipper without an attachment comb for close trimming around the base and sides of the neck.
- To produce a clean,n straight line at the sideburns, reverse the hair clipper.
- Place the reversed clipper at right angles to the head, tips of the blades lightly touching the skin, in and then work downwards.
DUAL BOOST SYSTEM (HC5700)
- There is a 3-position switch on HC5700 only. First position is Off, second is normal speed, and third position is Boost for extra power to cut through thicker hair.
- If the clipper is set to On, it will run at regular power.
- If the clipper is set to Boost, it will provide maximum power.
CARE FOR YOUR HAIRCLIPPER
- Your clipper is fitted with high-quality blades.
- To ensure long-lasting performance of your clipper, clean the blades and unit regularly.
- Always keep the attachment guide comb on the trimmer blade.
AFTER EACH USE
- Ensure the appliance is switched off and unplugged from the mains before cleaning.
- Brush the accumulated hair from the blades and body of the clipper. Do not submerge the clipper in water.
- To clean the unit, wipe with a damp cloth and dry immediately
- Place a few drops of cutter or sewing machine oil onto the blades. Wipe off excess oil.
WASHABLE BLADE CLEANING
- The blade cartridge is removable.
- NOTE: Only the blades on this clipper can be washed under running water.
- To remove the blades, ensure the unit is off. Press the blade release button on the back of the clipper where it meets the blade,e and push away from the clipper.
- To reattach once the blades are cleaned and dry, align the bottom of the blade with the bottom blade housing tab and slide the cartridge back into place until you hear a click.
- Do not run the entire unit under the ; a., Only the blade set is meant to be submerged in water.
- Place a few drops of cutter or sewing machine oil onto the blades. Wipe off excess oil.
EVERY SIX MONTHS
- At regular intervals, the blade set should be removed and cleaned.
- Remove the 2 screws retaining the fixed blade with a screwdriver. Do not remove the blade set.
- Brush out the hair from between the blades with a soft cleaning brush. Do not remove the lubricating grease from the blades. It is not necessary to remove the small moving blade from the unit.
- If the moving blade has been removed, this can be re-fitted by slotting the coated blade holder over the pin in the centre of the interior product head.
- The groove on the coated blade, just below the teeth, rests on a metal plate at the opposite side to the screw holes. The fixed blade is fitted with the raised profile pointing outwards and fixed with the 2 screws.
- If the blades are not correctly aligned, cutting efficiency will be impaired.
- Place a few drops of cutter or sewing machine oil onto the blades. Wipe off excess oil.
CLEANING CAUTIONS
- Ensure the appliance is switched off and unplugged from the mains before cleaning.
- Only the attachment guidecombs and trimmer blade may be removed from the product for cleaning.
- Do not rinse under water.
- Do not use harsh or corrosive cleaners on the units or their blades.
BATTERY REMOVAL
- The appliance must be disconnected from the supply mains when removing the battery.
- Turn the trimmer on and discharge all remaining power.
- Remove the comb attachment.
- Detach the blade cartridge.
- Pry the decorative panel off the top housing to expose the internals and printed circuit board.
Troubleshooting Common Issues
Common Problems and Solutions
- Clipper Not Turning On: Ensure the battery is charged; if the LED indicator does not light up during charging, try a different USB cable or power source. Allow 14–16 hours for a full charge.
- Blade Not Cutting Efficiently: Clean the blade and remove any hair buildup. Ensure the blade is properly attached and the comb is locked in place.
- Comb Not Adjusting: Check for obstructions in the SlideSelect mechanism. Gently move the adjustor back and forth to free any stuck parts.
Error Codes and Fixes
No specific error codes are indicated ithe n the available documentation. Most issues can be resolved with basic maintenance and charging checks.
Preventive Measures
- Regularly clean the blade and combs after each use.
- Avoid dropping the clipper to prevent damage to internal components.
- Store in a dry place to prolong battery life.
Warranty and Support
The Remington Precision Cut Hair Clipper HC5500 comes with a 3+1 year limited warranty[3]. For support, contact Remington customer service via their official website or the retailer where the product was purchased. Always retain your proof of purchase for warranty claims.
Pros & Cons
Advantages
- Precision Cutting: Titanium AccuAngle blades deliver sharp, professional results.
- Versatile Length Settings: 22–23 settings accommodate all hair types and styles
- Cordless Convenience: Up to 60 minutes of runtime and USB charging for portability.
- Easy Maintenance: Removable, washable blade cartridge simplifies cleaning.
- Durable Build: Titanium coating enhances blade longevity.
Limitations
- Charge Time: Full recharge takes 14–16 hours, which is longer than some competitors.
- Limited Accessories: Comes with only two combs; additional guards may be needed for specialized cuts.
- Mid-Range Price: Slightly higher cost than entry-level clippers, but justified by features and durability.
Value for money is strong, especially for users seeking reliable performance and advanced features. When compared to alternatives, the HC5500 stands out for its blade technology and adjustability, though those needing ultra-fast charging or more accessories may consider other models.
Customer Reviews and Feedback
Users consistently praise the Remington Precision Cut Hair Clipper HC5500 for its sharp blades, smooth operation, and ability to handle thick hair with ease. Many highlight the convenience of cordless use and the ease of cleaning the removable blade. The adjustable comb system receives positive remarks for making fades and blends straightforwardly, even for beginners.
Common complaints include the lengthy recharge time and the desire for more comb options. Some users note that, while the build quality is robust, the price point may be a consideration for budget-conscious buyers. Overall, the HC5500 earns strong ratings for performance and reliability, with most users recommending it for home grooming and occasional professional use.
Star ratings typically range from 4 to 5 stars, with particular appreciation for its cutting precision and durability. Frequent mentions in reviews include the clipper’s ability to maintain consistent cutting length even under pressure, a feature not always found in lower-priced models.
For those seeking a versatile, durable hair clipper with professional-grade results, the Remington Precision Cut Hair Clipper HC5500 is a top choice, especially for users prioritizing blade quality and adjustability over ultra-fast charging or a wide array of accessories.
Faqs
How do I correctly set up the remington Precision Cut Hair Clipper HC5500 for the first use?
What troubleshooting steps should I follow if my remington Precision Cut Hair Clipper HC5500 stops working?
What are the key features of the remington Precision Cut Hair Clipper HC5500 that enhance haircut precision?
Can I use the remington Precision Cut Hair Clipper HC5500 on wet or damp hair?
How do I maintain and clean my remington Precision Cut Hair Clipper HC5500 for long-lasting performance?
Are the adjustable combs on the remington Precision Cut Hair Clipper HC5500 interchangeable and how do I adjust cutting lengths?
What should I do if the remington Precision Cut Hair Clipper HC5500 battery is not holding a charge?
Is the remington Precision Cut Hair Clipper HC5500 suitable for all hair types and thicknesses?
More remington manuals
- How to Use: Remington Indestructible Hairclipper HC5880 User Manual
- How to Use: Remington Easy Fade Pro Hair Clipper HC550 User Manual
- How to Use: Remington HC5900 PrecisionCut Hair Clipper User Manual
- How to Use: Remington Heritage Hair Clipper HC9100 User Manual
- Setup: Remington HC5780 Lithium Powered Hair Clipper User Manual
- How to Use: Remington Pro Power Hair Clipper HC5350 User Manual
Leave a Comment