
How to Use: Remington PrecisionCut Hair Clipper HC5300 Instruction Manual
Content
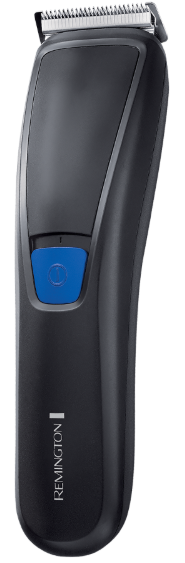
Remington PrecisionCut Hair Clipper HC5300
Introduction
The Remington PrecisionCut Hair Clipper HC5300 is a versatile, high-performance grooming tool designed for both professional stylists and home users. Renowned for its precision engineering and durable build, this clipper delivers salon-quality results with every use. Equipped with self-sharpening stainless steel blades, the HC5300 ensures clean, even cuts for all hair types, making it ideal for regular haircuts, detailing, and trimming. Its cordless design, powered by a long-lasting Li-Ion battery, offers unmatched convenience for on-the-go grooming.
Key benefits include a wide range of length settings (0.5–44 mm), adjustable combs for customized styling, and a robust 40-minute runtime. The Remington PrecisionCut Hair Clipper HC5300 is suitable for men, women, and children, making it a must-have for families and barbers alike. With an estimated price range of $29–$37, it offers excellent value for money and is widely available through major retailers and online platforms. Whether you're maintaining a classic cut or experimenting with new styles, this clipper delivers consistent, professional results every time.
Specifications of the Remington PrecisionCut Hair Clipper HC5300
- Brand: Remington
- Model: PrecisionCut HC5300
- Blade Material: Stainless steel (self-sharpening)
- Blade Width: 45 mm
- Cutting Length Range: 0.5–44 mm
- Number of Length Settings: 17
- Power Source: Rechargeable Li-Ion battery (cordless and mains operation)
- Battery Life: Up to 40 minutes
- Charging Time: 14 hours
- Weight: 500 g
- Accessories: Two adjustable combs, short and long length attachments
- Warranty: 5 years (carry-in)
Compared to similar models like the Pro Power HC5400, the HC5300 offers a wider cutting range and longer battery life, making it a top choice for users seeking precision and reliability in their grooming routine.
IMPORTANT SAFETY INSTRUCTIONS
WARNING – TO REDUCE THE RISK OF BURNS, ELECTROCUTION, FIRE, OR INJURY TO PERSONS:
- This appliance can be used by children aged from 8 years and above and persons with reduced physical, sensory, or mental capabilities or lack of experience and knowledge if they have been supervised/instructed and understand the hazards involved. Children shall not play with the appliance. Cleaning and user maintenance shall not be done by children unless they are older than 8 and supervised. Keep the appliance and cable out of reach of children under 8 years.
- The adaptor contains a transformer. Do not cut off the adaptor to replace it with another plug, as this causes a hazardous situation.
- Use this appliance only for its intended use as described in this manual. Do not use attachments not recommended by Remington®.
- Do not use this product if it is not working correctly, if it has been dropped or damaged, or dropped in water.
- This appliance should never be left unattended when plugged into a power outlet, except when charging.
- Keep the power plug and cord away from heated surfaces.
- Do not immerse the appliance in liquid; do not use it near water in a bathtub, basin,, or other vessel; and don’t use it outdoors.
- Make sure the power plug, cord, and product unit do not get wet.
- Do not plug or unplug the appliance with wet hands.
- Do not reach for an appliance that has fallen into water. Unplug it immediately.
- Always place and use the appliance on a surface that is fluid-resistant.
- Always put the headguard on the product to protect the cutting heads whilst travelling.
- Do not use the appliance, adaptor,, or any other part if it is damaged, as this may cause injury. Always replace a damaged adaptor or charging stand with one of the original type.
- Do not twist or kink the cable, or wrap it around the appliance.
- Charge, use, and store the product at a temperature between 10°C and 35°C. 16 This appliance is not intended for commercial or salon use.
- WARNING: Keep the appliance dry.
- This appliance should be supplied with approved safety isolating adaptors PA-3215E (Europe), PA-3215U (UK) with the output capacity of 3.2V dc;1500mA.
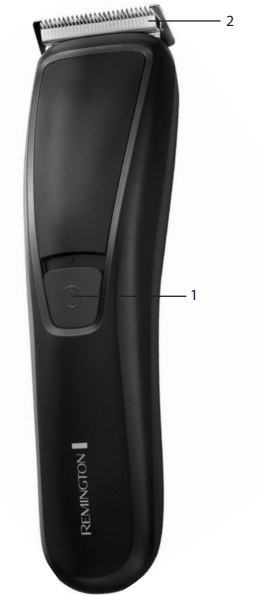
KEY FEATURES
- On / Off Switch
- Blade set
- 2 attachment guide combs: 1 -21mm and 24-44mm (not shown)
INSTRUCTIONS FOR USE
BEFORE STARTING THE CUT
- Inspect the clipper,, making sure that it is free from hair and dirt.
- Seat the person so that their head is approximately at your eye level.
- Before cutting, always comb the hair so it is tangle-free and dry.
TO ATTACH A COMB
- Hold the comb with its teeth upward.
- To attach a comb, align the legs of the comb with the holes in the top of the clipper on each side of the blade and slide the legs into the trimmer until they click.
- To remove, firmly pull the comb straight up away from the clipper.
HAIR CLIPPER COMB SETTINGS
- The clipper comes with two adjustable combs, a short length adjustable comb (indicated by 1-21mm on the back of the comb) and a longer length adjustable comb (indicated by 24-44mm on the back of the comb).
Please see the table below for the different cutting lengths available on each comb.
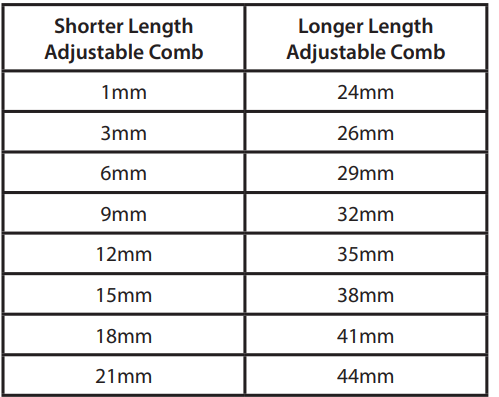
- On the slide select switch,, there is a silver indicator which, when the short length adjustable comb is on the product, shows the corresponding length setting on the left of the slide select switch. On the other side of the slide select switch,, there is another silver indicator which shows the corresponding length setting when the longer length adjustable comb is on the product, on the right side of the slide select switch.
- To adjust the length settings, you must press the upper half of the slide select switch to release the locking mechanism, then apply force upwards on the slide select switch to increase the length setting. To decrease the length settings, press the upper part of the slide, select the switch d, o,,wn and slide downwards.
- Use the clipper without any fixed combs for trimming hair close to the skin.
- This will trim hair to 1mm. Holding the clipper so the blades are perpendicular to the skin will trim hair to 0.5mm.
INSTRUCTIONS FOR CUTTING HAIR
- To turn the product on or off, slide the switch. To locate the On/Off switch, please refer to the key features section.
- For even cutting, allow the comb attachment/blade to cut its way through the hair. Do not force it through quickly. If you are cutting for the first time, start with the maximum comb attachment.
STEP 1 – Nape of the neck
- Set the comb to 3mm or 6mm.
- Hold the clipper with the blade teeth pointing upwards. Begin starting at the centre of the head at the base of the neck.
- Slowly lift the clipper, working upwards and outwards through the hair, trimming just a little at a time.
STEP 2 – Back of the head
- With the comb set at 12mm or 18mm, cut the hair at the back of the head.
STEP 3 – Side of the head
- With the comb set at 3mm or 6mm, trim sideburns. Then change to the longer 9mm guide comb and continue to cut the top of the head.
STEP 4 – Top of the head
- Use the longer length comb attachment and set it to 24mm or 27mm, then cut hair on top of the head against the direction in which the hair normally grows.
- For longer hair on top, use the longer length comb attachment (24 – 44mm) to achieve the desired style.
- Always work from the back of the head.
STEP 5 – The finishing touches
- Use the clipper without an attachment comb for close trimming around the base and sides of the neck.
- To produce a clean, straight line at the sideburns, reverse the hair clipper.
- Place the reversed clipper at right angles to the head, tips of the blades lightly touching the skin, and then work downwards.
BATTERY REMOVAL
- The appliance must be disconnected from the supply mains when removing the battery.
- Turn the trimmer on and discharge all remaining power.
- Remove the comb attachment.
- Remove the blade.
- Pry the decorative panel off the top housing to expose the internals and printed circuit board.
- Remove the assembly of the battery and the printed circuit board.
- Disconnect the battery from the circuit board.
- The battery is to be disposed of safely.
Troubleshooting Common Issues with the Remington PrecisionCut Hair Clipper HC5300
- Clipper won’t turn on: Ensure the battery is fully charged. Check for loose connections or damaged charging cables.
- Uneven cutting: Clean the blades and check for hair buildup. Replace the comb if damaged.
- Overheating: Allow the device to cool down. Avoid continuous use for more than 40 minutes.
- Blades not self-sharpening: Regularly clean and oil the blades to maintain performance.
- Error codes: None reported; contact customer support for persistent issues.
Preventive measures include regular cleaning, proper storage, and timely blade maintenance. The Remington PrecisionCut Hair Clipper HC5300 comes with a 5-year warranty. For support, contact Remington customer service or visit their official website.
Pros and Cons of the Remington PrecisionCut Hair Clipper HC5300
Pros
- Precision cutting with 17 length settings
- Self-sharpening stainless steel blades for durability
- Long battery life (40 minutes)
- Lightweight and ergonomic design
- 5-year warranty for peace of mind
Cons
- Charging time is relatively long (14 hours)
- Blades may require frequent cleaning for optimal performance
- Not suitable for very thick or coarse hair without additional maintenance
Overall, the Remington PrecisionCut Hair Clipper HC5300 offers excellent value for money, especially for users seeking a reliable, professional-grade grooming tool.
Customer Reviews of the Remington PrecisionCut Hair Clipper HC5300
Users consistently praise the Remington PrecisionCut Hair Clipper HC5300 for its precision, ease of use, and durability. Many highlight its ability to deliver salon-quality results at home, with a 4.5-star average rating on major retail platforms. Common praises include the wide range of length settings, comfortable grip, and long battery life. Some users mention minor issues with blade maintenance and charging time, but overall satisfaction remains high. Customers recommend this clipper for both personal and professional use, noting its reliability and value for money.
Faqs
How do I set up the remington PrecisionCut Hair Clipper HC5300 for the first use?
What should I do if the remington PrecisionCut Hair Clipper HC5300 is not cutting hair evenly?
Can I use any attachments or combs with the remington PrecisionCut Hair Clipper HC5300?
How do I clean and maintain the remington PrecisionCut Hair Clipper HC5300 to ensure long-term performance?
What are the key features of the remington PrecisionCut Hair Clipper HC5300 that enhance hair cutting precision?
Why does the remington PrecisionCut Hair Clipper HC5300 stop working during use, and how can I fix it?
Is the remington PrecisionCut Hair Clipper HC5300 suitable for trimming both hair and beard?
How can I optimize battery life and charging for my remington PrecisionCut Hair Clipper HC5300?
More remington manuals
- Setup: Remington WETech Body Groomer BHT6250 User Manual
- Setup: Remington MyGroom Hairclipper HC5100 User Manual
- Setup: Remington Hair Clipper HC5810 User Manual
- Setup: Remington Hair Clipper HC335 User Manual
- Setup: Remington Pro Power Hair Clipper HC5150 User Manual
- Setup: Remington Apprentice Hair Clipper HC5018 User Manual
Leave a Comment