
How to Setup: Vevor GRINDER AND BELT SANDER COMBO Instruction Manual
Content
VEVOR Grinder and Belt Sander Combo
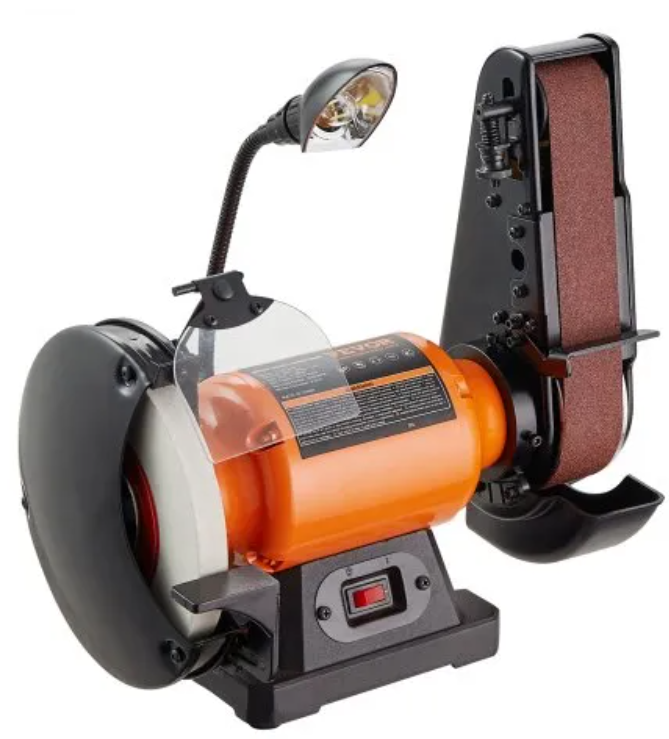
Introduction to the VEVOR Grinder and Belt Sander Combo
The VEVOR Grinder and Belt Sander Combo offers an efficient, versatile solution for both grinding and sanding needs in workshops, garages, and professional settings. Designed for metalworkers, woodworkers, DIY enthusiasts, and hobbyists, this combo machine combines a powerful motor with adjustable sanding and grinding functions to support a wide range of applications, from sharpening blades and shaping metal to smoothing wooden surfaces.
Key benefits include its durable steel construction for long-lasting performance, adjustable belt angles for precision work, and compact design for space-saving convenience. The integrated belt and disc sander provides flexibility, allowing users to quickly switch between different sanding and grinding tasks without changing tools.
This combo tool typically falls within an affordable price range suited for both professional workshops and home users, making it an excellent value for those seeking reliable and multifunctional equipment. Available globally through VEVOR’s extensive distribution network, the product comes with fast delivery and a 30-day free return policy, reflecting the brand's commitment to customer satisfaction and support.
FEATURES
GRINDER AND BELT SANDER COMBO
Following the instructions and procedures laid out i this user manual, you will receive years of excellent service and satisfaction. The machine is a professional tool, and like all power tools, proper care and safety procedures should be adhered to.
- Motor ................................... .......... 120-Volts, Single Phase,60-Hz No Load Speed.................... .......... 3600 RPM
- Amps ................................... .......... 2.5 Amp
- Grinding Wheel Diameter .... .......... 8”
- Grinding Wheel Material ...... .......... Aluminum Oxide
- Grinding Wheel Grit ............. .......... 60
- Sanding Belt Size ................ .......... Length 28” x Width 2”
- Belt Angle ............................ .......... 0 – 90°
- Dust Port.............................. .......... 1-1/8”
- Light Bulb............................. .......... LED
- Weight ................................. .......... 38 lbs
GRINDER AND BELT SANDER COMBOPHYSICAL FEATURES
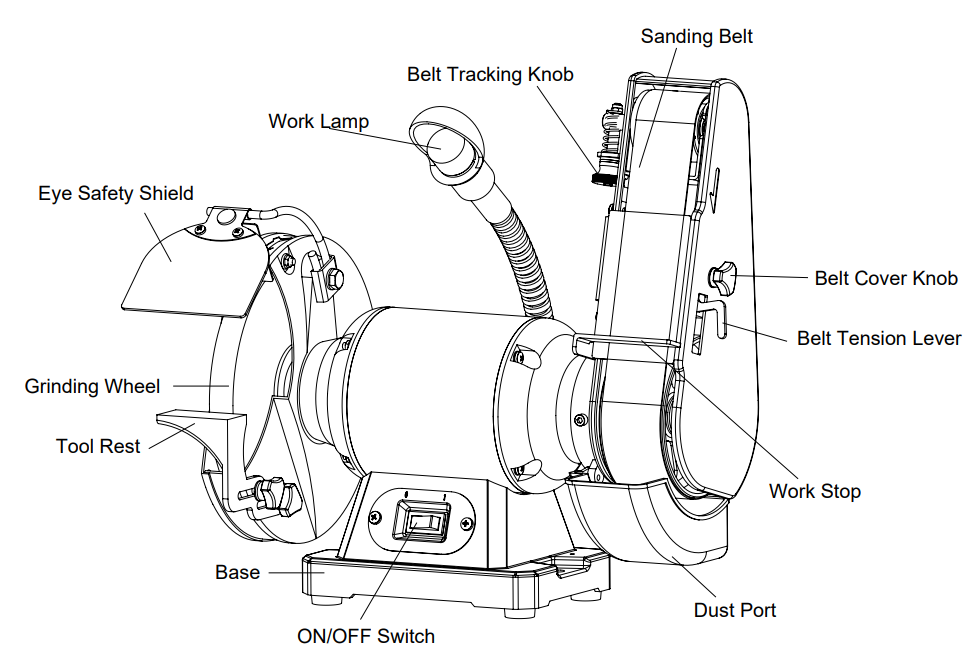
MOUNTING
- The Bench Grinder with Belt Sander weighs 38 lbs. When mounting it on a workbench, make sure the workbench is capable of holding the weight of the machine athat nd the surface of the workbench is level.
- The machine is provided with 2 pre-drilled holes on its base to allow it to be mounted on a workbench.
- To mount the machine on a workbench:
- Place the machine on the workbench and mark using a pencil on the bench surface through the 2 holes on the base.
- Remove the machine and drill the 2 holes on the marked points using a proper-sized drill bit.
- Position the machine on the table with the holes on the base aligned with the holes on the workbench.
- Use bolts (not provided) that exceed the thickness of the base plus the thickness of the bench top and secure the machine to the workbench.
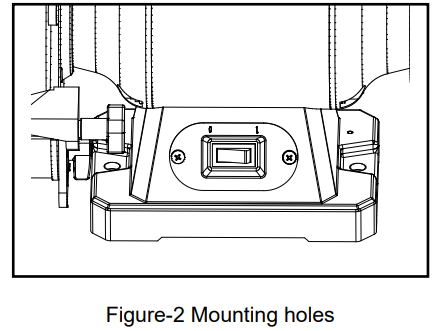
EYE SAFETY SHIELD
- The machine is provided with an eye safety shield,d which is positioned at 1/8” from the grinding wheel to protect the operator’s face from the sparks produced on the grinding wheel during grinding.
- To install the eye safety shield:
- Make sure the switch is in the OFF position and the cord is disconnected from the power source.
- Attach the eye safety shield to the spark deflector, the g scre, with the d washer provided. Attach the lock nut knob to the eye safety shield. See Figure 3.
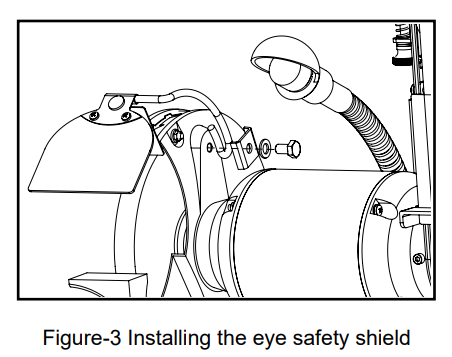
TOOL REST / WORK STOP
The tool rest provides a surface that supports the tool during operation. The machine is provided with a tool rest for grinding and a work stop for belt sanding.
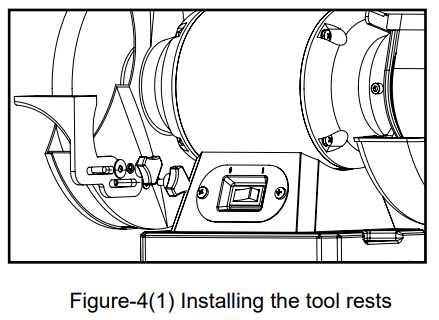
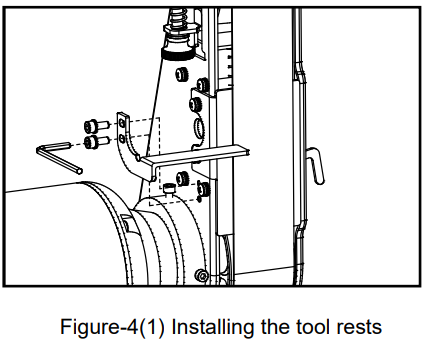
To install the tool rests:
- Make sure the switch is in the OFF position and the cord is disconnected from the power source.
- Attach the tool rest/work stop to the grinder so that the tool rests are perpendicular to the belt and to the grinding wheel. Do not tighten the screws at this time. See figure 4 (1) and figure 4 (2).
- Adjust the tool rests 1/8” to 1/16” away from the belt and the wheel,l and tighten the screws.
BELT TRACKING
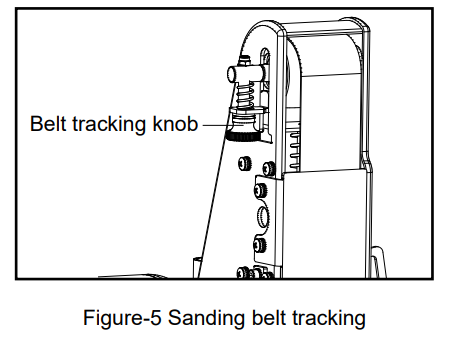
- Belt tracking means to adjust the belt so that it rides on, the center of the rollers and does not come in contact with the side covers.
- To check if the sanding belt is riding on the center of the wheels, make sure the switch is in the OFF position and the cord is disconnected from the power source. Turn the grinder wheel with your hand (which moves the sanding belt at the same time) and check where the sanding belt rides on the top roller.
- The belt should always be riding on, the center of the rollers. While turning the grinding wheel, turn the belt tracking adjustment knob clockwise or anti-clockwise, shown in Figure 5,5, to center the sanding belt on the wheels.
DUST PORT
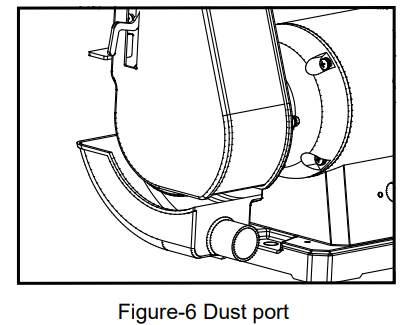
Machine features a 1-1/8” dust port located under the rollers. When connecting to a dust collector, use a properly sized hose and make sure all the connections are tightly sealed.
SANDING ARM ANGLE
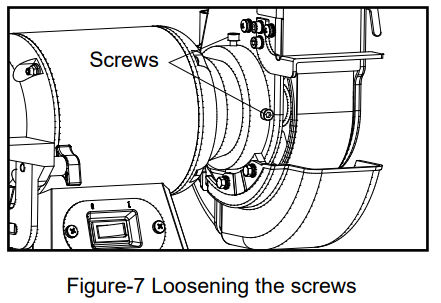
- The sanding arm can be tilted through 90° from horizontal to a vertical position.
- To move the sanding arm to the desired position: Turn the switch OFF and loosen the two screws shown in Figure 7,d move the sanding arm to the desired position, and retighten the screws.
TEST RUN
- Once you have assembled the machine and verified that the rinding wheel is secured and the belt is tensioned and tracking properly, it is then time to do a test run and see that the machine powers up and runs properly.
- All the tools and objects used for assembling the machine should be removed and cleared away during the test run. During the test run, make sure the start/stop button and all the safety features on the machine are working properly.
- Connect the machine to the correct power source. Stand to the side of the grinding wheel and start the machine.
- During the test run,n if there is any unusual noise or vibration, disconnect the machine from the power source immediately. Check all the parts you have assembled, once again, and try to find out the problem.
- WARNING
Do not make any adjustments while the machine is running. Turn the machine OFF and unplug from the power source before making any adjustments. Failure to do so may cause serious personal injury.
GRINDING WHEEL INSPECTION
- The machine comes with an 8” diameter, A60 grit aluminum oxide grinding wheel. The grinding wheel should be inspected properly before installation.
- Clean the dust and/or dirt from the surface of the wheel and inspect it for any cracks, dents, chips, or any kind of external damage.
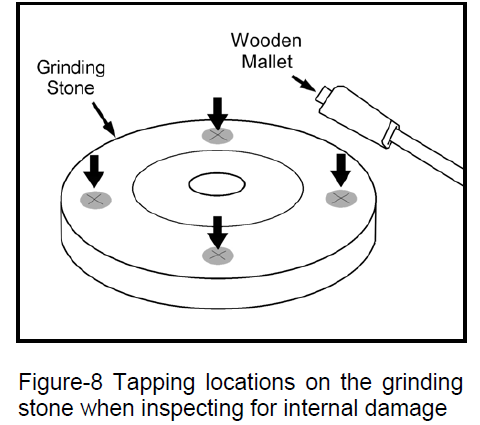
- To inspect the wheel for any internal damage:
- Hold the wheel up with a finger through the hole located in the middle of the wheel and tap it using a wooden mallet or a light non-metallic object, as shown in Figure 88.
WARNING
Tapping the wheel with heavy or metallic objects can damage the grinding wheel.
GRINDING WHEEL REPLACEMENT
- To replace the grinding wheel:
- Make sure the switch is in the OFF position and the cord is disconnected from the power source.
- Loosen the three screws securing the wheel guard and remove the wheel guard to expose the wheel.
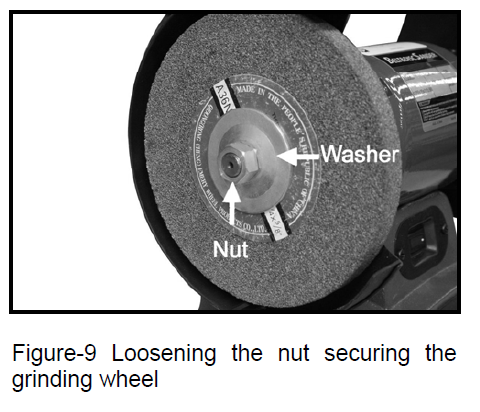
- Loosen the nut (shown in Figure 9) securing the grinding wheel by holding the wheel with one hand.
- Remove the nut, washer, and grinding wheel and replace the wheel with a new one.
- Make sure to inspect the new grinding wheel properly before installation.
SANDING BELT REPLACEMENT
- To remove and replace the sanding belt: Make sure the switch is in the OFF position and the cord is disconnected from the power source.
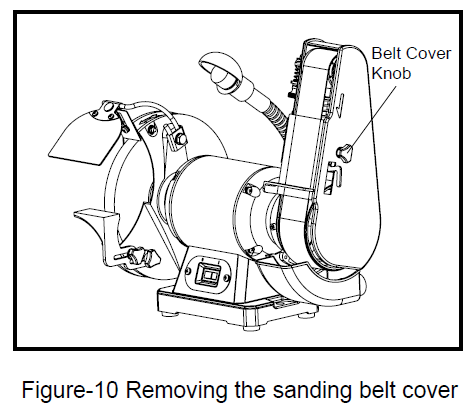
- Remove the belt guard by removing the knob securing the belt cover. See Figure 10
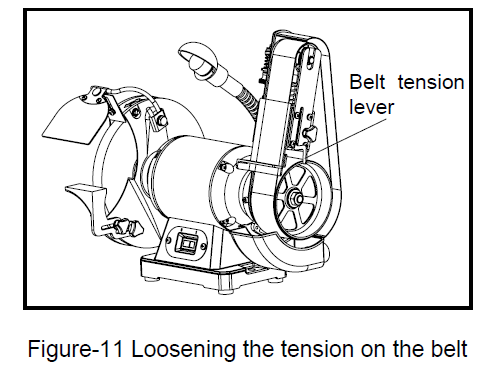
- Now, move the belt tension lever up as shown in Figure 11 to loosen the tension on the belt.
- Take the belt off the rollers and replace it with a new one.
- Move the belt tension lever down to tension the belt and reinstall the belt cover.
- Make sure to perform belt tracking adjustment on the when the new belt is installed. For details, see “BELT TRACKING” page 99.
Specifications of the VEVOR Grinder and Belt Sander Combo
- Motor Power: 375W high-efficiency motor delivering 1420 RPM for the sanding disc
- Belt Size: 915 x 100 mm (36" x 4") adjustable from 0° to 90° for versatile sanding angles
- Disc Diameter: 150 mm (6") sanding disc with a worktable size of 188 mm
- Dimensions: 48.5 x 30 x 27 cm (19" x 11.8" x 10.6")
- Weight: Approximately 15 kg (33 lbs) for portability and stability
- Construction: Robust steel frame ensuring durability during heavy-duty tasks
- Adjustability: Miter gauge included for precision work
- Performance Benchmark: Suitable for stock removal, profiling, finishing, satin or mirror finish work
- Comparison: Offers a combination of belt and disc sanding in one unit, unlike standalone belt sanders or grinders, ers which require multiple tools
Setup Guide for VEVOR Grinder and Belt Sander Combo
- Unpack the Unit: Carefully remove the machine from packaging and verify all components are present, including the miter gauge and any mounting hardware.
- Positioning: Place the grinder combo on a stable, flat work surface,ce ensuring sufficient clearance on all sides for safe operation.
- Assembly: Attach the worktable and miter gauge as per the instruction manual, ensuring they are securely fastened.
- Power Connection: Connect the device to a properly grounded electrical outlet rated for the motor specifications (375W, standard 110-240V depending on region).
- Configuration: Adjust the sanding belt angle from 0° to 90° depending on the task; set the disc sander worktable as needed.
- Operation Test: Power on the machine and check for smooth running without unusual noise or vibration.
- Troubleshooting Tips: If the machine doesn’t start, check the power supply and switch; ensure the sanding belt is properly tensioned.
- Safety Precautions: Always wear safety goggles, hearing protection, and avoid loose clothing. Disconnect power before adjustments or maintenance.
MAINTENANCE
- During the life of your machine, you will need to practice some regular maintenance to keep your machine in peak performance condition.
- Check your machine routinely for damaged or loose grinding wheel, worn power cord, or worn switch,h and any loose hardware.
- The grinding wheel should be checked regularly for any internal or external damage.
- The bearings are pre-lubricated and need no lubrication.
- Clean the wood dust from the sanding belt by using an abrasive cleaner against the sanding belt when the machine is moving.
- WARNING
Turn the switch OFF and unplug the cord from the power source before installing, servicing, or making any adjustments. Failure to do so may cause serious personal injury.
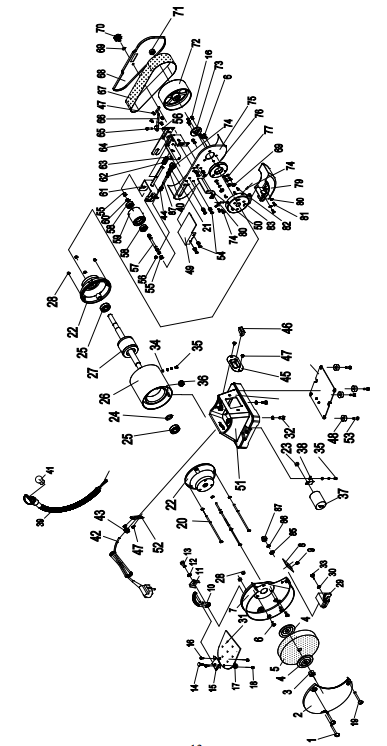
EXPLODED VIEW
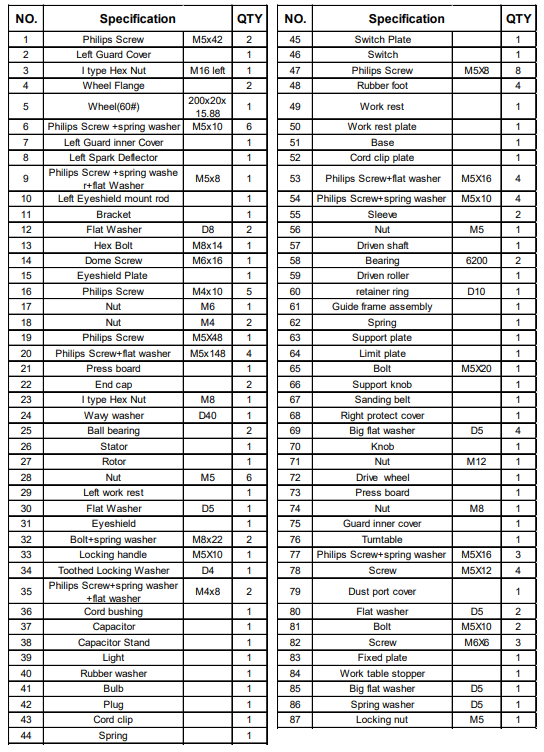
PARTS LIST
Troubleshooting Common Issues with the VEVOR Grinder and Belt Sander Combo
- Machine Fails to Start: Verify power source and switch functionality. Inspect for blown fuses or tripped circuit breakers.
- Excessive Noise or Vibration: Check for loose components or a worn belt/disc. Tighten screws and replace the sanding belt if necessary.
- Belt Slipping or Misalignment: Adjust belt tension and tracking as per manual instructions to ensure smooth operation.
- Uneven Sanding Results: Confirm correct belt grit and angle settings. Use a miter gauge for accurate workpiece positioning.
- Error Codes: The machine is mechanical; no digital error codes apply. For persistent issues, contact VEVOR support.
- Preventive Measures: Regular maintenance includes cleaning dust and debris, inspecting belts and discs, and lubricating moving parts as recommended.
- Warranty & Support: Comes with manufacturer's warranty; contact VEVOR’s 24/7 customer service for assistance or replacement parts.
Pros & Cons of the VEVOR Grinder and Belt Sander Combo
- Pros:
- Compact 2-in-1 design saves workspace and cost
- Robust 375W motor delivers reliable performance for various materials
- Adjustable sanding belt angle up to 90° allows versatile applications
- Durable steel construction ensures long-term use
- Includes miter gauge for precision work
- Affordable price point compared to purchasing separate tools
- Cons:
- Not suitable for extremely heavy industrial use requiring higher power
- Limited belt size compared to some larger standalone belt sanders
- Manual setup and adjustments may require time for beginners
- Weight (15 kg) may be heavy for some users to move frequently
Customer Reviews and Feedback on VEVOR Grinder and Belt Sander Combo
Users widely praise the VEVOR Grinder and Belt Sander Combo for its versatility and solid build quality. Many highlight its power and ease of switching between grinding and sanding tasks as major advantages, especially for small workshops and hobbyist use.
Common compliments include its adjustable belt angle, which enhances precision, and the sturdy steel construction that withstands regular use. Several customers note its excellent value for money, given the combination of features provided in one machine.
On the downside, some users report initial challenges with belt tracking and setup, though these issues are generally resolved with careful adjustment. A few mention the weight as a consideration for portability.
Overall, the combo receives a 4.5 out of 5 stars average rating, with strong recommendations for anyone needing a reliable, multifunctional grinder and sander at a reasonable price.
Faqs
How do I set up the vevor GRINDER AND BELT SANDER COMBO for the first time?
What should I do if the vevor GRINDER AND BELT SANDER COMBO belt is not tracking properly?
Can I use the vevor GRINDER AND BELT SANDER COMBO for both metal and wood projects?
How do I maintain and clean the vevor GRINDER AND BELT SANDER COMBO to ensure longevity?
What are the key safety features of the vevor GRINDER AND BELT SANDER COMBO?
How can I optimize the performance of the vevor GRINDER AND BELT SANDER COMBO for precision work?
Is the vevor GRINDER AND BELT SANDER COMBO portable enough for mobile workshops?
What power requirements and electrical safety tips are recommended for the vevor GRINDER AND BELT SANDER COMBO?
More vevor manuals
- Installation: Vevor Swing Gate Opener MK1302 User Manual
- Vevor Pressure Washer Pump KBD2815G User Guide
- How to Use: Vevor Electric Wax Melter DTL-S007A User Manual
- Operations: Vevor Electric Meat Grinder MG5008K-UL User Manual
- Vevor Ref Center Tank Pump RTP24WS115V User Manual
- Vevor Smart Dimmer Switch WS-USR-D User Manual
Leave a Comment