
Setup: Ariete Steam Iron 6214 User Manual
Content
Ariete Steam Iron 6214
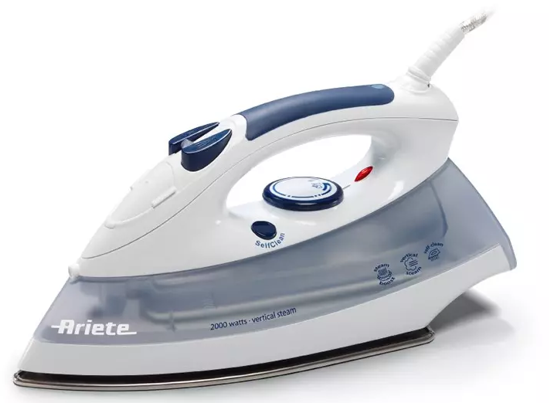
Introduction
The Ariete Steam Iron 6214 is a high-performance ceramic steam iron designed to deliver efficient and hassle-free ironing experiences for everyday use. With a powerful 2000-watt heating element and a sleek grey-white design, this iron combines style with functionality, making it an ideal choice for both household and small professional settings. Its ceramic soleplate ensures smooth gliding across various fabric types while providing uniform heat distribution to eliminate wrinkles quickly.
Key benefits include an ergonomic handgrip for comfortable handling, a large 280 ml water tank for extended steam output, and multiple steam control options that adapt to different fabric requirements. The iron also features vertical steam shot capability, allowing users to refresh hanging garments and curtains efficiently. Targeted at busy individuals and families who require fast, reliable ironing, this model suits a wide range of fabrics, from cotton to delicate synthetics.
Available at an estimated price range of $40 to $60, depending on retailer and region, the Ariete Steam Iron 6214 offers excellent value by integrating advanced features typical of more expensive irons. It is widely accessible through online stores and electronics retailers worldwide.
Specifications of the Ariete Steam Iron 6214
- Power Consumption: 2000 Watts for rapid heating and strong steam generation
- Water Tank Capacity: 280 ml for extended ironing sessions without frequent refills
- Soleplate Material: Ceramic plate that ensures smooth glide and even heat distribution
- Steam Functions: Adjustable steam output, vertical steam shot, and spray mist function for different fabric care
- Ergonomics: Comfortable handgrip and easy horizontal water filling system
- Self-Cleaning: Built-in self-cleaning feature to maintain performance and prevent scale buildup
- Colour Options: Grey and white finish for a modern look
Compared to similar irons in its category, the Ariete Steam Iron 6214 offers a balanced combination of power and convenience, especially with its ceramic soleplate and large water tank, which outperform many budget models that typically feature smaller tanks and less durable plates.
Setup Guide for the Ariete Steam Iron 6214
- Place the iron on a flat, stable surface and connect the power cord to a suitable electrical outlet (220-240V, 50/60 Hz).
- Fill the water tank via the horizontal filling hole using clean tap water up to the max line; avoid overfilling.
- Turn the temperature dial to the desired setting based on fabric type (e.g., low for synthetics, high for cotton).
- Wait approximately 2-3 minutes for the iron to heat; the indicator light will signal readiness.
- Adjust the steam output using the steam control slider according to fabric needs.
- For vertical steaming, hold the iron upright and press the steam shot button to release a burst of steam.
Troubleshooting tips: If the steam is weak, check the water level and clean the soleplate to remove mineral deposits. Always unplug and allow the iron to cool before cleaning.
Safety Precautions: Never immerse the iron in water; keep it out of reach of children; avoid ironing over zippers or buttons to prevent damage.
DESCRIPTION OF THE APPLIANCE
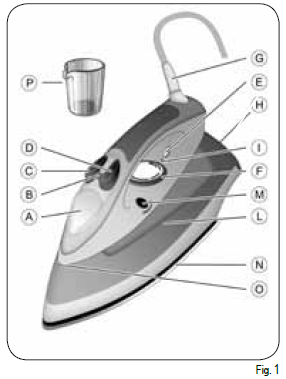
- Water tank filling cover
- Steam adjustment selector
- Steam button
- Spray button
- Iron temperature control lamp
- Temperature adjustment knob
- Power cord protection
- Iron stand
- Reference for temperature setting
- Tank
- Self-clean button
- Soleplate
- Spray nozzle
- Water measuring cup
INSTRUCTIONS FOR USE
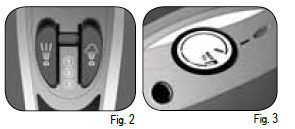
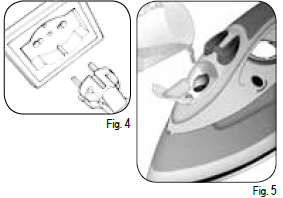
Filling the tank before use. Warning:: Make sure the iron is unplugged from the supply mains before filling the tank with water. Set the steam control knob (B) to “0” (Fig. 2). Open the door (A) by pushing it upwards and, holding the iron horizontally, fill the water tank up to the maximum level using the measuring cup ( P) provided (Fig. 5). Close the cover ( A) again. If your tap water is very hard, use demineralised water.
NEVER exceed the MAX mark when filling the tank.
Do not pour vinegar, descalers or other scented substances into the tank; under penalty of immediate cancellation of the warranty. If it proves necessary to add water while ironing, always turn off the iron and unplug the power cord before filling the tank with water. Open the water filling cover and turn the iron upside down to empty the tank.
Turning on the appliance
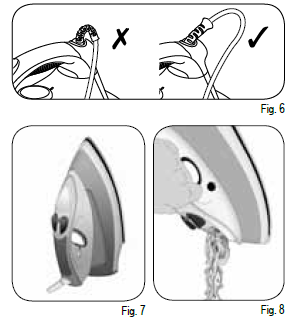
It is possible that there is white powder that leaks from the soleplate the first time the iron is used; this is normal, and the effect will disappear after a few jets of steam. You may notice a delay in the formation of steam the first time the iron is used; this is normal, and is because the water starts to circulate inside the iron. It may be necessary to press the steam and spray button a few times for it to operate correctly. Rest the iron upright on the iron stand ( H) (Fig. 7). Plug it into the socket. The temperature control lamp ( E) turns on. Select the desired temperature by turning the temperature adjustment knob (F), lining it up with the reference (I) on the iron. When the iron reaches the selected temperature, the lamp ( E) turns off (the temperature lamp turns off and on while ironing, indicating that the iron is maintaining the right temperature). Follow the instructions on the care label of the garment to be ironed so that the dots shown on the iron correspond to those shown on the label.
Suggestions
Do not run the iron over zippers or other objects made of a hard material, as this can damage the anti-adherent coating. Divide the articles to be ironed according to the types of material: wool with wool, cotton with cotton, etc… Because the iron heats up much more quickly than it cools down, it is advisable to start with those fabrics which require lower temperatures and move on to those which require progressively higher temperatures. If the material is made up of more than one type of fibre, always set the temperature to the fibre which requires less heat. For example, if the material is made up of 70% synthetics and 30% cotton, set the temperature control to position ( •) (see table) without steam, that is, the temperature for synthetic fabrics. If you do not know the composition of the article to be ironed, choose a part of the article which will not be seen.
Do a test ironing on this part to establish the appropri - ate temperature (always start with a relatively low temperature and work up until the ideal temperature is reached). Pure (100%) wool articles can be ironed with the iron set to one of the steam positions. To avoid pure wool, silk and synthetic materials becoming shiny, it makes good sense to iron them on the reverse side. For other materials, especially velvet, which can become shiny very easily, cover them with a cloth and iron in one direction only, using light pressure. The iron must be kept constantly moving over the fabric.
Nota: This symbol on the label means: this article cannot be ironed! (e.g. chlo - rofibre, elastodiene).
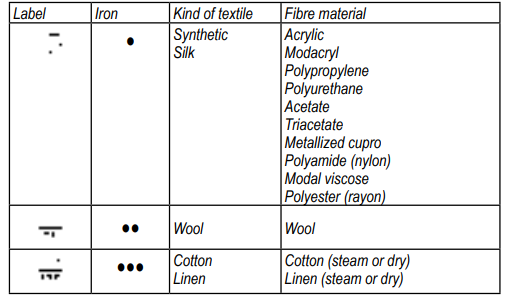
Steam Ironing
Steam ironing is only possible at high temperatures. Ensure that there is enough water in the water tank. Rest the iron upright on the iron stand (H). Insert the plug into the wall socket. Position the temperature adjustment knob (F) on position ••• or higher. When the temperature control lamp ( E) turns off, move the steam adjustment selector (B) to the desired position. You get maximum steam dispensing by moving the selector to the “max” position. Steam is not dispensed when it is moved to “3” (Fig. 2).
NOTE: This model is equipped with a drip-proof system that automatically blocks water from going from the tank to the holes of the soleplate. The dripproof system automatically cuts out the steam function if the iron’s temperature is too low.
Shot of steam
If there is water in the tank and the temperature is set on ••• or on a higher level, all you have to do is press the steam button (C).
Spray button
Make sure the steam adjustment selector is set on “0” and that there is water in the tank. Press the spray button ( D). It may be necessary to press the spray button repeatedly to activate this function.
DRY IRONING
Insert the plug into the wall socket. Move the steam adjusting knob (Btoto “0”. Set the temperature control knob (F) according to the type of fabric to be ironed. Wait a few minutes for the soleplate to reach the set temperature. Vertical ironing. This special ironing procedure serves to remove creases from curtains, fabrics, etc. Set the ironing temperature by turning the adjustment knob (I) past the symbol (•••). Put the curtain or fabric in the position you want to iron it vertically and press the steam button. If the temperature lamp is on, do not press the steam button more than three times in a row.
Vertical ironing
This special ironing procedure serves to remove creases from curtains, fabrics, etc. Set the ironing temperature by turning the adjustment knob (I) past the symbol (•••). Put the curtain or fabric in the position you want to iron it vertically and press the steam button. If the temperature lamp is on, do not press the steam button more than three times in a row.
Warning!
Do not iron fabrics held by other people. A fter ironin g Turn the temperature control knob (F) to « M I N». Disconnect the plug from the wall socket. Put the iron in a vertical position and let it cool down. Empty the tank: open the water filling cover (A), turn the iron upside-down and let the water pour out (Fig. 8). Warning! Let the iron cool down before emptying the tank: danger of burns. Wrap the power cord around the iron without pulling it too tight (Fig. 6). Store the iron in a vertical position (Fig. 7)
CLEANING THE APPLIANCE
- Warning!
Before deeming, always disconnect the plug from the power point and allow the iron to cool down. - Warning
Never immerse the appliance in water or other liquids - Warning
Check the state of the power cable of your iron on a regular basis before using it, and if it is damaged, take it to the service centre closest to you to have it replaced only by specialised personnel.
Self-cleaning system
- To prolong the life of your iron, we recommend that this procedure be carried out at regular intervals (once or twice a month).
- Fill the tank one-fourth full with water using the measuring cup (P) provided (Fig. 5).
- Set the iron on a stable surface in a vertical position on the iron stand (H). Plug it into the socket. Make sure the steam adjustment selector is set on "0".
- Position the temperature adjustment knob on "max".
- Heat the iron until the lamp (E) turns off a second time.
- Position the temperature adjustment knob on "min".
- Unplug the iron and keep the iron in a horizontal position on a sink.
- Press the self-clean button (M) and keep the iron in a horizontal position. Steam and boiling water will come out of the holes of the soleplate. They will remove the lime deposits and impurities that have accumulated inside the boiler.
- Gently move the iron back and forth until the tank is completely emptied.
- Put the steam adjustment selector back on minimum 'O" at the end of the self- cleaning procedure.
- Put the iron in a vertical position on its stand and wait for the soleplate to cool down completely.
- Make sure that the soleplate is completely dry before storing the iron.
- Before using the iron again, try it on an old piece of cloth to make sure that the soleplate and tank are clean and to allow residual water to vaporise.
Cleaning the soleplate and shell
Warning!
Do not use abrasives for cleaning the soleplate. Trtond keep the soleplate smooth: avoid contact with metal objects.
- Deposits and other residues on the soleplate can be removed with a rough cloth soaked in a vinegar/water solution.
- Clean plastic parts with a damp, non-abrasive cloth and dry them with a dry cloth.
FAILURE TO OBSERVE THE RULES ABOVE CAUSES THE WARRANTY TO BE FORFEITED.
Troubleshooting Common Issues with the Ariete Steam Iron 6214
- No Steam or Weak Steam: Ensure the water tank is filled,, and the steam control is activated. Descale regularly with the self-cleaning function to remove limescale buildup.
- Iron Not Heating: Confirm power connection and outlet functionality. Check that the temperature setting is not on “Off.”
- Water Leaking: Avoid overfilling and maintain proper temperature to prevent water from leaking out of the soleplate.
- Spray Button Not Working: Clear any blockages in the spray nozzle by rinsing with clean water.
For persistent issues, consult the warranty terms—typically covering 1-2 years depending on purchase location—and contact Ariete customer support or authorised service centres.
Contact Information: Visit the official Ariete website or your retailer's support portal for detailed assistance.
Pros & Cons of the Ariete Steam Iron 6214
- Pros:
- Powerful 2000W heating for quick ironing
- Large 280 ml water tank reduces refill frequency
- Ceramic soleplate glides smoothly and distributes heat evenly
- Multiple steam settings, including vertical steam shot, enhance versatility
- Ergonomic design with easy filling and handling
- Self-cleaning feature extends iron life and performance
- Cons:
- Relatively heavier compared to some ultra-light models
- No cordless option – tethered by power cord length
- Basic temperature control dial, lacking digital precision found in premium irons
In terms of value for money, the Ariete Steam Iron 6214 offers robust features at an affordable price, making it a strong contender against other mid-range steam irons. While it lacks some high-end digital controls, its core performance and durability stand out.
Customer Reviews of the Ariete Steam Iron 6214
Users consistently praise the Ariete Steam Iron 6214 for its fast heat-up time and effective steam output, with many citing smooth ironing results on various fabrics. The ceramic soleplate receives positive comments for reducing fabric sticking. Common complaints include the iron's weight and occasional water leakage if not handled carefully. Overall, the product holds an average star rating of 4.2 out of 5, reflecting strong satisfaction.
Many recommend the iron for daily household use, emphasising its ease of use and value. Frequent users advise regular cleaning and careful water filling to maintain optimal performance, highlighting the importance of following the setup and maintenance guidelines.
More ariete manuals
- Setup: Ariete Steam Iron 6207 User Manual
- Setup: Ariete Travel Chic Steam Iron 6224 User Manual
- Setup & Usage: Ariete Duetto Garment Steamer and Iron 6246 User Manual
- Setup: Ariete 6233 Eco Power Steam Iron User Manual
- Setup : Ariete Vertical Pro Garment Steamer 6248 User Manual
- Setup: Ariete Eco Power Smooth Steam Generator Iron 6422 User Manual
Leave a Comment