
Setup : Ariete Vertical Pro Garment Steamer 6248 User Manual
Content
Ariete Vertical Pro Garment Steamer 6248
Introduction
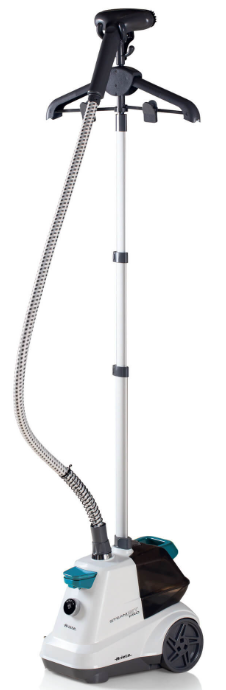
The Ariete Vertical Pro Garment Steamer 6248 is a premium handheld garment steamer designed for effortless wrinkle removal and fabric care. Ideal for busy professionals, frequent travellers, and home users, this steamer delivers powerful, consistent steam to refresh clothes, curtains, and upholstery in minutes. With its compact design and rapid heat-up time, the Ariete Vertical Pro is perfect for quick touch-ups before meetings, travel, or special occasions.
Key benefits include a large water tank for extended steaming sessions, an ergonomic handle for comfortable use, and a versatile steam nozzle that works on a wide range of fabrics. The steamer is also equipped with safety features such as automatic shut-off and a cool-touch exterior, making it safe for all users. Whether you're preparing for a business trip or refreshing your wardrobe at home, the Ariete Vertical Pro Garment Steamer 6248 offers convenience, efficiency, and professional results.
Available at major retailers and online stores, the Ariete Vertical Pro Garment Steamer 6248 typically retails between $60 and $90, offering excellent value for its performance and features.
Specifications: Ariete Vertical Pro Garment Steamer 6248
- Model: Ariete Vertical Pro 6248
- Power: 1500W
- Water Tank Capacity: 1.5L
- Steam Output: Up to 30g/min
- Heat-Up Time: 45 seconds
- Auto Shut-Off: Yes
- Weight: 2.2kg
- Dimensions: 25 x 15 x 40 cm
- Cord Length: 2.5m
- Material: Durable ABS plastic and stainless steel
- Accessories: Garment hanger, telescopic pole, steam nozzle, brush
The Ariete Vertical Pro Garment Steamer 6248 outperforms many competitors with its high steam output and large water tank, making it suitable for both light and heavy-duty steaming tasks. Its rapid heat-up time and ergonomic design set it apart from similar models in the market.
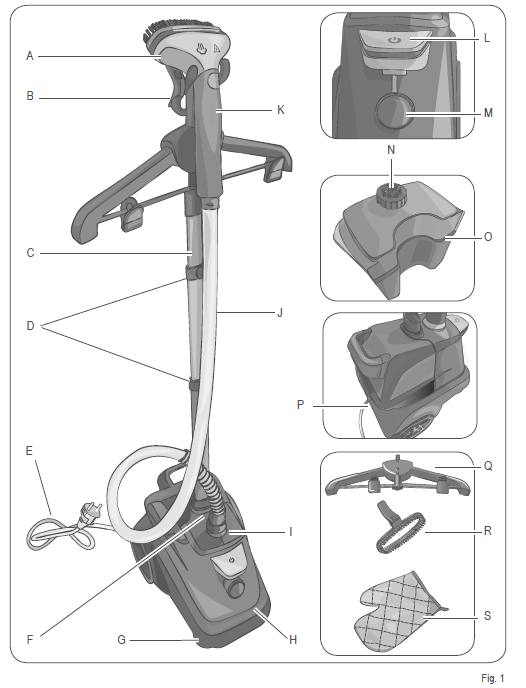
DESCRIPTION OF THE APPLIANCE
- Steam nozzle
- Dispenser support
- Telescopic rod
- Telescopic rod adjustment hook
- Power cord
- Rod connection
- Front swivel wheels
- Base with boiler
- Steam pipe connection
- Steam pipe
- Handle
- Power switch with indicator light
- Steam adjustment knob
- Tank cap
- Water tank
- Boiler drain cap
- Foldable hanger with garment pliers
- Brush accessory and for trousers creases
- Glove
Technical and identification data
The plate below the base contains the following data:
- manufacturer and CE marking
- model (Mod.)
- serial number (SN)
- electrical supply voltage (V) and frequency (Hz) |
- electrical power consumption (W)
- assistance toll-free phone number
When ordering at Authorised Service Centres, indicate the model and serial number.
Power consumption in off mode: 0,2W
Assembling
Warning!
- Before using the appliance for the first time, remove any labels and protections from the dispenser support.
- Remove the components from the box. Position the appliance on the ground on a horizontal surface.
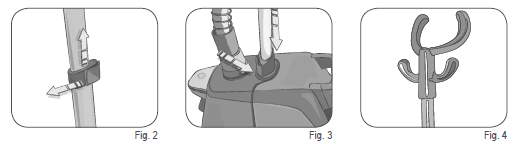
- Open the rod adjustment hook (D) and extend the telescopic rod to the desired level (Fig. 2).
- Open the specific hook and insert the rod into the joint on the base (Fig. 3).
- Close the hooks again to lock the rod into place.
- Install the dispenser support (B) in the upper part of the rod (Fig. 4).
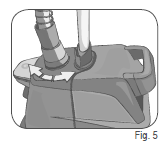
- Connect the steam tube (J) to the base (Fig. 5). Screw the connection (F) in the direction indicated by the arrow.
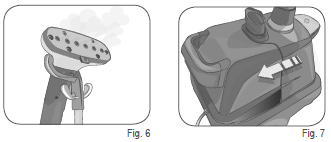
- Position the steam dispenser on the support (Fig. 6).
Filling the tank before use
- Make sure the appliance is unplugged from the supply mains before filling the tank with water.
- Remove the tank (Fig. 7).
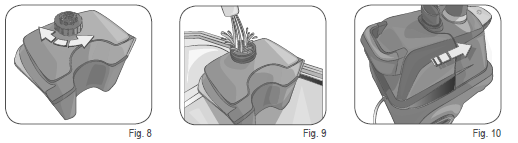
- Turn the tank upside-down and remove the cap (N) (Fig. 8).
- Fill the tank directly beneath the tap with cool tap water (Fig. 9).
NEVER fill the tank beyond the MAX level.
The product functions with normal tap water.
In the case of particularly calcareous waters (with hardness greater than 20°f), use a mixture composed of 50% of tap water and 50% of demineralised water.
Never use pure demineralised water.
Do not add any additives or chemicals (such as, for example, amides, starches, perfume or other); Otherwise, the warranty may be revoked.
Warning!
Never use the appliance without water in the tank.
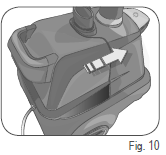
Put the tank back in, paying attention to match the tank valve with the pin in the appliance seat (Fig. 10). Press the tank all the way down until it is completely inserted and check that it is correctly installed.
Appliance switching on and use
- Before plugging it in, completely unwind the power cord.
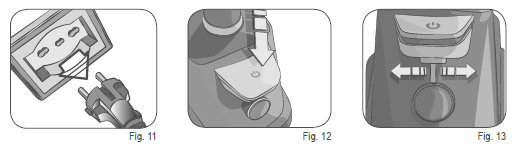
- Insert the plug into a power outlet (Fig. 11).
- Press the on/off button (Fig. 12). Make sure the button indicator light (L) turns on. After about 45 seconds, steam will come out from the dispenser.
- Place the garment on the specific hooks of the dispenser support (B).
- Turn the steam adjustment knob (Fig. 13) to select the desired quantity of steam.
- The first time the appliance is switched on, it is possible to see a light emission of smoke: This transitory effect is perfectly normal and will disappear very soon.
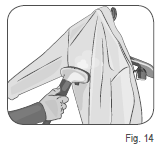
- Use the steam dispenser only, performing vertical movements from the bottom upwards and vice versa (Fig. 14).
Attention
Do not use the steam dispenser horizontally or upside down, with the nozzles turned down. Danger of hot water leakage from the nozzles.
Warning
- Position the steam dispenser on the dispenser support, holding the nozzles facing the opposite side of your body (Fig. 6).
- Risk of burns.
- During use, the steam pipe and the steam dispenser reach high temperatures. This is completely normal.
- Do not touch, risk of burns.
- Do not use the appliance on fabrics that are supported by other people.
Filling the boiler during use
Always check the level of water in the tank while you are ironing.
- Turn off the appliance by pressing the on/off button (L).
- Unplug the power cord from the socket (Fig. 11).
- Remove the tank (Fig. 7).
- Turn the tank upside-down and remove the cap (N) (Fig. 8).
- Add water directly from the tap (Fig. 9). NEVER exceed the MAX mark when filling the tank.
- Place the tank back on the appliance (Fig. 10), plug the cord in and turn on the appliance again.
HOW TO USE THE ACCESSORIES
The appliance is provided with accessories: a brush accessory (R), which can also be used to make hems and creases on trousers, a glove (S) and a foldable hanger with pliers (Q) to hang clothes. Before proceeding with theaccessoriess installation or removal, turn off the appliance. Wait until the appliance has completely cooled.
Using the brush accessory
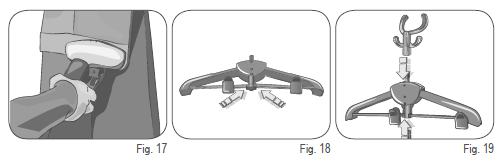
This accessory can be used as a lint brush, but also to make hems and creases on trousers. Attach the steam dispenser accessory (Fig. 18). To make hems and creases, press the lever of the accessory and place the edge of the trousers inside. Release the lever and, when steam is being distributed, slowly pull the dispenser to iron the cloth (Fig. 19).
Using the glove
This accessory allows you to keep a hand behind the garment that is being ironed, to keep it taut without getting burned.
Using the folding rack
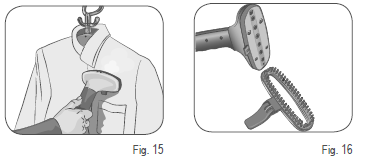
Lift the vertical bars of the folding rack, until the horizontal bars are aligned. Fit the horizontal bars in the seats located on the folding rack body (Fig. 15). Remove the dispenser support from the rod. Insert the folding rack in the rod (Fig. 16). Fit the dispenser support in the pin on the folding rack.
AFTER USING THE DEVICE
- Turn off the appliance by pressing the on/off button (L).
- Remove the power cable from the socket-outlet.
- Remove the tank from the base housing the boiler (Fig. 7).
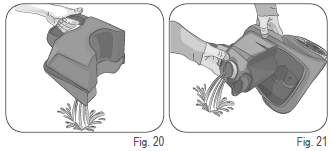
- Empty the water tank completely so as to prevent the water from stagnating, which may form a lime deposit (Fig. 20).
- Allow the appliance to cool for at least 30 minutes.
- Remove the steam tube (J). Close the telescopic rod (C).
- Place the appliance horizontally and hold it above a sink. Unscrew the cap and empty the boiler completely (Fig. 21).
- Put the appliance in a dry place and away from the reach of children.
CLEANING AND MAINTENANCE
Before de-energising or maintenance, always disconnect the plug from the mains supply. Allow the appliance to cool for at least 30 minutes.
Cleaning the appliance
Clean plastic parts with a damp, non-abrasive cloth and dry them with a dry cloth. Do not use abrasive products to clean the device.
Tank cleaning
To clean the tank, insert fresh water, rinse and drain. Do not put vinegar, decalcifying agents or other fragrant substances inside the tank; Otherwise, the warranty may be revoked.
Emptying the boiler and cleaning it internally
Warning
- This operation shall be only carried out only after the appliance has cooled down completely.
- Do not put vinegar, decalcifying agents or other fragrant substances inside the boiler; otherwise, the warranty may be revoked.
Remove the tank (O) and empty it completely before emptying the boiler.
- Place the appliance horizontally and hold it above a sink. Unscrew the cap and empty the boiler completely (Fig. 21). Fasten the cap back.
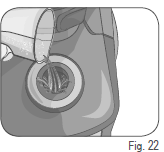
- Pour a cup of tap water through the steam tube joint (I) into the boiler (Fig. 22).
- Shake the appliance and empty it again, removing all water (Fig. 21). Repeat this operation until the water coming out of the boiler is clean and clear.
- Clean the boiler at least once a month, so as to remove any residue of lime that could jeopardise proper operation of the appliance.
THE WARRANTY DOES NOT COVER DAMAGES DUE TO LIMESTONE OBSTRUCTIONS.
Setup Guide: Ariete Vertical Pro Garment Steamer 6248
- Unpack the steamer and all accessories.
- Fill the water tank with cool, filtered water up to the maximum fill line.
- Reattach the water tank securely to the main unit.
- Plug the steamer into a standard electrical outlet.
- Turn on the power switch and wait for the indicator light to turn solid (approximately 45 seconds).
- Hang the garment on the provided hanger or clips.
- Press the steam button to begin steaming.
Troubleshooting Tips: If the steamer does not heat up, ensure the water tank is properly attached and the outlet is functioning. If the steam output is low, check for mineral buildup and clean the nozzle.
Safety Warnings: Always use the steamer on a stable surface. Avoid touching the steam nozzle during use. Keep the steamer out of reach of children.
Troubleshooting: Ariete Vertical Pro Garment Steamer 6248
- No Steam Output: Check water level and ensure the tank is securely attached. Clean the steam nozzle if clogged.
- Steamer Not Heating: Verify the power connection and outlet. Ensure the auto shut-off is not activated.
- Leaking Water: Do not overfill the tank. Check for cracks or damage.
- Indicator Light Issues: Reset the unit by unplugging and plugging it back in.
Preventive measures include regular cleaning of the water tank and steam nozzle, using filtered water, and storing the steamer in a cool, dry place. The Ariete Vertical Pro Garment Steamer 6248 comes with a 2-year warranty. For support, contact Ariete customer service at support@ariete.com or visit their official website.
Pros & Cons: Ariete Vertical Pro Garment Steamer 6248
Pros
- Powerful steam output for quick wrinkle removal
- Large water tank reduces refills
- Ergonomic design for comfortable use
- Automatic shut-off for safety
- Compact and portable
Cons
- Slightly heavier than some competitors
- The steam nozzle can get hot during extended use
- Requires regular cleaning to prevent mineral buildup
The Ariete Vertical Pro Garment Steamer 6248 offers excellent value for money, especially for users who need a reliable, high-performance steamer for frequent use.
Customer Reviews: Ariete Vertical Pro Garment Steamer 6248
Customers consistently praise the Ariete Vertical Pro Garment Steamer 6248 for its powerful steam and ease of use. Many users highlight its effectiveness on a variety of fabrics and its ability to handle large garments. Common complaints include the weight and the need for regular cleaning. The steamer has an average rating of 4.5 stars on major retail sites, with users recommending it for both home and travel use. Frequent mentions include its durability, quick heat-up time, and the convenience of the large water tank.
Faqs
How do I set up the ariete Vertical Pro Garment Steamer 6248 for first-time use?
What should I do if the ariete Vertical Pro Garment Steamer 6248 is not producing steam properly?
What are the key features of the ariete Vertical Pro Garment Steamer 6248 that improve ironing efficiency?
Can the ariete Vertical Pro Garment Steamer 6248 be used safely on all types of fabric?
How do I maintain and clean the ariete Vertical Pro Garment Steamer 6248 to ensure optimal performance?
Is a specific power supply or voltage required for the ariete Vertical Pro Garment Steamer 6248?
What accessories come with the ariete Vertical Pro Garment Steamer 6248, and how are they used?
How can I optimize the performance of the ariete Vertical Pro Garment Steamer 6248 for faster wrinkle removal?
More ariete manuals
- Setup: Ariete Steam Power Pro Ironing System 6413 User Manual
- Setup & Usage: Ariete Duetto Garment Steamer and Iron 6246 User Manual
- Setup: Ariete Ferro Dastiro Ironing System 5571 User Manual
- Setup: Ariete Steam Iron 6207 User Manual
- Setup: Ariete Vintage Fan Heater 808 User Manual
- Setup: Ariete Steam Iron 6214 User Manual
Leave a Comment