
Setup: Ariete Steam Power Pro Ironing System 6413 User Manual
Content
Ariete Steam Power Pro Ironing System 6413
Introduction
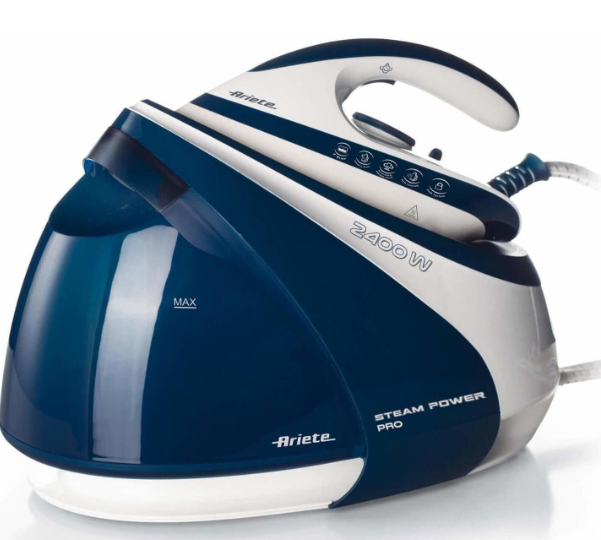
The Ariete Steam Power Pro Ironing System 6413 is a high-performance steam station designed for both home and professional use. With its powerful 2400W boiler and 1.8L water tank, this ironing system delivers continuous steam output of up to 140g/min, making it ideal for quickly and efficiently removing wrinkles from large loads of laundry. The Ariete Steam Power Pro 6413 stands out with its advanced ceramic or stainless steel soleplate, ensuring smooth gliding over all fabric types while minimizing the risk of scorching.
Key benefits include rapid heating, energy efficiency, and a robust steam shot function capable of releasing up to 600g of steam for stubborn creases. The system is perfect for busy households, small businesses, and anyone seeking professional-grade results without the hassle. The Ariete Steam Power Pro Ironing System 6413 is widely available online and in select retail stores, with an estimated price range of $120–$180, depending on region and retailer. Its durable build and user-friendly design make it a top choice for those who value both performance and convenience.
Specifications of the Ariete Steam Power Pro Ironing System 6413
- Power: 2400W for fast heating and consistent steam output
- Boiler Capacity: 1.8L for extended ironing sessions
- Steam Output: Up to 140g/min continuous steam, 600g steam shot
- Maximum Steam Pressure: 7 bar for deep wrinkle removal
- Soleplate Material: Ceramic or stainless steel for smooth gliding and fabric protection
- Dimensions: 400mm (W) x 225mm (D) x 290mm (H)
- Warranty: 1 year manufacturer warranty
- Weight: Approximately 3.5–4kg (varies by model)
Compared to similar steam stations, the Ariete Steam Power Pro 6413 offers a higher steam output and larger water tank, reducing refill frequency and increasing productivity. Its energy-efficient design and durable construction make it a competitive option in the mid-range steam ironing market.
DESCRIPTION OF THE APPLIANCE
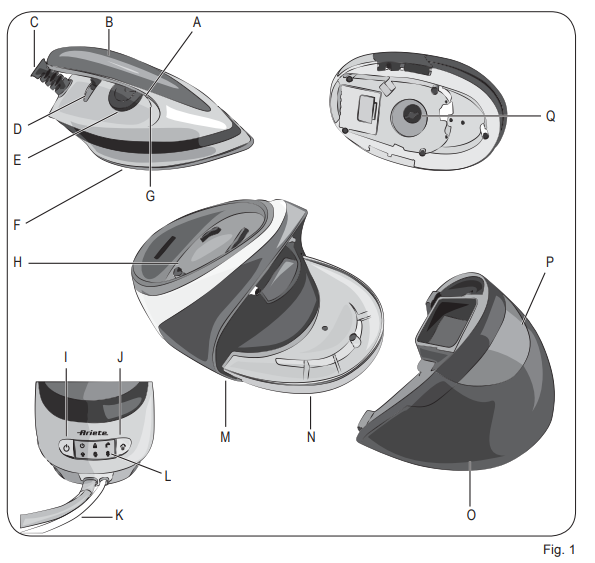
- Steam button
- Handle
- Iron/boiler connection cable
- Locking mechanism
- Temperature adjustment knob
- Soleplate
- Iron temperature control lamp
- Iron stand
- On/Off button
- Steam adjustment button
- Power cord + plug
- Control panel
- Cord storage device
- Base
- MAX water level indicator
- Removable water tank
- Boiler cap
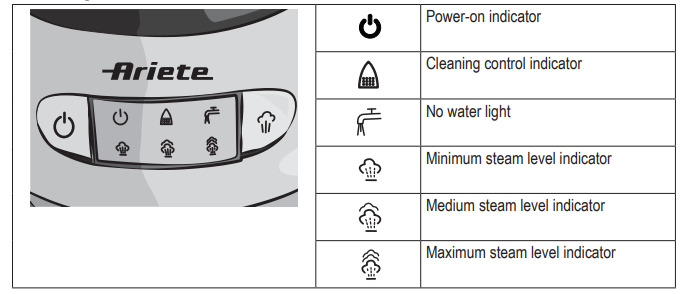
Control panel
Identification data
The plate located under the appliance support base shows the following identification data:
- manufacturer and CE marking
- model (Mod.)
- serial number (SN)
- electrical supply voltage (V) and frequency (Hz)
- electrical power consumption (W)
- assistance toll-free phone number
- When ordering at Authorized Service Centers, indicate the model and serial number.
PRELIMINARY PHASES FOR USE
Warning!
- Remove any labels and protections from the soleplate before using the appliance for the first time.
- Place the appliance on a horizontal and stable surface.
How to move the appliance
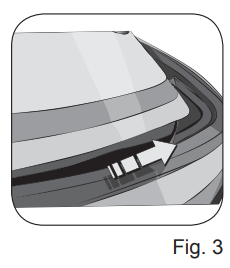
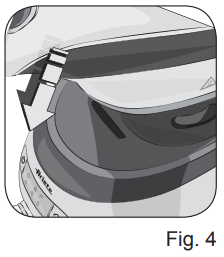
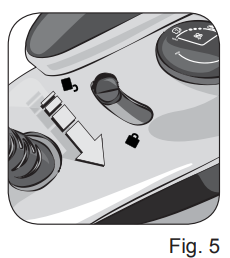
- To transport the appliance, place the iron on the iron stand, inserting the tip of the iron into the plastic support (Fig 3-4). Move the locking mechanism (D) to position (
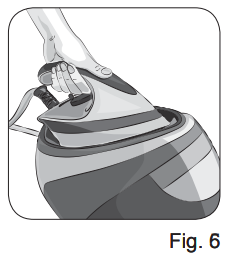
 ) (Fig. 5). Move the appliance (Fig. 6) by using the handle (B).
 - Filling the tank before use
- Make sure the appliance is unplugged from the supply mains before filling the tank with water.
- The product functions with normal tap water. In the case of particularly calcareous waters (with hardness greater than 20°f) use a mixture composed of 50% of tap water and 50% of demineralized water.
- Never use pure demineralized water.
- NEVER fill the tank beyond the MAX level.
- To avoid damaging the pump, never operate the appliance without any water in the tank, even for dry ironing. Do not add any additives or chemicals (such as for example, amides, starches, perfume or other); Otherwise, the warranty may be revoked. The possible presence of water, condensate or moisture in the tank indicates only that the appliance has been tested.
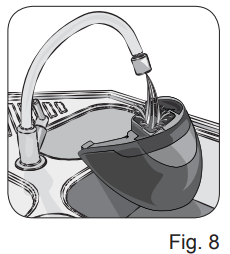
- Remove the tank (Fig. 7). Put water directly from the tap through the appropriate grid (Fig. 8).
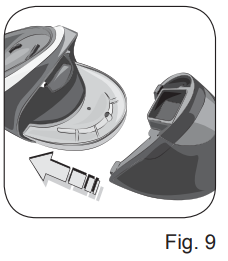
- Put the tank back in, paying attention to match the tank valve with the pin in the appliance seat (Fig. 9). Press firmly until the tank is completely inserted, until it clicks, confirming the correct installation.
.png)
INSTRUCTIONS FOR USE
- Switching on the appliance and first use
- Before you turn on the appliance, make sure there is sufficient water inside the tank. Totally unwind the power cord.
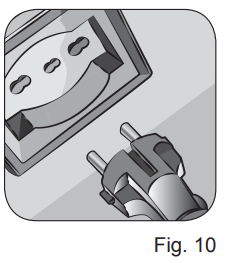
- Insert the plug into the electrical socket (Fig. 10), which must be earthed.
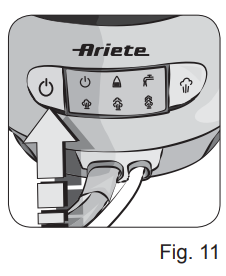
- Press the on/off button (I) to turn ON the appliance (Fig. 11). The power-on indicator (
 ) turns on.
 - The appliance is set to switch on in minimum steam level mode. The minimum steam level indicator (
 ) will start to flash. It is possible to iron any kind of clothes at this temperature and save energy while keeping the proper quantity of steam.
 - When the iron reaches the temperature, the iron temperature control lamp (G) goes off. The minimum steam level indicator ( ) turns on steady.
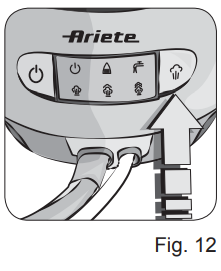
- Press the steam adjustment button (Fig. 12) to change the amount of steam dispensed: each time the steam adjustment button is pressed, the appliance switches from the minimum steam level to the following levels.
- The steam level indicator (), (
 ) or (
 ) will start to flash.
 - When the iron reaches the temperature, the steam level indicator turns on steady.
- When first used, the iron may give out a little smoke: This transitory effect is perfectly normal and will disappear very soon. On first use of the iron, try it on an old piece of cloth to remove any manufacturing residues.
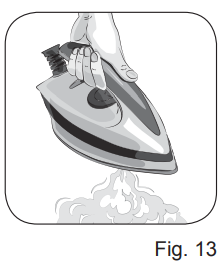
- Press the steam button (A) until the iron gives out steam (Fig. 13).
- Do not release steam when the iron is standing on is gill rest (H).
- The iron is fed automatically by means of a pump that at each filling, is activated for a few seconds by generating a normal operation sound (vibration). Immediately after the vibration, a decrease of the steam emission could occur. This is perfectly normal, and a after a few seconds the steam output will be normal again. If the iron is left inactive for a long time, before ironing it is recommended to hold it level and deliver a few shotsof steam into the ground to stabilize the jet and eliminate any condensation.
Temperature selection
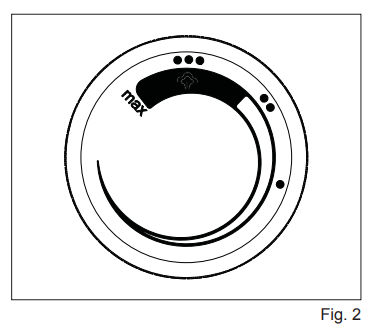
- Select the desired temperature by turning the temperature adjustment knob (E) (Fig. 2). The iron temperature control lamp starts to flash. The plate starts to warm up.
- Wait that the iron temperature control lamp (G) turns off. The iron is now ready for use. When changing the temperature, the temperature indicator starts flashing until the iron reaches the new temperature.
- If temperature (*) has been selcted, the steam emission is not available.
Steam ironing
- The quantity of steam to be emitted is automatically set and depends on the selected iron temperature. Before applying a jet of steam to the article to be ironed, release two or three good jets of steam towards the floor to stabilise the steam flow.
- When you press the steam button (A) from 3 to 5 seconds, a heavy steam jet is dispensed. The steam jet stops when the button is released. If the steam supply button (A) is operated continuously for more than 30 seconds, drops of water may come from the steam holes in the plate of the iron. It is recommended that the button (A) is used for shorter periods.
- During steam emission, the steam indicator is flashing.
Steam shot
- It is possible to increase the steam power.
- Press the steam button (A) twice to activate this function.
- The steam boost function is only available for modes (**), (**•) and Max.
- Filling the tank during use
Warning.
- Always check the water level in the tank during ironing
- The appliance is equipped with a no water light (f*).
- When the tank runs out of water, the no water indicator turns on. The steam function is not available. Turn off the appliance. Press the on-off button for 2 seconds. Unplug it from the electric outlet.
- Remove the tank (Fig. 7). Put water directly from the tap through the appropriate grid (Fig. 8).
- Put the tank back in, paying attention to match the tank valve with the pin in the appliance seat (Fig. 9). Press firmly until the tank is completely inserted, until it clicks, confirming the correct installation.
Warning!
- A Fil the tank up to the level marked MAX. Always turn off the power and unplug the power cord plug from the power outlet before filling the tank with water.
- Dry ironing
- For dry ironing, means without steam, after connecting the appliance to the mains, simply turn the temperature adjustment knob (E) to set the desired ironing temperature. Do not press the steam button (A).
Warning!
- To avoid damaging the pump, never operate the appliance without any water in the tank, even for dry ironing.
Vertical ironing
You can use the steam boost to iron clothes in vertical position. This special ironing procedure serves to remove creases trom curtains, tabrics, etc. Set the ironing temperature on MAX. Put the curtain or tabne in the position you want to iron it vertically and press the steam button.
Warning!
Do not iron fabrics held by other people.
SUGGESTIONS
First check whether the fabric has a label containing ironing instructions and compare the symbol with the instructions which follow. If there is no label with instructions, but you know the type of material, follow the instructions below. Note that the table refers to fabrics not treated with sizing agents or similar products; if they have been, you can also iron at a lower temperature.
Divide the articles to be ironed according to the types of material: wool with wool, cotton with cotton, etc.
Because the iron heats up much more quickly than it cools down, it is advisable to start with those fabrics which require lower temperatures and move on to those which require progressively higher temperatures. If the material is made up of more than one type of fibre, always set the temperature to the fibre which requires less heat. For example, if the material is made up of 70% synthetics and 30% cotton, set the temperature control to position (•) (see table) without steam, that is. the temperature for synthetic fabrics.
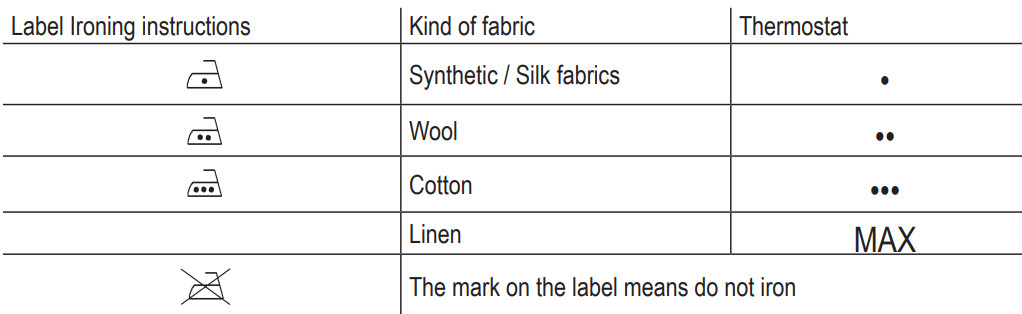
If you do not know the composition of the article to be ironed, choose a part of the article which will not be seen. Do a test ironing on this part to establish the appropriate temperature (always start with a relatively lowtemperature and work up until the ideal temperature is reached). Pure (100%) wool articles can be ironed with the iron set to one of the steam positions. To avoid pure wool, silk and synthetic materials becoming shiny, it makes good sense to iron them on the reverse side. For other materials, especially velvet, which can become shiny very easily, cover them with a cloth and iron in one direction only, using light pressure. The iron must be kept constantly moving over the fabric.
Auto-off function
- If the appliance is on but not in use, the auto-off function is activated after 10 minutes.
- To reactivate the appliance press the on-off button . The control display lights up and the appliance switches on in minimum steam level (*) mode. After 60 seconds, the iron is ready to use.
- When the auto-off function is activated, the appliance is not totally off.
AFTER IRONING
- Press the on-off button for 2 seconds. Unplug it from the electric outlet.
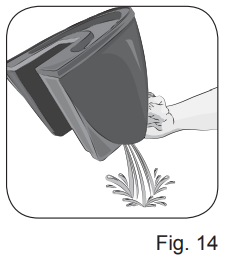
Empty the water tank completely so as to prevent the water from stagnating, which may form lime deposit (Fig. 14).
- To transport the appliance, place the iron on the iron stand, inserting the tip of the iron into the plastic support (Fig. 3-4). Move the locking mechanism (D) to position () (Fig. 5). Move the appliance (Fig. 6) by using the handle (B).
- Put the power cord and the iron-boiler connecting cord back into the cable compartment (M).
- Put the appliance back on top of a stable surface and out of the reach of children.
- Let the iron cool down on its stand, taking care not to touch the power cables and connection with the hot parts of the appliance.
CLEANING AND MAINTENANCE
Warning!
- A Before cleaning, always disconnect the plug from the mains supply and allow the iron to cool down on its stand grille.
Warning
- Never immerse the appliance in water or other liquid
- A Meck in state of the power cable of your iron on a regular basis before using it and if is damaged. take it to the service centre closest to you to have it replaced only by specialized personnel.
- The warranty does not cover damage caused by clogging due to lime.
- Emptying the boiler and cleaning it internally
- This procedure shall be carried out each time the cleaning control indicator turns on.
- A War unt the appliance is cold and the internal pressure is depleted, before unscrewing the cap (a).
- Remove the tank (P) and empty it completely before you empty the boiler (Fig. 14).
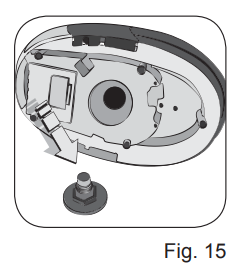
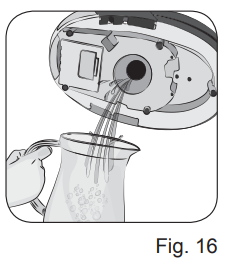
- Unscrew the boiler cap (Fig. 15). While holding the appliance over a sink, empty the boiler completely (Fig. 16).
- Fill the boiler with tap water. Tighten the cap and shake the appliance. Empty the boiler completely for a second time. Repeat this operation until the water coming out of the boiler is clean and clear.
- Do not put vinegar, decalcifying agents or other fragrant substances inside the boiler; Otherwise, the warranty may be revoked.
- After cleaning the boiler, pour approx. 400 cc of water into the boiler. Screw the cap (Q) on again lightly, without using excessive force.
- Clean the boiler each time the cleaning control indicator turns on, so as to eliminate any residue of lime that could jeopardize proper operation of the appliance.
- THE WARRANTY DOES NOT COVER DAMAGES DUE TO LIMESTONE OBSTRUCTIONS.
Troubleshooting Common Issues with the Ariete Steam Power Pro Ironing System 6413
- No Steam Output: Check water level, ensure the unit is heated, and verify the steam hose is not blocked.
- Leaking Water: Ensure the water tank is properly sealed and avoid overfilling.
- Steam Pressure Low: Clean the boiler and steam outlets regularly to prevent clogs.
- Error Codes: Refer to the user manual for specific error code meanings and solutions.
- Warranty & Support: The Ariete Steam Power Pro Ironing System 6413 comes with a 1-year warranty. For assistance, contact Ariete customer support or your retailer.
Preventive measures include regular descaling, using distilled water, and storing the unit in a dry place. For persistent issues, consult the official Ariete support website or contact customer service.
Pros & Cons of the Ariete Steam Power Pro Ironing System 6413
- Pros:
- High steam output for quick ironing
- Large water tank reduces refill frequency
- Durable ceramic or stainless steel soleplate
- Energy-efficient and easy to use
- Competitive price for its features
- Cons:
- Heavy compared to standard irons
- Requires regular descaling for optimal performance
- Some users report minor steam leakage if not maintained
The Ariete Steam Power Pro Ironing System 6413 offers excellent value for money, especially for those who iron frequently. It outperforms many budget models and rivals higher-end brands in steam output and durability.
Customer Reviews of the Ariete Steam Power Pro Ironing System 6413
Users consistently praise the Ariete Steam Power Pro Ironing System 6413 for its powerful steam, ease of use, and durability. Many highlight its ability to handle large laundry loads without frequent refills. Common complaints include the unit’s weight and the need for regular maintenance. The average star rating is 4.5/5, with customers recommending it for both home and professional use. Frequent mentions include its effectiveness on thick fabrics and the smooth glide of the soleplate. For best results, users suggest following the maintenance guidelines in the manual.
Faqs
How do I set up the Ariete Steam Power Pro Ironing System 6413 for the first time?
Why is my Ariete Steam Power Pro Ironing System 6413 not producing steam?
Can I use tap water in the Ariete Steam Power Pro Ironing System 6413?
How do I clean and maintain the Ariete Steam Power Pro Ironing System 6413?
What fabrics are safe to iron with the Ariete Steam Power Pro Ironing System 6413?
How do I troubleshoot water leakage from the Ariete Steam Power Pro Ironing System 6413?
What is the maximum steam pressure and output of the Ariete Steam Power Pro Ironing System 6413?
Is the Ariete Steam Power Pro Ironing System 6413 compatible with different voltage outlets?
More ariete manuals
- Setup: Ariete Ferro Dastiro Ironing System 5571 User Manual
- Setup : Ariete Vertical Pro Garment Steamer 6248 User Manual
- Setup: Ariete Vintage Fan Heater 808 User Manual
- Setup & Usage: Ariete Duetto Garment Steamer and Iron 6246 User Manual
- Setup: Ariete Ice Cream & Yogurt Maker 637 User Manual
- Setup: Ariete Steam Iron 6207 User Manual
Leave a Comment