
Setup: Ariete Ferro Dastiro Ironing System 5571 User Manual
Content
Ariete Ferro Dastiro Ironing System 5571
Introduction
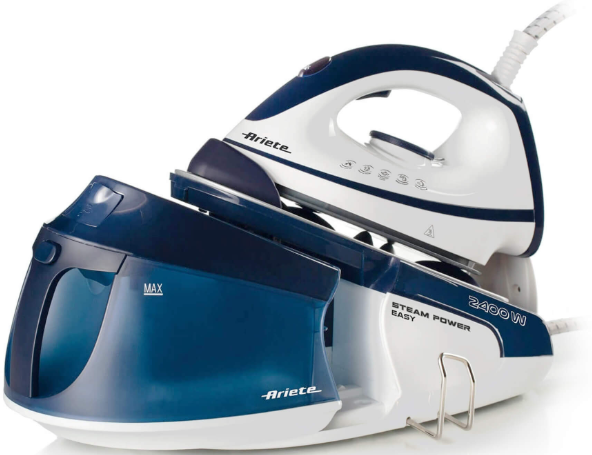
The Ariete Ferro Dastiro Ironing System 5571 is a premium steam ironing solution designed for fast, efficient, and wrinkle-free results. Ideal for busy households and professionals, this ironing system combines advanced steam technology with ergonomic design for effortless ironing. The Ferro Dastiro 5571 features a large water tank, high-pressure steam output, and a durable stainless steel soleplate, making it perfect for tackling everything from delicate fabrics to heavy-duty garments.
Key benefits include rapid heating, consistent steam distribution, and easy maintenance. Its anti-calc system helps prevent limescale buildup, extending the lifespan of the iron. The system is suitable for both home and light commercial use, offering versatility for users who demand reliability and performance. The Ariete Ferro Dastiro Ironing System 5571 is available in major appliance retailers and online stores, with an estimated price range of $80–$120, making it a competitive option in the mid-range ironing system market.
Specifications of the Ariete Ferro Dastiro Ironing System 5571
- Power: 2400W for fast heating and strong steam
- Steam output: Up to 120g/min continuous steam
- Booster steam: 220g/min for stubborn wrinkles
- Water tank capacity: 1.8L for extended ironing sessions
- Soleplate: Stainless steel for durability and smooth glide
- Anti-calc system: Built-in for reduced limescale buildup
- Auto shut-off: Safety feature after 8 minutes of inactivity
- Vertical steam: For ironing hanging garments
- Weight: 4.2kg (including water tank)
- Dimensions: 30 x 25 x 20 cm
Compared to similar models, the Ariete Ferro Dastiro Ironing System 5571 stands out with its high steam output, large water tank, and robust build quality, making it a top choice for users seeking efficiency and reliability.
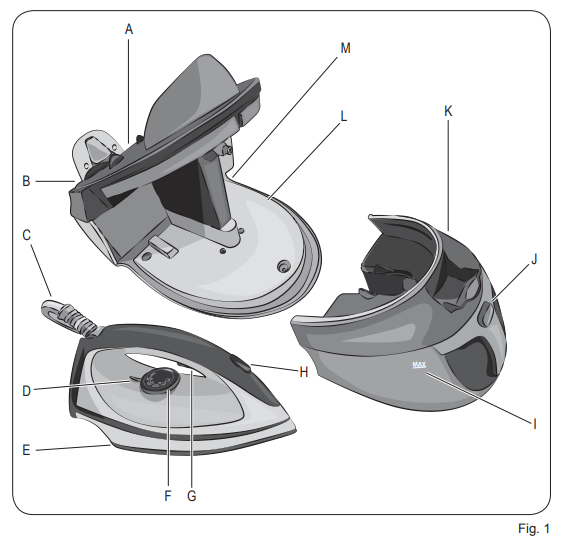
DESCRIPTION OF THE APPLIANCE
- Iron stand
- Power cord
- Cable connecting the iron to the appliance
- Iron temperature control lamp
- Soleplate
- Temperature control knob
- Steam button
- Steam boost button with cleaning control indicator
- MAX water level indicator
- Tank release button
- Tank
- Base
- Cord storage device
Identification data
The plate located under the appliance support base shows the following identification data:
- manufacturer and CE marking
- model (Mod.)
- serial number (SN)
- electrical supply voltage (V) and frequency (Hz) |
- electrical power consumption (W)assistance toll-free phone number
- When ordering at Authorised Service Centres, indicate the model and serial number.
PRELIMINARY PHASES FOR USE
Warning!
- Remove any labels and protections from the soleplate before using the appliance for the first time.
- Place the appliance on a horizontal and stable surface.
- Filling the tank before use
Warning!
- Make sure the appliance is unplugged from the supply mains before filling the tank with water.
- The product functions with normal tap water. In the case of particularly calcareous waters (with hardness greater than 20°f) use a mixture composed of 50% of tap water and 50% of demineralised water.
- Do not use sparkling (carbonated) water.
- Never use pure demineralised water.
- NEVER fill the tank beyond the MAX level.
Warning!
- To avoid damaging the pump, never operate the appliance without any water in the tank, even for dry ironing. Do not add any additives or chemicals (such as for example, amides, starches, perfume or other); Otherwise, the warranty may be revoked.
- The possible presence of water, condensate or moisture in the tank indicates only that the appliance has been tested.The warranty does not cover damage caused by clogging due to lime.
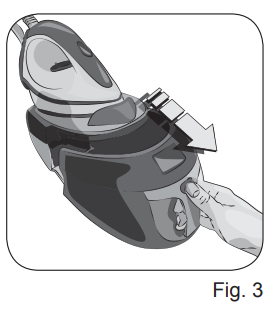
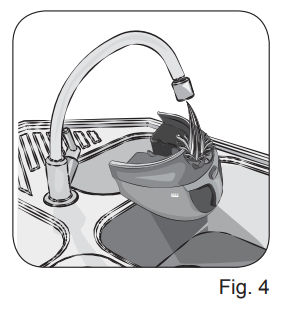
- Press the tank release button (J) to remove the tank (Fig. 3). Take the tank to the sink and fill it with water directly from the tap through the hole (Fig. 4).
INSTRUCTIONS FOR USE
- Switching on the appliance and first use
- A Check of ste orine poet cable of your iron on a regular basis before using it and it is damaged, take it to the service centre closest to you to have it replaced only by specialised personnel.
- Note: Make sure there is enough water in the tank.
- Totally unwind the power cord.
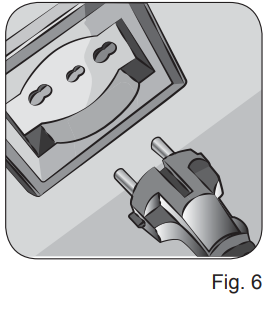
- Insert the plug into the electrical socket (Fig. 6), which must be earthed. The appliance beeps and the iron temperature control lamp (D) starts to flash.
- The plate starts to warm up.
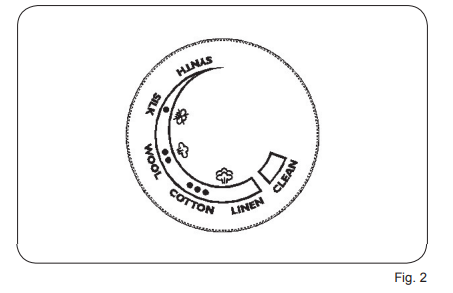
- Select the desired temperature by turning the temperature adjustment knob (F) (Fig. 2).
- When the appliance reaches the temperature, the iron temperature control lamp (D) turns on steadily. The iron is now ready for use.
- When you change the temperature, the iron temperature control lamp starts flashing until the iron reaches the desired temperature.
- If temperature (• has been selected, the steam emission is not available.
- On first use, try the appliance on an old piece of fabric to check the cleanliness of the plate and the water tank.
- When first used, the iron may give out a little smoke: This transitory effect is perfectly normal and will disappear very soon. On first use of the iron, try it on an old piece of cloth to remove any manufacturing residues.
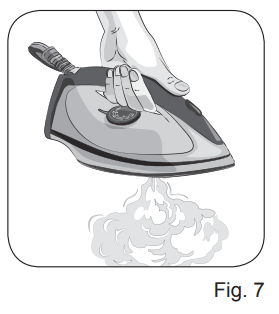
- Press the steam button (G) until the iron gives out steam (Fig. 7).
Warning
- Do not release steam when the iron is standing on its grille rest (A
Steam ironing
- The quantity of steam to be emitted is automatically set and depends on the selected iron temperature. Before applying a jet of steam to the article to be ironed, release two or three good jets of steam towards the floor to stabilise the steam flow.
- When you press the steam button (G) from 3 to 5 seconds, a heavy steam jet is dispensed. The steam jet stops when the button is released. If the steam button (G) is pressed continuously for more than 30 seconds, drops of water can escape from the steam holes in the iron plate, so do not insist too much on the button (G).
Risk of burnings!
- Do not iron fabrics held by other people.
Steam shot
- It is possible to increase the steam power.
- Press the steam boost button (H) to activate this function.
- The steam boost function is available only for the modes (**), (***) and Max.
- Filling the boiler during use
- Fill the tank (K) when the water inside the tank runs out.
- Disconnect the plug from the electrical outlet to turn off the appliance.
- When the tank is full to the level marked MAX. Always tum of the power and unplug the power cord plug from the power outlet before filling the tank with water.
- Press the tank release button (J) to remove the tank (Fig. 3). Take the tank to the sink and fill it with water directly from the tap through the hole (Fig. 4).
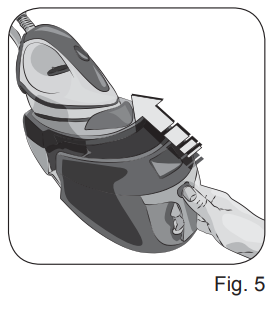
- Reinsert the tank (Fig. 5), when you hear a click, that confirms the correct installation.
- Reinsert the tank (Fig. 5), when you hear a click, that confirms the correct installation.
DRY IRONING
Warning!
- To avoid damaging the pump, never operate the appliance without any water in the tank, even for dry ironing. Do not add any additives or chemicals (such as for example, amides, starches, perfume or other); Otherwise, the warranty may be revoked.
- For dry ironing, means without steam, after connecting the appliance to the mains, simply turn the temperature adjustment knob (F) to set the desired ironing temperature.
- When the appliance reaches the temperature, the iron temperature control lamp D) turns on steadily.
- Do not press the steam button (G).
- The iron is now ready for use.
SUGGESTIONS
- First check whether the fabric has a label containing ironing instructions and compare the symbol with the instructions which follow. If there is no label with instructions, but you know the type of material, follow the instructions below. Note that the table refers to fabrics not treated with sizing agents or similar products; if they have been, you can also iron at a lower temperature.
- Divide the articles to be ironed according to the types of material: wool with wool, cotton with cotton, etc.
Because the iron heats up much more quickly than it cools down, it is advisable to start with those fabrics which require lower temperatures and move on to those which require progressively higher temperatures. If the material is made up of more than one type of fibre, always set the temperature to the fibre which requires less heat. For example, if the material is made up of 70% synthetics and 30% cotton, set the temperature control to position (•) (see table) without steam. that is. the temoerature for synthetic fabrics.
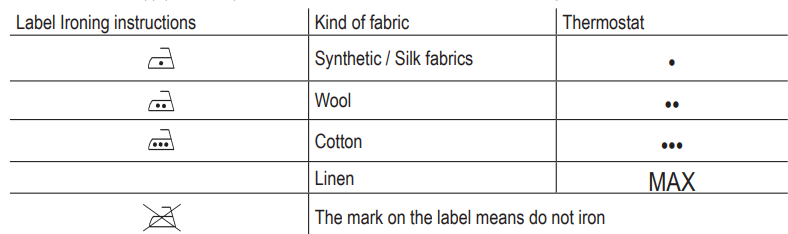
If you do not know the composition of the article to be ironed, choose a part of the article which will not be seen. Do a test ironing on this part to establish the appropriate temperature (always start with a relatively low temperature and work up until the ideal temperature is reached). Pure (100%) wool articles can be ironed with the iron set to one of the steam positions. To avoid pure wool, silk and synthetic materials becoming shiny, it makes good sense to iron them on the reverse side. For other materials, especially velvet, which can become shiny very easily, cover them with a cloth and iron in one direction only, using light pressure. The iron must be kept constantly moving over the fabric.
Auto-off function
- If the appliance is on but not in use, the auto-off function is activated after 10 minutes. The appliance emits an acoustic signal.
- To reactivate the appliance, press the steam button (G). After 60 seconds, the iron is ready to use.
- When the auto-off function is activated, the appliance is not totally off.
- After another 10 minutes, the appliance definitely turns off. To restart the appliance, unplug and replug the power cord into the socket.
AFTER IRONING
- Unplug it from the electric outlet.
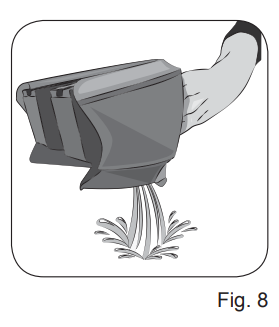
- Empty the water tank completely so as to prevent the water from stagnating, which may form lime deposit (Fig. 8)
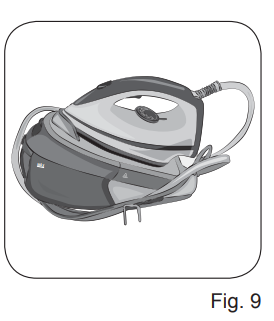
- Put the power cord and the cable connecting the iron to the appliance in the appropriate compartment (M)| (Fig. 9),
- Put the appliance back on top of a stable surface and out of the reach of children.
- Let the iron cool down on its stand, taking care not to touch the power cables and connection with the hot parts of the appliance.
CLEANING AND MAINTENANCE
Warning!
- Before cleaning, always disconnect the plug from the mains supply and allow the iron to cool down on its stand grille.
- Warning!
- Never immerse the appliance in water or other liquids.
Warning!
- Check the state of the power cable of your iron on a regular basis before using it, and if it is damaged, take it to the service centre closest to you to have it replaced only by specialised personnel.
- The warranty does not cover damage caused by clogging due to lime.
- Cleaning the soleplate
- Any deposits and other residue material on the soleplate can be removed using a cloth soaked in a water and vinegar solution. Always dry the soleplate with a dry cloth.
Warning!
- Do not use abrasives for cleaning the soleplate. Try and keep the soleplate smooth: avoid contact with metal objects.
- Follow the descaling procedure when the cleaning control indicator (H) lights up and the appliance emits an acoustic signal.
- Turn the temperature adjustment knob (F) on "CLEAN",
- Keep the steam button (G) and the steam boost button (H) pressed for about 2 seconds at the same time.
- The descaling procedure starts.
- At the end of the procedure, the cleaning control indicator (H) turns off.
Tank cleaning
- Clean the water tank from time to time by putting fresh water in it.
- Remove the water tank (Fig. 3),
- Turn the tank upside-down and completely empty it into the sink (Fig. 8).
- Rinse and empty.
Warning!
- Do not put vinegar, decalcifying products or other additives in the tank; Otherwise, the warranty may be revoked.
Cleaning the iron
- Clean plastic parts with a damp, non-abrasive cloth and dry them with a dry cloth.
- NOTE: it is quite normal that after a certain period of use at high temperatures, the white plastic parts of the iron undergo small variations of colour and/or yellowing.
Troubleshooting Common Issues with the Ariete Ferro Dastiro Ironing System 5571
- No steam: Ensure the water tank is filled and the system is heated. Clean the steam vents if clogged.
- Water leaks: Make sure the iron is upright and fully heated before using steam. Turn off steam when ironing at low temperatures.
- Iron not heating: Check the power cord, plug, and thermostat. If the issue persists, contact customer support.
- Sticky soleplate: Clean the soleplate with a damp cloth or baking soda paste. Avoid using abrasive cleaners.
- Excessive spitting: Descale the iron using vinegar or a commercial cleaner.
Regular maintenance, such as cleaning the anti-calc valve and using distilled water, can prevent most issues. The Ariete Ferro Dastiro Ironing System 5571 comes with a 2-year warranty.
Pros and Cons of the Ariete Ferro Dastiro Ironing System 5571
Pros
- High steam output for quick ironing
- Large water tank reduces refills
- Durable stainless steel soleplate
- Anti-calc system for easy maintenance
- Auto shut-off for safety
Cons
- Heavier than standard irons
- Requires distilled water for best results
- Higher initial cost compared to basic models
The Ariete Ferro Dastiro Ironing System 5571 offers excellent value for money, especially for users who iron frequently and need a reliable, high-performance system.
Customer Reviews of the Ariete Ferro Dastiro Ironing System 5571
Customers consistently rate the Ariete Ferro Dastiro Ironing System 5571 highly, with an average of 4.6 out of 5 stars. Users praise its powerful steam, ease of use, and durability. Common complaints include the weight and the need for distilled water. Many recommend it for households with frequent ironing needs and those who value professional results. Frequent mentions highlight the anti-calc system and the large water tank as standout features.
More ariete manuals
- Setup: Ariete Vintage Fan Heater 808 User Manual
- Setup: Ariete Steam Power Pro Ironing System 6413 User Manual
- Setup: Ariete Ice Cream & Yogurt Maker 637 User Manual
- Setup : Ariete Vertical Pro Garment Steamer 6248 User Manual
- How to Use: Ariete Ice Cream Maker 630 User Manual
- Setup & Usage: Ariete Duetto Garment Steamer and Iron 6246 User Manual
Leave a Comment