
Setup: Beurer Digital TENS/EMS Unit EM 80 User Manual
Content
Introduction — beurer Digital TENS/EMS Unit EM 80: overview, benefits and who it’s for
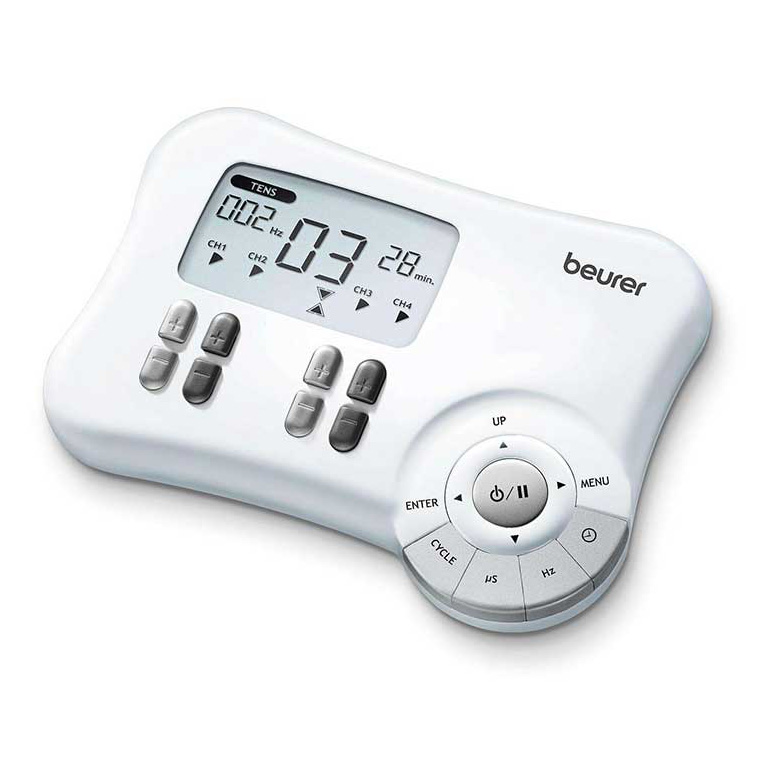
The beurer Digital TENS/EMS Unit EM 80 is a portable, medical-grade electrotherapy device that combines TENS (transcutaneous electrical nerve stimulation), EMS (electrical muscle stimulation) and massage programs in one unit to deliver drug‑free pain relief, targeted muscle training and relaxation therapy for home or clinical use. The EM 80 supports up to four separately adjustable channels and includes eight self-adhesive gel electrodes, enabling simultaneous treatment of multiple body zones and personalised multi-site protocols (e.g., bilateral shoulders, lower back and thighs) for pain management, post-exercise recovery and muscle reconditioning.
Key benefits and unique selling points include: 4 independently adjustable channels for multi-site therapy, 30 predefined programs plus 20 user-programmable settings (frequency, pulse width, on/off times) to customise TENS/EMS sessions, a “Doctor’s function” to coordinate therapy programs, visible backlit display and a safety auto-switch-off for secure home use. The unit delivers dual-phase square pulses with an output frequency range of 1–120 Hz and pulse width adjustable between 40–250 µs, with a maximum output current designed for therapeutic applications.
Target audience and common use cases: people seeking non-pharmacological pain relief (chronic or acute musculoskeletal pain), athletes and fitness users requiring muscle activation and recovery, physiotherapy patients using home-based electrotherapy, and wellness users who want a targeted massage and relaxation tool. Typical applications include lower back pain, shoulder/neck tension, knee rehabilitation support and muscle stimulation after exercise. The EM 80 is sold globally through Beurer’s channels and authorised retailers; the estimated retail price typically ranges in the mid-range for home medical electrotherapy devices (commonly around the equivalent of a mid‑hundreds currency bracket depending on market and retailer), and availability is widespread via the Beurer online store and medical/e‑commerce retailers.
Current Parameters
Electrical stimulation devices operate with different current settings, which influence the stimulation effect depending on the selected parameters.
Pulse Shape
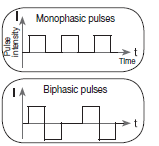
Pulse shape describes the time function of the excitation current, distinguishing between monophase and biphase pulse trains. With monophase pulse trains, the current flows in one direction. With biphase pulses, the excitation current alternates its direction. The Digital TENS/EMS unit uses only biphase pulse trains, as they reduce strain on the muscles, resulting in less muscle fatigue and safer application.
Pulse Frequency
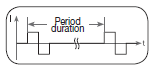
Pulse frequency indicates the number of individual pulses per second and is measured in Hertz (Hz). It can be calculated by determining the inverse value of the periodic time. The selected frequency determines which types of muscle fibres respond to stimulation. Slow-response muscle fibres tend to react to lower pulse frequencies of up to 15 Hz, while fast-response fibres respond to frequencies above approximately 35 Hz. At frequencies of approximately 45–70 Hz, continuous muscle tension occurs, which can lead to premature muscle fatigue. Higher pulse frequencies may therefore be used for elasticity and maximum strength training.
Pulse Width
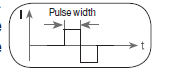
Pulse width indicates the duration of an individual pulse and is measured in microseconds (μs). Pulse width also influences the penetration depth of the current. Generally, a greater muscle mass requires a greater pulse width.
Pulse Intensity
The appropriate pulse intensity depends on the individual user's sensitivity and several factors, including the application site, skin circulation, skin thickness, and quality of electrode contact. The selected intensity should be effective but must never cause unpleasant sensations, particularly pain at the application site. A slight tingling sensation generally indicates that stimulation energy is being delivered. Any intensity setting that causes pain must be avoided. During prolonged application, intensity adjustments may be necessary as the body adapts to the stimulation.
ON and OFF Time
ON time describes the stimulation period within a cycle, measured in seconds. It represents the duration during which electrical pulses are delivered to the body. OFF time indicates the stimulation-free period within the cycle, also measured in seconds.
Cycle-Controlled Pulse Parameter Variation
In many applications, several pulse parameters are required to stimulate different tissue structures within the treatment area. The Digital TENS/EMS unit automatically varies pulse parameters cyclically through its preset programmes. This variation helps prevent individual muscle groups from becoming fatigued during application. The device provides useful preset current parameters. During treatment, users can adjust pulse intensity at any time. Certain individual programmes also allow pulse frequency to be adjusted beforehand to achieve a comfortable and effective stimulation experience.
Key Functions
Every time a key is pressed, the device produces a signal tone to confirm the action and help users recognize accidental key presses. This signal tone cannot be switched off.
ON/OFF Button
- Press the ON/OFF button briefly to switch on the device. If the button is held down for 10 seconds during start-up, the device automatically switches off again.
- Press the ON/OFF button once during treatment to pause stimulation. Press it again to continue treatment.
- Press and hold the ON/OFF button for approximately 3 seconds to switch off the device.
UP (▲) and DOWN (▼) Buttons
- Use the UP and DOWN buttons to select:
- Treatment programme.
- Treatment time.
- Pulse frequency.
- Pulse width.
- Number of cycles.
- ON/OFF time.
- During stimulation, press the DOWN (▼) button to reduce pulse intensity for all channels.
MENU Button
- Navigate between the TENS, EMS, and MASSAGE submenus.
- Return to the programme selection window or the main menu.
ENTER Button
- Select a menu option.
- Confirm selections made using the UP and DOWN buttons, except for channel intensity settings.
CH1±, CH2±, CH3±, CH4± Buttons
Adjust the pulse intensity independently for each corresponding channel.
Cycle Button
Set, modify, and confirm the number of stimulation cycles.
μs (Microseconds) Button
Set, modify, and confirm the pulse width of individual stimulation cycles.
Hz (Hertz) Button
Set, modify, and confirm the pulse frequency of individual stimulation cycles.
Cycle Timer Button
Set, modify, and confirm the ON and OFF times of individual stimulation cycles.
Start-Up
- Remove the battery compartment cover from the bottom of the device by releasing the catch.
- Insert three AA 1.5 V alkaline batteries. Ensure that the batteries are inserted with the correct polarity, as indicated inside the compartment.
- Carefully replace the battery compartment cover.
Attach the connecting cable to the electrodes (Fig. 1).
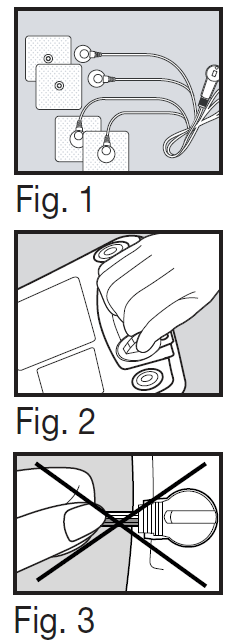
Note: The electrodes are equipped with clip fasteners for easy connection.
- Insert the connecting cable connector into the corresponding socket at the back of the device (Fig. 2).
- Avoid pulling, twisting, or sharply bending the connecting cables (Fig. 3).
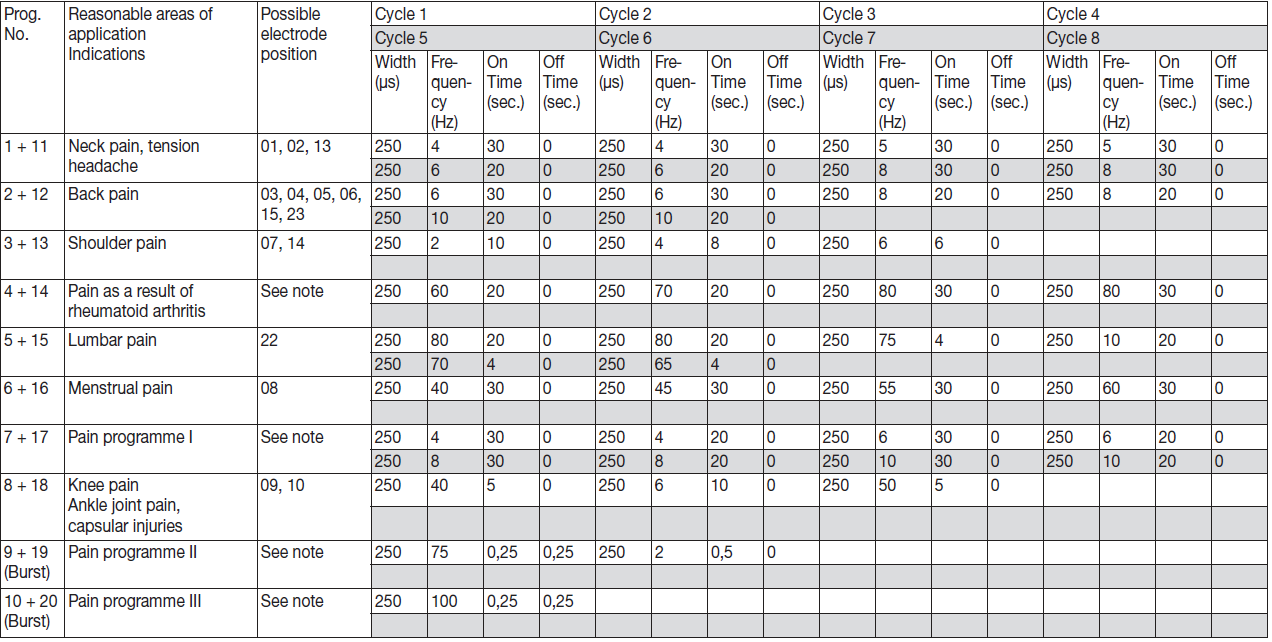
TENS programmes
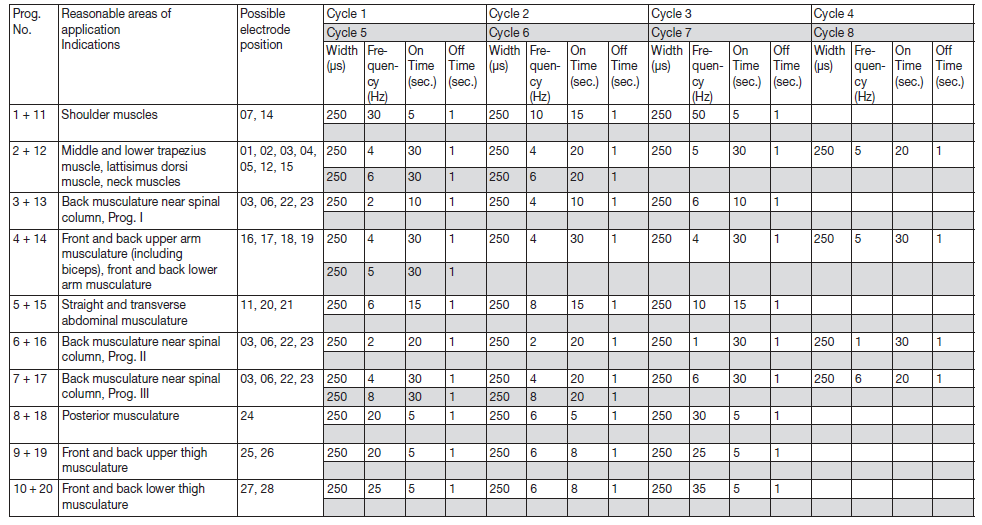
EMS-Programme
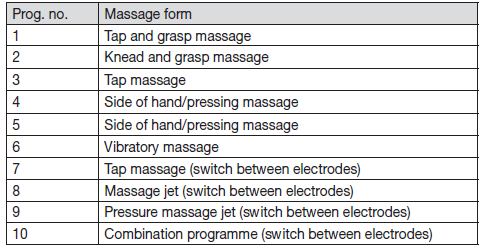
MASSAGE programmes
Information on Placing the Electrodes
Correct electrode positioning is essential for achieving the desired stimulation effect. It is recommended to consult your doctor to determine the most appropriate electrode positions for your intended treatment area. The electrode positions illustrated inside the cover (Figs. 1–28) are provided as general guidance. The following considerations apply when selecting electrode positions.
Electrode Distance
The distance between electrodes influences the area and depth of tissue stimulation. A greater electrode distance increases the volume of tissue exposed to stimulation. However, the stimulation strength decreases as the distance increases. Consequently, a larger electrode distance can stimulate a broader tissue area, but with reduced intensity. Increasing pulse intensity may compensate for this reduction, provided the stimulation remains comfortable and safe.
The following guidelines apply when selecting electrode distances:
- Approximately 5–15 cm: Generally the most suitable electrode distance.
- Below 5 cm: Primarily produces stronger stimulation of superficial tissue structures.
- Above 15 cm: Produces relatively weak stimulation across larger and deeper tissue structures.
Electrode Relationship to Muscle Fibre Orientation
The direction of current flow should be adapted to the orientation of the muscle fibres and the intended muscle layer. To stimulate superficial muscles, electrodes should be positioned parallel to the muscle fibre orientation (page 2, Fig. 16; 1A–1B/2A–2B). To stimulate deeper tissue layers, electrodes should be positioned crosswise to the muscle fibre orientation (page 2, Fig. 16; 1A–2A/1B–2B). A cross-electrode arrangement may also be used, as illustrated on page 2, Fig. 16; 1A–2B/2A–1B.
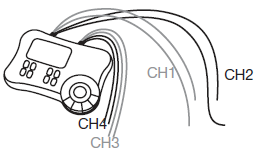
Cable and Channel Colour Coding
Observe the colour coding of the connecting cables and channels. The white cable corresponds to channels CH1/3, while the grey cable corresponds to channels CH2/4.
Electrode Placement for TENS Pain Treatment
When using the Digital TENS/EMS device for pain treatment, four independently controllable channels are available, each supporting two adhesive electrodes. It is advisable to position the two electrodes of one channel so that the painful area lies between them. Alternatively, one electrode may be positioned directly over the painful area, while the second electrode is placed at least 2–3 cm away. The electrodes of the remaining channels may be used to treat additional painful areas simultaneously. They can also be positioned together with the electrodes of the first channel to surround the affected area. A cross-electrode arrangement may be appropriate for this purpose.
Massage Function Tip
For the massage function, use all electrodes as recommended in the selected programme to achieve the intended stimulation coverage.
Electrode Care and Skin Preparation
To extend the service life of the adhesive electrodes, apply them to clean skin that is as free as possible from hair and grease. If necessary, clean the application area with water before use and remove excess hair to improve electrode adhesion.
Electrode Detachment During Treatment
If an electrode becomes detached during stimulation, the pulse intensity of the affected channel automatically returns to its lowest setting. Press the ON/OFF button to activate pause mode, reposition the electrode securely, and press the ON/OFF button again to resume treatment. After restarting, adjust the pulse intensity to the required comfortable level.
Important Safety Precaution
Use electrode positions appropriate to the device's instructions and your treatment needs. Do not place electrodes across the chest, on the front or sides of the neck, or on the head unless specifically permitted by the device instructions and a qualified healthcare professional. Do not use TENS/EMS if you have an implanted electronic device, such as a pacemaker, without appropriate medical guidance.
Doctor's Function
Doctor's Function is a specialized setting that allows users to access a previously configured personal treatment programme more easily. When this function is enabled, the stored individual programme is automatically retrieved when the device is switched on. The programme can then be activated by pressing the ON/OFF button. The individual programme settings may be established according to recommendations provided by a doctor. When Doctor's Function is activated, only pulse intensity can be adjusted during stimulation. All other programmes and treatment parameters remain locked and cannot be modified or accessed until Doctor's Function is cancelled.
Setting the Doctor's Function
- Select the desired treatment programme and configure the appropriate settings as described in Sections 7.2 or 7.3.
- Before activating the programme with the ON/OFF button, press and hold the ON/OFF button and the specified companion button simultaneously for approximately 5 seconds.
- A long signal tone confirms that the individual programme has been stored in Doctor's Function.
Cancelling Doctor's Function
- To unlock the device and regain access to other treatment programmes, press and hold the ON/OFF button and the specified companion button simultaneously for approximately 5 seconds.
- Doctor's Function cannot be cancelled while stimulation is active.
- A long signal tone confirms that Doctor's Function has been cancelled.
Note: The supplied text does not identify the companion button used with ON/OFF for activating or cancelling Doctor's Function. Refer to the original device manual to confirm the correct button combination.
Cleaning and Storage
Adhesive Electrodes
- Clean the adhesive electrodes carefully with a damp, lint-free cloth to help maintain their adhesive properties.
- After each use, attach the electrodes to their protective backing film.
Cleaning the Unit
- Remove the batteries from the device before every cleaning procedure.
- Clean the device after use using a soft, slightly damp cloth.
- For heavier soiling, use a cloth lightly moistened with mild soapy water.
- Ensure that no water enters the device. If moisture accidentally enters the unit, do not use it again until it is completely dry and safe to operate.
- Do not use chemical cleaning agents or abrasive substances, as they may damage the device.
Storage
- Remove the batteries if the device will not be used for an extended period. Leaking batteries may damage the internal components.
- Do not sharply bend or kink the connecting cables or electrodes.
- Disconnect the connecting cables from the electrodes before storage.
- After use, place the adhesive electrodes back onto their protective backing film.
- Store the device in a cool, dry, and well-ventilated location.
- Never place heavy objects on top of the device, as this may damage the housing or internal components.
Troubleshooting — common problems, error codes, fixes and support
- Common problem: weak or no stimulation. Solution: check electrode placement and adhesion (skin must be clean, dry, and free of oil/lotions), ensure electrodes are within recommended size/condition and replace worn gel pads; verify batteries (3 x AA) are fresh and correctly installed and that channels are activated at non-zero intensity.
- Common problem: uneven or painful stimulation. Solution: reduce intensity, switch to a different pre-program or channel, confirm electrodes are not overlapping and are placed symmetrically; use the unit’s adjustable pulse width and frequency settings to find a comfortable therapeutic level.
- Error codes and device warnings: the EM 80 uses a safety switch-off and on‑screen notifications for misuse or low battery; if the display shows a battery or fault icon, replace batteries and reboot the device; persistent faults indicate service is required and the unit should not be used until checked by authorised service.
- Preventive measures: store electrodes in a sealed bag, clean skin before application, rotate electrode placement sites to avoid skin irritation, replace gel pads when adhesion or conductivity decreases, remove the device during water exposure and follow the timer limits (5–90 minutes) to avoid overstimulation.
Warranty & support: the EM 80 is supplied as a medical device with manufacturer warranty (Beurer commonly supplies a multi‑year guarantee—check local packaging for exact terms, e.g., some regions list a 5‑year guarantee) and comes with a detailed instruction manual and storage pouch; for repairs or unresolved problems, contact Beurer customer service or your authorised retailer for warranty support and authorised service centres.
Contact for help: use the contact details provided on the device packaging or Beurer’s official website and the retailer you purchased from for returns or technical support; keep your proof of purchase and serial/EAN information (e.g., EAN 4211125662004 for EM 80 where printed) when contacting support.
Pros & Cons — clear assessment of the beurer Digital TENS/EMS Unit EM 80
- Pros — Multi-function versatility: Combines TENS, EMS and massage in one unit with 30 predefined programs and 20 programmable slots, allowing therapy flexibility for pain relief, muscle training and relaxation.
- Pros — Multi-site treatment: Four independently adjustable channels and eight electrodes enable simultaneous treatment of several body areas—useful for bilateral or multi‑region therapy sessions.
- Pros — Customisation & clinical features: Adjustable frequency (1–120 Hz), pulse width (40–250 µs), timer (5–90 min), and a “Doctor’s function” make the device adaptable to clinical or personalised regimens.
- Cons — Consumables & ongoing cost: Self-adhesive gel electrodes wear out and must be replaced regularly; running cost for replacement pads and batteries should be considered when assessing long-term value.
- Cons — Learning curve: Users new to electrotherapy may require time to learn proper electrode placement and program selection; consult the manual or a clinician to avoid suboptimal or uncomfortable sessions.
- Cons — Not a substitute for medical care: While effective for symptomatic relief and rehabilitation support, users with certain medical conditions (e.g., pacemakers, epilepsy, pregnancy) should consult a healthcare professional before use; device contraindications and safety information are provided in the manual.
- Value for money: Considering the four-channel design, eight electrodes and wide program range, the EM 80 generally represents solid value in the mid-range electrotherapy segment compared with single-channel or less configurable devices—especially for users requiring multi-site treatment or programmability.
- Alternatives: Simpler single/dual-channel TENS devices are cheaper but lack the EM 80’s multi-channel and programmable flexibility; clinical-grade stimulators with more advanced waveform options are pricier—choose based on required features and intended use.
Customer reviews and real-user feedback for beurer Digital TENS/EMS Unit EM 80
Overall user sentiment: customers commonly praise the EM 80’s multi-channel capability, build quality and the breadth of preset programs for pain relief and muscle stimulation, often highlighting the convenience of treating two body areas at once with four channels and eight electrodes.
Common praises: effective non-drug pain relief for back/shoulder complaints, useful EMS programs for muscle activation and recovery, easy-to-read display and a solid accessory kit (storage pouch, batteries, and electrodes included) are frequently mentioned in positive reviews.
Common complaints: typical negatives reported by users include the need to frequently replace adhesive electrode pads, initial setup complexity for inexperienced users, and occasional requests for longer battery life or an optional mains adapter—many buyers resolve setup questions using the manual or online guides.
Representative rating and endorsement: typical online retailer listings show high average ratings for the EM 80 (many four- to five‑star user reviews), with satisfied users recommending it for home physiotherapy and athletic recovery; prospective buyers are advised to follow electrode care tips and consult the manual for safe use.
SEO & long-tail headings to improve discoverability
How to use beurer Digital TENS/EMS Unit EM 80 for lower back pain relief at home
To treat lower back pain, select an appropriate TENS program on the EM 80, place paired electrodes on either side of the painful area (skin clean and dry), start at low intensity and increase gradually to a comfortable level, limit sessions to the recommended duration and rotate electrode positions between sessions to reduce skin irritation.
beurer Digital TENS/EMS Unit EM 80 programmable EMS settings for muscle recovery and training
Use one of the EMS programs for muscle regeneration or create a custom program adjusting frequency (Hz), pulse width (µs), and on/off cycles to match training goals—lower frequencies for relaxation/recovery, higher frequencies for contraction and strengthening—always follow physiotherapist guidance for rehabilitation protocols.p>
Keywords and semantic terms included
The content above naturally includes the primary keyword beurer Digital TENS/EMS Unit EM 80 multiple times and integrates related keywords and synonyms such as “TENS device,” “EMS stimulator,” “electrotherapy,” “muscle stimulation,” “pain relief,” “four channels,” “eight electrodes,” “programmable programs,” “medical device” and long-tail queries such as “how to use beurer EM 80 for lower back pain” to support featured snippet and voice-search optimization.
Faqs
How do I set up the beurer Digital TENS/EMS Unit EM 80 for the first time?
What should I do if the beurer Digital TENS/EMS Unit EM 80 won't turn on?
How do I choose and use programs on the beurer Digital TENS/EMS Unit EM 80?
Where should I place electrodes when using beurer Digital TENS/EMS Unit EM 80 for pain relief?
Can the beurer Digital TENS/EMS Unit EM 80 be used on any body part safely?
How do I create custom programs on beurer Digital TENS/EMS Unit EM 80 for better results?
How do I maintain and care for the beurer Digital TENS/EMS Unit EM 80 electrodes?
What batteries does beurer Digital TENS/EMS Unit EM 80 require and how long do they last?
More beurer manuals
- Setup: Beurer Insect Bite Healer BR 90 User Manual
- Setup: Beurer Compression Leg Therapy FM 150 Pro Owner Manual
- Setup: Beurer Insect Bite Healer BR 60 User Manual
- Setup: Beurer Digital TENS/EMS Device EM-49 User Manual
- Setup: Beurer Insect Bite Healer BR 10 User Manual
- Setup: Beurer Daylight Therapy Lamp TL-70 User Manual
Leave a Comment