
Setup: Brother Embroidery & Sewing Machine 888-L01 Owner Manual
Content
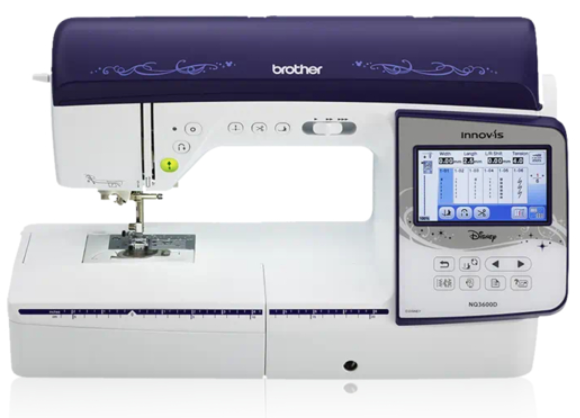
Brother Embroidery & Sewing Machine 888-L01
Introduction
The Brother Embroidery & Sewing Machine 888-L01 is a versatile and advanced sewing machine designed to cater to both embroidery and sewing needs. This machine is ideal for crafters, hobbyists, and professionals alike, offering a wide range of features that make it a valuable addition to any sewing room. The 888-L01 was launched in recent years, reflecting Brother's commitment to innovation and user-friendly design. With an estimated price range of $500-$700, this machine is a significant investment for those serious about their craft.
The machine is equipped with a large 5" x 7" embroidery area, allowing for intricate and detailed designs. It also features 138 built-in stitches, including 11 presser feet, and a backlit LCD for easy navigation. The machine's capability to handle both embroidery and sewing tasks makes it a multifunctional tool that can be used for various projects, from garment construction to home decor and quilting.
Names of Machine Parts and Their Functions
The names of the various parts of the machine and their functions are described below. Before using the machine, carefully read these descriptions to learn the names of the machine and their locations.
Machine
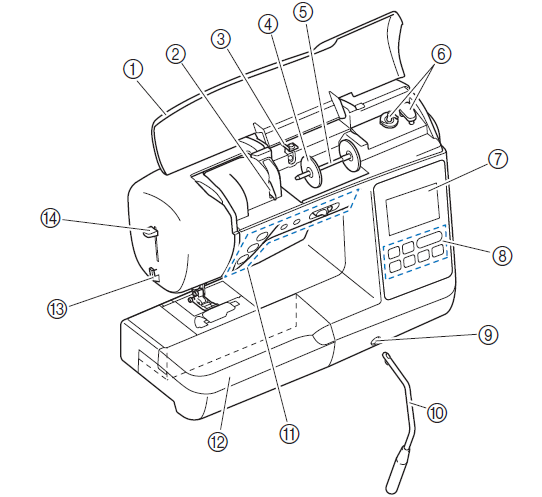
Front view
- Top cover
Open the top cover to place the spool of thread on the spool pin. - Thread guide plate
Pass the thread around the thread guide plate when threading the upper thread. - Bobbin winding thread guide and pretension disk
Pass the thread under this thread guide and around the pretension disk when winding the bobbin thread. - Spool cap
Use the spool cap to hold the spool of thread in place. - Spool pin
Place a spool of thread on the spool pin. - Bobbin winder
Use the bobbin winder when winding the bobbin. - LCD (liquid crystal display)
Settings for the selected stitch and error messages appear in the LCD. (page B-11) - Operation panel
From the operation panel, stitch settings can be selected and edited, and operations for using the machine can be selected. (page B-5) - Knee lifter mounting slot
Insert the knee lifter into the knee lifter mounting slot. - Knee lifter
Use the knee lifter to raise and lower the presser foot. (page B- 45) - Operation buttons and sewing speed controller
Use these buttons and the slide to operate the machine. (page B-4) - Flat bed attachment
Insert the presser foot accessory tray into the accessory compartment of the flat bed attachment. Remove the flat bbed attachment when sewing cylindrical pieces such as sleeve cuffs. - Thread cutter
Pass the threads through the thread cutter to cut them. - Needle threader lever
Use the needle threader lever to thread the needle.
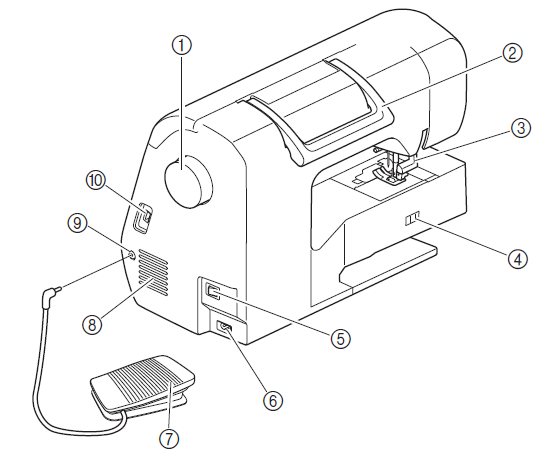
Right-side/rear view
- Handwheel
Turn the handwheel toward you (counterclockwise) to raise and lower the needle to sew one stitch. - Handle
Carry the machine by its handle when transporting. - Presser foot lever
Raise and lower the presser foot lever to raise and lower the presser foot. - Feed dog position switch
Use the feed dog position switch to raise and lower the feed dogs. (page S-31) - Main power switch
Use the main power switch to turn the machine on and off. - Power supply jack
Insert the plug on the power cord into the power supply jack. - Foot controller
Press the foot controller to control the speed of the machine. (page B-38) - Air vent
The air vent allows the air surrounding the motor to circulate.
Do not cover the air vent while the machine is being used. - Foot controller jack
Insert the plug on the end of the foot controller cable into the foot controller jack. - USB port (for a USB flash drive)
In order to import patterns from a USB flash drive, insert the USB flash drive directly into the USB port.
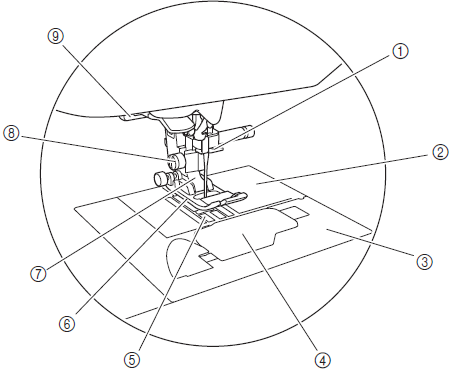
Needle and presser foot section
- Needle bar thread guide
Pass the upper thread through the needle bar thread guide. - Needle plate
The needle plate is marked with guides for sewing straight seams. - Needle plate cover
Remove the needle plate cover to clean the bobbin case and race. - Bobbin cover/bobbin case
Remove the bobbin cover and then insert the bobbin into the bobbin case. - Feed dogs
The feed dogs feed the fabric in the sewing direction. - Presser foot
The presser foot applies pressure consistently on the fabric as the sewing takes place. Attach the appropriate presser foot for the selected stitch. - Presser foot holder
The presser foot is attached to the presser foot holder. - Presser foot holder screw
Use the presser foot holder screw to hold the presser foot in place. (page B-34, B-52) - Buttonhole lever
Lower the buttonhole lever when sewing buttonholes and bar tacks or when darning.
Specifications
- Large 5" x 7" embroidery area
- 138 built-in stitches, including decorative, heirloom, and quilting stitches
- 11 presser feet for various sewing tasks
- Backlit LCD for easy stitch selection and embroidery design management
- Automatic threader and tension system
- Free arm for sewing cuffs, sleeves, and other hard-to-reach areas
- USB port for importing embroidery designs from your computer
- Comes with a variety of accessories,s including hoops, needles, and spool pins
IMPORTANT SAFETY INSTRUCTIONS
DANGER - To reduce the risk of electrical shock
- Always unplug the machine from the electrical outlet immediately after using, when cleaning, making any user servicing adjustments mentioned in this manual, or if you are leaving the machine unattended.
WARNING - To reduce the risk of burns, fire, electrical shock, or injury to persons.
- 2Always unplug the machine from the electrical outlet when making any adjustments mentioned in the instruction manual.
- To unplug the machine, switch the machine to the symbol “O” position to turn it off, then grasp the plug and pull it out of the electrical outlet. Do not pull on the cord.
- Plug the machine directly into the electrical outlet. Do not use an extension cord.
- Always unplug your machine if there is a power failure.
Electrical Hazards:
- This machine should be connected to an AC power source within the range indicated on the rating label. Do not connect it to a DC power source or converter. If you are not sure what kind of power source you have, contact a qualified electrician.
- This machine is approved for use in the country of purchase only.
Never operate this machine if it has a damaged cord or plug, if it is not working properly, has been dropped or damaged, or water is spilled on the unit. Return the machine to the nearest authorized Brother dealer for examination, repair, or electrical or mechanical adjustment.
- While the machine is stored or in use, if you notice anything unusual, such as an odor, heat, discoloration, or deformation, stop using the machine immediately and unplug the power cord.
- When transporting the machine, be sure to carry it by its handle. Lifting the machine by any other part may damage the machine or result in the machine falling, which could cause injuries.
- When lifting the machine, be careful not to make any sudden or careless movements, which may cause a personal injury.
Always keep your work area clear:
- Never operate the machine with any air openings blocked. Keep the ventilation openings of the machine and the foot control free from the buildup of lint, dust, and loose cloth.
- Do not store objects on the foot controller.
- Do not use extension cords. Plug the machine directly into the electrical outlet.
- Never drop or insert foreign objects in any opening.
- Do not operate where aerosol (spray) products are being used or where oxygen is being administered.
- Do not use the machine near a heat source, such as a stove or iron; otherwise, the machine, power cord, or garment being sewn may ignite, resulting in fire or an electric shock.
- Do not place this machine on an unstable surface, such as an unsteady or slanted table; otherwise, the machine may fall, resulting in injuries.
Special care is required when sewing:
- Always pay close attention to the needle. Do not use bent or damaged needles.
- Keep fingers away from all moving parts. Special care is required around the machine needle.
- Switch the machine to the symbol “O” position to turn it off when making any adjustments in the needle area.
- Do not use a damaged or incorrect needle plate, as it could cause the needle to break.
- Do not push or pull the fabric when sewing, and follow careful instructions when free-motion stitching so that you do not deflect the needle and cause it to break.
This machine is not a toy:
- Your close attention is necessary when the machine is used by or near children.
- The plastic bag that this machine was supplied in should be kept out of the reach of children or disposed of. Never allow children to play with the bag due to the danger of suffocation.
- Do not use outdoors.
For a longer service life:
- When storing this machine, avoid direct sunlight and high-humidity locations. Do not use or store the machine near a space heater, iron, halogen lamp, or other hot objects.
- Use only neutral soaps or detergents to clean the case. Benzene, thinner, and scouring powders can damage the case and machine, and should never be used.
- Always consult the Operation Manual when replacing or installing any assemblies, the presser feet, needle, or other parts, to assure correct installation.
For repair or adjustment:
- If the light unit is damaged, it must be replaced by an authorized Brother dealer.
- In the event a malfunction occurs or an adjustment is required, first follow the troubleshooting table in the back of the Operation Manual to inspect and adjust the machine yourself. If the problem persists, please consult your local authorized Brother dealer.
FOR USERS IN COUNTRIES EXCEPT CENELEC
This appliance is not intended for use by persons (including children) with reduced physical, sensory, or mental capabilities, or a lack of experience and knowledge, unless they have been given supervision or instruction concerning use of the appliance by a person responsible for their safety. Children should be supervised to ensure that they do not play with the appliance.
FOR USERS IN CENELEC
This appliance can be used by children aged from 8 years and above and persons with reduced physical, sensory, or mental capabilities or lack of experience and knowledge if they have been given supervision or instruction concerning the use of the appliance in a safe way and understand the hazards involved. Children shall not play with the appliance. Cleaning and user maintenance shall not be made by children without supervision.
Included accessories
Included accessories may differ from the table below, depending on the machine model you purchased. For more details h including accessories and their part codes for your machine, refer to the Quick Reference Guide.
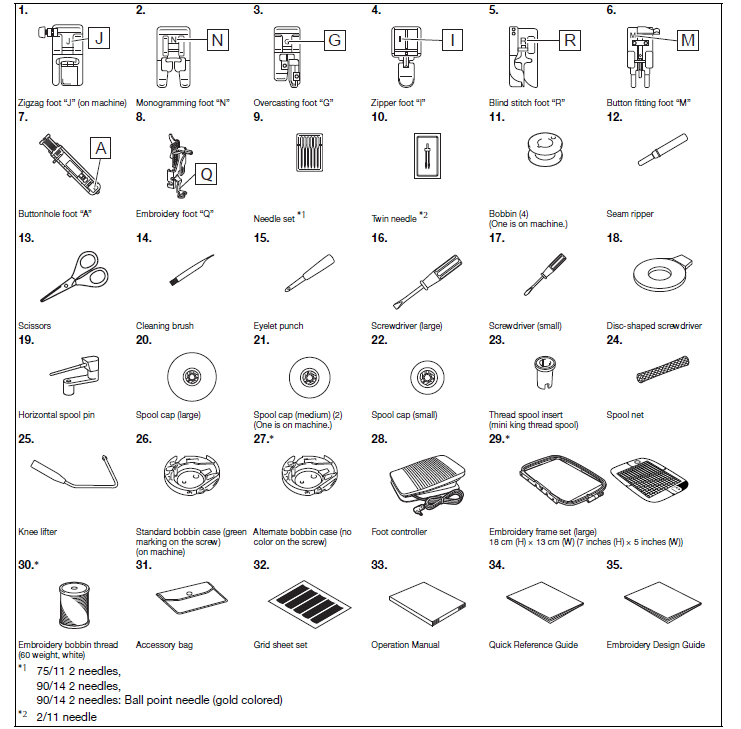
These accessories are included in the same box as the embroidery unit.
Note
(For U.S.A. only) Foot controller: Model T
This foot controller can be used on the machine with product code 888-L01/K00. The product code is mentioned on the machine rating plate.
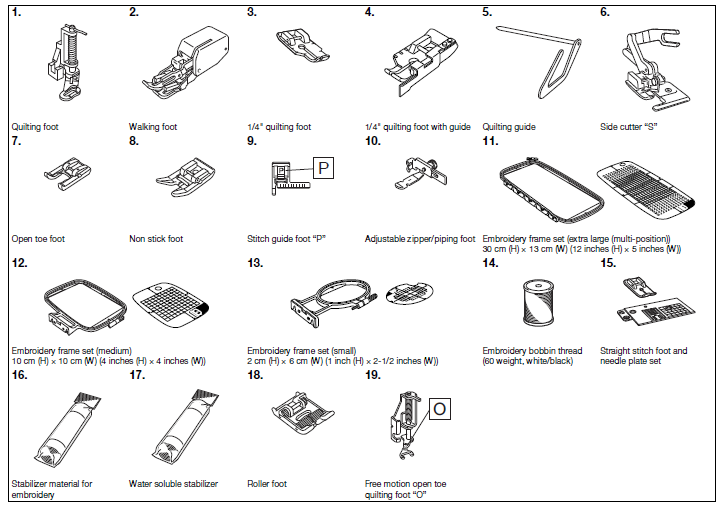
Optional accessories
The following are available as optional accessories to be purchased separately. For more optional accessories and their part codes, refer to the Quick Reference Guide.
Using the utility stitch tables in the “Sewing” section
The utility stitch numbers differ depending on the model of your machine. Refer to the column titled “Model 4” for your machine.

Care and Maintenance
Restrictions on oiling
- In order to prevent damaging this machine, it must not be oiled by the user.
- This machine was manufactured with the necessary amount of oil applied to ensure correct operation, making periodic oiling unnecessary.
- If problems occur, such as difficulty turning the handwheel or an unusual noise, immediately stop using the machine, and contact your authorized Brother dealer or the nearest Brother authorized service center.
Precautions for storing the machine
Do not store the machine in any of the locations described below;, otherwise, damage to the machine may result, for example, rust caused by condensation.
- Exposed to extremely high temperatures
- Exposed to extremely low temperatures
- Exposed to extreme temperature changes
- Exposed to high humidity or steam
- Near a flame, heat,r or air conditioner
- Outdoors or exposed to direct sunlight
- Exposed to extremely dusty or oily environments
Note
- In order to extend the life of this machine, periodically turn it on and use it.
- Storing this machine for an extended period of time without using it may reduce its efficiency.
Cleaning the machine surface
If the surface of the machine is dirty, lightly soak a cloth in neutral detergent, squeeze it out firmly, and then wipe the surface of the machine. After cleaning it once with a damp cloth, wipe it again with a dry cloth.
Troubleshooting
If the machine stops operating correctly, check the following possible problems before requesting service. You can solve most problems by yourself. If you need additional help, the Brother Solutions Center offers the latest FAQs and troubleshooting tips. Visit us at “ http://support.brother.com/ ”.
If the problem persists, contact your Brother dealer or the nearest Brother authorized service center.
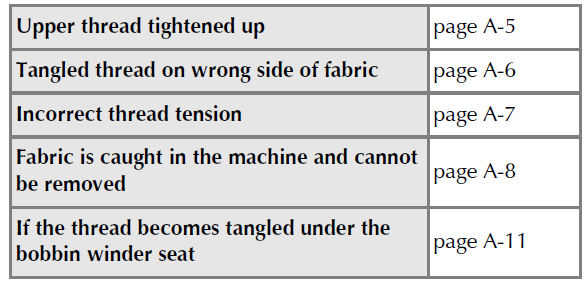
Frequent troubleshooting topics
Detailed causes and remedies for common troubleshooting topics are described below. Be sure to refer to this before contacting us.
Pros & Cons
Pros:
- Multi-functional capabilities for both embroidery and sewing
- Large embroidery area for detailed designs
- 138 built-in stitches offering a wide range of creative options
- Automatic threader and tension system for convenience
- Backlit LCD for easy navigation
- Durable construction and long-lasting performance
Cons:
- Higher price point compared to basic sewing machines
- Complex setup process for beginners
Customer Reviews
Customers praise the Brother Embroidery & Sewing Machine 888-L01 for its versatility and ease of use. Many appreciate the large embroidery area and the variety of built-in stitches. However, some users find the setup process complex and the price a bit steep. Common complaints include issues with thread tangling and occasional malfunctions with the automatic threader. Despite these minor drawbacks, the machine receives high marks for its overall performance and durability.
Faqs
What is the size of the embroidery area on the Brother 888-L01?
How many built-in stitches does the machine have?
Does the machine come with any presser feet?
Is there an automatic threader on this machine?
Can I import my own embroidery designs into this machine?
What kind of display does this machine have?
Is this machine suitable for beginners?
What kind of maintenance does this machine require?
Can I sew cuffs and sleeves with this machine?
What if I encounter issues with thread tangling or misaligned stitches?
More brother manuals
Leave a Comment