
How to Use: Govee Smart Countertop Ice Maker H717D User Manual
Content
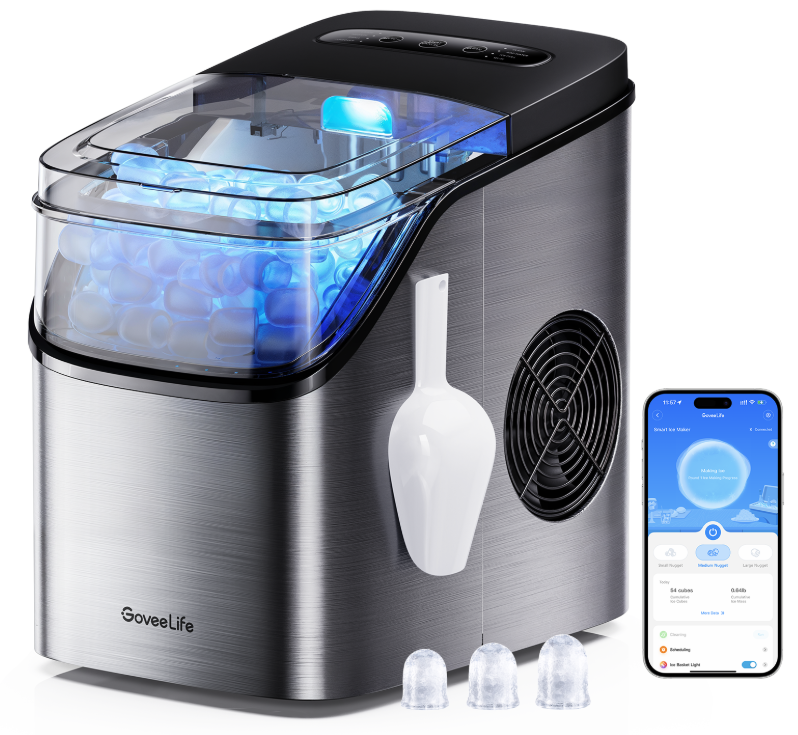
Govee Smart Countertop Ice Maker H717D
Introduction
The govee Smart Countertop Ice Maker H717D is a cutting-edge, portable ice maker designed to provide users with a convenient and efficient way to produce ice in the comfort of their own homes. This innovative device is perfect for families, party hosts, and anyone who needs a quick ice solution without relying on a refrigerator's built-in ice maker. Key benefits include its ability to produce ice rapidly, with batches ready in under 10 minutes, and its smart app control, allowing users to schedule ice production and receive notifications when the ice basket is full or when water needs to be refilled.
Targeted at individuals who value convenience and efficiency, this product is ideal for home use, outdoor events, or even RV adventures. The estimated price range for this model is competitive, typically falling between $100 and $200, making it an affordable addition to any kitchen. The Govee Smart Countertop Ice Maker H717D is available for purchase on various online platforms, including Govee's official website and popular retailers like Walmart and Best Buy.
Important Safety Instructions
When using this electrical equipment, basic safety precautions should always be followed, including the following:
READ AND FOLLOW ALL INSTRUCTIONS
- This product must be properly installed and located in accordance with the installation instructions before it is used.
- Do not touch hot surfaces. Use handles or knobs.
- To protect against electrical hazards, do not immerse the cord, plugs, or the appliance in water or other liquids.
- This appliance is not intended for use by persons (including children) with reduced physical, sensory,, or mental capabilities or a lack of experience and knowledge, unless they have been given supervision or instruction concerning the use of the appliance by a person responsible for their safety.
- Close supervision is necessary when any appliance is used by or near children. Children should be supervised to ensure that they do not play with the appliance.
- Unplug from the outlet when not in use and before cleaning or servicing.
Do not operate any appliance with a damaged cord or plug, or after the appliance malfunctions, or is dropped or damaged in any manner. Return appliance to manufacturer for examination, repair, or electrical or mechanical adjustment. All
servicing should be performed by an authorized service representative
- The Ice Maker is for indoor household use only. Do not use outdoors.
- Do not let the cord hang over the edge of the table or counter, or touch hot surfaces. Do not let the power cord cross over carpeting or other heat insulators. Do not cover the cord.
- Do not place on or near a hot gas or electric burner, or in a heated oven.
- Always attach the plug to the appliance first, then plug the cord into the wall outlet. To disconnect, turn any control to ‘OFF’, then remove the plug from the wall outlet.
- Do not use the appliance for anything other than its intended use.
- Do not leave the unit unattended while in use.
- Plug the Ice Maker into an exclusive grounded 3-prong outlet. No other appliance should be plugged into the same outlet. Be sure that the plug is fully inserted into the receptacle.
- If the Ice Maker is brought in from outside in the wintertime, do not use it for a few hours, allowing the unit to warm up to the room temperature before operating.
- Do not clean your Ice Maker with any flammable fluids. The fumes may create a fire hazard or explosion.
- WARNING: Do not touch the Evaporator when the Ice Maker is making ice; it may burn your skin.
- DANGER – Risk of fire or explosion. Flammable refrigerant is used. Do not use mechanical devices to defrost the ice maker. Do not puncture refrigerant tubing.
- DANGER – Risk of fire or explosion. Flammable refrigerant used. To be repaired only by trained service personnel. Do not puncture refrigerant tubing.
- CAUTION – Risk of fire or explosion. Flammable refrigerant is used. Consult the repair manual /owner’s guide before attempting to install or service this product. All safety precautions must be followed.
- CAUTION – Risk of fire or explosion. Dispose of property in accordance with federal or local regulations. Flammable refrigerant is used .
- CAUTION – Risk of fire or explosion due to puncture of refrigerant tubing; follow handling instructions carefully. Flammable refrigerant is used.
- When handling, moving, installing, and operating the appliance, care should be taken to avoid either damaging the refrigerant tubing, or increasing the risk of a leak.
- The ice maker should be installed in accordance with the safety standard for refrigeration systems, ASHRAE 15. The ice maker shall not be installed in corridors or hallways of public buildings.
- If the unit is with a problem that needs to be maintained, it should be replaced with like components,, and that servicing shall be done by factory-authorized service personnel, to minimize the risk of possible ignition due to incorrect parts or improper service.
- Dispose of the ice maker in accordance with Federal and Local Regulations, as it uses flammable refrigerant.
Power Cord & Plug
- This appliance must be plugged into at least a 15-AMP 110-115 VOLT 60 Hz GROUNDED OUTLET. This appliance must be grounded. It is equipped with a 3-wire cord having a grounding plug. The plug must be plugged into an outlet that is properly installed and grounded.
- Avoid the use of an extension cord because it may overheat and cause a risk of fire. However, if it is necessary to use an extension cord:
a. Use only 3-wire extension cords with a 3-blade grounding plug.
b. Do not under any circumstances, cut or remove the third (ground) prong from the power cord. Any questions concerning power and/or grounding should be directed toward a certified electrician.
c. The marked rating of an extension cord must be equal to or greater than the rating of this appliance.
d. It should be positioned such that it does not drape over the counter or tabletop,, where it can be pulled on by children intentionally.
Risk of Electric Shock & Leakage
- WARNING: Improper use of a grounded wire can result in the risk of electric shock. Consult a professional if necessary. Do not attempt to defeat this safety feature by modifying the plug.
- To minimize the possibility of electric shock, unplug this appliance from the power supply or disconnect at the household distribution panel by removing the fuse or switching off the circuit breaker before attempting any maintenance or cleaning.
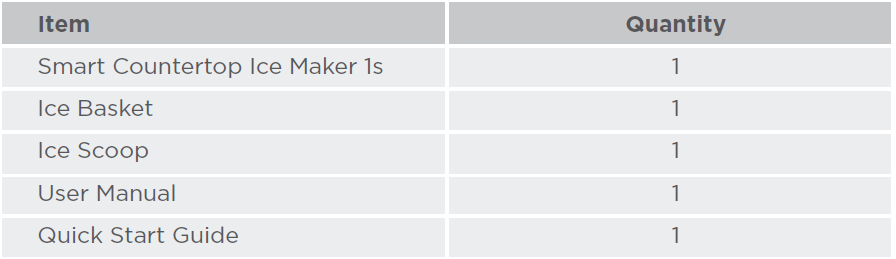
Included in the Box
Part Names
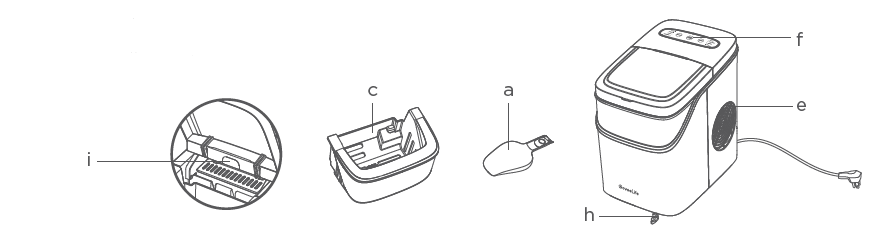
- Ice Scoop
- Ice Shovel Board
- Ice Basket
- Large Viewing Window
- Air Exhaust
- Control Panel
- Maximum Water Level: Remove the ice basket to see the Maximum Water Level mark.
- Water Drain CaThe The p
- RGB LTheRGB lighting will display different lighting effects based on different modes and statuses. Adjust or turn it off in the app if necessary.
Specifications
Here are the key specifications of the Govee Smart Countertop Ice Maker H717D:
- Model Name: H717D
- Power Voltage: AC 120V,60Hz
- Rated Power: ≤170W
- Water Tank Capacity: 2L/0.53 Gal
- Net Weight: 16.8lb/7.6kg
- Dimensions: 9.45x12.52x13.11in/24*31.8*33.3cm
- Ice Making Current: 1.7A
- Ice Harvest Current: 2.0A
- Refrigerant: R600a 0.53oz/15g
- Design Pressure:
- High Side
- Low Side
- 290 PSIG
- 88 PSIG
Smart Alerts & Indicator Status
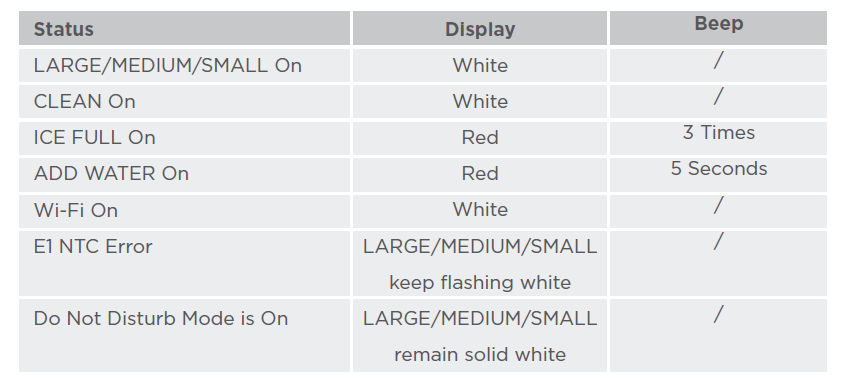
Functions
- Memory Function
The ice maker will save its previous ice size (LARGE/MEDIUM/SMALL) when powered off. When it is powered back on, the settings will resume. - Smart Function
Connect the ice maker to Govee Home App via Wi-Fi or Bluetooth to remotely switch to cleaning mode, select the ice size, set a delayed start, etc. - Waterless Protection
The ice maker will enter the Waterless status when the tanks have no water left. Please press the START/CANCEL Button to dismiss that status and add some water before restarting.
Using Your Ice Maker
- Plug the ice maker into the wall outlet, and all the indicator lights will blink.
- Open the cover and remove the ice basket.
- Fill the water tank.
Note: Do not fill above the maximum water level mark at the back of the water tank. - Replace the ice basket and close the cover.
- Press the START/CANCEL Button and the white indicator light of LARGE mode will flash 3 seconds until it remains on. To change one of the ice sizes among LARGE, MEDIUM,, or SMALL, press the SELECT button until the light remains on beside the desired ice size.
- The first ice-making cycle will last approximately 8-13 minutes,, depending on the ice size that is selected. The ice-making cycle starts with water being pumped into the water tray situated below the evaporator tubes. Over the next 8-13 minutes, ice will form on the evaporator tubes. Once this is completed, the ice tray will tilt backwards,, and the remaining water in the ice tray will be drained back into the water tank. The ice is then dropped from the evaporator tubes and pushed forward into the ice basket by the ice shovel. The ice tray will automatically move back into position under the evaporator tubes and start the next cycle.
Note: The recommended room temperature is 50℉ to 95℉ - The ICE FULL light will light up in red when the ice basket is full, and the ice maker will stop the ice-making cycle automatically. Gently remove the ice from the ice basket with the ice scoop.
Note: Once the ice basket has been emptied and the cover closed, the ice maker will restart its ice-making function automatically. - The ADD WATER light will light up in red when there is no more water in the water tank,, and the ice-making cycle will stop automatically.
Note: Press the power button once to dismiss Waterless Protection. Remove the ice basket and add water to the water tank. Do not fill above the maximum water level mark of the water tank. Replace the ice basket and close the cover. After refilling the water tank, press the power button again. - When you have finished making ice, it is recommended to enjoy the fresh ice directly; otherwise, transfer the ice to a freezer.
Note: The ice machine does not turn off automatically. If the ice is not taken for a long time after the ice-making is completed, the ice will melt, and the ice maker will start making ice again. - Stop the ice-making cycle by pressing the power button. Unplug the unit from the wall outlet. Open the cover and allow the ice maker to reach room temperature, and follow the directions in the Cleaning section.
Cleaning and Maintaining
Before using your ice maker, it is strongly recommended to clean it thoroughly.
- Open the cover, take out the ice basket. Add diluted detergent into the water tank,, the water level below the water level mark.
Note: It is recommended to use drinking water for making ice. For cleaning, use water and specialized detergents (such as citric acid descaling agents and nickel-safe cleaners). Do not put other acidic solvents such as vinegar, hydrochloric acid, sulfuric acid, and hydrofluoric acid into the ice maker, as this may damage the machine and may have an impact on food safety. Close the cover and press the CLEAN button. Wait for the self-cleaning process to be finished
Note:
If the water pump can’t inject water, the ice maker will activate Waterless Protection, and the “ADD WATER” indicator will turn on. Press the “START/CANCEL” Button to dismiss this status, and fill water up to the maximum water level mark. Press the "CLEAN" Button again to turn on the cleaning process.
You can only turn CLEAN mode on when the ice maker is off.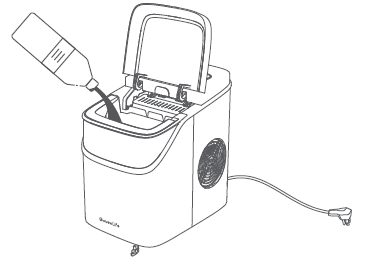
Use the water to rinse the inside parts and drain out the water by unplugging the drain cap on the front bottom side.
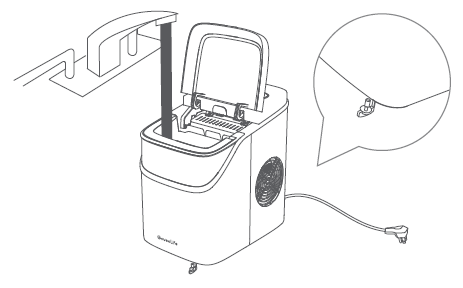
- The outside of the ice maker should be cleaned regularly with a mild detergent solution and water.
- Dry the interior and exterior with a clean and soft cloth.
Troubleshooting
The troubleshooting section below is for solving frequently asked questions. If your problem persists, please contact Customer Support.
For Govee Smart Ice Maker
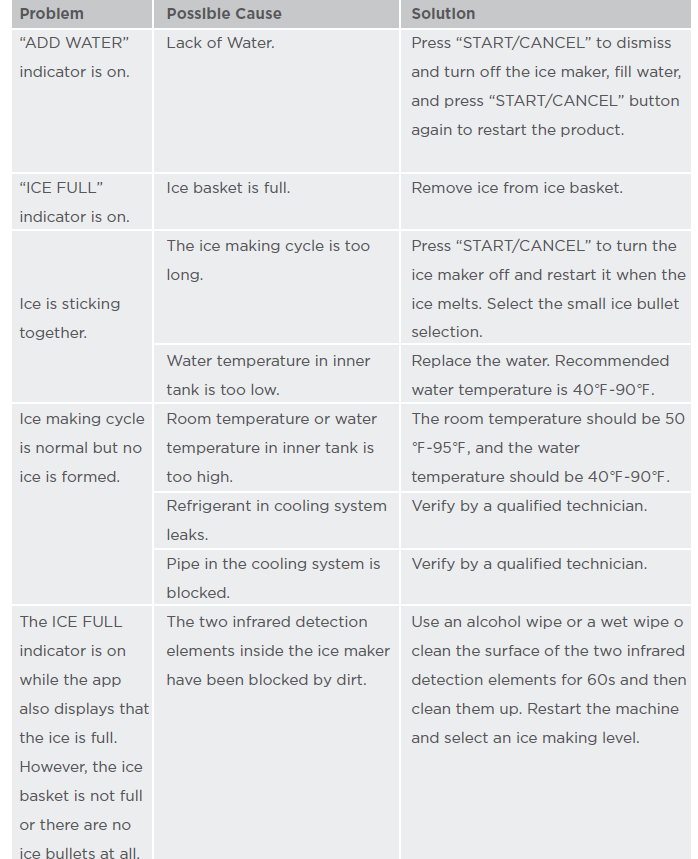
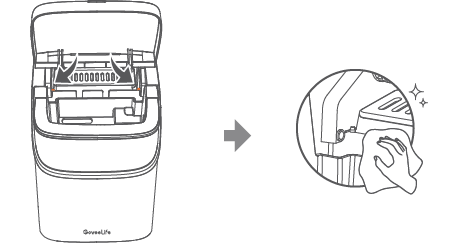
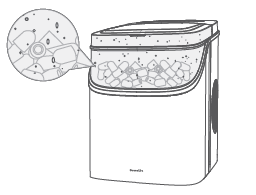
Note: a difference in temperature between the ice basket and the surrounding environment while the ambient humidity is high will create condensation on the ice basket's surface, which is normal. Please use the product within the recommended temperature range.
For App & Connectivity
- Cannot connect to Govee Home App.
- Make sure the Bluetooth of your smartphone is enabled and your smartphone is not connected to other Bluetooth devices.
- Enable the smartphone’s Location Services.
- Try connecting with another smartphone.
- Make sure your app is the latest version.
- Make sure you connect to your Wi-Fi router’s 2.4GHz network and that the network is working correctly.
- Make sure the Wi-Fi password you entered is correct.
- Shorten the distance between the ice maker, Wi-Fi router, and the smartphone.
- Make sure your ice maker and the Wi-Fi router are located away from appliances that produce electromagnetic radiation (e.g.,, microwave ovensrefrigeratorsrs, etc.).
- If you are using a VPN, try turning it off and then connecting the ice maker.
- Disable portal authentication for your Wi-Fi network. If portal authentication is enabled, this ice maker will not be able to access your Wi-Fi network, and setup will fail. Portal authentication means that you need to sign in to your Wi-Fi network through a web page before you can use the Internet.
- Cannot find the device on the Bluetooth Device Nearby page of the app.
- The ice maker may be connected to another smartphone. Disconnect it from the other smartphone first.
- The ice maker is offline.
- Make sure the ice maker is plugged in and powered on, then refresh “Devices” in the Govee Home App by swiping down on the screen.
- Make sure your router is connected to the internet and your phone’s network connections are are working.
- If the Wi-Fi password has been changed, the ice maker will automatically go offline. Try connecting it to the network again.
- Delete the offline ice maker from the Govthe ee Home App, then add and reconfigure the ice maker again in the app.
Pros and Cons
Pros:
- Rapid Ice Production: Quickly produces ice, ideal for those who need it fast.
- Smart App Control: Allows for scheduling and notifications, enhancing user experience.
- Compact Design: Suitable for small spaces, making it perfect for home or RV use.
- Value for Money: Offers competitive pricing with robust features.
Cons:
- Noise During Operation: Some users may find the noise level slightly higher than expected.
- Ice Quality: Some users report that the ice can be "wet," which is common in countertop ice makers.
Customer Reviews
Users generally praise the **govee Smart Countertop Ice Maker H717D** for its efficiency and smart features. On average, it receives a rating of around 4 out of 5 stars, with many reviewers appreciating its ability to produce ice quickly and its compact design. However, some users have noted that the ice can be slightly wet, which is a common issue with countertop ice makers. Despite this, the product is highly recommended for its value and ease of use.
For those considering purchasing a countertop ice maker, the Govee Smart Countertop Ice Maker H717D is an excellent choice. Its smart features, quick ice production, and affordable price make it a great addition to any home.
Faqs
How do I set up govee Smart Countertop Ice Maker H717D for the first time?
What should I do if govee Smart Countertop Ice Maker H717D is not producing ice?
Can I use govee Smart Countertop Ice Maker H717D with voice assistants like Amazon Alexa?
How often should I clean the govee Smart Countertop Ice Maker H717D?
What are the key features that make govee Smart Countertop Ice Maker H717D different?
How do I optimize the performance of govee Smart Countertop Ice Maker H717D?
What should I do if govee Smart Countertop Ice Maker H717D is making too much noise?
Can I use govee Smart Countertop Ice Maker H717D outdoors or in high-temperature environments?
More govee manuals
- Setup: Govee Smart Air Purifier H7121 User Manual
- Govee RGBIC Neon Rope Light H61A21D1 Guide
- Setup: Govee Smart Air Purifier 2 H7124 User Manual
- Govee RGBIC LED Strip Lights H6171 | Pairing Instructions
- Setup: Govee Smart Mini Air Purifier H7126 User Manual
- Govee Doorbell H7202 User Manual | Specs & Operations
Leave a Comment