
Setup: Honeywell Media Air Cleaners User Manual
Content
Honeywell Media Air Cleaners
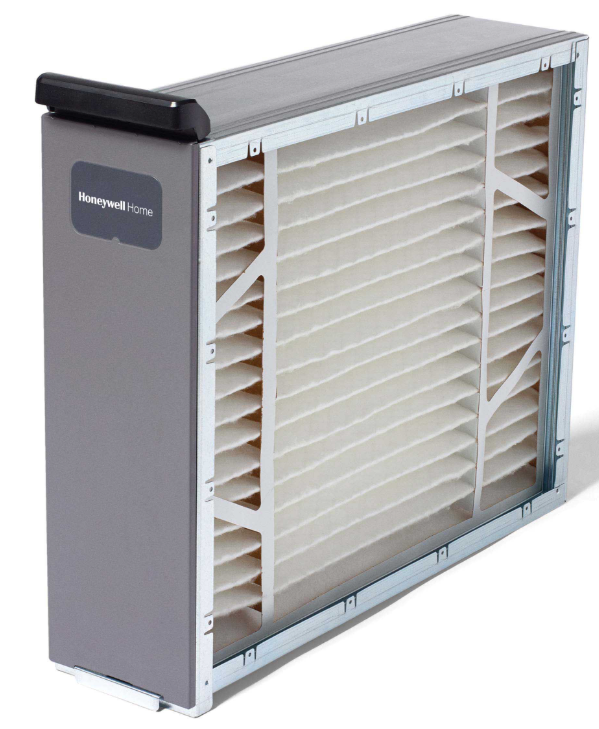
Introduction to Honeywell Media Air Cleaners
Honeywell Media Air Cleaners are advanced filtration systems designed to improve indoor air quality in homes and commercial spaces. These units utilize high-efficiency pleated media filters to capture airborne particles such as dust, smoke, pollen, pet dander, and mold spores. With MERV 11 or MERV 13 ratings, Honeywell Media Air Cleaners offer superior filtration compared to standard HVAC filters, making them ideal for allergy sufferers, pet owners, and anyone seeking cleaner, healthier air.
Key benefits include low maintenance, easy installation, and compatibility with most forced-air heating and cooling systems. Honeywell Media Air Cleaners are suitable for residential, office, and light commercial environments, including homes, schools, and healthcare facilities. These units are available in various sizes, such as the F100F1625 and F200F2025/U, and typically range from $100 to $250 depending on model and features. They are widely available through HVAC suppliers, home improvement stores, and online retailers.
Specifications of Honeywell Media Air Cleaners
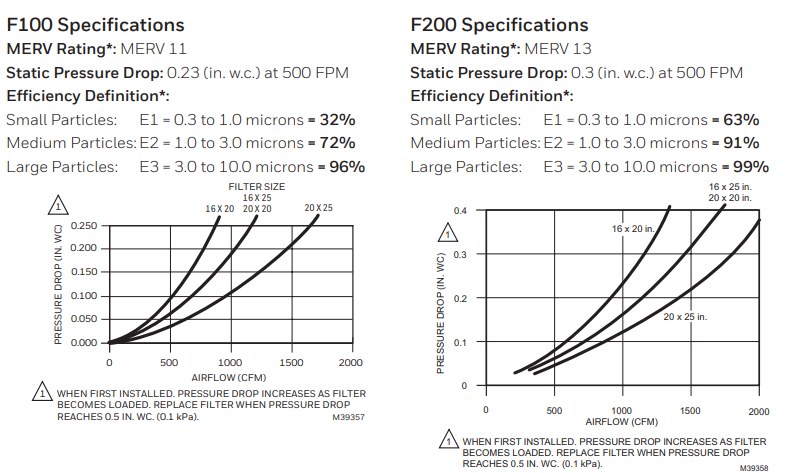
- Filter Rating: MERV 11 or MERV 13 (captures particles as small as 0.3 microns)
- Maximum Airflow: Up to 1400 CFM (varies by model)
- Installation Location: Return air duct (any orientation)
- Electrical Requirements: None (powered by furnace blower)
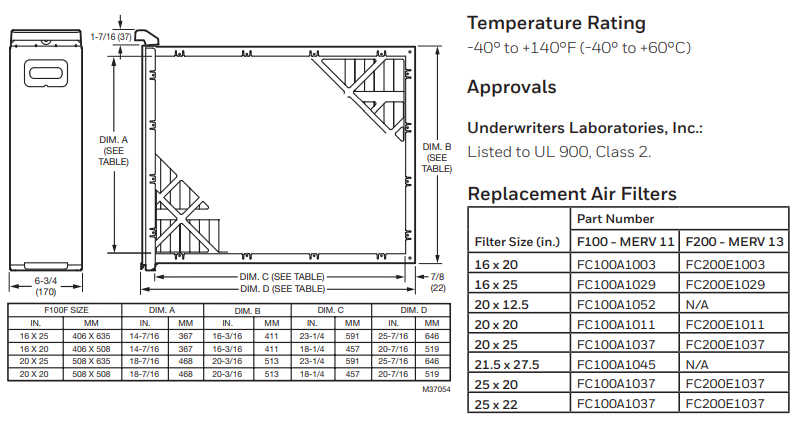
- Cabinet Size: 16" x 25" x 4" (F100F1625), 20" x 25" (F200F2025/U)
- Static Pressure Drop: 0.23–0.3 in. w.c. at 500 FPM
- Efficiency: 25–85% for particles 0.3–10 microns
- Material: Zinc-coated, corrosion-resistant cabinet
- Upgradeable: Compatible with higher-rated media or electronic air cleaners
Honeywell Media Air Cleaners outperform standard fiberglass filters and offer a cost-effective solution for whole-home air purification. Compared to HEPA air purifiers, they provide less filtration but are easier to install and maintain.
Dimensions
Tools needed to install the Enhanced Air Cleaner
- Standard screwdriver
- Phillips screwdriver
- Metal cutter
- Drill
- Duct Sealant
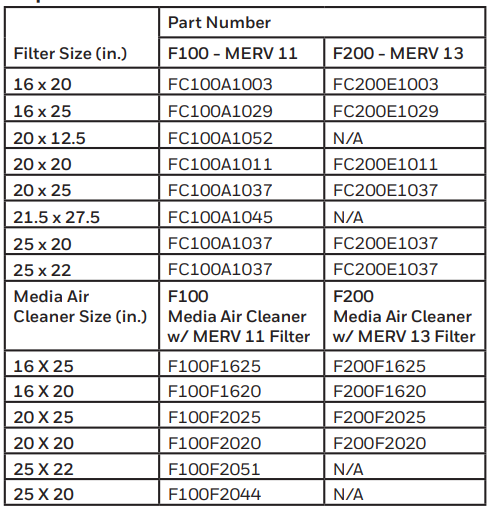
Replacement Air Filters
Important Installation Requirements
Personal Safety
- Wear safety glasses while installing the unit.
- Do not cut into any air conditioning or electrical lines.
- Follow professional safety standards and all local codes for plumbing, electrical, and mechanical considerations.
Before Mounting
- Using the figure on the cover and the lists on the inside cover, make sure that you have all the components for your Media Air Cleaner and the tools to install it.
- Ensure airflow direction through the Media Air Cleaner matches the arrows on the filter cartridge. The arrows should point in the direction of the airflow.
- Choose a location that is readily accessible for checking and replacing the filter. Allow at least 26 in. (660 mm) clearance in front of the unit for removal of the cartridge.
- Install the media air filter where the temperature will not exceed the ratings in the Specifications.
- Do not mount in the supply air duct.
- NOTE: Generally, the best location is in the return air duct next to the blower compartment so the media air cleaner can help to keep the blower motor and evaporator coils clean.
If Replacing an Old Air Cleaner
- If the Media Air Cleaner is not identical in size and shape to the existing air cleaner, before performing a retrofit installation, you might need to add duct transitions to ensure a smooth air flow.
- For optimum system performance, replace the filter every six months (before heating season and before cooling season). Adjust the schedule to your needs, but replace the filter at least once per year.
Choosing a Mounting Position
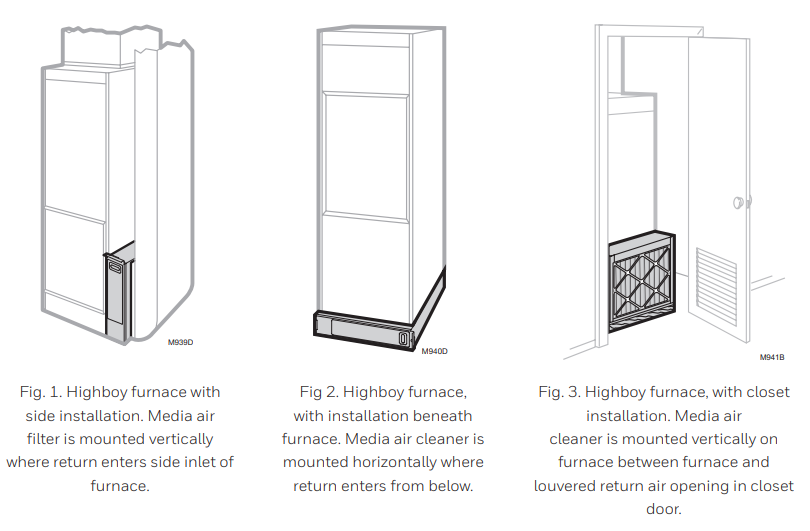
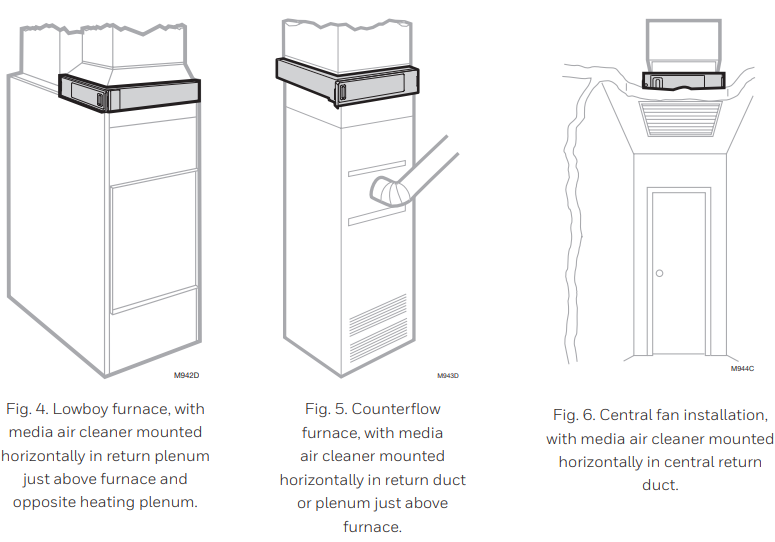
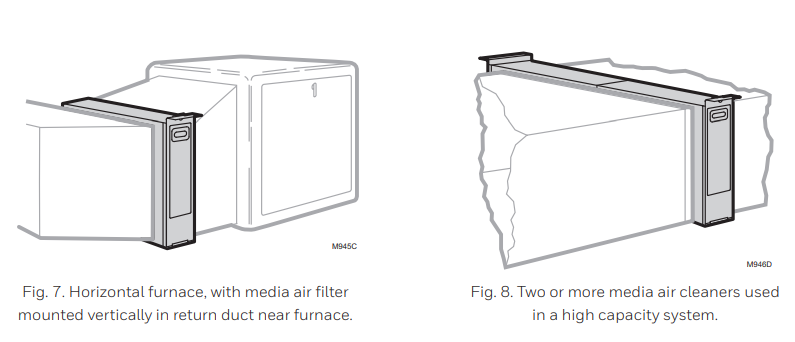
The Media Air Cleaner mounts in any position within the return air duct, usually next to the furnace blower compartment, but the arrow on the cartridge must point in the same direction as the airflow. See Figs. 1-8 for the proper location of the media air cleaner for a variety of furnace installations.
NOTE: The media air cleaner cabinet is sturdy enough to easily support the weight of the furnace and evaporator coil.
Mounting the Media Air Cleaner
The following procedure describes a typical side installation on an existing highboy furnace (Fig. 1). Alternate procedures are noted as appropriate. Other changes in installation procedures may be necessary to complete your installation.
- NOTE: Before starting the installation, remove and discard the existing furnace filter (if used). Thoroughly clean the blower compartment. If possible, power vacuum the ductwork to remove accumulated dust in an occupied home or remove construction dirt in a new home. The media air cleaner cannot remove dirt that has settled in the blower compartment and distribution ducts.
- STEP ONE: Review the Installation Plan
Temporarily place the cabinet on the floor, oriented as it will be when installed. Insert and remove the cartridge to make sure the plan allows adequate clearance for easy removal and replacement of the cartridge. - STEP TWO: Fasten the Cabinet to the Furnace
- Align the cabinet with the return air opening.
- Place blocks under the cabinet, as necessary, to make sure the unit sits securely.
- Create an opening in the furnace to match the cabinet opening.
- Attach the cabinet securely to the furnace. Attach the unit directly or fit a starting collar in the furnace opening. Either drill holes and fasten with sheet metal screws or rivets, or use slip joints. If you are drilling holes, use a locking pliers to help hold the unit in place during drilling.
- STEP THREE: Install Turning Vanes
Install turning vanes to help distribute air equally over the full surface of the upstream side of the media.
Install them whenever an abrupt 90-degree elbow is installed directly against the media air cleaner cabinet. - STEP FOUR: Fasten Cabinet to Ductwork
Fasten the side of the cabinet to the ductwork using sheet-metal screws, rivets, or slip joints, as appropriate. - STEP FIVE: Connect Ductwork
- Connect the vertical duct section to the elbow. If the vertical drop of the duct is less than 7 in. (178 mm) from the side of the furnace, shorten the horizontal trunk or attach an offset fitting to the elbow.
- When ductwork is properly aligned, connect the vertical duct to the horizontal trunk.
- STEP SIX: Seal Joints
Seal all joints in the return air system between the media air filter and the furnace to prevent dust from entering the clean airstream. - STEP SEVEN: Install Filter Cartridge
Slide the filter cartridge into the cabinet, making sure the arrow on the cartridge points in the direction of air flow. Replace the access door. Insert the tab on the bottom of the door into the slot in the cabinet. Swing the door closed and press it into place.
Checkout
Visually check the installation and make sure that:
- Airflow is in the direction of the arrow on the media air filter cartridge.
- Turning vanes and transitions, if used, are properly installed.
- Joints in sheet metal between the dia air filter and the furnace are sealed.
- All sheetmetal connections are complete.
- The original furnace filter has been removed, and the right compartment has been cleaned. When you have verified that checkout has been completed:
- Replace any access doors removed during the Installation or Checkout.
- Run the furnace or cooling system through one complete cycle to make sure the system operates as desired.
Maintenance
The media filter must be replaced when the pressure drop across the media filter reaches 0.5 in. w.c. (0.1 kPa), Or at least annually. If the media air cleaner is installed downstream from an atomizing humidifier or if the installation includes both heating and cooling, more frequent replacement may be necessary. Clogged media must be replaced promptly to avoid restricting airflow and reducing the efficiency of the heating/cooling system. Record the replacement date in the space provided on the replacement media filter.
Troubleshooting Honeywell Media Air Cleaners
Common issues include reduced airflow, filter clogging, and rattling noises. If airflow is low, check for a dirty filter and replace it if necessary. Rattling may indicate loose screws or improper installation—tighten all connections and ensure the unit is securely mounted. If the unit is not capturing particles effectively, verify the filter rating and replace it with a higher MERV if needed. Preventive measures include regular filter replacement and periodic inspection of the cabinet and duct connections.
Honeywell Media Air Cleaners are backed by a limited warranty. For support, contact Honeywell customer service or visit their official website. Error codes are rare, but if the unit fails to operate, check for power to the HVAC system and ensure the filter is properly seated.
Pros and Cons of Honeywell Media Air Cleaners
Pros
- High-efficiency filtration (MERV 11/13)
- No electrical connections required
- Easy installation and maintenance
- Durable, corrosion-resistant cabinet
- Upgradeable for higher performance
- Cost-effective for whole-home air cleaning
Cons
- Less filtration than HEPA air purifiers
- Requires periodic filter replacement
- Not suitable for odor or gas removal
- May reduce HVAC airflow if not sized correctly
Honeywell Media Air Cleaners offer excellent value for money and are a reliable choice for improving indoor air quality in most environments.
Customer Reviews of Honeywell Media Air Cleaners
Users consistently praise Honeywell Media Air Cleaners for their ease of installation, effective filtration, and durability. Many report noticeable improvements in air quality and reduced allergy symptoms. Common complaints include the need for regular filter replacement and occasional airflow reduction in older HVAC systems. The average star rating is 4.5 out of 5, with customers recommending these units for homes with pets, allergies, or high dust levels. Frequent mentions include the rugged cabinet, simple maintenance, and compatibility with various HVAC systems.
Faqs
How do I properly install honeywell Media Air Cleaners in my HVAC system?
What should I do if my honeywell Media Air Cleaner is not effectively filtering air?
Can honeywell Media Air Cleaners work with all types of forced air furnaces and air conditioning systems?
How often should I replace the media filter in honeywell Media Air Cleaners for optimal performance?
What are the key features of honeywell Media Air Cleaners that improve indoor air quality?
How do I maintain and clean the honeywell Media Air Cleaner to ensure longevity?
What common installation problems should I avoid when setting up honeywell Media Air Cleaners?
Are there any upgrades available for honeywell Media Air Cleaners to enhance air filtration?
More honeywell manuals
- Pairing & Setup: Honeywell Plug-In Wireless Doorbell Instruction Guide
- Setup: Honeywell F50F and F300E Electronic Air Cleaners User Manual
- Pairing & Setup: Honeywell Portable Wireless Doorbell RDWL311A2000 User Manual
- Setup: Honeywell Quietclean Air Purifiers HFD-010 Series User Manual
- Pairing : Honeywell Portable Wireless Doorbell RDWL917AX2000 User Manual
- Setup: Honeywell Hpa100 Series Air Purifier User Manual
Leave a Comment