
Setup: Linksys WRT 1900 AC Dual Band Gigabit Wi-Fi Router User Manual
Content
Linksys WRT 1900 AC Dual Band Gigabit Wi-Fi Router
Introduction
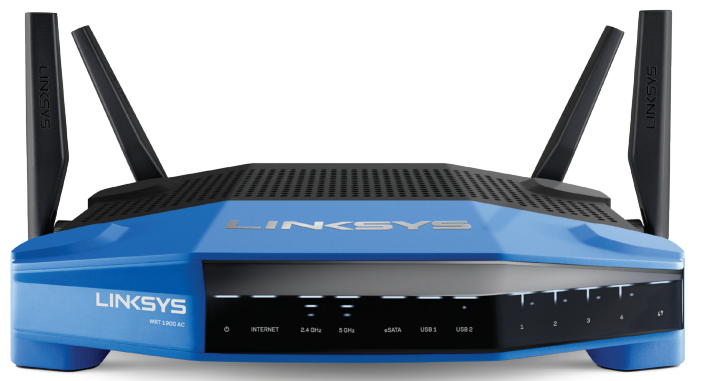
The Linksys WRT 1900 AC Dual Band Gigabit Wi-Fi Router is a high-performance networking device designed to deliver powerful and reliable wireless connectivity for both home and small office environments. Built with a dual-core 1.2 GHz ARM processor and 256 MB of DDR3 RAM, this router offers robust processing power that supports smooth multitasking and faster data handling. Featuring dual-band technology with simultaneous 2.4 GHz and 5 GHz radios, it supports 802.11ac Wave 1 standards, providing combined wireless speeds up to 1900 Mbps for uninterrupted streaming, gaming, and file sharing.
This router is equipped with four detachable external antennas, allowing customizable placement for optimal Wi-Fi coverage and signal strength across larger spaces. Additionally, it includes a unique eSATAp port (combining eSATA and USB functionality) for enhanced connectivity options,, such as attaching external drives or printers. Designed with an internal cooling fan and a sleek, pizza-sized form factor, it ensures durability and consistent performance without overheating.
Targeted at tech-savvy users, gamers, and professionals working remotely, the Linksys WRT 1900 AC excels in managing multiple devices simultaneously with advanced features like VLAN support, VPN passthrough, port forwarding, and a comprehensive SPI firewall. The router is also compatible with open-source firmware such as OpenWrt, appealing to enthusiasts who want enhanced control over their network settings.
The estimated price range for this premium router is approximately $200 to $250, available through major online retailers and electronics stores. Its blend of cutting-edge technology, flexibility, and reliability makes it a compelling choice for those seeking a future-proof Wi-Fi solution.
Specifications
LINKSYS WRT1900AC
- Model Name: Linksys Smart Wi-Fi Router AC 1900
- Description: Dual-Band AC Router with Gigabit and 2xUSB
- Model Number: WRT1900AC
- Switch Port Speed: 10/100/1000 Mbps (gigabit Ethernet)
- Radio Frequency: 2.4 GHz and 5 GHz # of Antennas:: 4 external adjustable antennas
- Ports: Power, 1 x USB 3.0, 1 x combo USB 2.0/eSATA, Internet, Ethernet (1-4), R-SMA (4)
- Buttons: Reset, Wi-Fi Protected Setup, Power
- Front Panel Indicators: POWER, INTERNET, 2.4 GHz, 5GHz, eSATA, USB1, USB2, Ethernet (1-4), Wi-Fi Protected Setup
- UPnP: Supported
- Security Features: WEP, WPA2, RADIUS
- Security Key Bits: Up to 128-bit encryption
- Storage File System Support: FAT, NTFS, and HFS+
- Browser Support: Internet Explorer 8 or higher, Firefox 4 or higher, Google Chrome 10 or higher, and Safari 4 or higher
Environmental
- Dimensions: 9.68" x 7.64" x 2.05" without antennas (246 x 194 x 52 mm)
- Unit Weight: 36.68 oz (1.040 Kg)
- Power: 12V, 4A
- Certifications: FCC, IC, CE, Wi-Fi a/b/g/n/draft ac, Windows 7, Windows 8, DLNA
- Operating Temp: 32 to 104°F (0 to 40°C)
- Storage Temp: -4 to 140°F (-20 to 60°C)
- Operating Humidity: 10 to 80% relative humidity, non-condensing
- Storage Humidity: 5 to 90% non-condensing
Product Overview
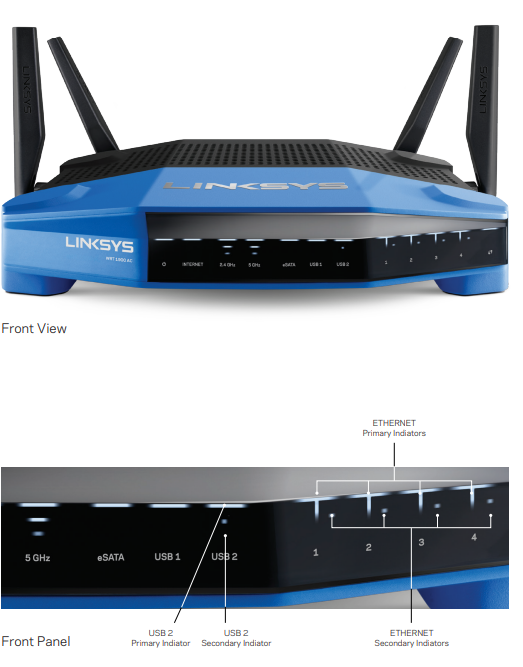
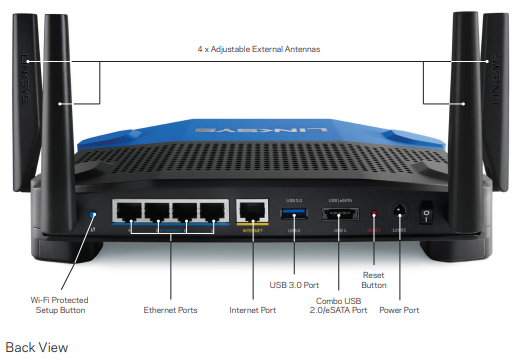
FRONT PANEL INDICATORS
(White) The icon LED is solid white while the router is powered on. It will blink when the router goes through its self-diagnostic mode during every boot-up.
- Internet
(White/Amber) The Internet LED is solid white when connected to the Internet. It blinks white while the router works to establish a connection. A solid amber LED indicates the connection is down due to configuration issues. Amber blinking indicates that the connection is down due to hardware issues. - 2.4 GHz
(White) The Wireless LED is solid white when one or more clients are connected to the 2.4 GHz network. If the LED is blinking white, the router is sending or receiving data over the 2.4 GHz network. - 5 GHz
(White) The Wireless LED is solid white when one or more clients are connected to the 5GHz network. If the LED is blinking white, the router is sending or receiving data over the 5 GHz network. - eSATA
(White) When off, the USB/eSATA port is off,, or a USB device is connected. The LED is solid white when an eSATA device is connected. A blinking white LED indicates activity through the eSATA port. - USB 1
(White) When off, the USB /eSATA port is off,, or an eSATA device is connected. The LED is solid white when a USB device is connected. A blinking white LED indicates activity on the port. - USB2 Primary
(White) When off, the USB 3.0 port is off. The LED is solid white when a USB device is connected. A blinking white indicates activity on the port. - USB2 Secondary
(White) When off, a USB 1.0 or USB 2.0 device is connected. A solid white LED indicates a USB 3.0 device is connected. - ETHERNET 1 thru 4 (Primary)
(White) These numbered LEDs correspond with the numbered ports on the router’s back panel. If the white LED is solid, the router is connected to a device through that port. A flashing white LED indicates network activity over that port. - ETHERNET 1 thru 4 (Secondary)
(White)If the white LED is off, the router is successfully connected to a device through that port at 10/100 Mbps. A solid white LED indicates that the router is successfully connected to a device at 1000 Mbps.
(White/Amber) The LED blinks slowly for two minutes during Wi-Fi Protected Setup. It will be solid white for five seconds to indicate a successful connection. The LED blinks amber if the he Wi-Fi Protected Setup process fails. Make sure the client device supports Wi-Fi Protected Setup. Wait until the LED is off, and then try again. The router supports one session at a time.
HOW TO INSTALL YOUR ROUTER
To Install Your Router:
- If replacing an existing router, disconnect it. Power on your new router.
- Connect the Internet cable from your modem to the yellow INTERNET port on your router. Wait until the power light on the front of the router is solid.
- Connect to the secure wireless name shown in the Quick Start Guide that came with your router. (You can change the network name and password later.) If you need help connecting to the network, refer to your device documentation. Note: You will not have Internet access until router setup is complete.
- Open a web browser and follow the instructions to complete setup. If instructions do not appear in the web browser, type “linksyssmartwifi.com” in the address bar.
- At the end of setup, follow the on-screen instructions to set up your Linksys Smart Wi-Fi account. Use Linksys Smart Wi-Fi to configure your router from any computer with an Internet connection.
Manage Your Router’s Settings:
- Change your router’s name and password
- Set up guest access
- Configure parental controls
- Connect devices to your network
- Test your Internet connection speed
Note:
As part of the router setup process, you will be sent a verification e-mail. From your home network, click the link in the e-mail to associate your router with the Linksys Smart Wi-Fi account.
If you cannot click the link while behind your new Linksys router, log into Linksys Smart Wi-Fi while behind the router and add your router there. For more information, see “How to associate a router with your Linksys Smart Wi-Fi account” on page 22.
Tip:
Print this page, then record your router and account settings in the table below as a reference. Store your notes in a safe place. Setting up also saves your setup information as a file to your computer desktop.
- Network Name (SSID)
- Network Password
- Router Password
- Guest Network Name
- Guest Network Password
- Linksys Smart Wi-Fi Username
- Linksys Smart Wi-Fi Password
Maintaining and Monitoring
HOW TO BACK UP AND RESTORE YOUR ROUTER CONFIGURATION
As with any valuable data, you should back up your router configuration. Your router might contain many customized settings. Those settings would be lost if you reset your router to its factory defaults, and you would need to re-enter all of them manually. If you back up your router configuration, restoring settings is easy.
Note:
You can only back up the router configuration locally (not remotely).
To back up your router configuration, do the following:
- Log in to Linksys Smart Wi-Fi. (See “How to connect to Linksys Smart Wi-Fi” on page 7.)
- Under Router Settings, click Troubleshooting.
- Click the Diagnostics tab.

- Under Router configuration, click Backup. You are prompted to save the file.
- Specify a file location, then click Save.
HOW TO UPGRADE THE ROUTER’S FIRMWARE
Linksys may periodically publish a firmware upgrade either to fix a problem or to add features to your router.
Important:
Do not interrupt the upgrade process. You should not turn off the router or press the Reset button during the upgrade. Doing so may permanently disable the router.
Tip:
Your router automatically checks for available updates and installs them by default. Use the following instructions only if the automatic firmware update has been turned off.
To upgrade the router’s firmware, do the following:
- Log in to Linksys Smart Wi-Fi. (See “How to connect to Linksys Smart Wi-Fi” on page 7.)
- Under Router Settings, click Connectivity.
- Click the Basic tab.
- Under Firmware Update, click Check for Updates.
- If an available update is found, follow the on-screen instructions to install it.
Tip:
To have your router automatically check for updates and install them, select Automatic under Firmware Update.
HOW TO RESTORE FACTORY DEFAULTS
If you’ve tried previous troubleshooting steps and your network still doesn’t work, you may need to restore your router’s factory defaults. To restore your router to factory defaults, you can use the Reset button on the router or use Linksys Smart Wi-Fi.
To reset your router using the reset button:
Caution:
Whenever you restart the router, all logs that are not saved will be lost.
With your router connected to power and turned on, press and hold the Reset button on the back of your router for about 10 seconds (until the power indicator flashes).
To reset your router to factory defaults using Linksys Smart Wi-Fi, do the following:
- Log in to Linksys Smart Wi-Fi. (See “How to connect to Linksys Smart Wi-Fi” on page 7.)
- Under Router Settings, click Troubleshooting.
- Click the Diagnostics tab.
- Under Factory reset, click Reset.
- A confirmation screen opens.
- Click Yes to confirm. All settings and logs will be deleted, and your router will return to its factory default settings.

HOW TO TEST YOUR INTERNET CONNECTION
Your router includes two diagnostic tests, Ping and Trace route, that let you check network connections, including network devices and your Internet connection.
To diagnose your Internet connection, do the following:
- Log in to Linksys Smart Wi-Fi. (See “How to connect to Linksys Smart Wi-Fi” on page 7.)
- Under Router Settings, click Troubleshooting.
- Click the Diagnostics tab.

To check whether an address can be reached:
- Under Ping IPv4, enter an IP address or URL into the IP or host name field.
- Select several times to ping from the Number to ping drop-down list.
- Click Start to Ping. A window will open showing the ping test results. You will see a response for each successful ping.
To check whether an address can be reached:
- Under Ping IPv4, enter an IP address or URL into the IP or host name field.
- Select several times to ping from the Number to ping drop-down list.
- Click Start to Ping. A window will open showing the ping test results. You will see a response for each successful ping.
Notes:
If an Internet URL fails to respond to ping, it doesn’t necessarily mean that the site is down. For security reasons, some sites are configured not to respond to ping requests.
To trace the route that packets take between your router and a specific address:
- Under Trace route, enter an address in the IP or host name field.
- Click Start to Trace route. A window will open with the test results.

HOW TO CONFIGURE AND USE LOGS
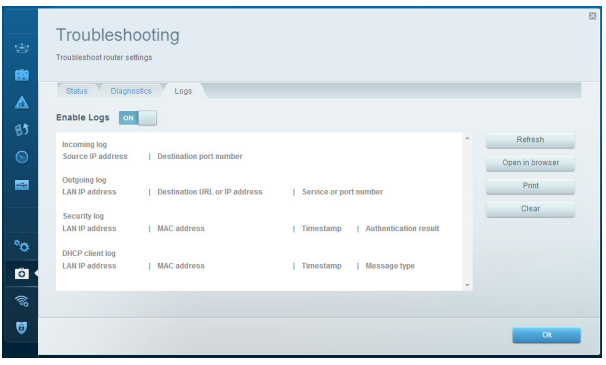
Your router can track all traffic for your Internet connection and record that information in a log.
To enable and view logs, do the following:
- Log in to Linksys Smart Wi-Fi. (See “How to connect to Linksys Smart Wi-Fi” on page 7.)
- Under Router Settings, click Troubleshooting.
- Click the Logs tab.
- To enable logs, click the Enable Logs button so that ON is displayed.
- You can view the logs directly in the list, open the logs in a separate browser window, or print the logs.
Troubleshooting
This chapter can help you solve common setup issues and connect to the Internet. You can find more help from our award-winning customer support at linksys.com/support.
YOUR ROUTER WAS NOT SUCCESSFULLY SET UP
If Linksys Smart Wi-Fi did not complete the setup, you can try the following:
- Press and hold the Reset button on your router with a paperclip or pin until the LED starts blinking (about 10 seconds). Install the router again.
Your router’s appearance may vary.. - Temporarily disable your computer’s firewall (see the security software’s instructions for help). Install the router again.
- If you have another computer, use that computer to install the router again.
WINDOWS XP SERVICE PACK UPDATE
On Windows XP computers, Linksys Smart Wi-Fi requires Service Pack 3. If the currently installed Service Pack is older than version 3, download and install Service Pack 3.
Tip:
To temporarily connect to the Internet and download the required Service Pack, you can use the included Ethernet cable to connect your computer directly to your modem.
To install Service Pack 3:
- Connect to the Microsoft Update website (update.microsoft.com/windowsupdate).
- Follow the instructions on the website or contact Microsoft if you need further help.
- After downloading and installing Service Pack 3, install the router again.
YOUR INTERNET CABLE IS NOT PLUGGED IN MESSAGE
If you get a “Your Internet cable is not plugged in” message when trying to set up your router, follow these troubleshooting steps.
To fix the problem:
Make sure that an Ethernet or Internet cable (or a cable like the one supplied with your router) is securely connected to the yellow Internet port on the back of the router and to the appropriate port on your modem. This port on the modem is usually labeled Ethernet, but may be named Internet or WAN.

- Make sure that your modem is connected to power and is turned on. If it has a power switch, make sure that it is set to the ON or l (as opposed to O) position.
- If your Internet service is cable, verify that the cable modem’s CABLE port is connected to the coaxial cable provided by your ISP.
- Or, if your Internet service is DSL, make sure that the DSL phone line is connected to the modem’s DSL port.
- If your computer was previously connected to your modem with a USB cable, disconnect the USB cable.
- Install the router again.
CANNOT ACCESS YOUR ROUTER MESSAGE
If you cannot access your router because your computer is not connected to your network, follow these steps.
To access your router, you must be connected to your own network. If you currently have wireless Internet access, the problem may be that yoyou haveonnectedifferent wireless network.
To fix the problem on Windows computers, do the following:
- On your Windows desktop,, right-click the wireless icon in the system tray.
- Click View Available Wireless Networks. A list of available networks will appear.
- Click your own network name. Click Connect. In the example below, the computer was connected to another wireless network named Router. The name of the Linksys E-Series network, BronzeEagle in this example, is shown selected.

- If you are prompted to enter a network key, type your password (Security Key) into the Network key and Confirm network key fields. Click Connect.
- Your computer connects to the network, and you should now be able to access the router.
- Depending on your version of Windows, there could be some differences in wording or icons in these steps.
To fix the problem on Mac computers, do the following:
- In the menu bar across the top of the screen, click the Wi-Fi icon. A list of wireless networks will appear. Linksys Smart Wi-Fi has automatically assigned your network a name.
- In the example below, the computer was connected to another wireless network named Router. The name of the Linksys E-Series network, BronzeEagle in this example, is shown selected.
- Click the wireless network name of your Linksys E-Series router (BronzeEagle in the example).
- Type your wireless network password (Security Key) into the Password field. Click OK.
Pros & Cons of the Linksys WRT 1900 AC Dual Band Gigabit Wi-Fi Router
Pros
- Powerful Hardware: Dual-core 1.2 GHz processor and 256 MB DDR3 RAM enable fast data processing and stable multitasking.
- Dual-Band AC1900 Wi-Fi: Supports both 2.4 GHz and 5 GHz bands with up to 1900 Mbps combined throughput for high-speed connectivity.
- Detachable Antennas: Four adjustable external antennas allow for optimized and extended Wi-Fi coverage.
- Flexible Connectivity: Unique eSATAp port supports external storage and peripheral devices, increasing functionality.
- Advanced Features: Includes VPN passthrough, VLAN support, SPI firewall, port forwarding, and DDNS compatibility for secure and customizable networking.
- Open-Source Firmware Ready: Compatible with OpenWrt for users seeking enhanced customization beyond factory firmware.
Cons
- Price Point: At $200–$250, this router is pricier than many basic models, which may deter budget-conscious buyers.
- Internal Fan Noise: The built-in cooling fan can generate audible noise, which might be distracting in quiet environments.
- Network Map Limitations: The router’s network map feature can sometimes be inaccurate or incomplete, affecting ease of device monitoring.
- Performance on 2.4 GHz Band: Compared to competitors, its 2.4 GHz throughput is average, which could impact older or long-range devices.
- Size and Placement: Its relatively large size and heat sink design require dedicated space and careful placement to avoid performance issues.
Overall, the Linksys WRT 1900 AC offers excellent value for users needing advanced networking capabilities and strong dual-band performance, though alternatives like the WRT1900ACS or newer models might provide incremental improvements for those seeking the highest throughput on 2.4 GHz or quieter operation.
Customer Reviews and Feedback on the Linksys WRT 1900 AC Dual Band Gigabit Wi-Fi Router
Users generally praise the Linksys WRT 1900 AC Dual Band Gigabit Wi-Fi Router for its rock-solid reliability and powerful hardware. Many appreciate its broad device compatibility across 802.11 a/b/g/n/ac standards and the convenience of dual-band SSIDs for seamless client connections. Star ratings commonly range between 4 to 4.5 out of 5 for performance and build quality.
Positive testimonials highlight the router's fast throughput on the 5 GHz band, excellent range enhanced by the four external antennas, and the value of the eSATAp port for network-attached storage. Remote workers and gamers particularly recommend it for maintaining stable, low-latency connections.
On the downside, some customers report complaints about the internal fan noise and the complexity of the user interface for beginners. A few reviews mention occasional issues with the network map’s accuracy and the average speed on the 2.4 GHz band. However, many users find these compromises acceptable given the router’s overall capabilities and robust performance.
Purchase recommendations often suggest this router for users who prioritize advanced configuration options, dual-band performance, and long-term reliability over budget models. It remains a popular choice in its category, especially for those comfortable with technical setups or interested in open-source firmware customization.
Faqs
How do I set up my Linksys WRT 1900 AC Dual Band Gigabit Wi-Fi Router for the first time?
What can I do if the Linksys WRT 1900 AC router is not providing internet access?
Does the Linksys WRT 1900 AC Dual Band Gigabit Wi-Fi Router support USB storage devices?
Can I optimize the wireless performance on my Linksys WRT 1900 AC Dual Band Gigabit Wi-Fi Router?
Is the Linksys WRT 1900 AC Dual Band Gigabit Wi-Fi Router compatible with gaming consoles and smart TVs?
How do I perform a firmware update on the Linksys WRT 1900 AC Dual Band Gigabit Wi-Fi Router?
What maintenance steps should I take to keep the Linksys WRT 1900 AC Dual Band Gigabit Wi-Fi Router running smoothly?
How do I troubleshoot Wi-Fi signal problems on the Linksys WRT 1900 AC Dual Band Gigabit Wi-Fi Router?
More linksys manuals
- Setup & Features: Linksys Atlas Max WiFi 6E System AXE8400 MX8500 Series User Manual
- Specifications: Linksys AC1200 Max Wi-Fi Range Extender RE6500 User Guide
- How to Setup: Linksys Cable/DSL Router BEFSR41, BEFSR81, BEFSX41, BEFVP41 (EU/LA) User Manual
- Linksys RE9000 Wi-Fi Range Extender User Manual
- Linksys Max-Stream WiFi Range Extender RE7310 User Manual
Leave a Comment