
Setup: Sharper Image 2-IN-1 STEAM MOP SI-160 User Manual
Content
Sharper Image 2-IN-1 STEAM MOP SI-160
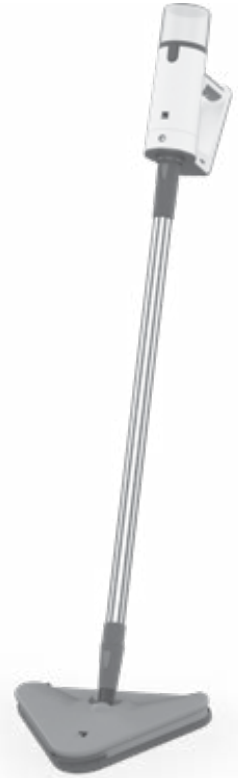
Introduction
The Sharper Image SI-160 2-in-1 Steam Mop is a versatile cleaning solution designed to provide all-natural steam care for your home. This product seamlessly switches between steam mopping and handheld steam cleaning, making it ideal for various hard floors, including sealed hardwood and durable stained concrete. The SI-160 is perfect for homeowners seeking a chemical-free, efficient way to clean and sanitize surfaces. With its adjustable steam flow and 9 versatile accessories, it caters to a wide range of cleaning tasks.
Targeted at homeowners and cleaning enthusiasts, this product is available within an estimated price range of $50 to $100, depending on the retailer. It is widely available online and in-store at major retailers like Bed Bath & Beyond. The SI-160 is backed by a 1-year limited manufacturer's warranty, ensuring peace of mind for users.
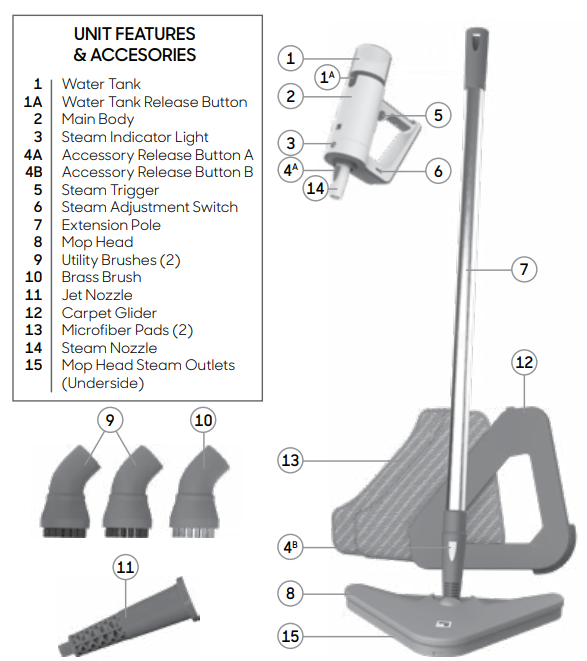
- The Water Tank is the reservoir where water is held before being transferred to the heat exchange and converted to steam. The Water Tank holds 8.45 ounces (250ml).
- To fill the Water Tank, push the Water Tank Release Button and pull upwards.
- The Main Body can be used as an individual handheld unit with attachable and interchangeable accessories for cleaning and sanitizing.
- The Steam Indicator Light illuminates orange when the unit is plugged in. The Steam Indicator Light will flash orange for approximately 25 seconds while the unit is heating. The light will stop flashing and be a steady orange when ready to produce steam.
- The Accessory Release Buttons (4A and 4B) lock the accessories into place.
- When pressed Steam Trigger will start the flow of steam from the Steam Nozzle.
- The Steam Adjustment Switch will release a more powerful stream of steam when the switch is slid up towards the Steam Nozzle.
- The Extension Pole connects to the main body of the unit for use as a mop (with Mop Head attachment) or to extend the Steam Nozzle attachment.
- The Mop Head connects to the Extension Pole for steam cleaning a variety of floors. NOTE: It is NOT recommended that this unit be used on unsealed floors. Use care when steaming floors that may be warped or damaged by heat and moisture, and limit use of this unit on these types of surfaces.
- The Utility Brushes connect to the Jet Nozzle and are designed to scrub tough dirt and scuffs from surfaces.
- The Brass Brush connects to the Jet Nozzle and is designed for scrubbing especially tough stains. NOTE: Use careful judgment when deciding what surface to clean with the Brass Brush. Some delicate surfaces, such as stainless steel, may be scratched or damaged by the brass bristles. If you are unsure whether or not a surface will be damaged, it is recommended that you test a small inconspicuous spot before proceeding.
- The Jet Nozzle connects to the Steam Nozzle or the Extension Pole and is designed to focus the flow of steam for concentrated cleaning.
- The Carpet Glider attachment attaches to the Mop Head to steam and freshen carpets, area rugs,, and other soft surfaces.
- The Microfiber Pads attach to the bottom of the Mop Head. The Pad is designed to clean scuffs and stains from hard floors. The Pads are reusable and machine washable. Two pads are included. NOTE: Microfiber Pads are not designed to absorb and collect large amounts of dirt. For best results, it is recommended to vacuum the floor before mopping.
- The Steam Nozzle emits a flow of hot, penetrating steam when the Steam Trigger is activated.
- The Mop Head Steam Outlets emit steam from the bottom of the Mop Head.
ASSEMBLY
STEAM MOP SETUP EXTENSION POLE
- Select the Extension Wand. Insert the end (A) of the Extension Pole into the Main Body (B) with the orange Accessory Release Button slightly off center with the hole. Fully insert and rotate the wand slightly to allow the button to snap into the hole.
NOTE: To ensure the pieces are properly locked, all sides of the Accessory Release Button should be raised against the Extension Pole surface; they should not sit flush with each other. - Connect the bottom side of the Extension Pole (the side that is not interlocked to the Steam Nozzle) to the Mop Head attachment. Interlock the Accessory Release Button on the Extension Pole with the triangle-shaped cutout on the Mop Head.
NOTE: To ensure the pieces are properly locked, all sides of the Accessory Release Button piece should be raised against the surface. Lay one Microfiber Pad on a flat surface, with “v-shaped” fastener strips facing upward. Align the Mop Head above the Microfiber Pad and press the Mop Head firmly down onto the Microfiber Pad. Fastener strips will adhere to pad grips on the underside of the Mop Head. The pad should now be attached and ready for use. - Refer to “How to Use” on page 12 for instructions on how to use the Steam Mop function of your SI-160 2-in-1 Steam Mop.
- To use the Carpet Glider, first attachthe Microfiber Pad following the steps listed above. Then, lay the Carpet Glider on a flat surface, with the clasps facing up. Align the Mop Head above the Carpet Glider and press the Mop Head onto the Carpet Glider until it clicks securely into place.
NOTE: Microfiber Pads are machine washable. To avoid picking up lint, washing separately from other fabrics is recommended. Only use liquid detergent. Avoid using any fabric softeners or bleach. Air drying is recommended; machine drying on a low setting is acceptable as well.
STEAM CLEANER SETUP
To use your SI-160 2-in-1 Steam Mop as a handheld steam cleaner, follow the setup instructions below:
- Attach the Jet Nozzle to the Steam Nozzle by interlocking the Accessory Release Button on the Steam Nozzle with the triangle-shaped cutout on the Jet Nozzle.
NOTE: To ensure the pieces are properly locked, all sides of the Accessory Release Button should be raised against the surface. - To use the Utility Brushes and Brass Brush, follow Step 1 and then attach your desired rush to the Jet Nozzle.
CAUTION: Always allow unthe it to cool before connecting/disconnecting any accessories.
WARNING: HOT SURFACE- Main Body Surface (see Illustration B on page 9) can become hot when the unit runs out of water.
STORAGE & CARE
PROPER STORAGE
Preparing your 2-In-1 Steam Mop for storage is quick and simple. When you have finished your streamingg tasks, follow the steps listed below.
- Unpluthe g the power cord.
- Allow unit to completely cool (at least 30 minutes).
- Remove all accessories from the unit.
- Remove the Water Tank and drain any remaining water into a sink or tub to minimize potential mineral build-up. Replace the Water Tank when done.
- Store the unit in a cool, dry location, along with all included accessories.
MICROFIBER PAD CARE: Machine wash warm, separately. Air or tumble dry low. No fabric softener or bleach.
MINERAL BUILD-UP
A common maintenance need for steam appliances is the removal of build-up caused by high mineral content in many municipal water supplies. This mineral build-up may limit the effectiveness and reduce the life of your product.
The best way to minimize mineral build-up is to use distilled or de-mineralized water when using your 2-In-1 Steam Mop. If you are unable to use distilled water, it is recommended that the following procedure be followed monthly to remove any
mineral build-up:
- Follow Steps 1-4 under the Proper Storage section above. However, do not replace the Water Tank at the end of Step 4.
- Fill a measuring cup (not included) with 2oz (59ml) distilled water and .5oz (04.7ml) vinegar.
- Slowly pour water-vinegar solution into the Water Tank,, then replacthe e the Fill Cap.
- Plug in the power cord to turn the unit on.
- Let sthe team release from the unit for 1 minute,, then turthe n the unit off by unplugging it.
- Allow the unit to sit for approximately 30 minutes, then let the steam release until the Water Tank has been emptied.
- Once the Water Tank is drained, turn the unit off and refill the Water Tank with 8.45 ounces (250ml) of fresh distilled water. Allow the unit to produce steam until the Water Tank is empty. Repeat as necessary until the vinegar odor dissipates.
- Turn uthe nit off by unplugging the power cord and store it as usual.
IMPORTANT: On average, it is recommended that you follow the mineral build-up removal procedure once per month (if the unit is used once every week). More frequent use may require following the procedure more often to keep your 2-in-1 Steam Mop operating at full potential. Do not exceed 20 hours of use without cleaning out mineral build-up.
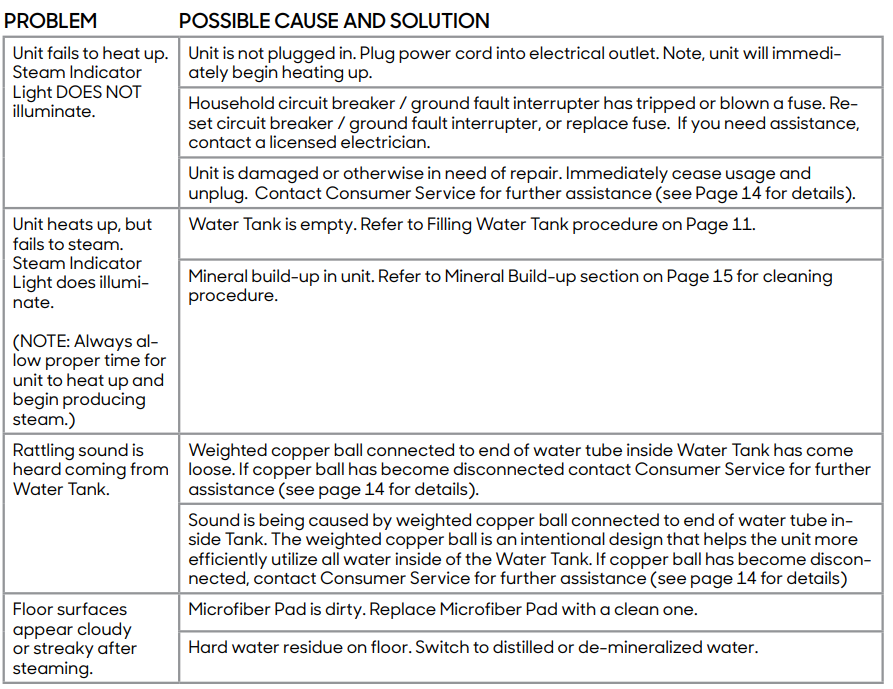
TROUBLESHOOTING
WARRANTY
If you’re not satisfied with this product, let us know.
- Vornado Air, LLC warrants to the original consumer or purchaser that this Sharper Image® Steam Product (“Product”) is free from defects in material or workmanship for a period of one (1) year from the date of purchase. If any such defect is discovered within the warranty period, Vornado, at its discretion, will repair or replace the Product at no cost.
- For warranty or repair service: Call 833-800-8669 to obtain a Return Authorization (“RA”) form. Please have or include your Product’s model number and serial number, as well as your name, address, city, state, zip code,, and phone number when contacting Vornado for warranty service.
- After receiving the RA form, ship your Product to: Vornado Air L,,LC Attn: Warranty & Re,,pair 415 East 13th S,treet Andover, KS 67002. For your convenience, please have your model number and serial number when contacting Vornado with service inquiries. To assure proper handling, packages must be clearly marked with the RA number. Packages not clearly marked with the RA number may be refused at the receiving dock. Please allow 1-2 weeks for repair and return of your Product after the Product is received.
- Repairs not covered by the warranty or outside the warranty period will require a fee to cover the cost of materials, labor, h,,andling and shipping.
- This warranty does not apply to defects resulting from abuse of the Product, modification, alteration, mishandling, improper maintenance, comme,,rcial use or repair or service of the Product by anyone other than Vornado; damages which occur in shipment or are attributed to acts of God. Improper product use, which includes using an external device that alters or converts the voltage or frequency of electricity, or shipping a Vornado product to a country not inten,ded for use will void all warranties. Any unauthorized product modification, repair by unauthorized repair center, or use of non-approved replacement parts is not, recommended and any consequences will not be covered by support services or product warranties. The product warranty will be honored only on models that are being used in the country intended.
- REPAIR OR REPLACEMENT AS PROVIDED UNDER THIS WARRANTY IS THE EXCLUSIVE REMEDY OF THE CONSUMER. VORNADO SHALL NOT BE LIABLE FOR ANY INCIDENTAL OR CONSEQUENTIAL DAMAGES FOR BREACH OF ANY EXPRESS OR IMPLIED WARRANTY ON THIS PRODUCT. EXCEPT TO THE EXTENT PROHIBITED BY APPLICABLE LAW, ANY IMPLIED WARRANTY OF MERCHANTABILITY OR FITNESS FOR A PARTICULAR PURPOSE ON THIS PRODUCT IS LIMITED IN DURATION TO THE DURATION OF THIS WARRANTY.
- Some states do not allow the exclusion or limitation of incidental or consequential damages, or allow limitations on how long an implied warranty lasts, so the above limitations or exclusions may not apply to you. This warranty gives you specific legal rights, and you may have other rights that vary from state to state. The manufacturer assumes no responsibility for damage caused by failure to follow these instructions or improper product use. Any such actions will invalidate the product warranty.
- All company names and product names are trademarks of their respective owners. © All rights reserved. All technical information, data, and instructions for the installation, connection, and operation contained in these instructions for use correspond to the latest available inthe formation at the time of printing. The contents of this manual may differ slightly from the actual product. Observe any additional supplements.
- ©2021 Vornado Air LLC, Andover, Kansas 67002 USA.
- Specifications subject to change without notice.
- Sharper Image® name and logo are registered trademarks.
- Manufactured, marketed,, and distributed under license by Vornado Air LLC, Andover, Kansas 67002. Manufactured in China.
- U.S. Patents Pending.
- Sharper Image® Distributed under license by Vornado Air LLC, Andover, Kansas 67002.
Specifications
Here are the key technical specifications and features of the Sharper Image SI-160 2-in-1 Steam Mop:
- Water Capacity: 8.45 oz (250 ml)
- Power Consumption: 1350 watts, 9.5 amps
- Accessories: 9 versatile accessories, including a Jet Nozzle, Carpet Glider, Utility Brushes, Brass Brush, and more
- Steam Flow Adjustment: Allows for customizable steam output for different surfaces
- Warranty: 1-year limited manufacturer warranty
- Dimensions and Assembly: Assembly required; dimensions vary based on configuration
- Color: White
Compared to similar products, the SI-160 offers a balance of versatility, power, and affordability, making it a strong contender in the steam mop market.
Troubleshooting
Here are some common issues and solutions for the Sharper Image SI-160:
- Steam Not Emitting: Check the water level and ensure the Steam Trigger is pressed.
- Steam Indicator Light Not Functioning: Ensure the unit is properly plugged in and check for any blockages in the Steam Nozzle.
- Preventive Measures: Regularly clean the Steam Nozzle and Mop Head to maintain performance.
- Warranty and Support: Contact the manufacturer for assistance with repairs or replacements under warranty.
For more detailed troubleshooting or to contact support, refer to the user manual or visit the Sharper Image customer service website.
Pros & Cons
Pros
- Chemical-Free Cleaning: Offers an all-natural cleaning solution.
- Versatility: 9 accessories for various cleaning tasks.
- Adjustable Steam Flow: Suitable for different types of hard floors.
Cons
- Limited Water Capacity: May require frequent refills for larger areas.
- Assembly Required: Some users may find assembly challenging.
- Not Suitable for Unsealed Floors: Use with caution on certain surfaces.
The Sharper Image SI-160 2-in-1 Steam Mop provides excellent value for its price, offering a comprehensive cleaning solution with a wide range of accessories.
Customer Reviews
The Sharper Image SI-160 has received positive reviews for its performance and versatility. Users praise its ability to clean effectively without chemicals and appreciate the variety of accessories provided. Common complaints include the need for frequent water refills and the assembly process. Overall, the SI-160 is rated highly, with many users recommending it for its efficiency and ease of use.
Star Rating: 4.8 out of 5 stars based on customer feedback.
For those seeking a reliable and eco-friendly steam mop, the Sharper Image SI-160 is a solid choice.
Faqs
How do I properly assemble and configure the Sharper Image 2-IN-1 Steam Mop SI-160 for the first time?
What types of flooring are safe to clean with the Sharper Image 2-IN-1 Steam Mop SI-160, and are there any surfaces to avoid?
Why is my Sharper Image 2-IN-1 Steam Mop SI-160 not producing steam, and how can I troubleshoot this issue?
Can I use cleaning solutions or essential oils in the Sharper Image 2-IN-1 Steam Mop SI-160 water tank?
How do I switch between upright steam mop and handheld steam cleaner modes on the Sharper Image SI-160?
What maintenance steps should I follow to keep my Sharper Image 2-IN-1 Steam Mop SI-160 in good working condition?
Is the Sharper Image 2-IN-1 Steam Mop SI-160 suitable for sanitizing surfaces, and how effective is it against germs and bacteria?
What should I do if my Sharper Image SI-160 2-IN-1 Steam Mop causes interference with other electronic devices?
More sharper image manuals
- How to Use: Sharper Image PORTABLE ICE MAKER User Manual
- Setup & Usage : Sharper Image ULTRASONIC HUMIDIFIER VOTIV 4 User Manual
- How to Use: Sharper Image BACON EXPRESS TOASTER User Guide
- Usage: Sharper Image HANDHELD GARMENT STEAMER THREAD PASSPORT User Manual
- How to Use: Sharper Image DIGITAL ULTRASONIC HUMIDIFIER User Guide
- Setup: Sharper Image HANDHELD GARMENT STEAMER THREAD EXPRESS User Manual
Leave a Comment