
How to Use: Sharper Image BACON EXPRESS TOASTER User Guide
Content
Sharper Image BACON EXPRESS TOASTER
Introduction
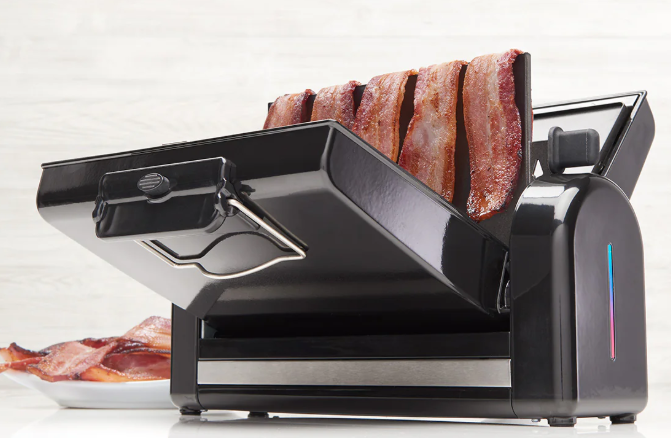
The Sharper Image BACON EXPRESS TOASTER is a specialized kitchen appliance designed exclusively for cooking bacon quickly, efficiently, and with minimal mess. Unlike conventional toasters, this device uses a unique vertical cooking design that allows bacon strips to be cooked upright between two non-stick plates, letting excess fat drip away for healthier, crispier results. Its compact, foldable structure with cool-touch handles makes it ideal for small kitchens, dorm rooms, or anyone looking to simplify bacon preparation without compromising taste.
Key benefits include fast cooking times, adjustable crispness settings to suit personal preferences, and easy cleanup thanks to a removable drip tray. The appliance appeals primarily to bacon lovers who want a convenient, dedicated device for perfect bacon every time without needing a stovetop or oven.
Estimated to retail around $60 to $70, the Sharper Image BACON EXPRESS TOASTER is widely available online via the official Sharper Image website and major retail platforms. It’s a practical choice for busy individuals, breakfast enthusiasts, and small households seeking a foolproof way to cook up to six slices simultaneously with consistent results.
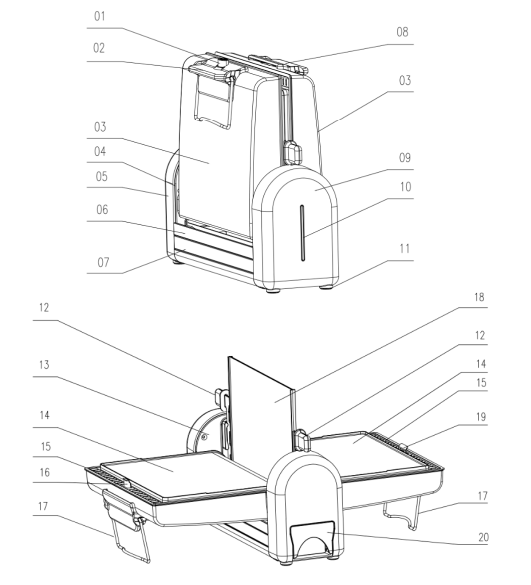
IDENTIFICATION OF PARTS
- Open Button
- Cool Touch Handle
- Doors
- Front Base Cover
- Front Base 06 Side Panel
- DecorativeStrip
- Cool Touch Handle
- Front Base Cover
- Indicator Light
- Feet
- Center Plate Handles
- Back Base Cover
- Griddle Plates
- Drainage Grate
- Hook
- Leg Supports
- Center Plate
- Clip
- Drip Tray
OPERATING THE BACON EXPRESS TOASTER
BEFORE USE
- Wash the Griddle Plates, Center Plate, and Drip Tray in warm, soapy water and dry thoroughly.
- Wipe the main unit and exterior of the Doors with a slightly damp, non-abrasive cloth.
- Once clean, replace the Center Plate and Drip Tray.
- Place the Bacon Express Toaster on a flat, stable surface, away from water.
- While in the closed position, plug the power cord into an AC outlet. To indicate power, the Indicator Light will illuminate RED and BLUE.
- Allow the unit to preheat. When preheating is complete, the BLUE half of the Indicator Light will darken.
- NOTE: A small amount of smoking is normal during the first use. COOKING BACON
- Make sure the Center Plate and Drip Tray are properly in place.
- While in the closed position, plug the power cord into an AC outlet. To indicate power, the Indicator Light will illuminate RED and BLUE.
- Allow the unit to preheat. When preheating is complete, the BLUE half of the Indicator Light will darken.
- NOTE: A small amount of smoking is normal during the first use.
- Carefully open the Doors of the unit using the Open Button and Cool-Touch Handles. Be sure the Doors are resting on the Leg Supports to ensure stability. CAUTION: Doors will be HOT!
- Ensure fingers and hands do not touch the Doors. If needed, use oven mitts to open Doors.
- Drape strips of bacon, evenly spaced, over the Center Plate (5 or 6 strips). The maximum number of bacon strips may vary based on the thickness and width of each strip. Do not overlap bacon strips.
- CAUTION: DO NOT put bacon in this appliance without the Center Plate in place.
- The Doors must be closed to cook bacon. Use the Cool-Touch Handles to close the Doors. NOTE: A small gap in the Doors is both normal and necessary, as it allows steam from the bacon to vent while cooking.
- Allow bacon to cook. Bacon will begin to cook in 4 minutes. Frequently check the doneness of bacon so it does not overcook.
- CAUTION: Steam is generated during use that could cause burns or other injury. Stay clear of the steam when opening the Doors.
- When bacon is done to your liking, open the Doors of the unit and use tongs or a fork to carefully remove bacon from the Center Plate. Be sure the Doors are resting on the Leg Supports to ensure stability.
- NOTE: It is recommended that you use plastic or wooden utensils when removing bacon. Over time, metal utensils may damage the non-stick cooking surfaces of the Center Plate.
- Before cooking more bacon, check the Drip Tray to ensure it does not need to be emptied. NOTE: Avoid grease spills by always checking the Drip Tray before moving the unit. If the Drip Tray is full, properly dispose of grease before moving the unit.
- When you are finished cooking, unplug the power cord from the AC outlet. Allow the appliance to cool completely before cleaning.
USING THE GRIDDLE
- Remove the Center Plate (using the Center Plate Handles) to convert the appliance into a griddle.
- While in the closed position, plug in the Bacon Express Toaster and preheat as described above.
- When preheating is complete, the BLUE half of the Indicator Light will darken.
- Carefully pull open the Doors of the unit using the Open Button and Cool-Touch Handles. Be sure the Doors are resting on the Leg Supports to ensure stability. CAUTION: Doors will be HOT!
- Ensure fingers and hands do not touch the doors. If needed, use oven mitts to open Doors.
- Apply cooking spray to the Griddle Plates, then begin cooking your food. Cooking time will vary depending on the food(s) being made.
- CAUTION: Cooking surfaces will be HOT. Wear oven mitts to prevent burns.
- When you are finished, unplug the power cord from the AC outlet. Allow the appliance to cool completely before cleaning.
- NOTE: Avoid grease spills by always checking the Drip Tray before moving the unit. If the Drip Tray is full, properly dispose of grease pbeforemoving the unit.
COOKING TIPS
- Place bacon strips evenly (about 5 or 6 strips) on the Center Plate. Do not overlap strips.
- If necessary, trim the bacon to fit on the Center Plate.
- For best results, allow your bacon to sit at room temperature for 15 minutes before cooking.
- Bacon will cook in about 4 minutes. Cook longer to achieve your preferred crispiness.
- Because this appliance drains fat from the bacon, its appearance may be different than bacon cooked in a frying pan.
- Remove foods from the Griddle using a flat plastic or wooden utensil. DO NOT use metal utensils as they may scratch and damage the non-stick cooking surfaces.
- When cooking meat, be sure to periodically check the Drip Tray to prevent overflow.
- During cooking, the BLUE light may turn on and off. This is normal.
SMOKE DURING OPERATION
- If the unit begins to smoke during cooking, it may be due to grease buildup. To reduce smoking, make sure that you clean the Center Plate and Griddle Plates between uses.
- NOTE: It is normal for steam to escape through the small gap in the closed doors. To avoid burns and injury, stay clear of the steam when opening the Doors.
CLEANING AND MAINTENANCE
- Make sure the Drip Tray is free of grease.
- Make sure the appliance is unplugged and cool to the touch.
- Wash the Griddle Plates, Center Plate, and Drip Tray in warm, soapy water and dry thoroughly. Center Plate is top rack dishwasher safe.
- Wipe the main unit and exterior of the Doors with a slightly damp, non-abrasive cloth.
- Once clean, replace the Center Plate and Drip Tray.
- NOTE: NEVER immerse the unit in water or any other liquid. DO NOT use harsh or abrasive cleaners.
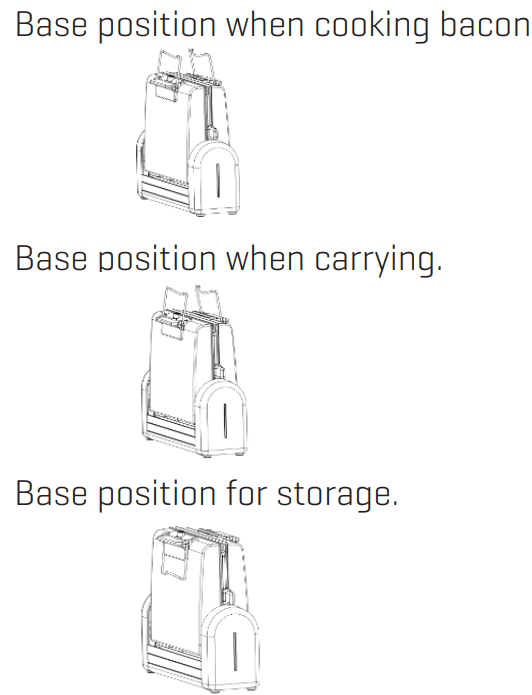
BASE POSITIONS
WARRANTY/CUSTOMER SERVICE
Sharper Image-branded items include a 1-year limited replacement warranty. If you have any questions not covered in this guide, please call our Customer Service department at 1 (877) 210-3449. Customer Service agents are available Monday through Friday, 9:00 a.m. to 6:00 p.m. ET.
Specifications and Technical Features of the Sharper Image BACON EXPRESS TOASTER
- Dimensions: 12.4" L x 4.4" W x 10" H
- Weight: 5.6 lbs – lightweight and portable
- Cooking Capacity: Up to 6 slices of bacon at once
- Vertical Cooking Design: Bacon cooks upright between two non-stick plates
- Temperature Control Dial: Adjustable for desired crispness levels, accommodating varying bacon thicknesses
- Preheat & Cook Indicators: Includes blue light to signal operation and auditory beep when cooking completes
- Removable Drip Tray: Collects excess grease for easy cleaning and healthier cooking
- Cool-Touch Handles: For safe handling during and after use
- Foldable Design: Space-saving for storage
Compared to standard countertop griddles or frying pans, the Bacon Express offers a specialized, mess-minimizing solution focused entirely on bacon, making it faster and cleaner than typical methods. Its compact footprint is smaller than most multi-use breakfast makers, which often come at higher prices.
Troubleshooting the Sharper Image BACON EXPRESS TOASTER
- Bacon Not Cooking Evenly: Adjust the crispness dial based on bacon thickness; ensure the appliance is fully preheated before inserting bacon.
- Device Won't Start: Confirm the unit is plugged in and the preheat light is on; reset by unplugging for 30 seconds if unresponsive.
- Excess Grease Leakage: Check that the drip tray is correctly installed and not full; clean regularly to prevent overflow.
- Unusual Odors or Smoke: Clean non-stick plates thoroughly to remove residual grease buildup.
- Error Indicators: The toaster uses indicator lights rather than error codes; refer to the user manual if the lights blink irregularly.
Preventive measures include always cleaning the drip tray after use, avoiding using metal utensils on non-stick surfaces, and not overloading the bacon slots. The product typically comes with a one-year limited warranty covering defects in materials and workmanship.
For further assistance, customers can contact Sharper Image customer support through their official website or phone hotline provided in the product manual.
Pros and Cons of the Sharper Image BACON EXPRESS TOASTER
- Pros:
- Specialized vertical design drains fat for healthier, crispier bacon
- Adjustable crispness control accommodates all bacon thicknesses
- Compact, foldable, and lightweight for easy storage and portability
- Easy cleanup with removable drip tray and non-stick plates
- Safe cool-touch handles reduce burn risks
- Reasonably priced at around $60-$70, offering good value for bacon enthusiasts
- Cons:
- Single-function device; limited to bacon cooking only
- May require a learning curve to perfect crispness settings
- Capacity limited to six slices, less suitable for large families
- Some users report slow preheat times compared to stovetop frying
Compared to multi-purpose breakfast makers or griddles, the Bacon Express excels in bacon quality but lacks versatility. For those prioritizing bacon, it presents better value and cleaner cooking than frying pans or microwaving, but less so for broader kitchen tasks.
Customer Reviews and Feedback on the Sharper Image BACON EXPRESS TOASTER
Users consistently praise the Sharper Image BACON EXPRESS TOASTER for producing evenly cooked, crispy bacon with minimal grease splatter. Many highlight the convenience of vertical cooking and the easy cleanup as significant advantages. The crispness dial receives positive mentions for allowing personalization of bacon texture.
Common complaints include the preheat time being longer than expected and occasional difficulty finding the perfect dial setting initially. Some customers also note the unit's single-use nature as a downside.
Overall, the product holds an average rating of around 4 out of 5 stars, with many recommending it specifically for bacon lovers seeking a dedicated, hassle-free cooking appliance. Buyers advise reading the manual carefully and experimenting with settings for optimal results.
Faqs
How do I set up and preheat my sharper image BACON EXPRESS TOASTER for the first use?
What should I do if my sharper image BACON EXPRESS TOASTER is not heating up or cooking bacon evenly?
Can I use the sharper image BACON EXPRESS TOASTER to cook foods other than bacon, like sausage or vegetables?
How do I clean and maintain my sharper image BACON EXPRESS TOASTER to ensure longevity?
What safety features does the sharper image BACON EXPRESS TOASTER offer during operation?
How do I adjust the cooking time and crispness settings on my sharper image BACON EXPRESS TOASTER?
Is the sharper image BACON EXPRESS TOASTER compact and easy to store in a small kitchen?
What kind of bacon works best with the sharper image BACON EXPRESS TOASTER, and how many slices can I cook at once?
More sharper image manuals
- How to Use: Sharper Image DIGITAL ULTRASONIC HUMIDIFIER User Guide
- How to Use: Sharper Image PORTABLE ICE MAKER User Manual
- How to Use: Sharper Image Star Wars Coffee Maker CM3-SRW-DVST User Guide
- Setup: Sharper Image 2-IN-1 STEAM MOP SI-160 User Manual
- Setup: Sharper Image Purify 5 Air Purifier User Manual
- Setup & Usage : Sharper Image ULTRASONIC HUMIDIFIER VOTIV 4 User Manual
Leave a Comment