
Westinghouse Digital Inverter Generator IGen4500 User Manual
Content
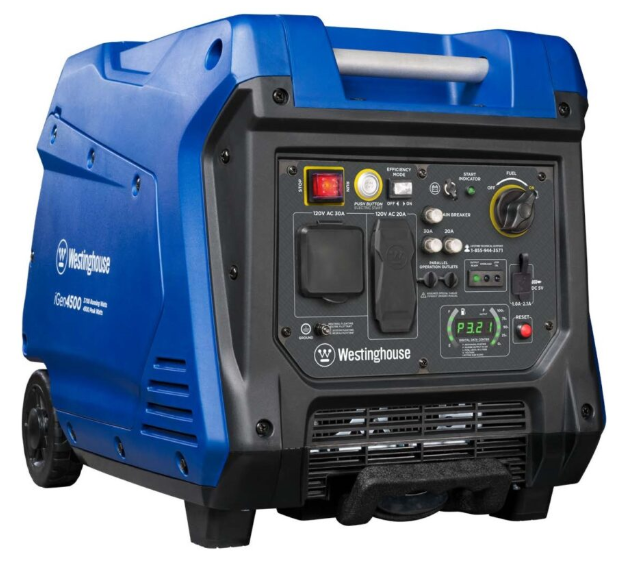
Westinghouse Digital Inverter Generator iGen4500
Introduction
The Westinghouse Digital Inverter Generator iGen4500 is a robust and efficient power solution designed for various applications, including camping, RVing, and home backup power. Launched in recent years, this generator has quickly gained popularity due to its reliability, quiet operation, and advanced features. The estimated price of the iGen4500 is around $800-$900, making it a competitive option in the market.
This generator is ideal for users who need a reliable source of power that is both portable and efficient. With its inverter technology, it provides clean energy suitable for sensitive electronics such as laptops, smartphones, and medical devices. The iGen4500 is also known for its user-friendly interface and durable construction, making it a favorite among outdoor enthusiasts and homeowners alike.
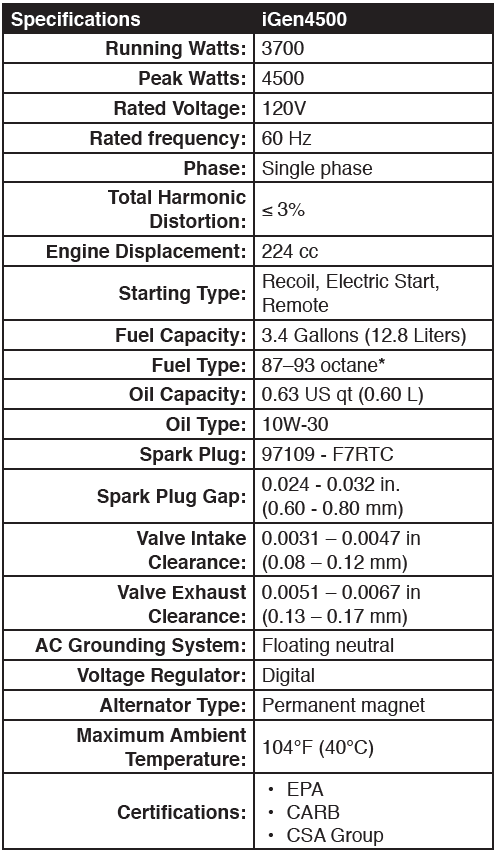
Specifications
SAFETY INSTRUCTIONS
CORRECT USAGE
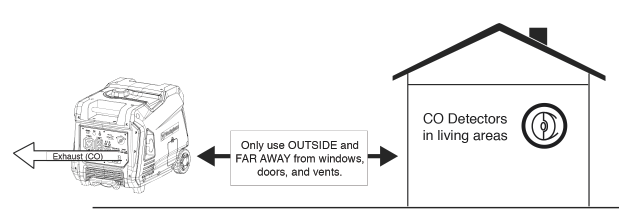
Example location to reduce risk of carbon monoxide poisoning
- ONLY use outside and downwind, far away from windows, doors and vents.
- Direct exhaust away from occupied spaces
INCORRECT USAGE
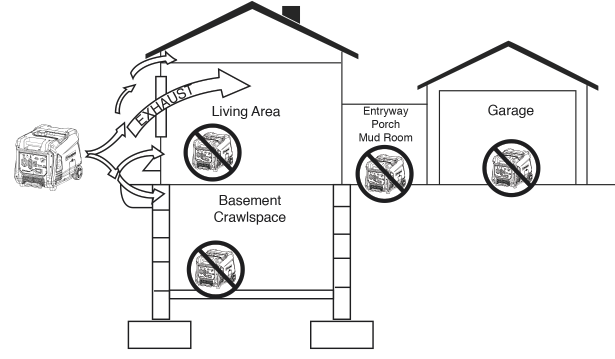
Do not operate in any of the following locations:
- Near any door, window, or vent
- Garage
- Basement
- Crawl Space
- Living Area
- Attic
- Entry Way
- Porch
- Mudroom
SAFETY LABELS AND DECALS
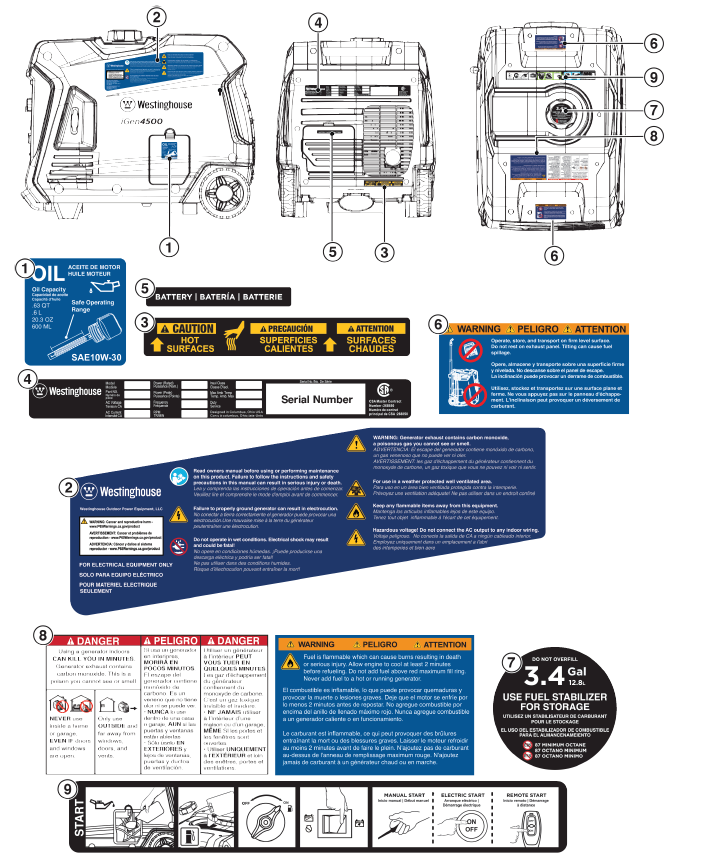
COMPONENTS
CONTROL PANEL COMPONENTS
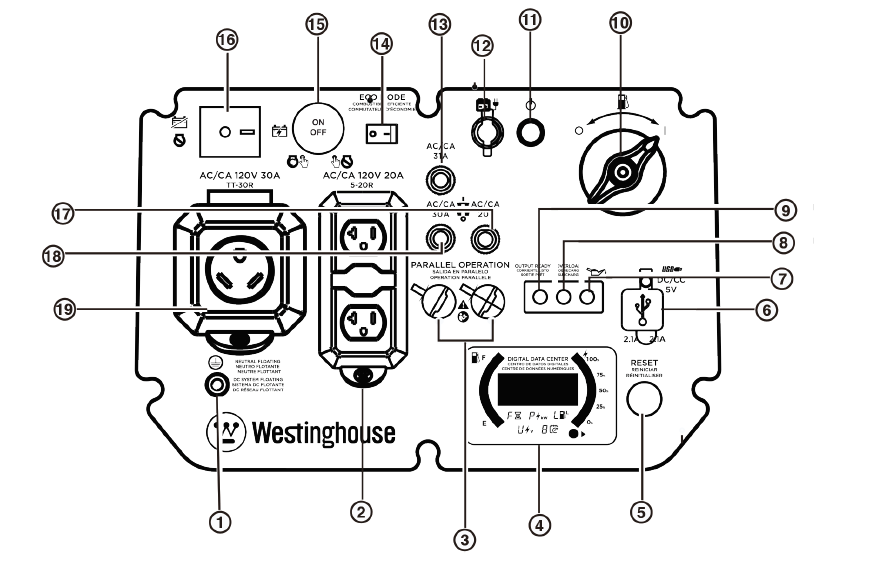
- Ground Terminal: The ground terminal is used to externally ground the generator.
- 120 Volt AC, 20 Amp Duplex NEMA 5-20R Receptacle: Receptacle can supply a maximum of 20 Amps.
- Parallel Operation Outlets: A compatible Westinghouse Inverter Generator can be connected for additional power output.
- LED Data Center: Displays remaining run time (F), power output in kW (P), fuel level in liters (L), voltage output (V), and lifetime hours.
- Overload Reset: The generator inverter will automatically switch OFF all AC output to protect the generator if overloaded or if there is a short circuit in a connected appliance.
- USB Ports: Two-port 5V/2.1A USB outlet. Accepts Type A USB plugs.
- Low Oil LED: Indicates low oil level. When the oil level in the crankcase falls below the safe operating limit, the low oil level indicator will illuminate and the generator will automatically shut off the engine.
- Overload LED: Indicates that the generator is overloaded. See page 17.
- Output Ready LED: Illuminates when the generator is operating normally. Indicates the generator is producing electrical power at the receptacles.
- Fuel Switch: Used to turn gas valve open or closed.
- Battery Indicator: Indicates that power is ON. Light will remain illuminated while the unit is ON.
- Battery Charging Port: Used to charge the battery with the included battery charger.
- Main Circuit Breaker: The main circuit breaker controls total output of all outlets to protect the generator from overload or short circuit.
- Eco Mode: Eco mode minimizes fuel consumption and noise by adjusting the engine RPM to the minimum required for the current load.
- Push-Button Start/Stop: Push once to automatically start the engine. Push again to stop the engine.
- Battery Switch: Turns battery ON and OFF. Must be ON before electric start or remote start.
- 20 Amp AC Circuit Breaker: Circuit breaker limits the current that can be delivered through the NEMA 20R receptacle to 20 Amps.
- 30 Amp AC Circuit Breaker: Circuit breaker limits the current that can be delivered through the NEMA TT-30 receptacle to 30 Amps.
- 120 Volt AC, 30 Amp NEMA TT-30R Receptacle: Receptacle can supply a maximum of 30 Amps.
GENERATOR COMPONENTS
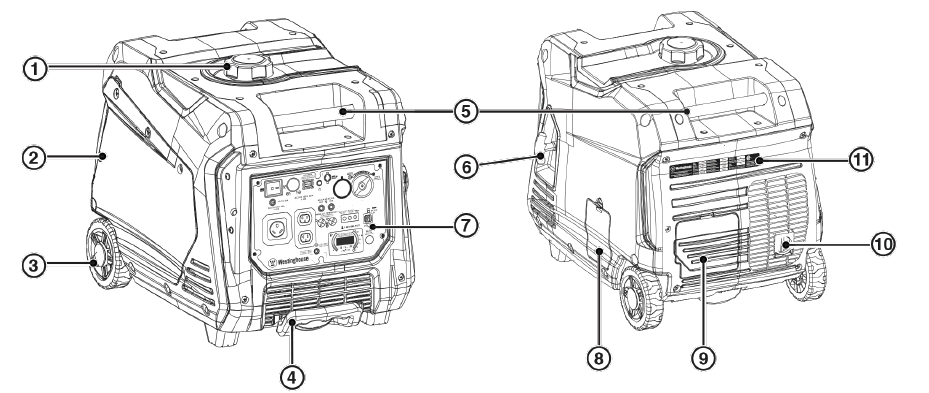
- Fuel Cap: Add unleaded fuel here. Close the cap until it clicks.
- Engine Service Cover: Cover provides access to the engine, air cleaner, carburetor, and spark plug.
- Transport Wheels: Wheels allow one-handed maneuverability when used with the extendable handle.
- Extendable Handle: Extend and retract the handle by pushing the locking button.
- Carry Handles: Built-in handles allow easy, two-person transport.
- Recoil Handle: Pull the recoil handle to manually start the engine.
- Control Panel: The control panel contains the outlets and operational controls.
- Oil Access Cover: Cover provides access to the oil fill cap/dipstick and oil drain plug.
- Battery Access Cover: Cover provides access to the battery and quick-connect plug.
- Muffler and Spark Arrestor: The spark arrestor prevents sparks from exiting the muffler.
- Model Information Label: Provides model serial number, voltage/amps, and power rating information.
MAINTENANCE
ENGINE OIL LEVEL CHECK
Caution
Avoid skin contact with engine oil. Wear protective clothing and equipment. Wash all exposed skin with soap and water.
NOTICE
Always use the specified engine oil. Failure to use the specified engine oil can cause accelerated wear and/or shorten the life of the engine.
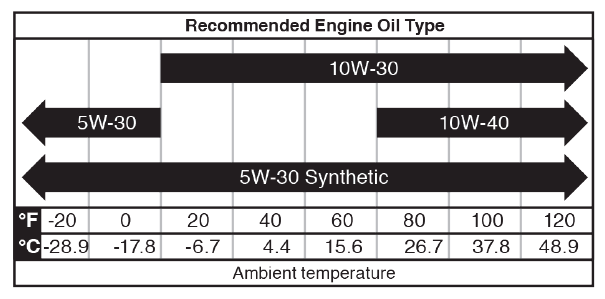
ENGINE OIL CHANGE
When using the generator under extreme, dirty, dusty conditions or in extremely hot weather, change the oil more frequently. Change the oil while the engine is still warm from operation.
- Place the generator on a level surface and allow the engine to cool for several minutes.
- Remove the engine service cover. Disconnect the spark plug wire from the spark plug and place the wire where it cannot contact the spark plug.
- Remove the oil access cover.
- With a damp rag, clean around the oil dipstick. Remove the dipstick and wipe clean.
- Remove the rubber plug under the oil drain bolt and place an oil pan (or suitable container) under the drain hole.
- Using a 10mm wrench, remove the oil drain bolt and allow the oil the to drain.
- Install the oil drain plug and tighten securely. Install the rubber plug.
Note: A new oil drain plug crush washer is recommended at each oil change. - Slowly pour oil into the oil fill opening until oil the level is between the L and H marks on the dipstick. Stop frequently to check the oil level. DO NOT overfill.
Maximum oil capacity: 0.63 US qt (0.60 L) - Replace the dipstick and hand-tighten.
- Connect the spark plug wire and install the engine service cover.
SPARK PLUG MAINTENANCE
Inspect and clean the spark plug after every 100 hours of use or six months. Replace the spark plug after 300 hours of use or every year.
- Place the generator on a level surface and allow the engine to cool.
- Remove the engine service cover.
- Remove the spark plug boot by firmly pulling the spark boot directly away from the engine.
- Clean the area around the spark plug.
- Remove the spark plug with the included spark plug socket wrench.
- Inspect the spark plug. Replace if electrodes are pitted, burned, or the insulator is cracked. Only use a recommended replacement plug.
- Measure the spark plug electrode gap with a wire-type feeler gauge. If necessary, correct the gap by carefully bending the side electrode.
VALVE CLEARANCE
NOTICE Checking and adjusting valve clearance must be done when the engine is cold.
- Remove the rocker arm cover and carefully remove the gasket. If the gasket is torn or damaged, it must be replaced.
- Remove the spark plug so the engine can be rotated more easily.
- Rotate the engine to top dead center (TDC) by pulling the recoil handle slowly. Looking through the spark plug hole, the piston should be at the top (both valves are closed).
- Both the rocker arms should be loose at TDC on the compression stroke. If they are not, rotate the engine 360°.
- Insert a feeler gauge between the rocker arm and the valve stem to measure valve clearance.
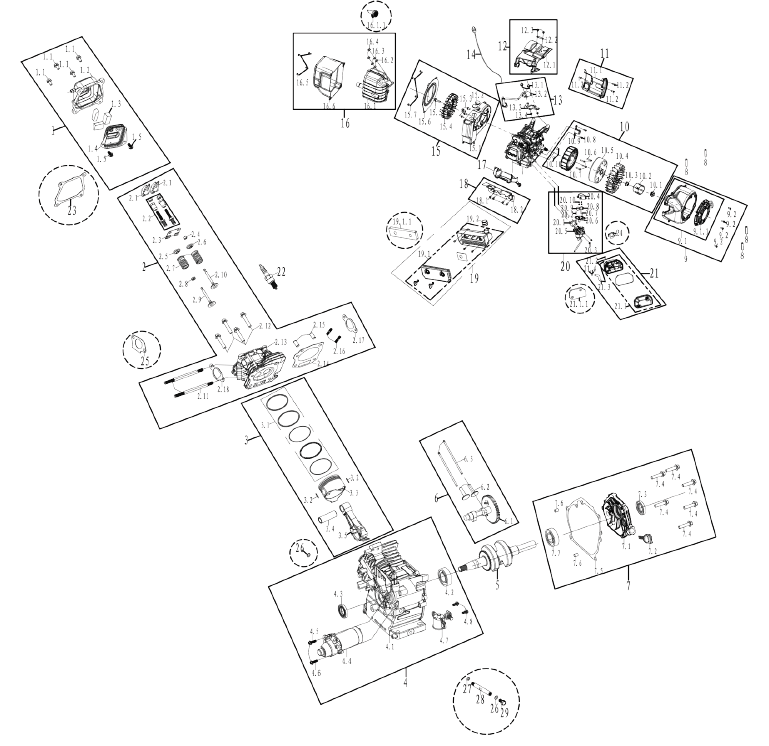
EXPLODED VIEWS
Troubleshooting
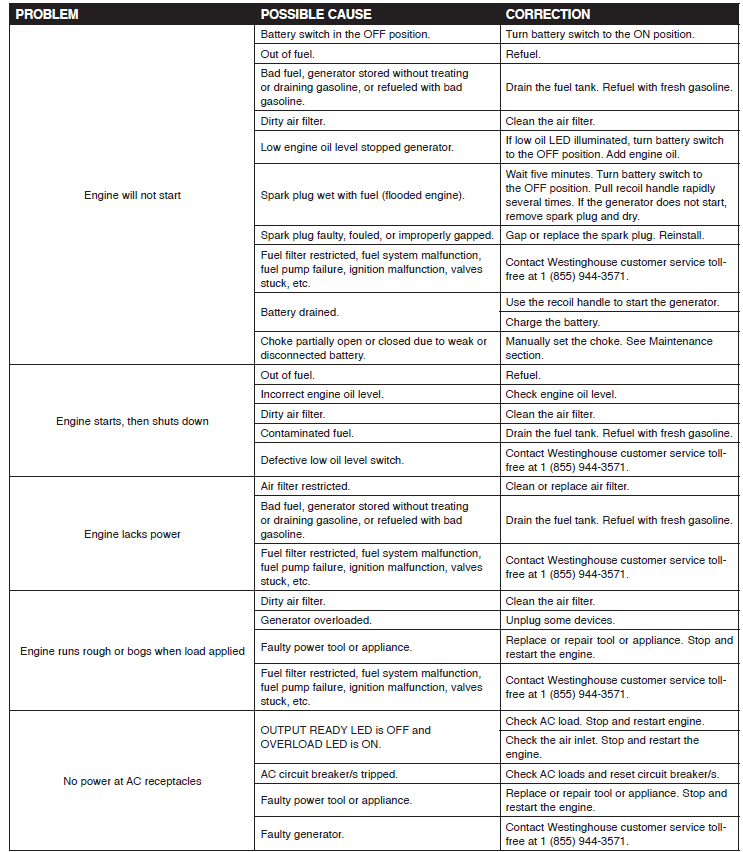
If the generator does not start, check the fuel level and ensure it is not empty. Also, verify that the choke is in the correct position and that there are no blockages in the air filter or muffler.
For issues with power output, ensure that the load does not exceed the rated capacity of the generator. Check for any loose connections or damage to the outlets and cords. Always refer to the user manual for specific troubleshooting steps and safety precautions.
Pros & Cons
Pros:
- High Efficiency and Long Runtime
- Inverter Technology for Clean Power
- Quiet Operation
- Remote Start Capability
- Durable Construction
- Multiple Outlets for Versatility
Cons:
- Slightly Heavy for Solo Transport
- No Electric Start Option (Only Remote Start)
- Some Users Report Issues with Remote Start Battery Life
Customer Reviews
Customers generally praise the Westinghouse iGen4500 for its reliability and quiet operation. Many users appreciate the remote start feature and the comprehensive LED data center. However, some users have reported issues with the weight of the generator and occasional problems with the remote start battery life.
Faqs
What is the peak and rated power output of the Westinghouse iGen4500?
How long can the iGen4500 run on a single tank of fuel?
Is the iGen4500 suitable for sensitive electronics?
What is the noise level of the iGen4500?
Does the iGen4500 come with a remote start feature?
What are the dimensions and weight of the iGen4500?
How many outlets does the iGen4500 have?
Is the iGen4500 designed for outdoor use?
What kind of engine does the iGen4500 use?
Does the iGen4500 come with an electric start option?
More westinghouse manuals
- Westinghouse Electric Pressure Washer EPX2000 User Manual
- Westinghouse Portable Room Air Conditioner WPAC10000
- Westinghouse Lighting Fan ETL-ES-Albert-WH23 User Guide
- Westinghouse Portable Generator WGen5300V User Guide
- How to Use: Westinghouse Pressure Washers WPX2700, WPX3200 User Manual
- Westinghouse Portable Generator WGen7500 User Manual
Leave a Comment