
Setup: Asus PRIME X470-PRO Motherboard User Manual
Content
ASUS PRIME X470-PRO Motherboard
Introduction
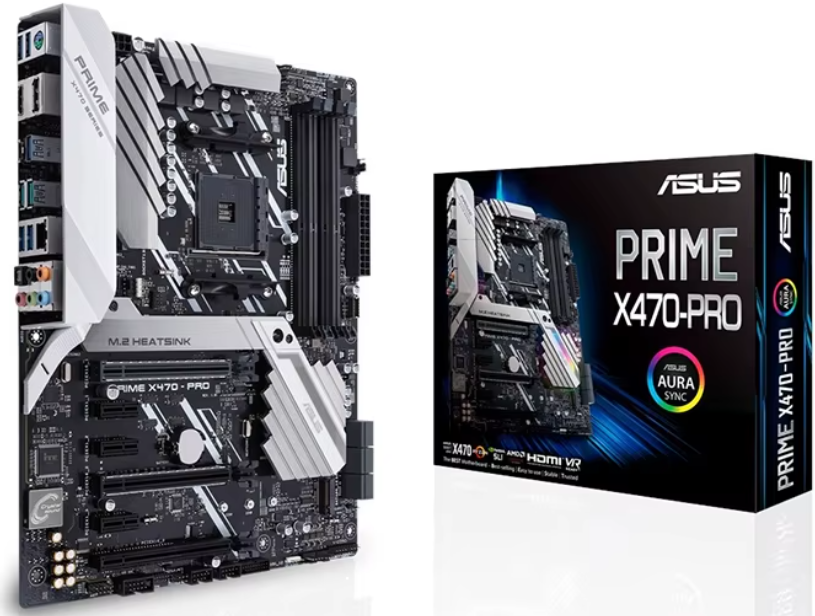
The Asus PRIME X470-PRO Motherboard is a high-performance ATX motherboard designed to unlock the full potential of AMD Ryzen processors with the AM4 socket and the X470 chipset. Engineered for enthusiasts, gamers, and professional users, this motherboard offers robust power delivery through its 6+4 phase Digi+ VRM design, ensuring stable overclocking and efficient CPU performance. Its comprehensive feature set includes advanced cooling controls with the Fan Xpert 4 software, dual M.2 slots with ultra-efficient heatsinks to prevent thermal throttling, and extensive connectivity options such as USB 3.1 Gen 2 ports and Intel Gigabit Ethernet for high-speed networking.
Unique selling points include ASUS’s signature 5-Way Optimization, which consolidates CPU performance tuning, intelligent power saving, digital power control, and thermal management in a one-click interface. The motherboard also supports ASUS Aura Sync, enabling customizable RGB lighting that synchronizes with compatible components to brighten up any build aesthetically. Its durable construction features ASUS 5X Protection III safeguards like SafeSlot Core for PCIe slot reinforcement, LAN surge protection, and enhanced ESD guards for long-lasting reliability.
This motherboard is ideal for PC builders seeking a balance between powerful performance and versatile features for gaming, content creation, streaming, and multitasking. It supports up to 64GB of DDR4 RAM across four DIMM slots, multiple PCIe 3.0 lanes for GPUs and expansion cards, and RAID configurations for storage flexibility.
Available originally at a $170 to $190 price range, the ASUS PRIME X470-PRO remains a competitive choice for mid- to high-end AMD platforms, especially for users who prefer proven ASUS quality and extensive BIOS customization options. While newer chipsets exist, this board provides exceptional value for Ryzen 2000 and 3000 series CPUs and is widely available through retailers and online marketplaces.
Package contents
Check your motherboard package for the following items.
- Motherboard; PRIME X470-PRO
- Cables: 2 x SATA 6 Gb/s cables 1 x SLI™ HB Bridge(2-WAY-M)
- Accessories:
- 1 x ASUS Q-Shield
- 1 x Q-connector
- 1 x M.2 Screw Package
- Application DVD: Motherboard support DVD
- Documentation: User guide
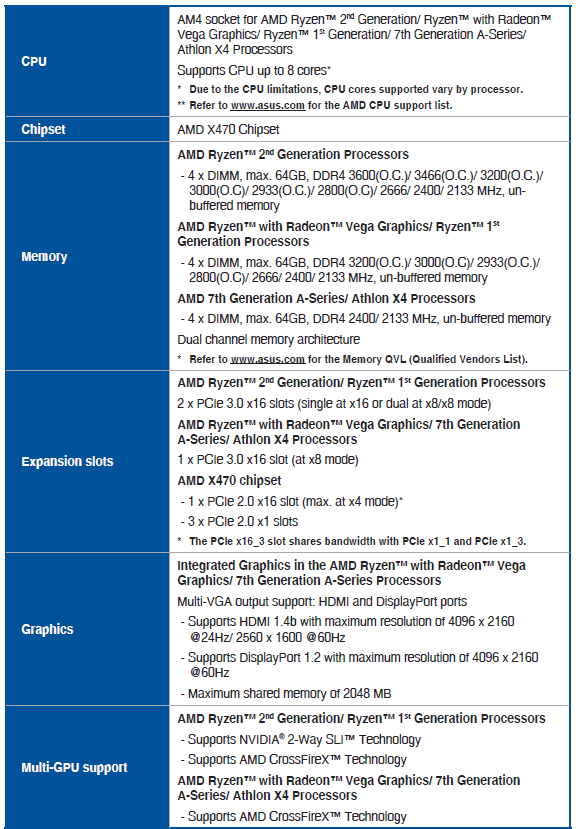
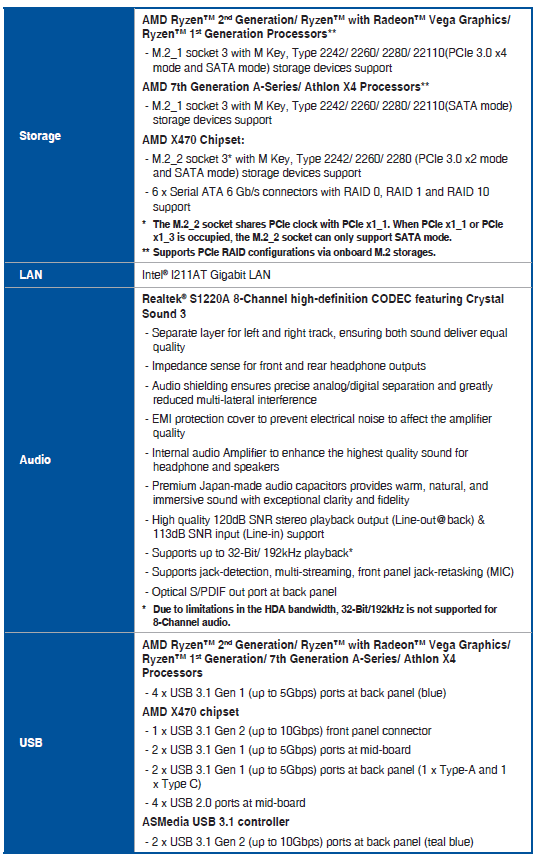
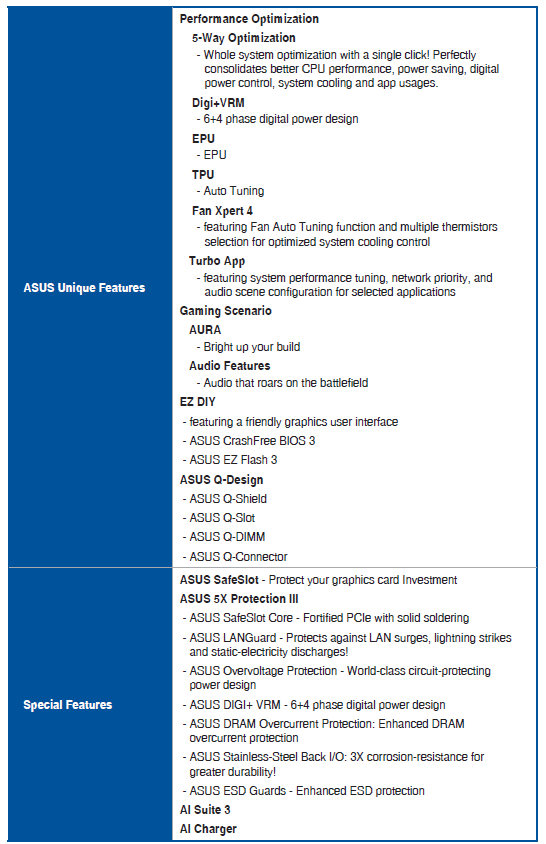
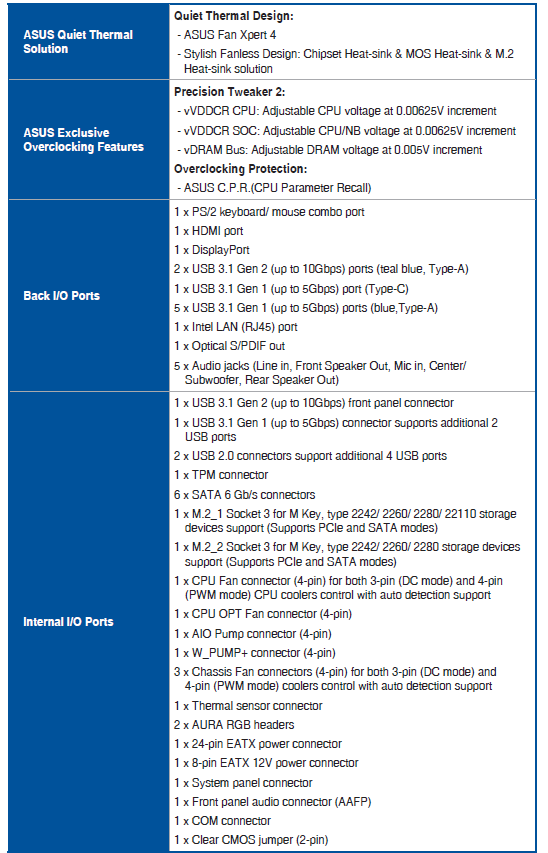
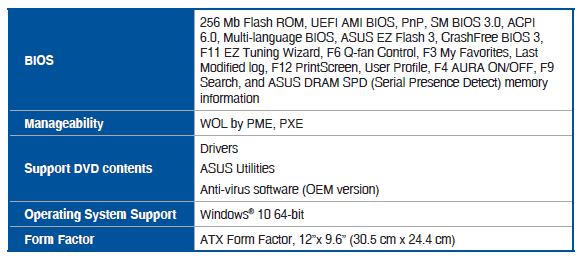
PRIME X470-PRO specifications summary
Safety information
Electrical safety
- To prevent an electrical shock hazard, disconnect the power cable from the electrical outlet before relocating the system.
- When adding or removing devices to or from the system, ensure that the power cables for the devices are unplugged before the signal cables are connected. If possible, disconnect all power cables from the existing system before you add a device.
- Before connecting or removing signal cables from the motherboard, ensure that all power cables are unplugged.
- Seek professional assistance before using an adapter or extension cord. These devices could interrupt the grounding circuit.
- Ensure that your power supply is set to the correct voltage in your area. If you are not sure about the voltage of the electrical outlet you are using, contact your local power company.
- If the power supply is broken, do not try to fix it by yourself. Contact a qualified service technician or your retailer.
Operation safety
- Before installing the motherboard and adding devices to it, carefully read all the manuals that came with the package.
- Before using the product, ensure all cables are correctly connected and the power cables are not damaged. If you detect any damage, contact your dealer immediately.
- To avoid short circuits, keep paper clips, screws, and staples away from connectors, slots, sockets, and circuitry.
- Avoid dust, humidity, and temperature extremes. Do not place the product in any area where it may become wet.
- Place the product on a stable surface.
- If you encounter technical problems with the product, contact a qualified service technician or your retailer.
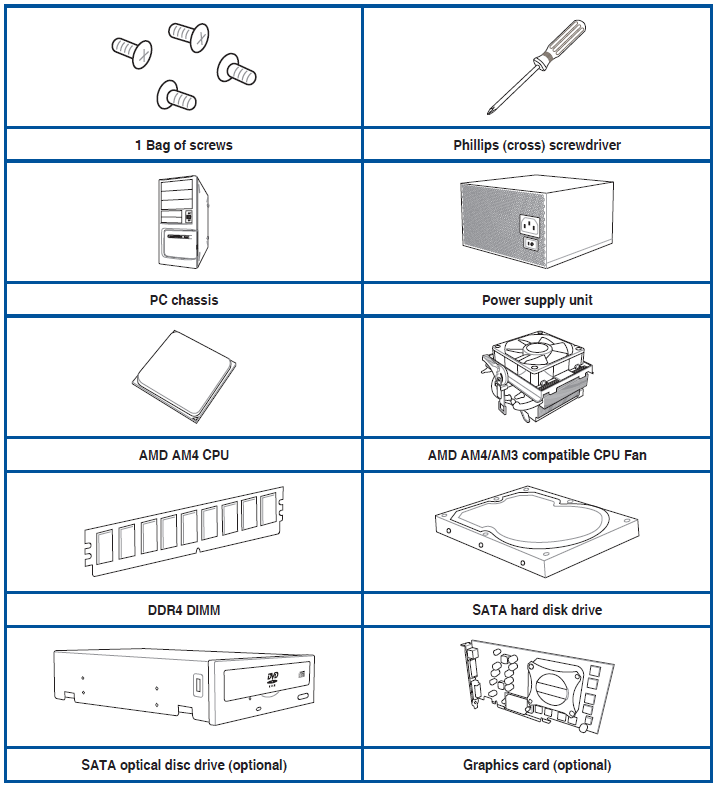
Installation tools and components
Motherboard overview
Before you proceed
Take note of the following precautions before you install motherboard components or change any motherboard settings.
- Unplug the power cord from the wall socket before touching any component.
- Before handling components, use a grounded wrist strap or touch a safely grounded object or a metal object, such as the power supply case, to avoid damaging them due to static electricity.
- Hold components by the edges to avoid touching the ICs on them.
- Whenever you uninstall any component, place it on a grounded antistatic pad or in the bag that came with the component.
- Before you install or remove any component, ensure that the ATX power supply is switched off or the power cord is detached from the power supply. Failure to do so may cause severe damage to the motherboard, peripherals, or components.
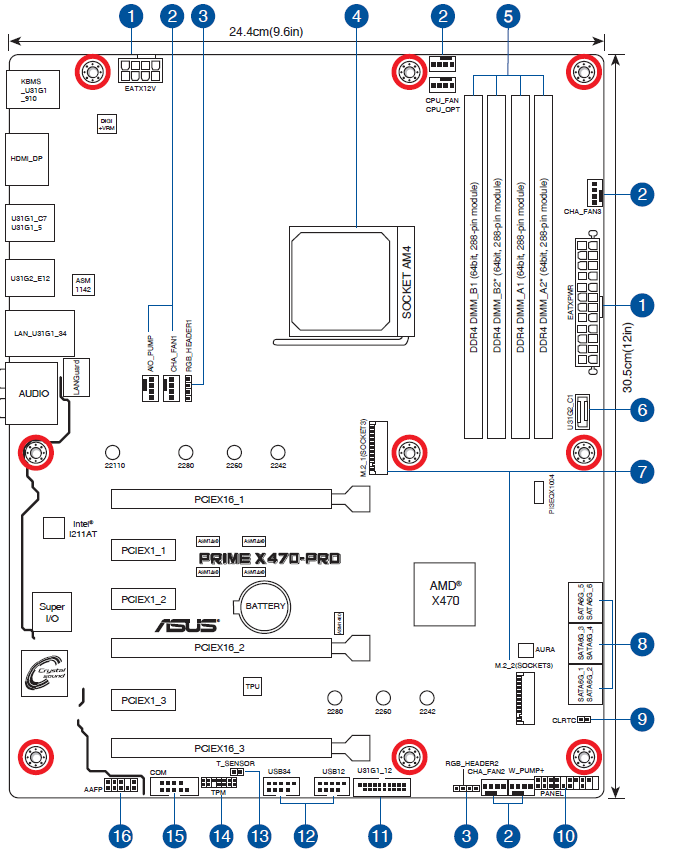
Motherboard layout
Basic Installation
Building your PC system
The diagrams in this section are for reference only. The motherboard layout may vary with models, but the installation steps are the same for all models.
Motherboard installation
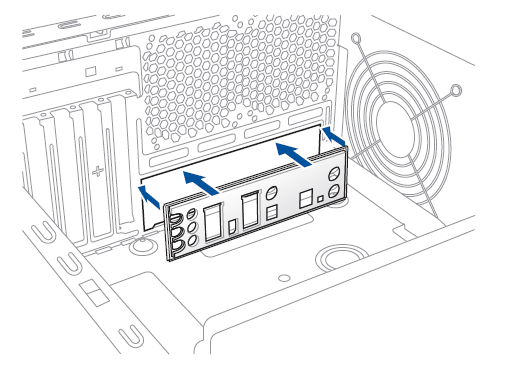
Install the ASUS Q-Shield on the chassis rear I/O panel.
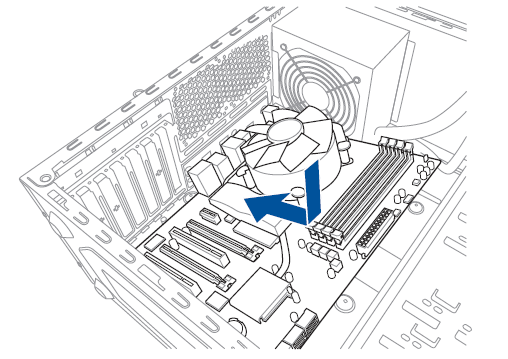
Place the motherboard into the chassis, ensuring that its rear I/O ports are aligned to the chassis’ rear I/O panel.
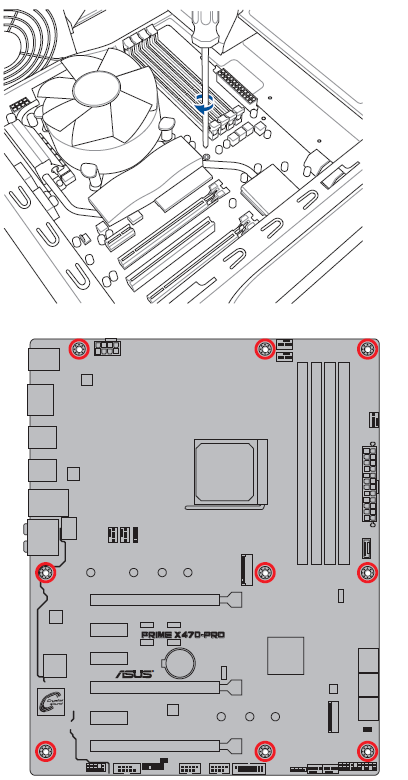
- Place nine (9) screws into the holes indicated by circles to secure the motherboard to the chassis.
CPU installation
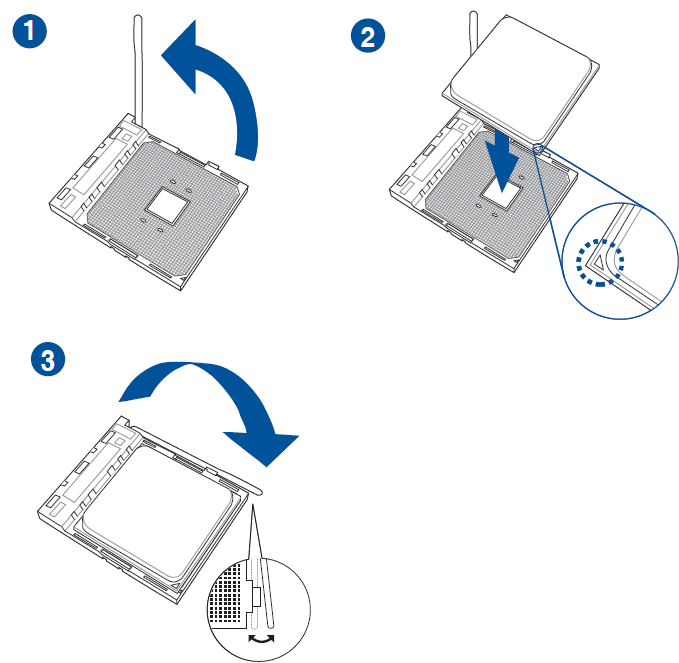
The AMD AM4 socket is compatible with AMD AM4 processors. Ensure you use a CPU designed for the AM4 socket. The CPU fits in only one correct orientation. DO NOT force the CPU into the socket to prevent bending the connectors on the socket and damaging the CPU!
BIOS Setup
Knowing BIOS
The new ASUS UEFI BIOS is a Unified Extensible Interface that complies with UEFI architecture, offering a user-friendly interface that goes beyond the traditional keyboard-only BIOS controls to enable a more flexible and convenient mouse input. You can easily navigate the new UEFI BIOS with the same smoothness as your operating system. The term “BIOS” in this user manual refers to “UEFI BIOS” unless otherwise specified.
BIOS (Basic Input and Output System) stores system hardware settings such as storage device configuration, overclocking settings, advanced power management, and boot device configuration that are needed for system startup in the motherboard CMOS. In normal circumstances, the default BIOS settings apply to most conditions to ensure optimal performance. DO NOT change the default BIOS settings except in the following circumstances:
- An error message appears on the screen during the system bootup and requests you to run the BIOS Setup.
- You have installed a new system component that requires further BIOS settings or an update.
Inappropriate BIOS settings may result in instability or boot failure. We strongly recommend that you change the BIOS settings only with the help of a trained service personnel.
- When downloading or updating the BIOS file, rename it as PX470P.CAP for this motherboard.
- BIOS settings and options may vary due to different BIOS release versions. Please refer to the latest BIOS version for settings and options.
BIOS setup program
Use the BIOS Setup to update the BIOS or configure its parameters. The BIOS screen includes navigation keys and brief onscreen help to guide you in using the BIOS Setup program.
Entering BIOS at startup
To enter BIOS Setup at startup, press <Delete> or <F2> during the Power-On Self Test (POST). If you do not press <Delete> or <F2>, POST continues with its routines.
Entering BIOS Setup after POST
To enter BIOS Setup after POST:
- Press <Ctrl>+<Alt>+<Delete> simultaneously.
- Press the reset button on the system chassis.
- Press the power button to turn the system off, then back on. Do this option only if you failed to enter BIOS Setup using the first two options.
After doing either of the three options, press the <Delete> key to enter BIOS.
- The BIOS setup screens shown in this section are for reference purposes only, and may not exactly match what you see on your screen.
- Ensure that a USB mouse is connected to your motherboard if you want to use the mouse to control the BIOS setup program.
- If the system becomes unstable after changing any BIOS setting, load the default settings to ensure system compatibility and stability. Select the Load Optimized Defaults item under the Exit menu or press hotkey <F5>. See section 3.10 Exit Menu for details.
- If the system fails to boot after changing any BIOS setting, try to clear the CMOS and reset the motherboard to the default value. See section 1.1.7 Headers for information on how to erase the RTC RAM via the Clear CMOS button.
- The BIOS setup program does not support the Bluetooth devices.
BIOS menu screen
The BIOS Setup program can be used under two modes: EZ Mode and Advanced Mode. You can change modes from Setup Mode in the Boot menu or by pressing the <F7> hotkey.
Appendix
Notices
Federal Communications Commission Statement
This device complies with Part 15 of the FCC Rules. Operation is subject to the following two conditions:
- This device may not cause harmful interference.
- This device must accept any interference received, including interference that may cause undesired operation.
This equipment has been tested and found to comply with the limits for a Class B digital device, pursuant to Part 15 of the FCC Rules. These limits are designed to provide reasonable protection against harmful interference in a residential installation. This equipment generates, uses, and can radiate radio frequency energy and, if not installed and used in accordance with the manufacturer’s instructions, may cause harmful interference to radio communications. However, there is no guarantee that interference will not occur in a particular installation.
If this equipment does cause harmful interference to radio or television reception, which can be determined by turning the equipment off and on, the user is encouraged to try to correct the interference by one or more of the following measures:
- Reorient or relocate the receiving antenna.
- Increase the separation between the equipment and receiver.
- Connect the equipment to an outlet on a circuit different from that to which the receiver is connected.
- Consult the dealer or an experienced radio/TV technician for help.
Troubleshooting Common Issues on the ASUS PRIME X470-PRO Motherboard
Users of the Asus PRIME X470-PRO Motherboard may encounter a few typical issues, which can often be resolved with straightforward steps:
- POST Failure or No Boot: Verify CPU and memory compatibility, reseat RAM modules, and reset CMOS using the clear CMOS jumper or button. Check for loose power connections on the 24-pin ATX and 8-pin CPU power connectors.
- Error Codes on Q-Code LED: Refer to the motherboard manual for specific two-digit codes indicating hardware initialization stages. Common codes include memory initialization errors, which suggest testing individual RAM sticks or updating the BIOS.
- USB or Peripheral Recognition Issues: Update chipset and USB drivers from the ASUS support site and ensure BIOS is up to date with the ASUS EZ Flash 3 utility.
- Overheating or Fan Control Problems: Use Fan Xpert 4 to calibrate fan speeds and verify all fan headers are properly connected and configured in BIOS.
Preventive measures include regularly updating BIOS, using high-quality power supplies to avoid electrical surges, and maintaining dust-free environments for optimal cooling. The motherboard carries the ASUS 3-year warranty, with customer support accessible through the ASUS official website or authorized service centers. For technical assistance, users can contact ASUS support via phone or live chat, details of which are available on the ASUS support portal.
Pros & Cons of the Asus PRIME X470-PRO Motherboard
- Pros:
- Robust 6+4 phase digital power design ensures stable overclocking and optimized CPU performance.
- Comprehensive cooling controls via Fan Xpert 4 with multiple thermistor inputs for fine-tuned thermal management.
- Dual M.2 slots with heatsinks enhance SSD performance and reliability by reducing temperatures up to 20°C.
- Wide connectivity options, including USB 3.1 Gen 2 ports, Intel Gigabit Ethernet, and multiple PCIe 3.0 slots for expansion.
- ASUS Aura Sync RGB lighting allows aesthetic customization synchronized with other compatible components.
- ASUS 5X Protection III provides excellent hardware safeguards such as surge protection and reinforced PCIe slots.
- Cons:
- Lacks advanced ARGB lighting headers, which may limit RGB customization compared to newer motherboards.
- Onboard RGB lighting is basic and may not meet enthusiast expectations for vibrant effects.
- Some users report a need for an additional M.2 heatsink or cover for the second M.2 slot to further improve cooling.
- While well-equipped, the X470 chipset is now older, and newer options with PCIe 4.0 are available for more future-proof builds.
Overall, the Asus PRIME X470-PRO offers excellent value for money for AMD Ryzen users who want reliable performance and versatile features without paying a premium for the latest chipset. It stands strong against similar ATX boards in its class, providing a solid foundation for gaming, workstations, and general computing.
Customer Reviews and Feedback on the Asus PRIME X470-PRO Motherboard
Users consistently praise the ASUS PRIME X470-PRO Motherboard for its dependable power delivery and ease of BIOS configuration, with many highlighting the intuitive ASUS 5-Way Optimization and cooling features as major benefits. Its dual M.2 support and stable network performance are also frequent points of approval, contributing to smooth gaming and productivity experiences.
Common complaints include the limited RGB lighting options and lack of ARGB headers, which some users feel detract from the overall “Pro” aesthetic appeal. A few customers mention that the onboard software utilities could be more user-friendly, though the BIOS is generally well-regarded for customization.
The motherboard holds an average rating of around 4.7 out of 5 stars from verified buyers. Many recommend it as a reliable mid-range AMD motherboard, especially for those upgrading from older platforms or building a balanced gaming rig without overspending. Frequent advice includes ensuring BIOS updates are applied to maximize CPU compatibility and system stability.
Faqs
How do I properly install the CPU on the ASUS PRIME X470-PRO Motherboard?
What should I do if my ASUS PRIME X470-PRO Motherboard is not working properly?
How do I overclock RAM on the ASUS PRIME X470-PRO Motherboard?
Can I use the ASUS PRIME X470-PRO Motherboard with older DDR3 RAM?
How do I set up M.2 storage on the ASUS PRIME X470-PRO Motherboard?
What are the key features that make the ASUS PRIME X470-PRO Motherboard different?
How often should I update the BIOS on my ASUS PRIME X470-PRO Motherboard?
How do I maintain and care for my ASUS PRIME X470-PRO Motherboard?
More asus manuals
- Setup: Asus M5A78L-M LX3 Series Motherboard User Manual
- Asus AC1700 Wireless Gigabit Router RT-ACRH17 User Guide
- Asus P4C800-E Deluxe Computer Motherboard User Manual
- Configuration: Asus Motherboard Prime Z390-A User Manual
- Asus 24 Inches LCD Monitor VS248 User Guide
- Asus Prime Motherboard Z590-A User Manual | Installation Instruction
Leave a Comment