
Setup: Beurer Upper Arm Blood Pressure Monitor BM-45 User Manual
Content
Beurer Upper Arm Blood Pressure Monitor BM-45: Comprehensive Product Manual
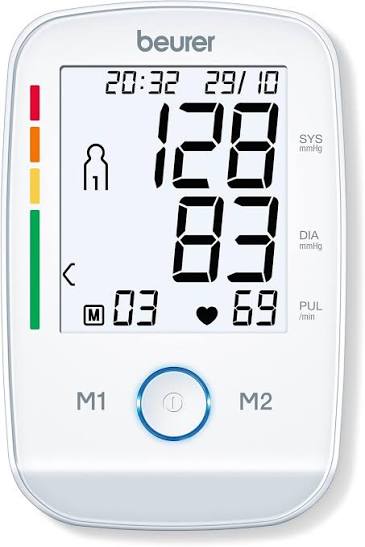
Introduction to the Beurer Upper Arm Blood Pressure Monitor BM 45
The Beurer Upper Arm Blood Pressure Monitor BM 45 is a fully automatic, user-friendly device designed for accurate, non-invasive blood pressure and pulse measurements at home. Featuring an extra-large illuminated XL display (70 x 82 mm), illuminated Start/Stop button, and intuitive sensor-touch buttons, this upper arm blood pressure monitor ensures easy operation for all users, including those with visual impairments. Its ergonomic design includes automatic pressure preselection and deflation for quick, comfortable readings, with a measurement range of systolic 60-250 mmHg, diastolic 40-199 mmHg, and pulse 30-180 beats per minute.
Key benefits include arrhythmia detection to warn of possible cardiac irregularities, a risk indicator with a colored scale for classifying measurements, and 2 user memory channels storing up to 60 readings each—plus average values for all measurements and morning/evening blood pressure over the last 7 days. Compatible with the beurer HealthManager Pro app via Scan & Save, it supports digital tracking. Ideal for seniors, hypertension patients, or anyone monitoring cardiovascular health, the Beurer BM 45 upper arm blood pressure monitor fits upper arm circumferences of 22-36 cm (XL cuff available separately). Compact at 165 x 107 x 50 mm and weighing 288 g (without batteries), it comes with 4 AA batteries, a storage pouch, and a multilingual manual. As a CE-marked medical device with a 5-year warranty, it's reliable for daily use. Estimated price range: $40-60 USD, widely available online and in pharmacies across Germany, the UK, the US, and more.
Technical Specifications
- Type: BM 45
- Measurement Method: Oscillometric, non-invasive blood pressure measurement on the upper arm.
- Measurement Range:
- Cuff Pressure: 0–300 mmHg
- Systolic Pressure: 60–250 mmHg
- Diastolic Pressure: 30–199 mmHg
- Pulse: 40–180 beats/minute
- Display Accuracy:
- Systolic Pressure: ±3 mmHg
- Diastolic Pressure: ±3 mmHg
- Pulse: ±5% of the displayed value
- Measurement Inaccuracy:
- Maximum permissible standard deviation according to clinical testing:
- Systolic Pressure: 8 mmHg
- Diastolic Pressure: 8 mmHg
- Maximum permissible standard deviation according to clinical testing:
- Memory: 2 × 60 memory spaces
- Dimensions:
- Length: 160 mm
- Width: 107 mm
- Height: 50 mm
- Weight: Approximately 408 g (without batteries, including cuff)
- Cuff Size:
- Standard Cuff: 22–36 cm
- XL Cuff: 35–44 cm
- Permissible Operating Conditions:
- Temperature: +5°C to +40°C
- Relative Humidity: 15–90% (non-condensing)
- Permissible Storage and Transport Conditions:
- Temperature: −25°C to +70°C
- Relative Humidity: ≤90%
- Ambient Pressure: 700–1060 hPa
- Power Supply: 4 × 1.5 V AA batteries (LR6)
- Battery Life: Approximately 250 measurements, depending on blood pressure level and/or pump pressure.
- Classification:
- Internal Power Supply
- Protection Rating: IP20
- No AP or APG
- Continuous Operation
- Applied Part: Type BF (cuff)
- Protection Class: Class II (when using a mains adapter)
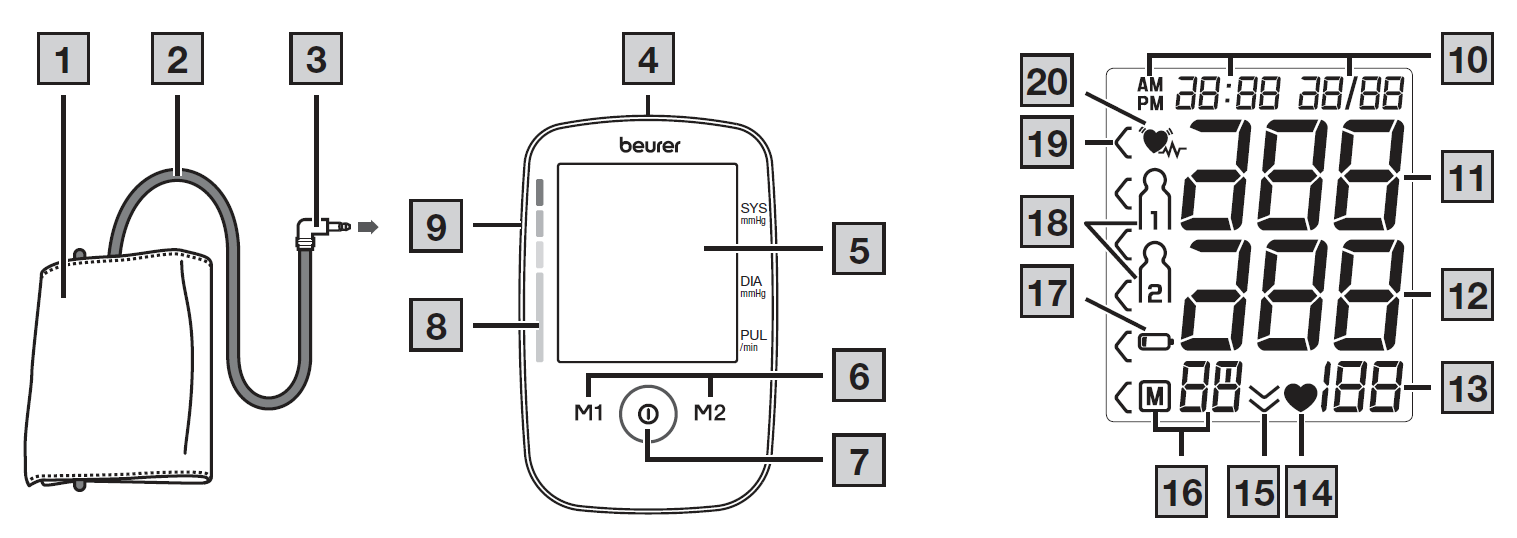
Device Description
- Cuff
- Cuff Line
- Cuff Connector
- Connection for Mains Adapter (Rear of Device)*
- Display
- Memory Buttons (M1/M2)
- START/STOP Button
- Risk Indicator
- Connection for Cuff Connector (Left-Hand Side)
Information on the Display:
- Date / Time
- Systolic Pressure
- Diastolic Pressure
- Calculated Pulse Rate
- Pulse Symbol
- Release Air Symbol
- Memory Space Number / Memory Display:
- Average Value
- Morning Average
- Evening Average
- Battery Replacement Symbol
- User Memory
- Risk Indicator
- Cardiac Arrhythmia Symbol
INTENDED USE
Purpose
The blood pressure monitor (hereinafter referred to as the device) is intended for the fully automatic, non-invasive measurement of arterial blood pressure and pulse values on the upper arm. It is designed for self-measurement by adults in a domestic environment.
Target Group
The blood pressure measurement is suitable for adult users whose upper arm circumference is within the range printed on the cuff.
Clinical Benefits
The user can record their blood pressure and pulse values quickly and easily using the device. The recorded values are classified according to internationally applicable guidelines and evaluated graphically. Furthermore, the device can detect irregular heartbeats that occur during measurement and inform the user via a symbol on the display. The device saves the recorded measurements and can also provide average values of previous measurements. The recorded data can support healthcare providers during the diagnosis and treatment of blood pressure problems and contribute to the long-term monitoring of the user's health.
Indications
In the event of hypertension or hypotension, the user can independently monitor their blood pressure and pulse values at home. However, the user does not need to have hypertension or arrhythmia to use the device.
Contraindications
WARNING
- Do not use the blood pressure monitor on newborns, children, or pets.
- Persons with reduced physical, sensory, or mental capabilities should be supervised by a person responsible for their safety and receive instructions from that person on how to use the device.
- If you have any of the following conditions, consult your doctor before using the device:
- Cardiac arrhythmia
- Circulatory problems
- Diabetes
- Pregnancy
- Pre-eclampsia
- Hypotension
- Chills or shaking
- Do not use the device if you have an electrical implant, such as a pacemaker.
- Do not use the cuff on people who have undergone a mastectomy.
- Do not place the cuff over wounds, as this may cause further injury.
- Make sure the cuff is not placed on an arm whose arteries or veins are undergoing medical treatment, such as intravascular access, intravascular therapy, or an arteriovenous (AV) shunt.
WARNINGS AND SAFETY NOTES
WARNING
- The measurements you take are for your information only and are not a substitute for a medical examination. Discuss your measured values with your doctor and never make medical decisions based on them without professional advice, such as changing medication doses.
- The device is intended only for the purpose described in these instructions for use. The manufacturer is not liable for damage resulting from improper or incorrect use.
- Using the blood pressure monitor outside your home environment or while moving, such as travelling in a car, ambulance, or helicopter, or participating in physical activities such as sports, can affect measurement accuracy and produce incorrect readings.
- Cardiovascular diseases may lead to incorrect measurements or negatively affect measurement accuracy.
General Precautions
CAUTION
- The blood pressure monitor contains precision electronic components. Measurement accuracy and device service life depend on careful handling.
- Protect the device and its mains adapter from impacts, humidity, dirt, significant temperature fluctuations, and direct sunlight.
- Ensure the device is at room temperature before taking a measurement. If the device has been stored near the maximum or minimum specified storage and transport temperatures and is then placed in an environment at 20°C, wait approximately 2 hours before using it.
- Do not use the device near strong electromagnetic fields. Keep it away from radio systems and mobile phones.
- Remove the batteries if the device will not be used for an extended period.
- Avoid mechanically restricting, compressing, or sharply bending the cuff line.
- Do not use the device on people with allergies or sensitive skin.
Notes on Handling Batteries
WARNING
- If your skin or eyes come into contact with battery fluid, rinse the affected areas with water and seek medical assistance.
- Choking hazard! Small children may swallow batteries and choke. Store batteries out of their reach.
- Seek medical attention immediately if a battery is swallowed.
- Risk of explosion! Do not throw batteries into a fire.
- If a battery leaks, wear protective gloves and clean the battery compartment with a dry cloth.
- Do not disassemble, open, or crush batteries.
- Observe the positive (+) and negative (-) polarity markings.
CAUTION
- Protect batteries from excessive heat.
- Do not charge or short-circuit the batteries.
- Remove the batteries from the battery compartment if the device will not be used for an extended period.
- Use only identical or equivalent battery types.
- Always replace all batteries at the same time.
- Do not use rechargeable batteries.
Notes on Electromagnetic Compatibility
CAUTION
- The device is suitable for use in all environments specified in these instructions, including domestic environments.
- Electromagnetic interference may affect device functionality, resulting in error messages or display/device failure.
- Avoid using the device directly next to or stacked on other electronic devices, as this may cause incorrect operation. If such positioning is necessary, monitor both devices to ensure they operate correctly.
USAGE
Inserting the Batteries
- Remove the battery compartment cover from the back of the device (A).
- Insert four 1.5 V AA alkaline (LR6) batteries, ensuring the polarity matches the markings inside the battery compartment (A).
- Close the battery compartment cover.
If the battery replacement symbol appears and remains displayed, measurements can no longer be performed. Replace all batteries. After removing the batteries, the date and time must be set again. Previously saved measurements are retained.
Operation with the Mains Adapter
The device can also operate using a compatible mains adapter, which is not included in the delivery. Before connecting the mains adapter, remove all batteries from the device. Batteries must not remain in the battery compartment during mains operation, as this could damage the device.
- To prevent damage, use only a mains adapter that meets the requirements specified in the "Technical Specifications" section.
- Connect the mains adapter only to the voltage indicated on its rating plate.
- Remove the protective cap from the mains adapter connector on the rear of the device and insert the adapter plug into the designated connection.
- Insert the mains adapter plug into a suitable electrical outlet.
- After using the blood pressure monitor, unplug the mains adapter from the electrical outlet first, then disconnect it from the blood pressure monitor.
When the mains adapter is disconnected, the device loses its date and time settings. However, previously saved measurements remain stored.
Adjusting the Settings
Ensure that the device settings are configured correctly to use all available functions. Incorrect settings may prevent measurements from being saved with the correct date and time or accessed later. There are two ways to access the settings menu:
Before Initial Use or After Replacing the Batteries:
The settings menu opens automatically when batteries are inserted.
When Batteries Are Already Installed:
With the device switched off, press and hold the START/STOP button for approximately 5 seconds.
Configure the settings in the following order:

Confirm each selection using the START/STOP button.
Time Format
When the time format flashes:
- Press M1 or M2 to select the desired time format.
- Confirm your selection.
Date
When the year flashes:
- Press M1 or M2 to select the year.
- Confirm your selection.
When the month flashes:
- Press M1 or M2 to select the month.
- Confirm your selection.
When the day flashes:
- Press M1 or M2 to select the day.
- Confirm your selection.
If the 12-hour time format is selected, the order in which the day and month are displayed is reversed.
Time
When the hour flashes:
- Press M1 or M2 to select the hour.
- Confirm your selection.
When the minutes flash:
- Press M1 or M2 to select the minutes.
- Confirm your selection.
Before the Blood Pressure Measurement
General Rules When Measuring Your Own Blood Pressure
- To create a useful profile of changes in your blood pressure, take measurements regularly and at approximately the same time each day.
- Measure your blood pressure twice daily:
- Once in the morning after getting up.
- Once in the evening.
- Always take measurements when you are sufficiently rested. Avoid measuring during stressful situations.
- Do not take measurements within 30 minutes of eating, drinking, smoking, or exercising.
- Before taking a blood pressure measurement, rest for approximately 5 minutes.
- If taking several measurements consecutively, allow at least 1 minute between measurements.
- Repeat the measurement if you have doubts about the recorded value.
Attaching the Cuff
You can measure blood pressure on either arm. Some differences between readings from the right and left arms are normal. Always perform measurements on the arm with the higher blood pressure readings. Consult your doctor before beginning self-measurement to determine the appropriate arm.
- Always measure your blood pressure on the same arm.
- Place the cuff directly on your bare upper arm. Ensure that tight clothing does not restrict circulation.
- Position the cuff so that its lower edge is approximately 2–3 cm above the elbow, over the artery. The cuff line should point toward the centre of the palm (B).
- Pass the loose end of the cuff through the metal ring, fold it back around the arm, and secure it using the hook-and-loop fastener.
- Fasten the cuff securely but not too tightly. You should be able to fit two fingers beneath the closed cuff (C).
- Check that the cuff index mark is within the designated OK range after fitting.
- Insert the cuff line connector into the designated connection on the device.
Adopting the Correct Posture
- Sit comfortably in an upright position with your back supported.
- Rest your arm on a suitable surface (D).
- Keep both feet flat on the floor, positioned next to each other.
- Ensure the cuff is at heart level.
- Remain as still as possible during the measurement and do not talk.
Selecting the User
The device supports two users, each with 60 memory spaces, allowing measurements from two different people to be stored separately. If multiple people use the device, make sure the correct user memory is selected before each measurement.
- Press the M1 or M2 memory button to select the desired user.
- Confirm the selection by pressing the START/STOP button.
- If no user memory is selected, the measurement is stored in the most recently used user memory. The corresponding M1 or M2 symbol appears on the display.
- Press the START/STOP button to switch off the device. The measurement is stored in the selected user memory.
If the device is not switched off manually, it switches off automatically after approximately 3 minutes. The measurement is still saved in the selected or most recently used user memory.
Taking a Blood Pressure Measurement
Requirement: The cuff must be correctly attached, and the appropriate user memory must be selected.
Measurement
- Press the START/STOP button.
- All display elements appear briefly.
- The cuff inflates automatically.
- The measurement process begins.
- The pulse symbol appears when a pulse is detected.
- To cancel the measurement, press the START/STOP button again.
- Once the measurement is complete:
- The systolic blood pressure is displayed.
- The diastolic blood pressure is displayed.
- The measured pulse rate is displayed.
- If an error symbol appears, the measurement was not completed correctly. Refer to the "Troubleshooting" section.
- If necessary, wait at least 1 minute before adjusting and reattaching the cuff for another measurement.
The device automatically switches off after approximately 3 minutes. The measurement is saved in the selected or most recently used user memory.
Evaluating the Results
General Information About Blood Pressure. Blood pressure is expressed using two values:
- Systolic Blood Pressure: The highest pressure, occurring when the heart muscle contracts and pumps blood into the blood vessels.
- Diastolic Blood Pressure: The lowest pressure, occurring when the heart muscle relaxes and fills with blood.
Blood pressure naturally fluctuates throughout the day. Even consecutive measurements may show noticeable differences. A single measurement or irregular measurements may not provide reliable information about actual blood pressure. Reliable assessment requires regular measurements taken under comparable conditions.
Cardiac Arrhythmia
The device can detect irregularities in heart rhythm during blood pressure measurement. If the cardiac arrhythmia symbol appears after a measurement, an irregularity in the pulse has been detected. Repeat the measurement if the cardiac arrhythmia symbol appears. When assessing your blood pressure, use measurements recorded without detected pulse irregularities whenever possible. Consult your doctor if the cardiac arrhythmia symbol appears frequently. Only a healthcare professional can determine whether an abnormal heart rhythm is present through an appropriate examination.
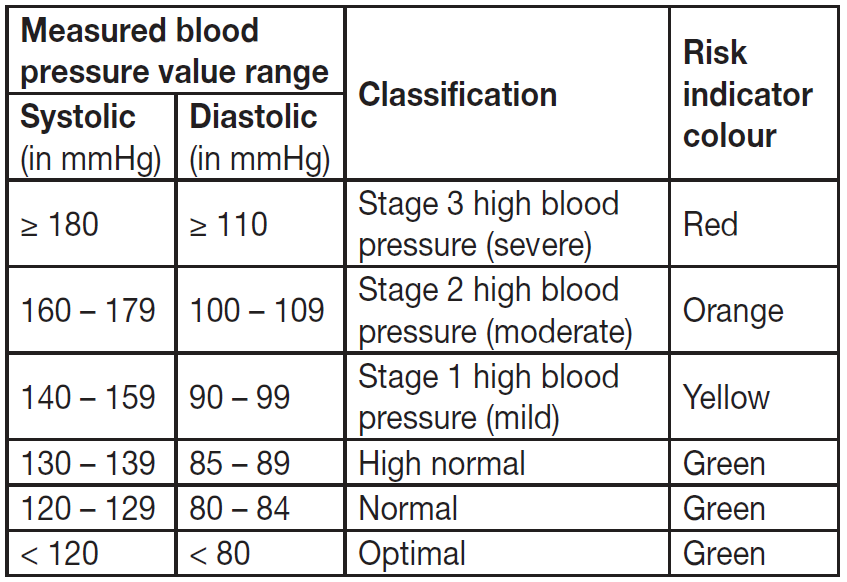
Risk Indicator
The risk indicator (8/19) shows the category into which the measured blood pressure values fall. If the systolic and diastolic values fall into different categories, the indicator displays the higher category. For example, if the systolic pressure falls within the "High Normal" range and the diastolic pressure falls within the "Normal" range, the indicator displays “High Normal.” These reference values are intended as general guidance only, as individual blood pressure levels may vary. Blood pressure readings taken at home are often lower than those obtained in a doctor's office. Consult your doctor regularly to determine appropriate personal blood pressure targets, particularly if you are receiving medical treatment.
Displaying and Deleting Measured Values
User Memory
Every successful measurement is saved automatically with its date and time. Each user memory can store up to 60 measurements. When the memory is full, the oldest measurement is deleted to make space for the newest reading.
- Press the START/STOP button to switch on the blood pressure monitor.
- After the display check, select the desired user memory within 3 seconds:
- Press M1 for User 1.
- Press M2 for User 2.
- The most recent measurement appears on the display.
- Press the corresponding memory button to access the stored measurement data:
- Press M1 if User 1 is selected.
- Press M2 if User 2 is selected.
Average Values
When the average value symbol flashes, the display shows the average of all measurements saved for the selected user.
- Press the corresponding memory button (M1 or M2).
- The morning average symbol flashes.
- The average of morning measurements recorded during the last 7 days is displayed.
- Morning measurements are those recorded between 5:00 AM and 9:00 AM.
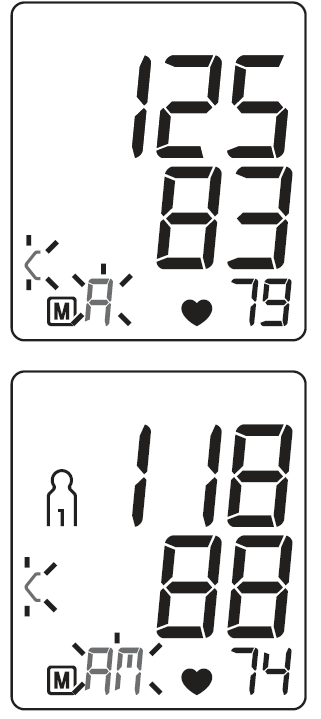
- Press the corresponding memory button (M1 or M2) again.
- The evening average symbol flashes.
- The average of evening measurements recorded during the last 7 days is displayed.
- Evening measurements are those recorded between 6:00 PM and 8:00 PM.
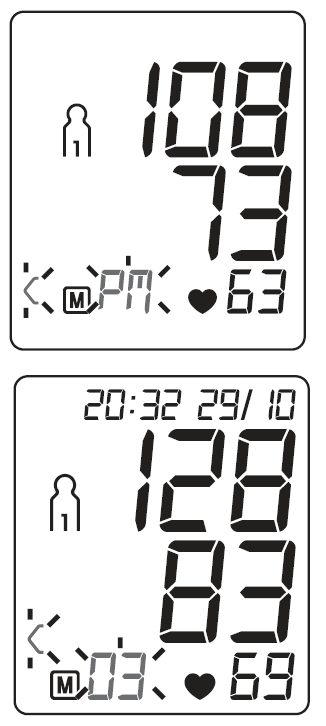
Individual Measured Values
- Press the corresponding memory button (M1 or M2) again to display the most recent individual measurement.
- Continue pressing the same memory button to view previous individual measurements.
- Press the START/STOP button to switch off the device or exit the memory menu.
Deleting Measured Values
- Select the user memory (M1 or M2) from which measurements should be deleted.
- Open the individual measurement display.
- Press and hold the M1 and M2 memory buttons simultaneously for approximately 5 seconds.
- The deletion confirmation symbol appears on the display.
- All stored measurements for the selected user are deleted.
- The device switches off automatically.
CLEANING AND MAINTENANCE
- Clean the device and cuff carefully using a slightly damp cloth.
- Do not use cleaning solutions, detergents, or solvents.
- Never immerse the device or cuff in water or hold them under running water, as liquid may enter and damage the components.
- When storing the device and cuff, do not place heavy objects on them.
- Avoid sharply bending, twisting, or compressing the cuff line during storage.
- Remove the batteries if the device will not be used for an extended period.
Troubleshooting Guide for Beurer Upper Arm Blood Pressure Monitor BM 45
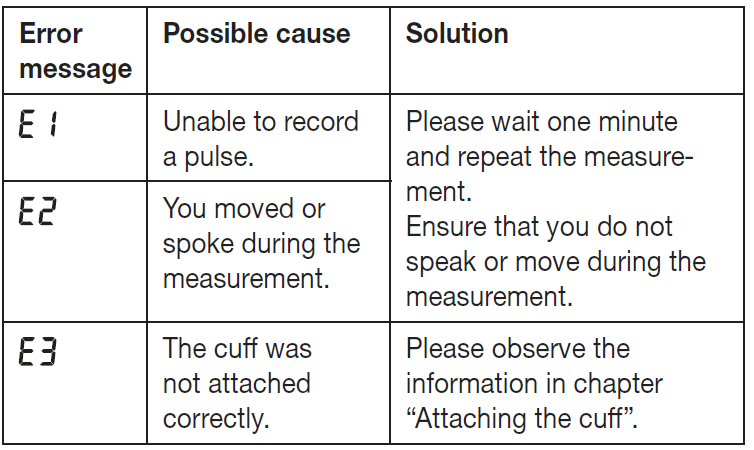
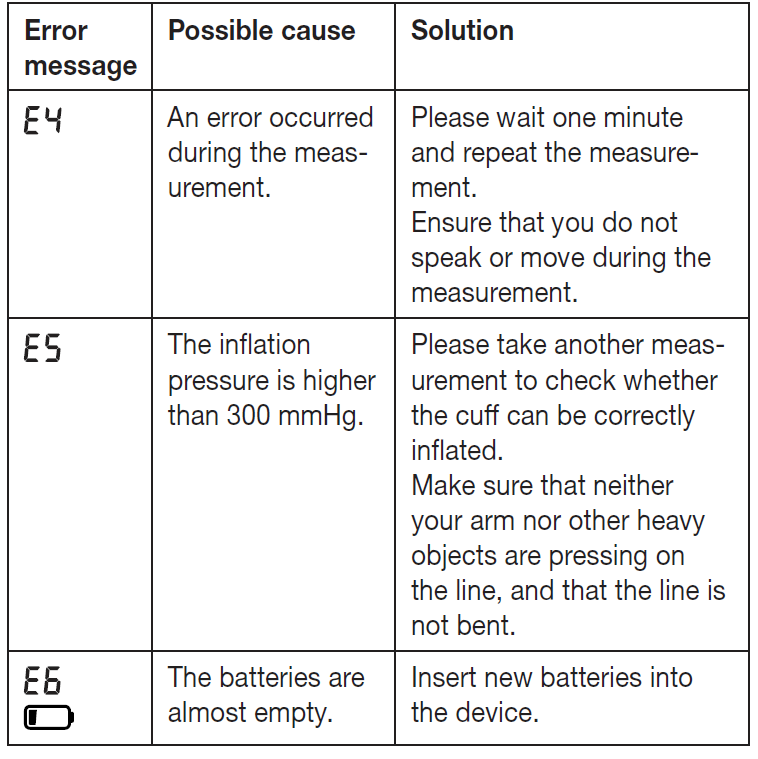
Common issues with the Beurer Upper Arm Blood Pressure Monitor BM 45 include inaccurate readings, no display, or error codes. If the device shows "Err 1" (no pulse detected), ensure the cuff is properly fitted 2-3 cm above the elbow and the arm is at heart level—reposition and retry. "Err 2" or "Err 3" indicates movement or cuff issues; stay still and check for leaks. For arrhythmia warnings, consult a doctor, as it detects irregular heartbeats.
No power? Replace 4 x 1.5V AA alkaline batteries and avoid mixing old/new ones. Display errors may require resetting: remove batteries for 10 minutes. Preventive measures: Store in 10-40°C, clean cuff with damp cloth (no immersing), avoid extreme temperatures/humidity (<85% RH). For persistent problems, check the user manual or contact Beurer support: Beurer GmbH, Söflinger Straße 218, 89077 Ulm, Germany (phone: +49 731 39870; website: beurer.com). 5-year warranty covers defects—register online for support. Professional servicing recommended annually.
Pros and Cons of the Beurer Upper Arm Blood Pressure Monitor BM 45
Pros
- Extra-large illuminated XL display and sensor-touch buttons for effortless reading and operation, ideal for elderly users.
- Risk indicator with colored scale and arrhythmia detection provides valuable health insights, enhancing home monitoring.
- Generous memory (2x60) with averages supports long-term tracking; app compatibility boosts data management.
- Compact, lightweight (288g), includes batteries/pouch—excellent value at $40-60 vs. pricier brands like Omron.
- Accurate oscillometric measurements (display accuracy: ±3 mmHg systolic/diastolic, ±5% pulse).
Cons
- No peer-reviewed clinical validation per Medaval, potentially less proven accuracy than validated alternatives like Omron M3.
- Standard cuff (22-36 cm) may not fit larger arms without extra XL purchase.
- Battery-powered only (no AC adapter), requiring frequent changes for heavy use.
- Limited availability of user reviews; single measurements only, no advanced averaging beyond basics.
Overall, the Beurer BM 45 offers strong value for money for casual home use, outperforming budget monitors but trailing clinically validated premium options.
Customer Reviews and Feedback on Beurer Upper Arm Blood Pressure Monitor BM 45
User feedback on the Beurer Upper Arm Blood Pressure Monitor BM 45 highlights its ease of use and clear display, with praise for the illuminated XL screen and quick setup. One review notes: “Perfect for daily checks—arrhythmia alert is a lifesaver.” Average ratings hover at 4-5 stars where available, commending memory storage and comfort for upper arm monitoring. Common praises: Intuitive touch buttons and colored risk scale aid seniors; app integration simplifies tracking.
Complaints include occasional cuff fit issues for larger arms and lack of validation data, with some preferring doctor-recommended brands. No major widespread issues reported; most recommend for home blood pressure tracking. "Reliable and affordable—great first monitor," says a user. Addressed concerns: Ensure proper positioning for accuracy. High purchase recommendation for budget-conscious users seeking the upper-arm blood pressure monitor BM 45 features.
Faqs
How do I set up the beurer Upper Arm Blood Pressure Monitor BM 45 for the first time?
What should I do if the beurer Upper Arm Blood Pressure Monitor BM 45 shows an E3 or incorrect usage error?
How can I get the most accurate readings from my beurer Upper Arm Blood Pressure Monitor BM 45?
How do I store and access measurement history on the beurer Upper Arm Blood Pressure Monitor BM 45?
Can I connect beurer Upper Arm Blood Pressure Monitor BM 45 to apps or other devices?
What regular maintenance and care does the beurer Upper Arm Blood Pressure Monitor BM 45 require?
Why might my beurer Upper Arm Blood Pressure Monitor BM 45 readings differ from my doctor's mercury or clinic device?
What accessories or cuff sizes are compatible with the beurer Upper Arm Blood Pressure Monitor BM 45 and how do I choose one?
More beurer manuals
- Setup: Beurer Blood pressure monitor BM-40 User Manual
- Setup: Beurer Blood Pressure Monitor BC-44 User Manual
- Setup: Beurer Blood pressure monitor BC 21 User Manual
- Setup: Beurer Upper Arm Blood Pressure Monitor BM 35 User Manual
- Setup: Beurer Portable Mesh Atomiser IH 51 User Manual
- Setup: Beurer Upper arm blood pressure monitor BM 38 User Manual
Leave a Comment