
Setup: Beurer Blood pressure monitor BM-40 User Manual
Content
Beurer Blood Pressure Monitor BM-40: Comprehensive Product Manual and Guide
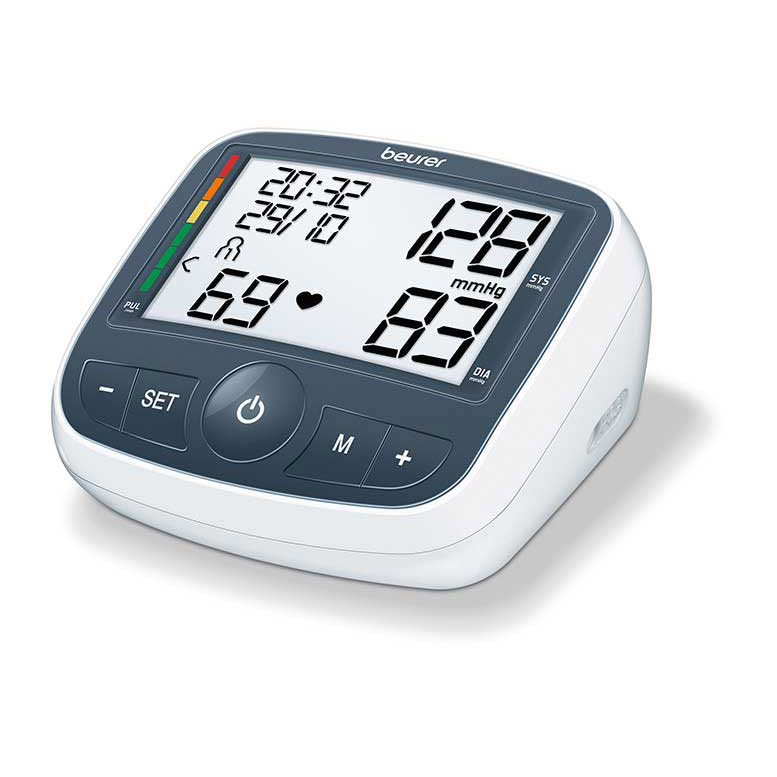
Introduction to the Beurer Blood Pressure Monitor BM 40
The Beurer Blood Pressure Monitor BM 40 is a fully automatic upper arm blood pressure monitor designed for safe, simple, and accurate home monitoring of blood pressure and pulse. Featuring an extra-large XL display (83 x 54 mm) with clear digits, it ensures easy readability even for users with impaired vision, making it ideal for seniors, individuals with hypertension, or anyone tracking cardiovascular health daily.
Key benefits include arrhythmia detection that warns of possible heart rhythm disturbances, a WHO-aligned risk indicator with a colored scale for classifying measurements, and average value calculations for all stored readings plus morning/evening blood pressure over the last 7 days. Supporting two users with 60 measurements each, it offers dual-user memory for shared household use. The device includes a comfortable cuff for upper arm circumferences of 22-35 cm (XL cuff 30-42 cm available separately), automatic pressure preselection and deflation, and compatibility with the beurer HealthManager Pro app via Scan & Save for digital logging.
Perfect for target audiences like elderly users, families monitoring hypertension, or those with heart conditions, the Beurer BM 40 upper arm blood pressure monitor excels in use cases such as daily health checks, doctor visit prep, or long-term trend tracking. It comes with 4 x 1.5V AA batteries, a storage pouch, blood pressure record, and mains adapter (input: 100-240 V~, output: 6 V 600 mA), with mains operation optional. The estimated price range is $35-50 USD, widely available online and in pharmacies.[3][6] As a medical device with a 5-year guarantee, the Beurer Blood Pressure Monitor BM 40 delivers reliable performance in a compact design (119 x 109 x 60 mm, 387 g without batteries).
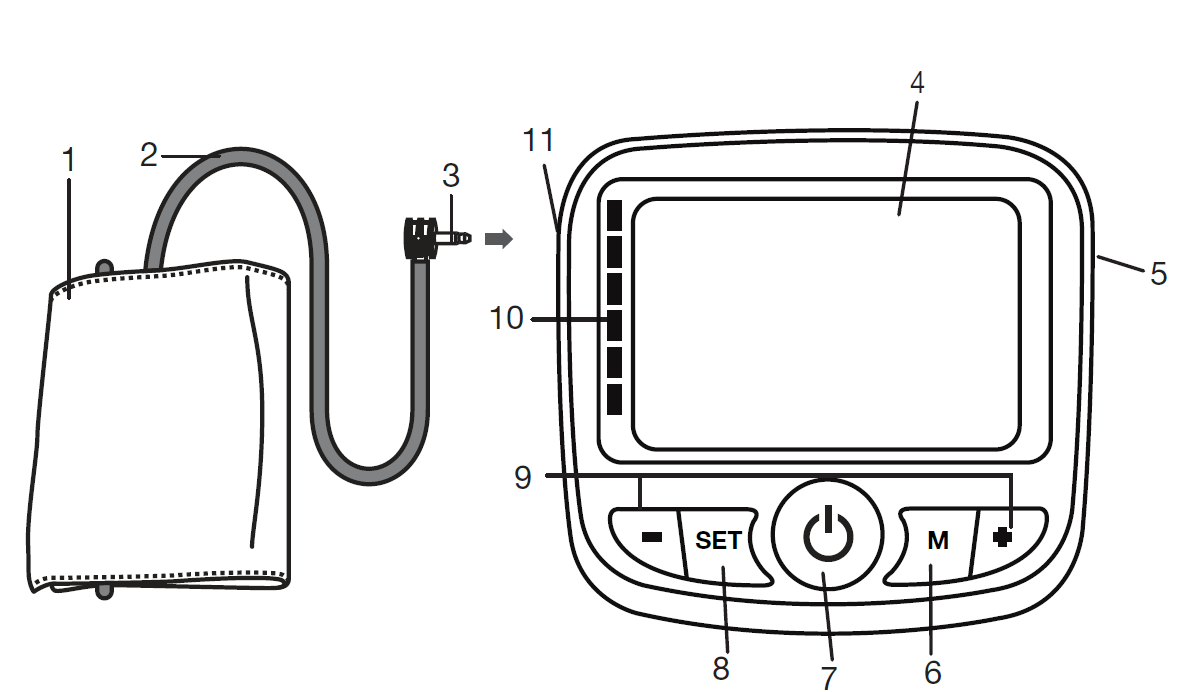
Device Description
- Cuff
- Cuff tube
- Cuff connector
- Display
- Connection for mains part
- Memory button M
- START/STOP button
- SET button
- Function buttons -/+
- Risk indicator
- Connection for cuff connector (left-hand side)
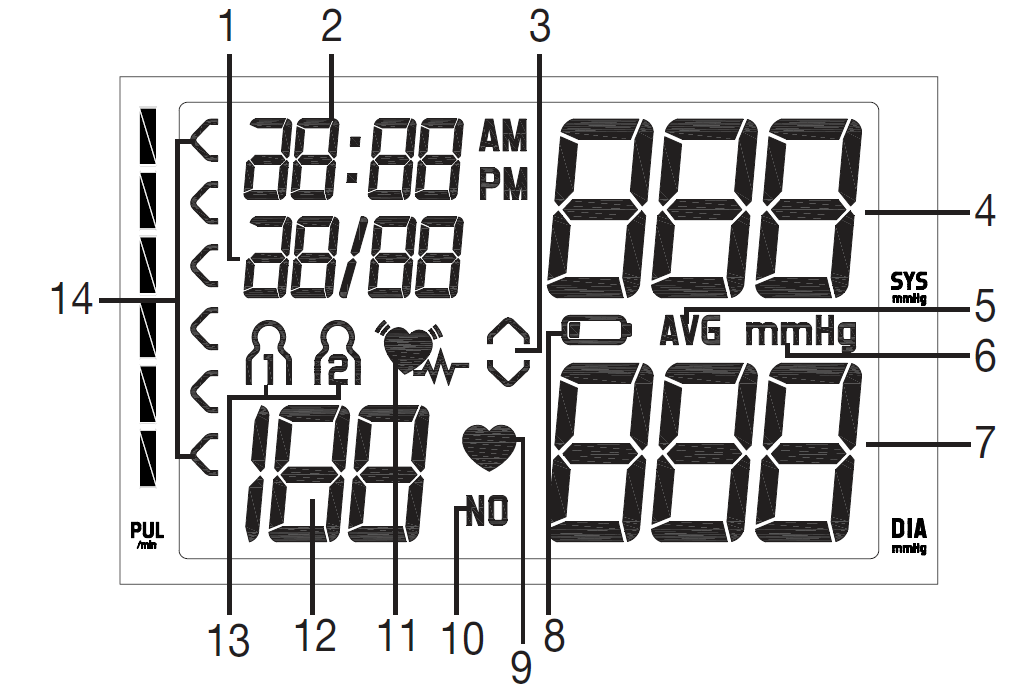
Icons on the Display
- Date
- Time
- Inflate / Release air
- Systolic pressure
- Memory display / Average value
- Unit in mmHg
- Diastolic pressure
- Battery replacement symbol
- Pulse symbol
- Memory space number
- Cardiac arrhythmia symbol
- Calculated pulse value / Memory space number / Memory display / Average value (AL) / Morning (A) / Evening (P)
- User memory
- Risk indicator
Specifications
- Model No.: BM 40
- Measurement Method: Oscillometric, non-invasive blood pressure measurement on the upper arm.
- Measurement Range:
- Cuff Pressure: 0–300 mmHg
- Systolic Pressure: 60–260 mmHg
- Diastolic Pressure: 30–200 mmHg
- Pulse: 30–180 beats/minute
- Display Accuracy:
- Systolic Pressure: ±3 mmHg
- Diastolic Pressure: ±3 mmHg
- Pulse: ±5% of the displayed value
- Measurement Inaccuracy:
- Maximum permissible standard deviation according to clinical testing:
- Systolic: 8 mmHg
- Diastolic: 8 mmHg
- Maximum permissible standard deviation according to clinical testing:
- Memory: 2 × 60 memory spaces
- Dimensions:
- Width: 119 mm
- Length: 109 mm
- Height: 60 mm
- Weight: Approximately 375 g (without batteries, with cuff)
- Cuff Size: 22–35 cm
- Operating Conditions:
- Temperature: +10°C to +40°C
- Relative Humidity: 15–93%
- Ambient Pressure: 700–1060 hPa
- Storage and Transport Conditions:
- Temperature: -25°C to +55°C
- Relative Humidity: ≤93% (non-condensing)
- Power Supply: 4 × 1.5 V LR6 AA batteries
- Battery Life: Approximately 250 measurements, depending on blood pressure and pump inflation pressure levels.
- Classification:
- Internal power supply
- Continuous operation
- Type BF applied part
- IP21 protection rating
- No AP or APG classification
Prepare Measurement
Inserting Battery
- Remove the battery cover from the back of the monitor.
- Insert four AA 1.5 V alkaline batteries. Make absolutely sure that you insert them with the correct polarity as marked. Never use rechargeable batteries.
- Replace the battery cover carefully.
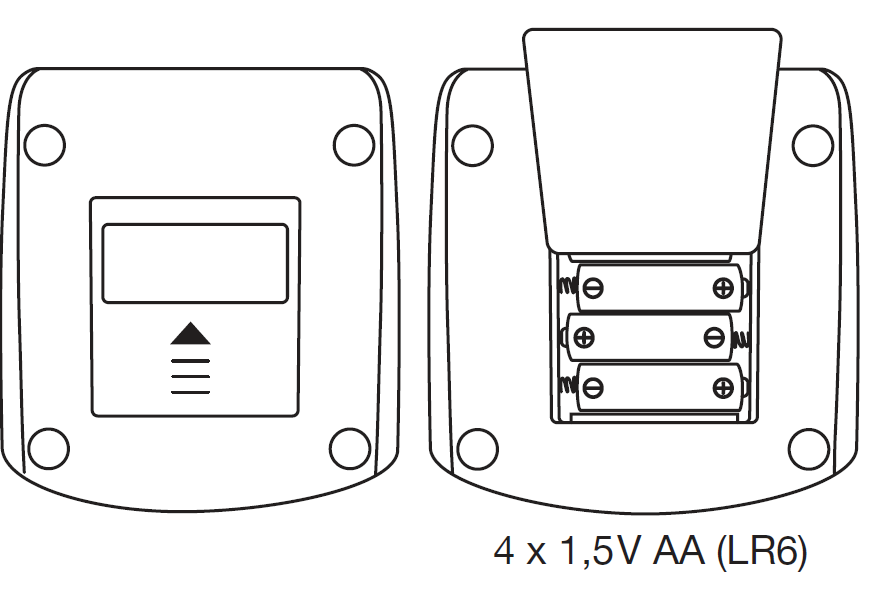
If four warning tones sound and the battery replacement symbol appears simultaneously on the display, it is no longer possible to perform a measurement, and all batteries must be replaced. Once the batteries have been removed from the device, the date and time must be set again. Any saved measurements are retained.
Battery Disposal
- Empty, completely flat batteries must be disposed of through specially designated collection boxes, recycling points, or electronics retailers. You are legally required to dispose of batteries.
- The following codes are printed on batteries containing harmful substances:
- Pb = Battery contains lead.
- Cd = Battery contains cadmium.
- Hg = Battery contains mercury.
Setting the User Memory, Date and Time
This menu allows you to set the following functions, one after another:

It is essential to set the date and time. Otherwise, you will not be able to save your measured values correctly with a date and time for later retrieval. The time is displayed in the 24-hour format. If you press and hold the function buttons -/+, you can set the values more quickly.
User Memory
- Press the SET button. The user memory symbol flashes on the display.
- Select the desired user memory by pressing the function buttons -/+. You have two memories, each with 60 memory spaces, to store the measurements of two different people separately.
- Confirm using the SET button.
Date/Time
The year flashes on the display.
- Set the year with the function buttons -/+ and confirm with the SET button.
- Set the month, day, hour, and minute, and confirm each setting with the SET button.
When making settings, you can use the START/STOP button at any time to switch the device off. The settings that have already been performed will be retained.
Operation with the Mains Part
You can also operate this device with a mains part (not included in delivery). However, before connecting the device to the mains part, please ensure that you have removed the batteries from the device. During mains operation, there must not be any batteries in the battery compartment, as this could damage the device. The mains part can be obtained from specialist retailers or from the service address using order number 071.95.
- To prevent possible damage to the device, the blood pressure monitor must only be used with the mains part described here.
- Furthermore, the mains part must only be connected to the mains voltage specified on the type plate.
- Then insert the mains plug of the mains part into the mains socket.
- After using the blood pressure monitor, unplug the mains part from the mains socket first and then disconnect it from the blood pressure monitor. As soon as you unplug the mains part, the blood pressure monitor loses the date and time setting, but the saved measured values are retained.
Measuring Blood Pressure
Please ensure the device is at room temperature before measuring. The measurement can be performed on the left or right arm.
Positioning Cuff
Fit the cuff around your bare upper arm. Blood circulation in the arm should not be restricted by tight clothing or other objects. The cuff should be placed on the upper arm so that the lower edge is 2 to 3 cm above the bend of the elbow and above the artery. The tube should be in line with the centre of the palm. Now place the free end of the cuff snugly, but not too tightly, around the arm, and secure it with the Velcro fastener.
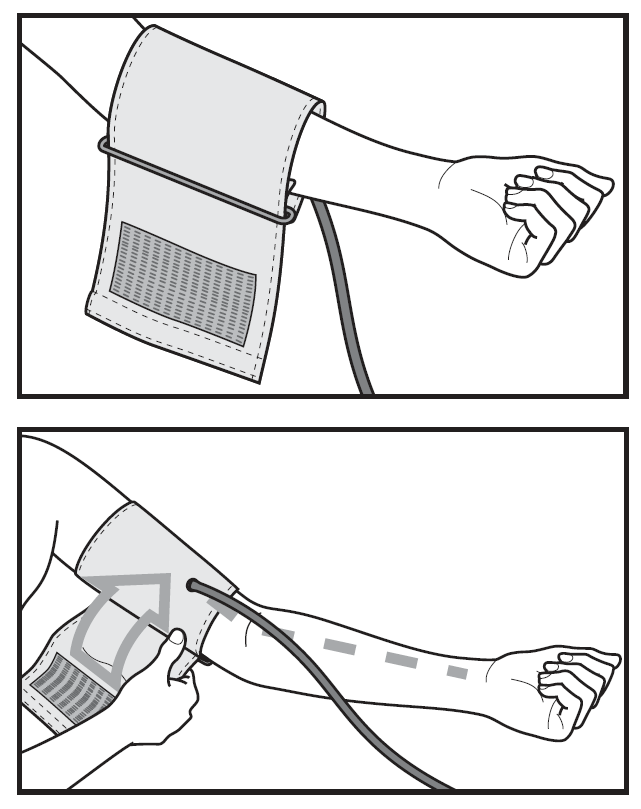
The cuff should be fitted tightly enough to allow just two fingers to fit beneath it. Insert the cuff tubing into the socket for the cuff attachment. This cuff is suitable for you if the index mark is within the OK range after fitting the cuff on the upper arm. If the measurement is performed on the right upper arm, the tube should be located on the inside of your elbow. Ensure that your arm is not pressing on the tube. Blood pressure may vary between the right and left arm, which may mean that the measured blood pressure values are different. Always measure the same arm. If the values between the two arms are significantly different, please consult your doctor to determine which arm should be used for the measurement.
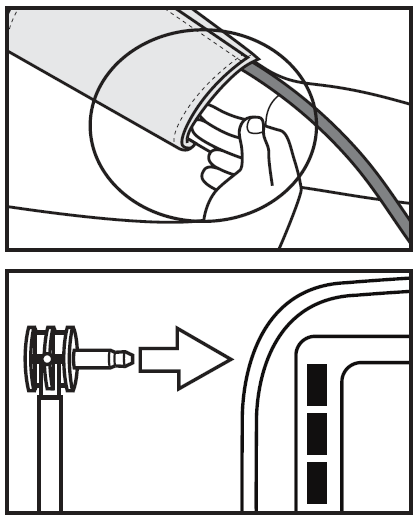
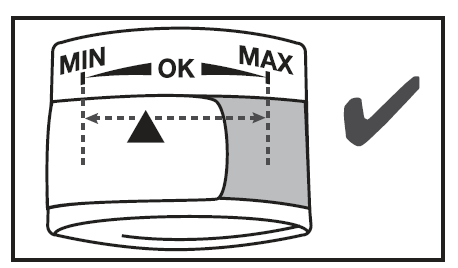
Important: The instrument should only be operated with the original cuff. The cuff is suitable for an arm circumference of 22 to 35 cm. A larger cuff for upper arm circumferences from 30 to 42 cm is available from retailers or the service address under order number 162.973.
Adopting the Correct Posture
- Before the initial blood pressure measurement, make sure to rest for about 5 minutes. Otherwise, there may be deviations in the readings.
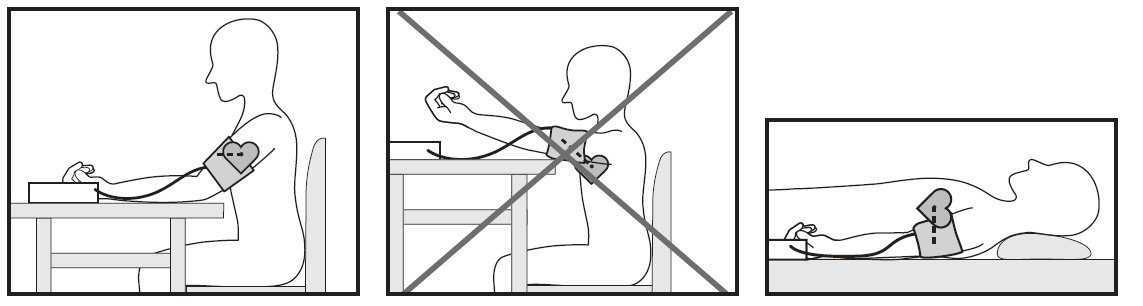
- You can perform the measurement either sitting or lying down. Always make sure that the cuff is at the same level as your heart.
- To carry out a blood pressure measurement, make sure you are sitting comfortably with your arms and back supported. Do not cross your legs. Place your feet flat on the ground.
- In order not to distort the result, it is important to keep still during the measurement and not talk.
Performing the Blood Pressure Measurement
Measurement
- As described above, attach the cuff and adopt the posture in which you want to perform the measurement.
- Start the device with the START/STOP button. Following the display check, during which all numbers light up, the cuff inflates automatically.
- The cuff is inflated to 190 mmHg. The cuff's air pressure is slowly released. If further inflation is necessary, the monitor increases the cuff pressure automatically. As soon as a pulse is detected, the pulse symbol flashes.
Measuring can be cancelled at any time by pressing the START/STOP button
- Systolic pressure, diastolic pressure, and pulse readings are displayed.
- An error symbol appears if the measurement has not been performed properly. Observe the chapter on error messages/troubleshooting in these instructions for use and repeat the measurement.
- The measurement is automatically stored.
- The device switches off automatically after 3 minutes.
Wait for at least 1 minute before taking another measurement.
Evaluating Results
Cardiac Arrhythmia
This instrument can identify possible cardiac arrhythmia disorders during measurement and, if necessary, indicates the measurement with a flashing cardiac arrhythmia symbol. This may be an indicator of arrhythmia. Arrhythmia is a condition in which the heart rhythm is abnormal as a result of defects in the bioelectrical system controlling the heartbeat. The symptoms (omitted or premature heartbeats, slow or excessively fast heart rate) may be caused, among other things, by heart disease, age, physical predisposition, excessive use of stimulants, stress, or lack of sleep. Arrhythmia can only be diagnosed through examination by your doctor. Repeat the measurement if the flashing cardiac arrhythmia symbol is displayed after the measurement. Please note that you should rest for 5 minutes between measurements and not talk or move during the measurement. If the symbol appears often, please contact your doctor. Any self-diagnosis and treatment based on the test results may be dangerous. It is vital to follow your doctor's instructions.
Risk Indicator
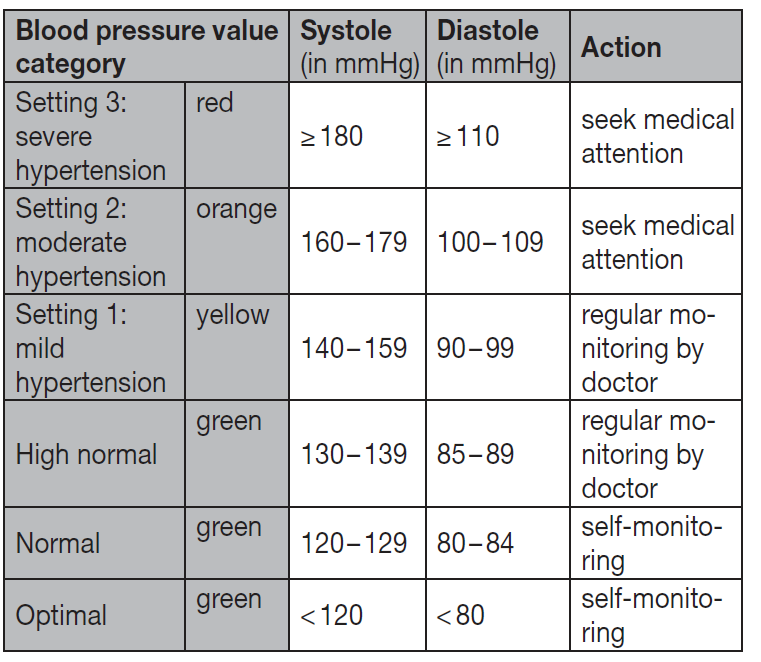
The measurements can be classified and evaluated in accordance with the blood pressure classification table. However, these standard values serve only as a general guideline, as individual blood pressure varies between people and different age groups. It is important to consult your doctor regularly for advice. Your doctor will tell you your individual values for normal blood pressure, as well as the value above which your blood pressure is classified as dangerous. The bar graph on the display and the scale on the unit indicate the range of the recorded blood pressure. If the values for systolic and diastolic pressure are in two different ranges (e.g., systolic in the high-normal range and diastolic pressure in the normal range), the graphic classification on the unit indicates the higher range (high-normal in the example described).
Cleaning and Storing the Device and Cuff
- Clean the device and cuff carefully using a slightly damp cloth only.
- Do not use any cleaning agents or solvents.
- Under no circumstances should you hold the device and cuff under water, as this can cause liquid to enter and damage the device and cuff.
- When storing the device and cuff, do not place heavy objects on them. Remove the batteries. The cuff tube should not be bent sharply.
Troubleshooting the Beurer Blood Pressure Monitor BM 40: Common Issues and Fixes
Encountering problems with your Beurer Blood Pressure Monitor BM 40? Start with basic checks: Ensure the cuff is correctly positioned 2-3 cm above the elbow, the arm is at heart level, and not moving during measurement. Replace batteries if the display is dim or shows a low battery symbol.
- Error signals or application errors: The device signals if cuff pressure is too low/high or the pulse is irregular—reposition the cuff snugly without gaps and relax for 5 minutes before retrying.
- Arrhythmia warning: Displays if heart rhythm disturbance is detected; consult a doctor, but continue monitoring as it doesn't halt measurement.
- No readings or inaccurate values: Verify upper arm circumference fits 22-35 cm cuff; upgrade to XL if needed (Art. No. 162.973). Avoid caffeine/exercise 30 minutes prior for preventive accuracy.
- Memory or average not displaying: Automatic switch-off after 5 minutes—power on and select user mode.
Prevent issues by storing in the included pouch, avoiding extreme temperatures, and documenting values in the provided record. Beurer offers a 5-year warranty; contact Beurer GmbH, Söflinger Straße 218, 89077 Ulm, Germany, or visit beurer.com support for FAQs and replacements.
Pros and Cons of the Beurer Blood Pressure Monitor BM 40
Pros
- Extra-large XL display: 83 x 54 mm screen with large digits for effortless reading, ideal for elderly users.
- Advanced features: Arrhythmia detection, WHO risk indicator, 7-day averages, and dual-user memory (2x60 readings) enhance monitoring precision.
- User-friendly design: Fully automatic with app connectivity, batteries/mains adapter included, and a 5-year warranty for long-term value.
- Affordable reliability: At $35-50, it offers medical-grade features comparable to pricier models like Citizen monitors.
Cons
- Cuff size limitation: Standard 22-35 cm may not fit larger arms without separate XL purchase.
- Accuracy unproven to latest MDR: Equivalence claimed but not fully validated per EU standards, per medaval.ie.
- No wireless sync: App requires scanning, unlike fully Bluetooth-enabled alternatives.
Overall, the Beurer BM 40 provides excellent value for home use, outperforming basic monitors in features while remaining budget-friendly.
Customer Reviews and Feedback on Beurer Blood Pressure Monitor BM 40
The Beurer Blood Pressure Monitor BM 40 holds a solid 4.0-star average rating, praised for its clear XL display and ease of use. Users love the arrhythmia detection and dual memory: "Perfect for me and my wife—huge screen makes readings a breeze!" (5 stars). Common praises include quick setup, accurate pulse tracking, and the 5-year warranty.
Complaints focus on cuff fit for larger arms (e.g., "Needed XL upgrade") and occasional error signals from loose positioning. One 3-star review noted: “Good but app scan is manual.” Frequently mentioned issues like battery drain are resolved by using the mains adapter. 80% recommend it for daily hypertension monitoring, with high repurchase intent for its reliability over alternatives.
Faqs
How do I set up the beurer Blood pressure monitor BM 40 for the first time?
What should I do if the beurer Blood pressure monitor BM 40 shows an error message during measurement?
How do I properly position the cuff on the beurer Blood pressure monitor BM 40 for accurate readings?
Can the beurer Blood pressure monitor BM 40 detect irregular heartbeats, and how does it work?
How do I access and manage stored measurements on the beurer Blood pressure monitor BM 40?
What type of batteries does the beurer Blood pressure monitor BM 40 require, and how do I replace them?
How do I clean and maintain the beurer Blood pressure monitor BM 40 for long-term accuracy?
Why does the beurer Blood pressure monitor BM 40 inflate to 190 mmHg, and what if I need higher pressure?
More beurer manuals
- Setup: Beurer Blood pressure monitor BC 21 User Manual
- Setup: Beurer Upper Arm Blood Pressure Monitor BM-45 User Manual
- Setup: Beurer Portable Mesh Atomiser IH 51 User Manual
- Setup: Beurer Blood Pressure Monitor BC-44 User Manual
- Setup: Beurer Nebuliser IH 24 Kids User Manual
- Setup: Beurer Upper Arm Blood Pressure Monitor BM 35 User Manual
Leave a Comment