
Setup: Beurer Nebuliser IH 24 Kids User Manual
Content
Introduction — beurer Nebuliser IH 24 Kids: Overview, benefits and who it’s for
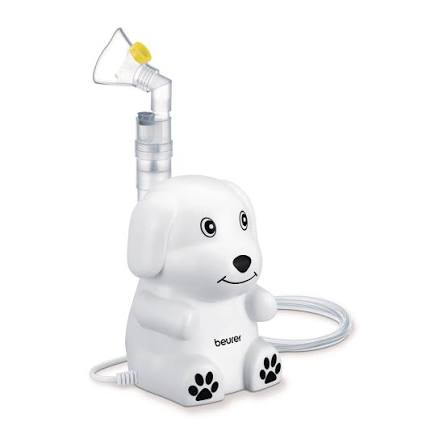
beurer Nebuliser IH 24 Kids is a compact, child-focused compressor nebuliser designed to deliver inhaled medications (saline, bronchodilators, corticosteroids as prescribed) quickly and gently for infants and young children. It combines a quiet compressor, paediatric masks and mouthpieces, and simple controls to make treatments less stressful for parents and more tolerable for young patients. The unit’s small footprint and plug-in power make it suitable for home use, daycare travel and bedside treatments for recurring respiratory conditions such as asthma, bronchiolitis and chronic cough.
Key benefits and unique selling points include: quiet operation and vibration damping for child comfort, a paediatric mask set and mouthpiece included for flexible delivery, an easy-to-clean medication cup and detachable tubing for hygiene, and a user-friendly design intended for caregivers with limited clinical training. Typical use cases are acute wheeze or asthma exacerbations, nebulised saline for secretion clearance, and routine maintenance therapy for children with chronic respiratory conditions. Expected retail price range is generally in the entry-level compressor nebuliser category (mid-to-low price band for branded home nebulisers); availability is through major medical-device retailers, pharmacy chains and online marketplaces (stock and price vary by region).
Specifications
- Model: IH 24 Kids
- Type: IH 24
- Dimensions (W × H × D): 150 × 210 × 150 mm
- Weight: 1.5 kg (with accessories)
- Operating Pressure: Approx. 0.8–1.55 bar
- Atomiser Filling Volume:
- Maximum: 8 ml
- Minimum: 2 ml
- Medication Flow Rate: Approx. 0.35 ml/min
- Sound Pressure: Approx. 52 dBA
- Mains Connection:
- 230 V~, 50 Hz, 230 VA
- UK: 240 V~, 50 Hz, 240 VA
Operating Conditions
- Temperature: +10 °C to +40 °C
- Relative Humidity: 15% to 93%
- Ambient Pressure: 700 to 1060 hPa
Storage and Transportation Conditions
- Temperature: -25 °C to +70 °C
- Relative Humidity: 10% to 95%
Aerosol Values
According to EN 27427:2019, based on adult breathing patterns with sodium fluoride (NaF):
- Aerosol Delivery: 0.11 ml
- Aerosol Delivery Rate: 0.07 ml/min
- Fill Volume Dispensed per Minute: 3.5%
- Residual Volume: 1.68 ml
- Particle Size (MMAD): 3.07 µm
- GSD (Geometrical Standard Deviation): 2.03
- RF (Respirable Fraction, <5 µm): 75%
- Large Particle Range (>5 µm): 25%
- Medium Particle Range (2 to 5 µm): 47.8%
- Small Particle Range (<2 µm): 27.2%
INITIAL USE
Setting Up the Device
- Take the device out of the packaging.
- Place the device on a flat surface.
- Make sure that the vents are free from obstructions.
Before Using the Device for the First Time
Notice
- Clean and disinfect the atomiser and atomiser set before using them for the first time. See “Cleaning and maintenance” in this regard.
- Connect the compressed air hose 7 to the bottom of the medication container 11. (A1)
- Connect the other end of the compressed air hose 7 to the nebuliser hose connection 4 by turning it slightly. (A2)
- Insert the medication container 11 into the holder for the atomiser 8.
Mains Adapter Connector
The device must only be connected to the mains voltage that is specified on the type plate.
- Insert the mains plug of the mains cable 3 into a suitable socket.
- To connect to the mains, fully insert the plug into the socket.
Notice
- Ensure that there is a mains socket close to the set-up area.
- Arrange the mains cable so that no one will trip over it.
- To disconnect the nebuliser from the mains after inhalation, first switch off the device and then pull the mains plug out of the socket.
Usage
Important
- For hygiene reasons, it is essential to clean the atomiser 8 and the rest of the atomiser set after each treatment and to disinfect them after the last treatment of the day.
- The atomiser set parts may only be used by one person; use by several people is not recommended.
- If the therapy involves inhaling several different medications one after the other, please be aware that the atomiser 8 must be rinsed under warm tap water following every usage. See “Cleaning and maintenance” in this regard.
- Please observe the notes on changing the filter in these instructions for use.
- Check that the hose connectors are firmly attached to the nebuliser 4 and the atomiser 8 before each use of the device.
- Before use, check that the device is functioning correctly. To do this, briefly switch on the nebuliser (together with the connected atomiser, but without medication). If air comes out of the atomiser 8, the device is working.
Inserting the Atomiser Insert
- Open the atomiser 8 by twisting the top anticlockwise against the medication container 11. Place the atomiser insert 9 in the medication container 11.
- Ensure that the cone for administering medication fits well on the cone for the air duct inside the atomiser 8.
- Insert the medication container 11 into the holder for the atomiser 6.
Filling the Atomiser
- Fill with an isotonic saline solution or pour the medication directly into the medication container. Avoid overfilling. The maximum recommended filling quantity is 8 ml. Use medication only as instructed by your doctor and ask about the appropriate inhalation period and quantity for you.
- If the prescribed quantity of medication is less than 2 ml, top this up to at least 4 ml with isotonic saline solution. Dilution is also necessary with viscous medications. Here too, please observe the instructions of your doctor.
Closing the Atomiser
- Close the atomiser 8 by twisting the top clockwise against the medication container 11. Ensure that the connection is correct.
Inserting the Valve
- Press the valve 10 into the opening intended for this purpose on the upper side of the atomiser 8.
Notice: The valve system ensures better delivery of the medication to the lungs. Only use the valve 10 with the mouthpiece 12. Never use it with the masks 13 and 14, and never with the nosepiece 16.
Connecting the Atomiser Set to the Atomiser
- Connect the atomiser 8 to the desired part of the atomiser set. The mouthpiece 12 or nosepiece (n/a) can be directly attached. The silicone children’s mask 13 and silicone baby mask 14 must be attached to the atomiser using the angled fitting 15.
Notice: The most effective form of nebulisation is by using the mouthpiece. Nebulisation using a mask is only recommended if it is not possible to use a mouthpiece (e.g. for children who are not yet able to inhale using a mouthpiece). When using a mask to inhale, take care to ensure the mask fits well and the eyes are unobstructed.
- Before the treatment, pull the atomiser upwards out of the holder 6.
- Start the nebuliser using the On/Off control 2.
- Spray mist pouring out indicates that the device is operating correctly.
Treatment
- When inhaling, sit upright and relaxed at a table and not in an armchair to avoid compressing the airways and therefore impairing the effectiveness of the treatment.
- Breathe in the atomised medication deeply.
Important
The device is not suitable for continuous operation; after 30 minutes of operation, it must be switched off for 30 minutes.
Notice: During the treatment, hold the atomiser straight (vertically); otherwise, the atomisation will not work and faultless functionality is not guaranteed.
Important
Essential oils, cough syrups, gargling solutions and drops to be used as a rub or in a steam bath are wholly unsuitable for inhalation using a nebuliser. These additives are often viscous and can impair the correct functioning of the device and therefore the effectiveness of the application in the long term. For individuals with a hypersensitive bronchial system, medications containing essential oils may under certain conditions cause an acute bronchospasm (a sudden cramp-like restriction of the bronchi with shortness of breath). Consult your doctor or pharmacist in relation to this matter.
Stopping the Inhalation
Once the mist is only coming out in an irregular flow or if the sound changes when inhaling, you can stop the treatment.
- Switch off the nebuliser after treatment using the On/Off control 2 and disconnect it from the mains.
- Place the atomiser 8 back in its holder 6 after the treatment.
Nasal Douche
The nasal douche is not included in the scope of delivery (n/a). You can find an overview of all replacement items in section “Atomiser set and replacement parts”. You can use the nasal douche to clean your nasal cavities. The nasal douche creates a fine jet of liquid for cleaning and moistening the nasal mucous membranes.
Warning: Do not use the nasal douche in combination with other medication or essential oils.
Important
- Only use the nasal douche with isotonic saline solutions.
- Replace the nasal douche after a year.
The maximum volume of the nasal douche is 10 ml. If you are unsure about the correct dilution of the saline solution, please consult your pharmacist.
Using the Nasal Douche
To use the nasal douche correctly, proceed as follows (B):
- Twist the cover 17 90° anticlockwise and remove it in an upward direction.
- Also lift the collection container 18 out.
- Fill the saline container 19 with saline solution.
- Place the collection container 18 into the saline container 19.
- Place the cover 20 on the saline container 19. Twist the cover 20 in a clockwise direction until it clicks firmly into place.
Important
- Do not attempt to clean the used filter and reuse it.
- Only use the manufacturer’s original filter; otherwise your nebuliser may become damaged, and sufficiently effective treatment cannot be guaranteed.
- Do not repair or maintain the air filter while it is in use.
- Never operate the device without a filter.
Cleaning and Maintenance
Atomiser and Atomiser Set
Warning: Adhere to the following hygiene instructions to avoid health risks.
- The atomiser 8 and the rest of the atomiser set are intended for multiple use. Please note that different areas of application involve different requirements in terms of cleaning and hygienic preparation.
Notice
- Do not clean the atomiser or the atomiser set mechanically using a brush or similar device, as this could cause irreparable damage and it will mean that the best treatment results can no longer be guaranteed.
- Please consult your doctor about the additional requirements in terms of the hygienic preparation needed (hand care, handling of medication/inhalation solutions) for high-risk groups (e.g. patients with cystic fibrosis).
- Ensure thorough drying after each cleaning and disinfection process. Residual moisture or wetness can represent an increased risk of bacterial growth.
Preparation
- Immediately after each treatment, all parts of the atomiser 8 and the rest of the atomiser set used must be cleaned of medication residues and contamination.
- To do this, dismantle the atomiser 8 into its individual parts.
- Remove the mouthpiece 12, mask 13 or 14, or nosepiece 21 from the atomiser.
- Disassemble the nosepiece if you have used it with the comfort attachment.
- Dismantle the atomiser by twisting the top anticlockwise against the medication container 11.
- Remove the atomiser insert 9 from the medication container 11.
- Remove the valve 10 by pulling it out of the atomiser 8.
- Reassembly is carried out in reverse order.
Condensation, Hose Care
Condensation may form in the hose depending on the ambient conditions. It is essential to remove the moisture to prevent bacterial growth and ensure proper treatment. To do so, proceed as follows:
- Disconnect the hose 7 from the atomiser 8.
- The hose must remain in the nebuliser 4.
- Operate the nebuliser until the moisture is removed by the air passing through.
- In the event of heavy contamination, replace the hose.
Disinfection
Please carefully observe the points below when disinfecting your atomiser and the atomiser set. We recommend disinfecting the individual parts on a daily basis after the last usage as a minimum measure.
- First, clean the atomiser and atomiser set as described in the “Cleaning” section.
- Place the disassembled atomiser 8, the nasal douche (n/a), the mouthpiece 12, the silicone masks 13 and 14, and the disassembled nosepiece in boiling water for 5 minutes.
Drying
- Place the individual parts on a clean, dry and absorbent surface and leave them to dry completely (at least 4 hours).
Durability of Materials
- As with any plastic parts, atomisers and the rest of the atomiser set are affected by a certain amount of wear and tear when used and hygienically prepared on a frequent basis. Over time, this can lead to a change in the aerosol, which can have a negative effect on the efficiency of the treatment. We therefore advise you to replace the atomiser and the atomiser set no later than one year if the parts are not disinfected more than 360 times a year. Frequent disinfection shortens the service life of the parts.
- The following point should be observed when selecting the cleaning product or disinfectant: Only use a mild cleaning product or disinfectant in the concentration and volume prescribed by the manufacturer.
Storage
- Do not store in damp conditions (such as in a bathroom) and do not transport with any damp items.
- When storing and transporting, protect from prolonged direct sunlight.
- The atomiser set parts can be safely stored in the storage bag. Store the device in a dry place, ideally in the original packaging.
Notes on Electromagnetic Compatibility
- The device is suitable for use in all environments listed in these instructions for use, including domestic environments.
- The use of the device may be limited in the presence of electromagnetic disturbances. As a result, the device may fail.
- Avoid using this device directly next to other devices or stacked on top of other devices, as this could lead to faulty operation. If, however, it is necessary to use the device in the manner stated, this device as well as the other devices must be monitored to ensure they are working properly.
- The use of an atomiser set other than that specified or provided by the manufacturer of this device can lead to an increase in electromagnetic emissions or a decrease in the device's electromagnetic immunity; this can result in faulty operation.
Troubleshooting — common problems, fixes, preventive measures and support
Common problem: unit not producing mist. First check power (mains connection or battery pack where applicable) and ensure the compressor is powered on. Inspect tubing for kinks, cracks or loose fittings and verify the medication cup is assembled correctly and filled to the recommended level; replace tubing or cup if damaged.
Common problem: weak or intermittent mist. Clean or replace the air filter and ensure tubing is free of moisture or residue buildup; crystallised medication can restrict airflow and reduce aerosol output.
Error codes/indicators: many simple home compressor nebulisers don’t display numeric error codes but may indicate problems by failing to start, making unusual noises, or producing no mist; consult the included user manual for any device-specific LED indicator meanings and follow manufacturer guidance for service.
Preventive measures: rinse and air-dry the medication cup and mask after each use, replace disposable tubing and filters per schedule, store the unit in a dust-free area, and avoid using oils or unauthorized liquids in the nebuliser. Regularly inspect seals and replace worn masks to avoid leaks
Warranty and support: check the manufacturer’s warranty card for the precise coverage period (commonly 1–2 years for small consumer medical devices) and register the product if required. For technical or warranty support, contact Beurer customer service through the contact details in your product documentation or the retailer where you purchased the device; if the device fails after basic troubleshooting, stop use and request repair or replacement under warranty.
Pros & Cons — honest assessment of beurer Nebuliser IH 24 Kids
- Pros — Child-friendly design: includes paediatric mask and mouthpiece, quieter compressor for reduced distress during treatments.
- Pros — Ease of use: simple assembly and one-button operation make it suitable for caregivers with minimal training; cleaning steps are straightforward for home hygiene maintenance.
- Pros — Value for money: competitively priced in the home nebuliser segment while including essential accessories (mask, tubing, cup), offering good baseline value compared with buying accessories separately.
- Cons — Not hospital-grade: as a consumer compressor nebuliser, it won’t match ultrasonic or mesh nebulisers in portability or ultra-quiet operation; treatments can be longer than some mesh-type devices
- Cons — Consumable replacements: filters, masks and tubing need periodic replacement; ongoing small costs and availability of genuine Beurer parts may vary by region.
- Comparison with alternatives: compared with portable mesh nebulisers, the beurer Nebuliser IH 24 Kids is usually more affordable and robust for frequent home use but less discreet and slightly noisier; compared with basic generic compressors, it typically offers better paediatric accessories and build quality.
Customer reviews, ratings and purchase recommendations for beurer Nebuliser IH 24 Kids
Typical customer feedback for child-focused compressor nebulisers like the beurer Nebuliser IH 24 Kids praises: easy assembly, effective relief for wheeze and cough, and included paediatric masks that improve compliance (many parents give 4/5 stars for comfort and value). Common complaints include noise (though quieter than older models), occasional need to replace tubing or filters, and longer session times compared with portable mesh devices.
Sample testimonial: “Very easy to use for nightly saline treatments — my toddler tolerates the mask and sessions are quick enough.” — 4/5 stars. Purchase recommendation: good value for families seeking a reliable home compressor nebuliser with child-specific accessories; consider upgrading to a mesh unit only if you need ultra‑quiet, truly portable treatments or faster aerosolisation.
SEO & keywords used
This manual uses the primary keyword beurer Nebuliser IH 24 Kids and related semantic keywords such as paediatric nebuliser, compressor nebuliser, nebuliser for kids, child-friendly nebuliser, nebuliser troubleshooting, nebuliser maintenance, and long-tail headings like “Troubleshooting the beurer Nebuliser IH 24 Kids: no mist, weak mist and fixes” to improve search visibility and compatibility with featured snippet and voice-search queries.
Faqs
How do I set up the beurer Nebuliser IH 24 Kids for the first time?
What should I do if the beurer Nebuliser IH 24 Kids is not producing mist or has low nebulisation?
Can I use any inhalation medication or saline with the beurer Nebuliser IH 24 Kids?
How do I choose between the child mask, baby mask, or mouthpiece on the beurer Nebuliser IH 24 Kids?
What routine maintenance and cleaning does the beurer Nebuliser IH 24 Kids require to stay hygienic and effective?
Why does the beurer Nebuliser IH 24 Kids make louder noise or vibration, and how can I reduce it?
How long should a typical treatment with beurer Nebuliser IH 24 Kids take and how can I optimize inhalation time?
What troubleshooting steps if the beurer Nebuliser IH 24 Kids stops working or the On/Off button doesn’t respond?
More beurer manuals
Leave a Comment