
Setup: Honeywell T10 & T10+ Pro Smart Thermostat with RedLINK 3.0 User Manual
Content
Honeywell T10 & T10+ Pro Smart Thermostat with RedLINK 3.0
Introduction
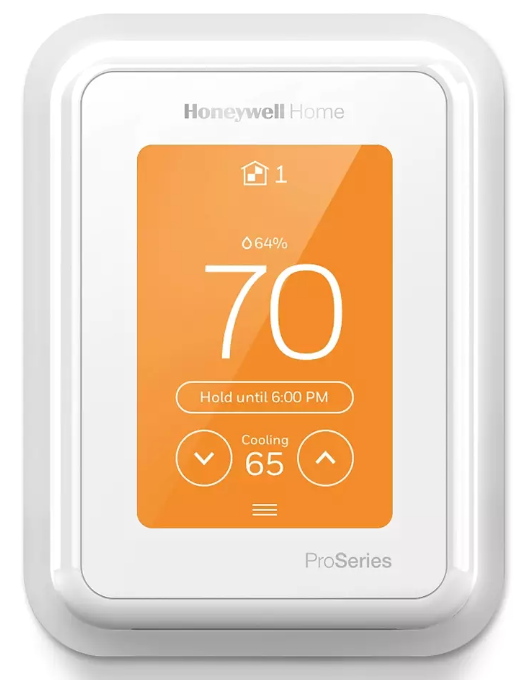
The Honeywell T10 & T10+ Pro Smart Thermostat with RedLINK 3.0 represents a cutting-edge solution for homeowners seeking enhanced comfort and energy efficiency. Equipped with advanced Wi-Fi capabilities and innovative RedLINK 3.0 wireless sensors, these thermostats empower users to prioritize temperature control in specific rooms based on occupancy and environmental conditions. This smart system intelligently adapts to your lifestyle by using motion detection, temperature, and humidity sensors to optimize heating and cooling dynamically.
Ideal for tech-savvy homeowners, HVAC professionals, and those managing multi-zone homes, the T10 and T10+ Pro offer seamless integration with popular voice assistants like Amazon Alexa, Google Assistant, and Apple HomeKit. The intuitive color touchscreen and 7-day programmable scheduling enable customizable comfort settings tailored to your routine.
Priced competitively within the mid to high smart thermostat market range, typically between $250 to $350 depending on retail and bundles, the Honeywell T10 & T10+ Pro are widely available through major home improvement stores and online platforms. Their Energy Star® certification further highlights their commitment to reducing energy consumption while maintaining superior climate control.
Specifications of Honeywell T10 & T10+ Pro Smart Thermostat with RedLINK 3.0
Temperature Ranges
- Heat: 40 °F to 90 °F (4.5 °C to 32.0 °C)
- Cool: 50 °F to 99 °F (10.0 °C to 37.0 °C)
Operating Ambient Temperature
- 32 °F to 120 °F (0 °C to 48.9 °C)
Shipping Temperature
- -20 °F to 120 °F (-28.9 °C to 48.9 °C)
Operating Relative Humidity
- 5% to 90% (non-condensing)
Humidity setting range
- 10% to 60% RH.
Dehumidity setting range
- Originally 40% to 80% RH. Lowered to 25% RH min on
- Oct 3,, 2019. Also updated via app.
Physical Dimensions in inches (mm) (H x W x D)
- T10 & T10+ PRO WiFi Thermostat:
- 4.9” x 3.7” x 0.93” (125.4 x 94.1 x 23.68)
- UWP Mounting System (included):
- 2-9/32” x 2-13/64” x 2-43/64” (58 x 56 x 10)
- Wireless temperature, humidity, and motion sensor:
- 2.6” x 2.6” x .78” (66.25 x 66.25 x 19.7)
- Cover Plate (included with THX321WFS2001W):
- 5 11/64” x 5 1/2” x 11/16” (131.4 x 139.7 x 17.5)
- Cover Plate (included with THX321WF2003W):
- 6 7/64” x 6 7/64” x 9/32” (155 x 155 x 7)
Electrical Ratings
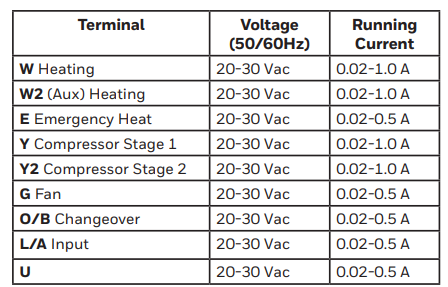
Power Consumption
- 3 VA
Setup Guide for Honeywell T10 & T10+ Pro Smart Thermostat with RedLINK 3.0
- Turn off the power to your HVAC system before installation to ensure safety.
- Mount the thermostat on a stable indoor wall, avoiding direct sunlight or drafts.
- Connect wiring according to your HVAC system type—refer to the included wiring diagram; the T10+ supports up to 3 Heat/2 Cool Heat Pump and 2 Heat/2 Cool Conventional systems.
- Power the thermostat and follow the touchscreen prompts for Wi-Fi setup, connecting to your home network using 2.4 GHz or 5 GHz bands.
- Pair the RedLINK 3.0 wireless sensors by pressing the pairing button on the sensor and confirming on the thermostat interface.
- Configure system settings, including heating/cooling schedules, temperature setpoints, and enable geofencing for location-based control.
- For advanced control, integrate with voice assistants via the Honeywell Home app.
Troubleshooting Tips: If Wi-Fi connection fails, verify network credentials and signal strength. Reset the thermostat by powering off and on. Consult the manual for error codes during setup.
Safety Precautions: Always disconnect power before wiring. Avoid mounting near heat sources or vents. Use only with compatible 24 VAC systems.
Thermostat Features
- Flexible scheduling: You can choose to use location-based temperature control (geofence technology), program a set schedule,, or use a combination of both to make sure your home is always comfortable.
- Location-based temperature control: Using geofence technology, the T10 & T10+ Pro Smart thermostat will automatically use your smartphone’s location, which can save you energy when you leave and make your home comfortable by the time you return.
- Smart Scheduling: Adds a Sleep period to location-based temperature control.
- Time-based scheduling: You can program a schedule where every day is different, a schedule where weekdays and weekends are different,,t or a schedule where every day is the same. There are four adjustable periods per day: Wake, Away, Home, and Sleep.
- No schedule: You can also choose not to set a schedule and adjust the thermostat manually.
- You can also choose not to set a schedule and adjust the thermostat manually. lly
- Schedule Using Sensors
- Up to 20 wireless indoor temperature/humidity/motion sensors per thermostat.
- Sensor Priority for each program period or when used manually.
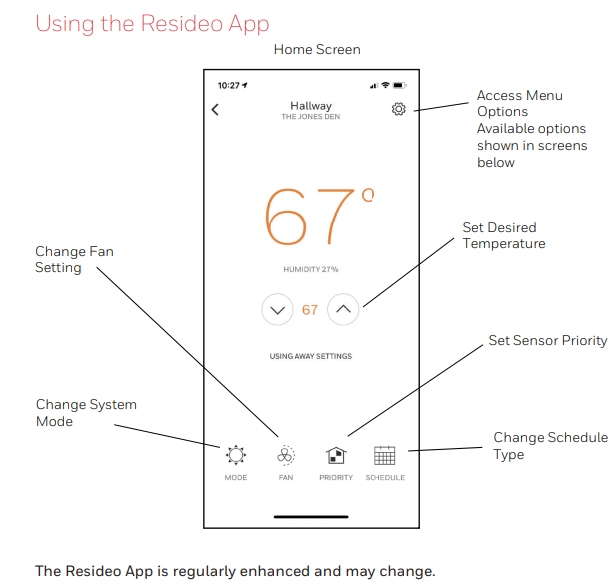
- Tip: The Resideo app can be used to manage multiple thermostats and multiple users in a household.
- Smart Alerts: The T10 & T10+ Pro Smart thermostat will send alerts for things like extreme indoor temperatures and reminders for things like filter changes.
- Auto change from heat to cool: When Auto mode is selected, the T10 & T10+ Pro Smart thermostat can automatically determine whether your home needs heating or cooling to reach the desired temperature.
- Adaptive Intelligent Recovery: The T10 & T10+ Pro Smart thermostat learns your heating and cooling cycle times to make sure the system delivers the temperature you want, when you want it.
Getting the most from the T10 & T10+ PRO Smart Thermostat
- Prioritize Rooms
Prioritize a specific room or multiple rooms, or let comfort follow your move using built-in motion detection. - Control on the Go
Adjust your thermostat from anywhere using your tablet or smartphone. - Save Energy
With geofencing, you can save money on the most expensive part of your energy bill while you’re away. - Simple Installation
The thermostat automatically programs itself. Just answer a few simple questions and you’ll be up and running in no time. - Whole-Home Range
With a 200-foot range, 20 sensors with temperature, humidity, and occupancy detection can connect to your thermostat from throughout your home. - Know Your Home Is Safe
Get customizable alerts on your mobile device when the basement is so cold a pipe could burst, or if the baby’s room is getting too hot.
Using Your Thermostat
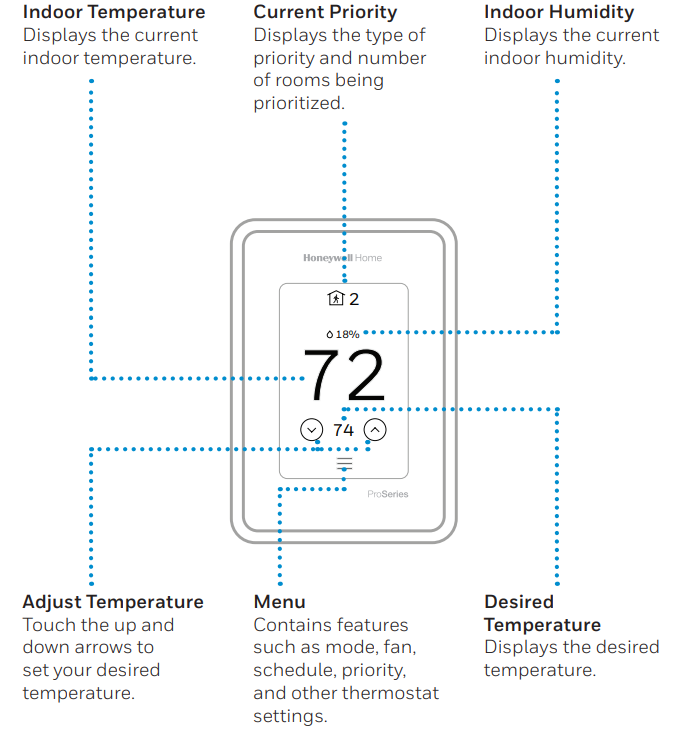
The screen will wake up by pressing the center area of the displayed temperature.
Advanced Features
ADAPTIVE INTELLIGENT RECOVERY
- Over time, the T10 thermostat “learns” how long it takes your system to reach your programmed temperature setting. The thermostat turns on the heating/cooling system early and assures that the programmed temperature setting is reached at the programmed time,, regardless of weather conditions. For example, if the Wake program period is set to 6:00 am with a heat setting of 70 degrees, the heat will turn on before 6:00 am, so the temperature is 70 degrees at 6:00 am. The thermostat displays
- “In Recovery” when it turns the system on early.
- Adaptive Intelligent Recovery® calculates the recovery ramp based on how far the room temperature is away from the temperature setting, previous equipment performance,,ce and weather history, allowing the thermostat to start recovery at the optimal time so it can reach the programmed temperature setting at the programmed time. The T10 thermostat uses two recovery ramps when set up to control a heat pump system with electric aux heat and droop set to “Comfort”. One ramp for the compressor and one ramp for the auxiliary heat. Once the room temperature intersects the compressor ramp, the compressor turns on until the setpoint is reached. If the room temperature does not rise quickly enough and intersects the second ramp, the auxiliary heat turns on. It takes about one week for the thermostat to adjust to weather conditions, equipment performance,, and construction of the home. If the temperature setting is reached too early or too late, the ramp is adjusted for the next day’s recovery.
COMPRESSOR PROTECTION
The thermostat keeps the compressor off for a few minutes before restarting, to prevent equipment damage. During this “off” time, the message “Waiting for Equipment” is displayed on screen. P + I CONTROL
A conventional mechanical thermostat does not control temperature precisely at the t setpoint. Typically, there is an offset (droop)* in the control point as the system load changes. Many factors contribute to offset, including the switch differential, thermal lag, overshoot, cycle rate,,s and system load.
- The T10 thermos, which, however, works much differently than a conventional mechanical thermostat. Droop is always set to comfort ais nd not adjustable when controlling a 2-stage furnace or a 2-stage heat pump without auxiliary heat. The proprietary algorithm in the thermostat eliminates the factors causing offset (droop). This makes temperature control more accurate than the conventional mechanical or electronic thermostat. The temperature control algorithm is called proportional plus integral (P + I) control.
- The thermostat sensor or indoor sensor senses the current space temperature. The proportional error is calculated by comparing the sensed temperature to the setpoint temperature. The deviation from the setpoint is the proportional error.
- The thermostat also determines integral error, which is a deviation based on the length of error time (how long the sensed room temperature has been away from the setpoint temperature). The sum of the two errors is the (P + I) error. The cycle rate used to reach and maintain the setpoint temperature is computed using the P + I control algorithm. The addition of the integral error is what differentiates the thermostat from mechanical thermostats.
- The T10 only uses droop for control of the aux heat on systems with a heat pump and either electric heat strips or a gas/oil furnace as backup heat. In these cases,, the droop setting locks out the aux heat unless the droop condition or upstage timer setting allows the aux heat to run. When electric strips are used as the aux heat, a “Comfort” setting is typically used instead of a droop setting. This is configured by the installer.
Troubleshooting
If you have difficulty with your thermostat, please try the following suggestions. Most problems can be corrected quickly and easily.
Display is blank
- Check the circuit breaker and reset if necessary.
- Make sure the power switch for heating and cooling is on.
- Make sure the furnace door is closed securely.
- Make sure the C-wire is connected.
- Make sure the R/Rc slider tab is set correctly (see wiring diagrams).
- The heating or cooling system does not respond.
- Press Menu > System Mode > Heat > Done to set the system to Heat mode. Make sure the desired temperature is higher than the indoor temperature.ResssRss Menu > System Mode > Cool > Done to set the system to Cool mode. Make sure the desired temperature is lower than the indoor temperature.
- Check the circuit breaker and reset if necessary.
- Make sure the power switch for the heating and cooling system is on.
- Make sure the furnace door is closed securely.
- Wait 5 minutes for the system to respond.
- Temperature settings do not change.
- Make sure the desired temperature is within acceptable ranges:
- Heat: 40 °F to 90 °F (4.5 °C to 32.0 °C)
- Cool: 50 °F to 99 °F (10.0 °C to 37.0 °C)
Aux heat runs in cooling
- For heat pump systems, verify that there is no a wire attached to W on the UWP.
Cool runs with a call for heat
- For heat pump systems, verify that there is no a wire attached to W on the UWP.
The sensor will not connect.
- Press and hold Connect on the wireless sensor for 15 seconds. The LED will turn Amber. Return to thermostat menu and press Menu > Devices and Sensors. Follow the on-screen instructions to add the sensor.
5-year limited warranty
Resideo warrants this product, excluding battery, to be free from defects in workmanship or materials, under normal use and service, for a period of five (5) years from the date of first purchase by the original purchaser. If at any time during the warranty period the product is determined to be defective due to workmanship or materials, Resideo shall repair or replace it (at Resideo’s option).
If the product is defective,
- return it, with a bill of sale or other dated proof of purchase, to the place from which you purchased it; or
- call Resideo Customer Care at 1-800-633-3991. Customer Care will make the determination whether the product should be returned to the following address: Resideo Return Goods, 1985 Douglas Dr. N., Golden Valley, MN 55422, or whether a replacement product can be sent to you.
This warranty does not cover removal or reinstallation costs. This warranty shall not apply if it is shown by Resideo that the defect was caused by damage that occurred while the product was in the possession of a consumer.
Resideo’s sole responsibility shall be to repair or replace the product within the terms stated above. RESIDEO SHALL NOT BE LIABLE FOR ANY LOSS OR DAMAGE OF ANY KIND, INCLUDING ANY INCIDENTAL OR CONSEQUENTIAL DAMAGES RESULTING, DIRECTLY OR INDIRECTLY, FROM ANY BREACH OF ANY WARRANTY, EXPRESS OR IMPLIED, OR ANY OTHER FAILURE OF THIS PRODUCT.
Some states do not allow the exclusion or limitation of incidental or consequential damages, so this limitation may not apply to you.
THIS WARRANTY IS THE ONLY EXPRESS WARRANTY RESIDEO MAKES ON THIS PRODUCT. THE DURATION OF ANY IMPLIED WARRANTIES, INCLUDING THE WARRANTIES OF MERCHANTABILITY AND FITNESS FOR A PARTICULAR PURPOSE, IS HEREBY LIMITED TO THE FIVE-YEAR DURATION OF THIS WARRANTY. Some states do not allow limitations on how long an implied warranty lasts, so the above limitation may not apply to you. This warranty gives you specific legal rights, and you may have other rights which vary from state to state. If you have any questions concerning this warranty, please write Resideo Customer Care, 1985 Douglas Dr, Golden Valley, MN 55422, or call 1-800-633-3991.
Pros & Cons of Honeywell T10 & T10+ Pro Smart Thermostat with RedLINK 3.0
Pros
- Advanced multi-room temperature and humidity sensing with wireless RedLINK 3.0 sensors
- Wide compatibility with HVAC systems including heat pumps, dual fuel, and radiant hot water
- Geofencing and adaptive intelligent recovery optimize energy savings and comfort
- Intuitive color touchscreen and easy-to-use mobile app for remote control
- Seamless integration with major smart home platforms and voice assistants
- Energy Star® certification ensures efficient operation
Cons
- Initial setup and wiring may be complex for non-technical users
- RedLINK sensors have a limited range (~200 feet), potentially requiring multiple units for larger homes
- Price point higher than basic smart thermostats without multi-room features
- Some users report occasional connectivity drops requiring resets
Compared to alternatives like Ecobee with built-in room sensors, the Honeywell T10+ requires additional sensor purchases but offers greater HVAC system compatibility, especially for complex setups.
Customer Reviews of Honeywell T10 & T10+ Pro Smart Thermostat with RedLINK 3.0
Users prai,se the Honeywell T10 & T10+ Pro Smart Thermostat with RedLINK 3.0 for its precise temperature control and ability to prioritize multiple. Rooms, often highlight improved comfort and energy savings. Star ratings average around 4.3 out of 5, with many appreciating the intuitive touchscreen and robust voice assistant support.
Common complaints include installation complexity and occasional Wi-Fi connectivity issues, but most users find customer support responsive. Several reviewers recommend the thermostat for multi-zone e homes or those with advanced HVAC needs, while noting that initial setup may benefit from professional assistance.
Testimonials frequently mention how the motion-based room prioritization creates a more responsive and comfortable environment compared to traditional smart thermostats.
Faqs
How do I set up the honeywell T10 & T10+ Pro Smart Thermostat with RedLINK 3.0 for Wi-Fi and mobile control?
What should I do if my honeywell T10 & T10+ Pro Smart Thermostat with RedLINK 3.0 is not responding to temperature changes?
Can I add wireless sensors to my honeywell T10 & T10+ Pro Smart Thermostat with RedLINK 3.0?
How do I create and customize a schedule on the honeywell T10 & T10+ Pro Smart Thermostat with RedLINK 3.0?
Is the honeywell T10 & T10+ Pro Smart Thermostat with RedLINK 3.0 compatible with all HVAC systems?
How do I adjust fan settings on the honeywell T10 & T10+ Pro Smart Thermostat with RedLINK 3.0?
What should I do if the display on my honeywell T10 & T10+ Pro Smart Thermostat with RedLINK 3.0 is dim or unresponsive?
How do I maintain and clean my honeywell T10 & T10+ Pro Smart Thermostat with RedLINK 3.0?
More honeywell manuals
- Setup & Features: Honeywell UtilityPROTM Series Touchscreen Programmable Demand Control Thermostat Owner Manual
- Setup: Honeywell T4 Pro Programmable Thermostat User Manual
- Features & Specs: Honeywell TP30WK Smart Dehumidifier User Manual
- Pairing: Honeywell T5+ Smart Programmable Thermostat User Manual
- Honeywell PB112C-GA Thermostat User Manual
- Setup & Pairing: Honeywell T9 Smart Thermostat with Smart Room Sensor User Manual
Leave a Comment