
Setup: Honeywell T4 Pro Programmable Thermostat User Manual
Content
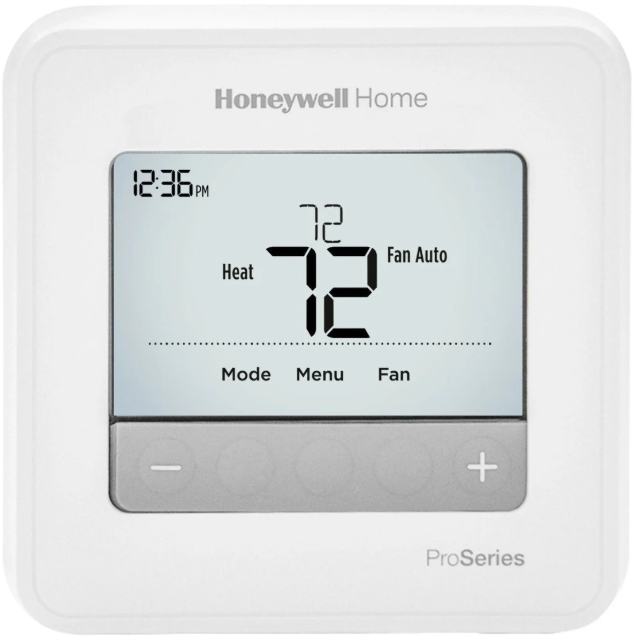
Honeywell T4 Pro Programmable Thermostat
Introduction
The Honeywell T4 Pro Programmable Thermostat presents an efficient, user-friendly solution for managing home heating and cooling systems. Designed to deliver precise temperature control with minimal effort, this thermostat offers advanced programming capabilities such as 7-day scheduling and adaptive intelligent recovery, which learns your home's heating and cooling patterns to ensure comfort when you need it. Ideal for homeowners seeking reliable and straightforward climate control, the T4 Pro suits conventional 1 Heat / 1 Cool HVAC systems in residential settings.
Its streamlined design incorporates simple push-button operation and a universal mounting system that makes installation and everyday use accessible for both professionals and DIY enthusiasts. Key benefits include energy savings via programmable schedules, filter change reminders for maintenance, and a robust 5-year warranty for peace of mind. Typically priced in the mid-range segment, the Honeywell T4 Pro Programmable Thermostat is widely available through professional HVAC partners, ensuring expert installation and support.
Specifications of Honeywell T4 Pro Programmable Thermostat
- System Compatibility: 1 Heat / 1 Cool conventional systems (gas, oil, electric furnace)
- Programming Options: 7-day, 5-2, 5-1-1 day scheduling with four time periods per day
- Control Features: Simple push-button interface, auto changeover between heating and cooling
- Adaptive Intelligent Recovery: Learns system run times to activate heating/cooling in advance
- Display: Backlit digital display with filter change reminders
- Mounting: Universal Wall Plate (UWP) mounting system compatible with Honeywell T Series
- Power: Battery powered with optional power stealing from HVAC system, 24 Vac supply
- Temperature Range: 37°F to 102°F (3°C to 39°C), adjustable in 1°F increments
- Dimensions: 4.06" x 4.06" x 1.03" (LxWxD)
- Warranty: 5 years
- Certifications: ENERGY STAR® not certified
Compared to similar thermostats, the Honeywell T4 Pro emphasizes ease of installation and basic programmable functionality without smartphone or Wi-Fi connectivity, making it a reliable choice for conventional HVAC setups without smart home integration needs.
Package Includes
- T4 Pro Thermostat
- UWP™ Mounting System
- Decorative Cover Plate
- Screws and Anchors
- 2 AA Batteries
Optional Cover Plate installation
NOTE: If the Optional Cover Plate is not required, see “UWP Mounting System installation” on the next page.
Use the Optional Cover Plate when you need to cover the paint gap from the old thermostat.
Different cover plates depend on when the thermostat was manufactured.
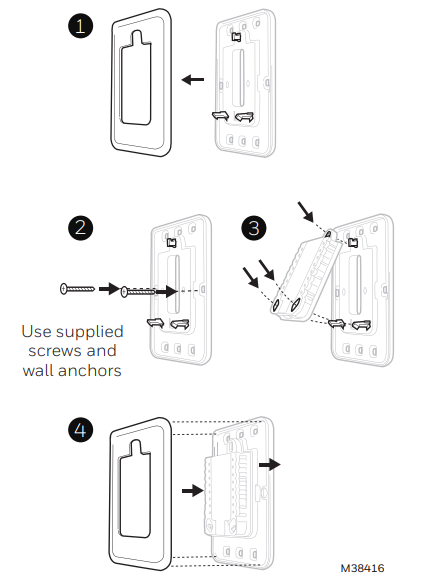
For the square cover plate:
- Separate the Cover Plate from the Mounting Plate.
- Mount the Mounting Plate onto the wall using any of the 8 screw holes. Insert and tighten mounting screws supplied with Cover Plate Kit. Do not overtighten. See Figure 2. Make sure the Mounting Plate is level.
- Attach the UWP by hanging it on the top hook of the Mounting Plate and then snapping the bottom of the UWP in place. See Figure 3.
- Snap the Cover Plate onto the Mounting Plate. See Figure 4.
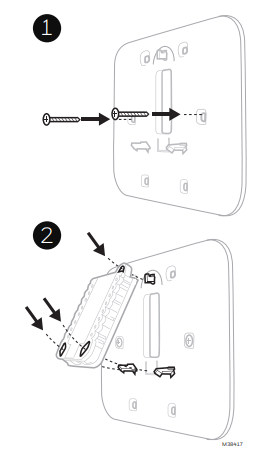
For the rectangular cover plate:
- Mount the Cover Plate on the wall using any of the 6 screw holes. Insert and tighten the mounting screws supplied with the Cover Plate. Do not overtighten. See Figure
- Make sure the Cover Plate is level. Attach the UWP by hanging it on the top hook of the Cover Plate and then snapping the bottom of the UWP in place. See Figure 2.
- If there are no existing wall anchors:
- Position the Cover Plate on the wall. Level and mark hole positions. See Figure 1.
- Drill holes at marked positions, and then lightly tap the supplied wall anchors into the wall using a hammer.
- If your box contains red anchors, drill 7/32” (5.6 mm) holes.
- If your box contains yellow anchors, drill 3/16” (4.8 mm) holes.
- Use 2x supplied screws (#8 1-½”(38 mm) for red anchors and #6 1- 1/2” (38 mm) for yellow anchors).
UWP Mounting System installation
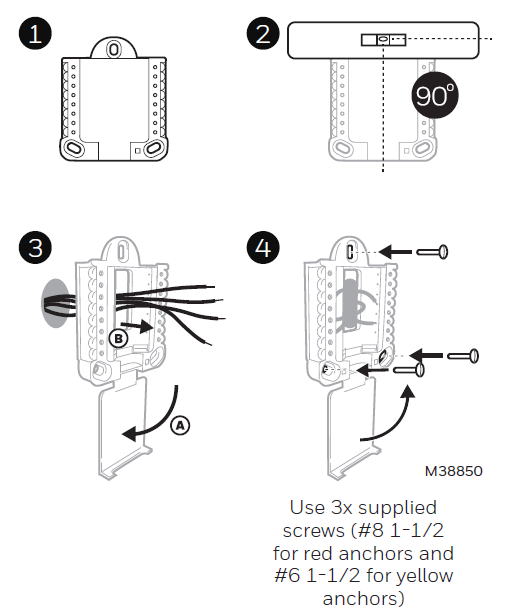
- Before starting, turn the power off at the breaker box or switch. Open the package to find the UWP. See Figure 1.
- Position the UWP on the wall. Level and mark hole positions. See Figure 2. Drill holes at marked positions, and then lightly tap the supplied wall anchors into the wall using a hammer.
- If your box contains red anchors, drill 7/32” holes.
- If your box contains yellow anchors, drill 3/16” holes.
- Pull the door open and insert the wires through the wiring hole of the UWP. See Figure 3.
- Place the UWP over the wall anchors. Insert and tighten mounting screws supplied with the UWP. Do not overtighten. Tighten until the UWP no longer moves. Close the door. See Figure 4.
Installer setup (ISU)
- Press and hold the CENTER and + buttons for approximately 3 seconds to enter the advanced menu.
- Press Select to enter ISU.
- Press Select to cycle through menu setup options.
- Press + or - to change values or select from available options.
- Press Select and confirm your settings or press Back to ignore changes and return to the ITheSU menu screen to continue editing another setup option.
- To finish the setup process and save your settings, press Home and return to the Home screen.
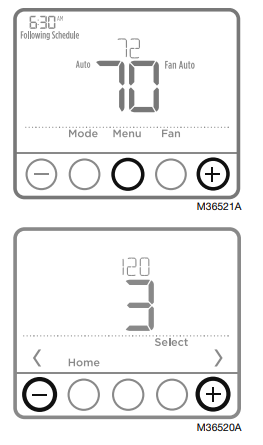
NOTE: A complete list of all setup (ISU) parameters and options starts below and continues through page 9.
Installer system test
To perform a System Test:
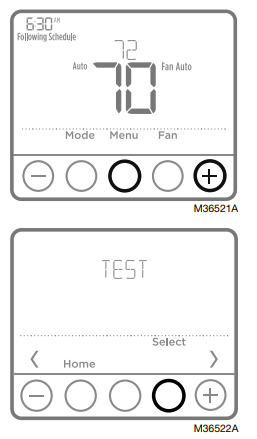
- Press and hold the CENTER and + buttons for approximately 3 seconds to enter the advanced menu.
- Use + to go to TEST. Press Select to enter System Test.
- Use + to change between Heat, Cool, Fan, Em. Heat (TH4210U only), or Ver (thermostat version information). Press Select.
- Press + to turn the heat, cool, or fan on. Press - to turn them off.
- Use the Home button to exit the System Test.
Setup Guide for Honeywell T4 Pro Programmable Thermostat
- Power Off HVAC System: Turn off the power to your heating and cooling system at the breaker for safety.
- Remove Old Thermostat: Detach the existing thermostat, labeling wires for easy reconnection.
- Mount the T4 Pro: Attach the universal wall plate (UWP) to the wall using the included screws and anchors.
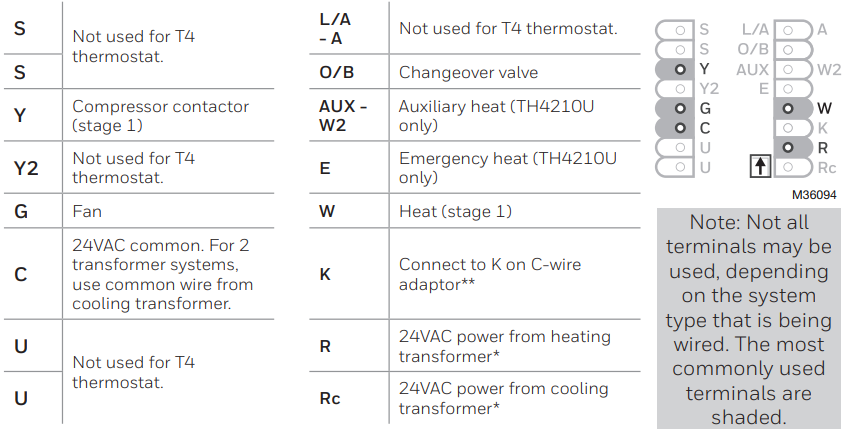
- Wire Connections: Connect wires to corresponding terminals (W for heat, Y for cool, G for fan) based on the labeled wires.
- Install Batteries: Insert two AA batteries to power the thermostat.
- Power On HVAC System: Restore power, and the thermostat display should activate.
- Initial Configuration: Use on-screen instructions to select system type (heat/cool), fan settings, and date/time.
- Programming: Set daily schedules with four adjustable time periods, optionally using 7-day or 5-2 programming modes.
UWP Wiring terminal designations
Safety Precautions: Always disconnect power before installation and avoid touching live wires. Follow local electrical codes and consult a professional installer if unsure.
Troubleshooting Honeywell T4 Pro Programmable Thermostat
Troubleshooting Tips: If the thermostat display does not power on, check battery installation and wire connections. For HVAC system non-responsiveness, verify breaker status and wiring compatibility.
Troubleshooting
If you have difficulty with your thermostat, please try the following suggestions. Most problems can be corrected quickly and easily.
Display is blank
- The thermostat can be powered by AA Alkaline batteries, with a common wire to C, or both. Verify that 24-volt power or AA batteries are good. Check the circuit breaker and reset if necessary.
- Check the circuit breaker and reset if necessary.
- Make sure the power switch for the heating & cooling system is on.
- Make sure the furnace door is closed securely.
- Make sure fresh AA alkaline batteries are correctly installed (see page 3).
The heating or cooling system does not respond.
- Press Mode button to set the system Heat (see page 5). Make sure the desired temperature is set higher than the inside temperature.
- Press Mode button to set the system to Cool (see page 5). Make sure the desired temperature is set lower than the inside temperature.
- Check the circuit breaker and reset if necessary.
- Make sure the power switch for the heating & cooling system is on.
- Make sure the furnace door is closed securely.
- Wait 5 minutes for the system to respond.
Temperature settings do not change.
- Make sure heating and cooling temperatures are set to acceptable ranges:
- Heat: 40 °F to 90 °F (4.5 °C to 32.0 °C)
- Cool: 50 °F to 99 °F (10.0 °C to 37.0 °C)
“Cool On” or “Heat On” is flashing
- Compressor protection feature is engaged. Wait 5 minutes for the system to restart safely, without damage to the compressor.
Aux heat runs in cooling.g
- For heat pump systverify that there is no a wire attached to W on UWP systems. See “Wiring heat pump systems” on page 4.
Cool runs with a call for heat
- For heat pump systems, verify that there is no a wire attached to W on UWP systems. See “Wiring heat pump systems” on page.
Preventive measures include regular battery replacement and filter changes. The product comes with a 5-year warranty covering manufacturing defects. For further support, Honeywell customer service and authorized professional partners are recommended contacts for assistance.
Pros & Cons of Honeywell T4 Pro Programmable Thermostat
- Pros:
- Simple, intuitive push-button controls ideal for all user levels
- Adaptive intelligent recovery enhances comfort by pre-heating or cooling
- Flexible programming options, including 7-day schedules and weekend customization
- Universal mounting system simplifies replacement and installation
- 5-year warranty provides long-term reliability assurance
- Cons:
- Lacks Wi-Fi or smartphone app connectivity for remote control
- No support for multi-stage heating or cooling systems
- Not ENERGY STAR® certified, limiting energy incentive eligibility
- No programmable fan control or advanced IAQ (Indoor Air Quality) features
Compared to smart thermostats like Honeywell’s Wi-Fi-enabled models, the T4 Pro focuses on straightforward programmable control without smart features, which may limit appeal for tech-savvy users but enhances reliability and ease of use.
Customer Reviews of Honeywell T4 Pro Programmable Thermostat
- Users praise the Honeywell T4 Pro Programmable Thermostat for its ease of installation and simple interface, highlighting the benefit of adaptive recovery that improves comfort. Many appreciate the clear backlit display and straightforward scheduling options.
- Common complaints include a lack of Wi-Fi connectivity and the absence of advanced features found in more expensive models. The filter change reminder and reliable temperature control received positive remarks, with an average rating of around 4 out of 5 stars.
- Overall, buyers recommend the T4 Pro for users looking for basic programmable thermostat functionality with dependable performance in single-stage heating and cooling systems.
Faqs
How do I set up the honeywell T4 Pro Programmable Thermostat for the first time?
What should I do if my honeywell T4 Pro Programmable Thermostat is not responding or showing a blank screen?
Can I program different schedules for weekdays and weekends on the honeywell T4 Pro Programmable Thermostat?
How do I override the schedule on my honeywell T4 Pro Programmable Thermostat temporarily?
Is the honeywell T4 Pro Programmable Thermostat compatible with all HVAC systems?
How do I change the temperature display from Fahrenheit to Celsius on the honeywell T4 Pro Programmable Thermostat?
What are the best practices for maintaining my honeywell T4 Pro Programmable Thermostat?
How can I access installer setup options on the honeywell T4 Pro Programmable Thermostat?
More honeywell manuals
- Setup: Honeywell T10 & T10+ Pro Smart Thermostat with RedLINK 3.0 User Manual
- Pairing: Honeywell T5+ Smart Programmable Thermostat User Manual
- Setup & Features: Honeywell UtilityPROTM Series Touchscreen Programmable Demand Control Thermostat Owner Manual
- Setup & Pairing: Honeywell T9 Smart Thermostat with Smart Room Sensor User Manual
- Features & Specs: Honeywell TP30WK Smart Dehumidifier User Manual
- Setup: Honeywell C1 Wi-Fi Security Camera CHC8080W User Manual
Leave a Comment