
Setup & Pairing: Honeywell T9 Smart Thermostat with Smart Room Sensor User Manual
Content
Honeywell T9 Smart Thermostat with Smart Room Sensor
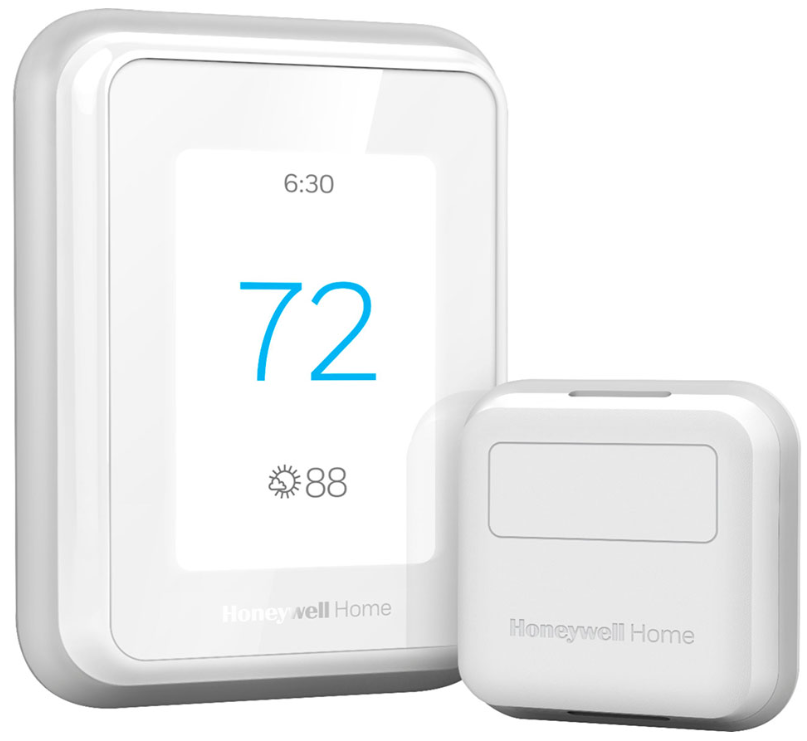
Introduction
The Honeywell T9 Smart Thermostat with Smart Room Sensor offers advanced temperature control designed to bring optimum comfort and energy savings to your home. This smart thermostat uniquely adapts to your lifestyle by detecting occupancy and focusing on the rooms you use most, thanks to its innovative Smart Room Sensors. With its intuitive touchscreen interface and seamless integration with popular smart home platforms like Amazon Alexa, Google Assistant, and Apple HomeKit, the T9 delivers a user-friendly experience tailored for modern homeowners.
Ideal for tech-savvy users who want precise climate control and energy efficiency, the Honeywell T9 suits both single-family homes and multi-room residences. It supports up to 20 sensors, allowing customized temperature management across multiple spaces. Key benefits include 7-day scheduling, geofencing for energy savings when you're away, indoor humidity sensing, and alerts for filter changes and frost conditions. The product comes with a two-year warranty and includes a C-wire adapter for easy installation in homes lacking a C-wire connection.
Typically priced in the mid-range segment of smart thermostats, the Honeywell T9 is widely available through major retailers and online stores. Its competitive price, combined with robust features,,s makes it an excellent choice for homeowners seeking smarter, energy-efficient climate control solutions.
Specifications of Honeywell T9 Smart Thermostat with Smart Room Sensor
Temperature Ranges
- Heat: 40 °F to 90 °F (4.5 °C to 32.0 °C)
- Cool: 50 °F to 99 °F (10.0 °C to 37.0 °C)
Operating Ambient Temperature
- 32 °F to 120 °F (0 °C to 48.9 °C)
Shipping Temperature
- -20 °F to 120 °F (-28.9 °C to 48.9 °C)
Operating Relative Humidity
- 5% to 90% (non-condensing) Physical Dimensions in inches (mm) (H x W x D)
- T9 Smart Thermostat: 4.9” x 3.7” x 0.93” (125.4 x 94.1 x 23.68)
- UWP Mounting System (included): 2-9/32” x 2-13/64” x 2-43/64” (58 x 56 x 10)
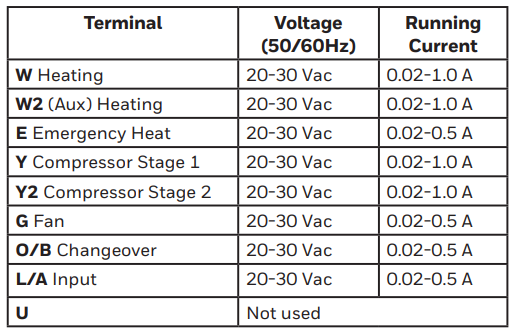
Electrical Ratings
Power Consumption
- 3 VA
Models
- RCHT9510WFW2001 (US): Sensor not included
- RCHT9510WFW2003: Sensor not included
- RCHT9510WFW2017 (CANADA): Sensor not included
- RCHT9610WFSW2003 (US): One sensor included
- RCHT9610WFSW2019 (CANADA): One sensor included
- RCHT9610WFW2004: Sensor not included
- Note: Some thermostat models listed here are no longer available for purchase.
- RCHTSENSOR-2PK/E: Sensor 2 pack
Thermostat Features
Flexible scheduling: You can choose to use location-based temperature control (geofence technology), program a set schedule, or use a combination of both to make sure your home is always comfortable.
- Location-based temperature control: Using geofence technology, the T9 Smart thermostat will automatically use your smartphone’s location, which can save you energy when you leave and make your home comfortable by the time you return.
- Smart Scheduling: Adds a Sleep period to location-based temperature control.
- Time-based scheduling: You can program a schedule where every day is different, a schedule where weekdays and weekends are different, or a schedule where every day is the same. There are four adjustable periods per day: Wake, Away, Home, and Sleep.
- No schedule: You can also choose not to set a schedule and adjust the thermostat manually.
- You can also choose not to set a schedule and adjust the thermostat manually.y
- Schedule Using Sensors
- Up to 20 wireless indoor temperature/humidity/motion sensors per thermostat.
- Sensor Priority for each program period or when used manually.
- Tip: The Resideo app can be used to manage multiple thermostats and multiple users in a household
- Smart Alerts: The T9 Smart thermostat will send alerts for things like extreme indoor temperatures and reminders for things like filter changes. Auto change from heat to cool:
- When Auto mode is selected, the T9 Smart thermostat can automatically determine whether your home needs heating or cooling to reach the desired temperature.
- Adaptive Intelligent Recovery: The T9 Smart thermostat learns your heating and cooling cycle times to make sure the system delivers the temperature you want, when you want
Getting the most from the T9 Smart Thermostat
- Prioritize Rooms
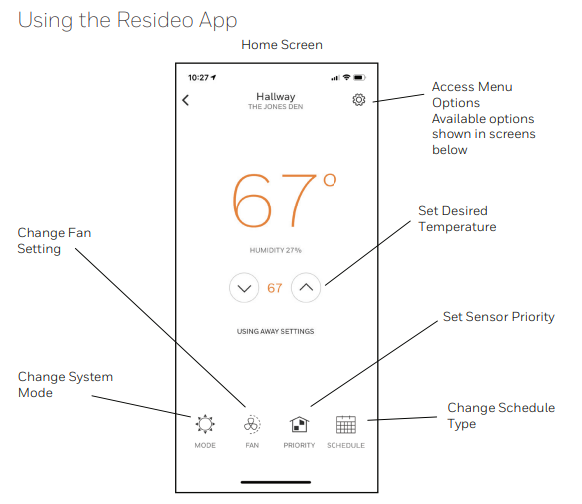
Prioritize a specific room or multiple rooms, or let comfort follow your move using built-in motion detection. - Control on the Go
Adjust your thermostat from anywhere using your tablet or smartphone. - Save Energy
With geofencing, you can save money on the most expensive part of your energy bill while you’re away. - Simple Installation
The thermostat automatically programs itself. Just answer a few simple questions and you’ll be up and running in no time. - Whole-Home Range
With a 200-foot range, 20 sensors with temperature, humidity, and occupancy detection can connect to your thermostat from throughout your home. - Keep an eye on your home.
Get customizable alerts on your mobile device when the basement is so cold a pipe could burst, or if the baby’s room is getting warm.
Using Your Thermostat
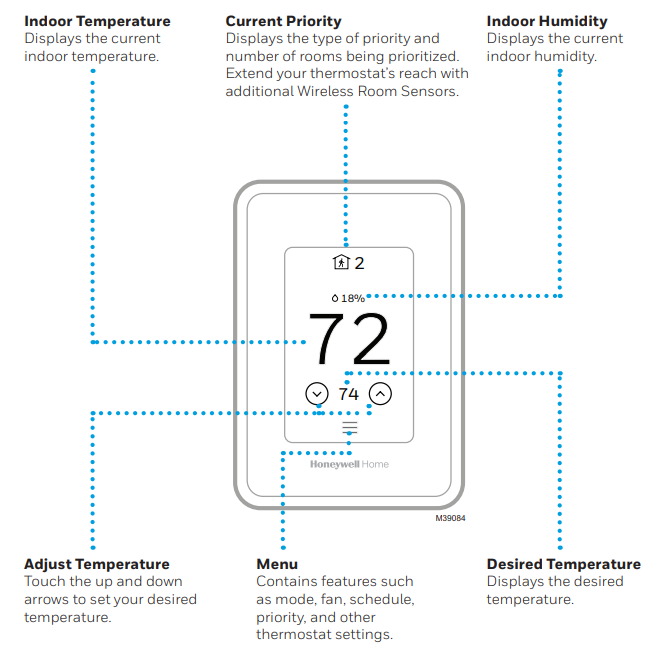
Using Your Thermosta:t The screen will wake up by pressing the center area of the displayed temperature.
The screen will wake up by pressing the center area of the displayed temperature.
Advanced Features
ADAPTIVE RECOVERY
- Over time, the T9 thermostat “learns” how long it takes your system to reach your programmed temperature setting.
- The thermostat turns on the heating/cooling system early and assures that the programmed temperature setting is reached at the programmed time,, regardless of weather conditions. For example, if the Wake program period is set to 6:00 am with a heat setting of 70 degrees, the heat will turn on before 6:00 am, so the temperature is 70 degrees at 6:00 am. The thermostat displays “In Recovery” when it turns the system on early.
- Adaptive Intelligent Recovery® calculates the recovery ramp based on how far the room temperature is away from the temperature setting, previous equipment performance,,ce and weather history, allowing the thermostat to start recovery at the optimal time so it can reach the programmed temperature setting at the programmed time.
COMPRESSOR PROTECTION
The thermostat keeps the compressor off for a few minutes before restarting, to prevent equipment damage. During this “off” time, the message “Waiting for Equipment” is displayed on screen.
Setup Guide for the Honeywell T9 Smart Thermostat with Smart Room Sensor
- Turn on the ff power to your heating and cooling system at the circuit breaker before installation.
- Remove the existing thermostat and label wires using the provided wire labels.
- Mount the T9 thermostat on the wall using the included UWP wall plate, screws, and anchors.
- Connect wires according to the installation guide; use the included C-wire adapter if your home lacks a C-wire.
- Power on the HVAC system and follow the on-screen prompts on the T9 touchscreen to complete initial setup.
- Download and install the Honeywell Home app on your smartphone or tablet.
- Pair Smart Room Sensors by placing them in desired rooms (up to 20 supported) and connecting via the app or thermostat interface.
- Configure settings,s including scheduling, geofencing, and multi-room prioritization, on through the app for personalized comfort.
Troubleshooting Tips: If the thermostat does not power on, verify wiring and circuit breaker status. For connectivity issues, ensure your Wi-Fi signal is strong and network credentials are correct.
Safety Warnings: Always turn off the power before installation. This thermostat is not compatible with electric baseboard heating systems. Installation by a professional is recommended if unfamiliar with HVAC wiring.
Troubleshooting the Honeywell T9 Smart Thermostat with Smart Room Sensor
If you have difficulty with your thermostat, please try the following suggestions. Most problems can be corrected quickly and easily.
Display is blank
- Check the circuit breaker and reset if necessary.
- Make sure the power switch for heating and cooling is on.
- Make sure the furnace door is closed securely.
- Make sure the C-wire is connected.
- Make sure the R/Rc slider tab is set correctly (see wiring diagrams).
The heating or cooling system does not respond.
- Press Menu > System Mode > Heat > Done to set the system to Heat mode. Make sure the desired temperature is higher than the indoor temperature.
- Press Menu > System Mode > Cool > Done to set the system to Cool mode. Make sure the desired temperature is lower than the indoor temperature.
- Check the circuit breaker and reset if necessary.
- Make sure the power switch for the heating and cooling system is on.
- Make sure the furnace door is closed securely.
- Wait 5 minutes for the system to respond.
- Temperature settings do not change
- Make sure the desired temperature is within acceptable ranges:
- Heat: 40 °F to 90 °F (4.5 °C to 32.0 °C)
- Cool: 50 °F to 99 °F (10.0 °C to 37.0 °C)
Aux heat runs in cooling
- For heat pump systems, verify that there is no a wire attached to W on the UWP.
Cool runs with a call for heat
- For heat pump systems, verify that there is no a wire attached to W on the UWP.
The sensor will not connect..
- Press and hold Connect on the wireless sensor for 15 seconds. The LED will turn Amber. Return to the thermostat menu and press Menu > Devices and Sensors. Follow the on-screen instructions to add the sensor..
The Honeywell T9 Smart Thermostat comes with a standard two-year limited warranty. For technical support, users can contact Honeywell customer service via their official website or through the Honeywell Home app support section.
2-year limited warranty
Resideo warrants this product, excluding battery, to be free from defects in workmanship or materials, under normal use and service, for a period of two (2) years from the date of first purchase by the original purchaser. If at any time during the warranty period the product is determined to be defective due to workmanship or materials, Resideo shall repair or replace it (at Resideo’s option).
If the product is defective,
- return it, with a bill of sale or other dated proof of purchase, to the place from which you purchased it; or
- call Resideo Customer Care at 1-800-633-3991. Customer Care will make the determination whether the product should be returned to the following address: Resideo Return Goods, 1985 Douglas Dr. N., Golden Valley, MN 55422, or whether a replacement product can be sent to you.
- This warranty does not cover removal or reinstallation costs. This warranty shall not apply if it is shown by Resideo that the defect was caused by damage that occurred while the product was in the possession of a consumer.
- Resideo’s sole responsibility shall be to repair or replace the product within the terms stated above. RESIDEO SHALL NOT BE LIABLE FOR ANY LOSS OR DAMAGE OF ANY KIND, INCLUDING ANY INCIDENTAL OR CONSEQUENTIAL DAMAGES RESULTING, DIRECTLY OR INDIRECTLY, FROM ANY BREACH OF ANY WARRANTY, EXPRESS OR IMPLIED, OR ANY OTHER FAILURE OF THIS PRODUCT.
- Some states do not allow the exclusion or limitation of incidental or consequential damages, so this limitation may not apply to you.
- THIS WARRANTY IS THE ONLY EXPRESS WARRANTY RESIDEO MAKES ON THIS PRODUCT. THE DURATION OF ANY IMPLIED WARRANTIES, INCLUDING THE WARRANTIES OF MERCHANTABILITY AND FITNESS FOR A PARTICULAR PURPOSE, IS HEREBY LIMITED TO THE TWO-YEAR DURATION OF THIS WARRANTY. Some states do not allow limitations on how long an implied warranty lasts, so the above limitation may not apply to you.
- This warranty gives you specific legal rights, and you may have other rights which vary from state to state. If you have any questions concerning this warranty, please write Resideo Customer Care, 1985 Douglas Dr, Golden Valley, MN 55422, or call 1-800-633-3991
Pros & Cons of the Honeywell T9 Smart Thermostat with Smart Room Sensor
- Pros:
- Advanced occupancy detection with Smart Room Sensors improves comfort and energy efficiency.
- Easy installation with included C-wire adapter, compatible with most HVAC systems except electric baseboard heating.
- Wide smart home integration supports Alexa, Google Assistant, Apple HomeKit, and more.
- Multi-room temperature management up to 20 sensors enhances whole-home comfort.
- Intuitive touchscreen interface and comprehensive Honeywell Home app streamline control.
- Energy Star certified, promoting energy savings and potential utility rebates.
- Cons:
- Requires a C-wire or adapter, which may complicate installation for some older homes.
- Not compatible with electric baseboard heating systems.
- Some users report occasional Wi-Fi connectivity drops needing reboots.
- Sensor batteries need periodic replacement, adding minor maintenance.
- Value for Money: The Honeywell T9 offers excellent features at a mid-range price point, balancing smart functionality and ease of use better than many alternatives.
Customer Reviews for the Honeywell T9 Smart Thermostat with Smart Room Sensor
Customers praise the Honeywell T9 Smart Thermostat with Smart Room Sensor for its reliable occupancy detection and multi-room comfort management. Reviews frequently highlight the intuitive touchscreen and the convenience of controlling the thermostat via the Honeywell Home app. The geofencing feature is often cited as a valuable energy saver, adjusting temperature automatically based on user location.
Common complaints include occasional Wi-Fi disconnections and the requirement of a C-wire for power, which some found challenging during installation. Despite these issues, many users recommend the product for its responsive customer support and overall performance, awarding it an average rating of 4.3 out of 5 stars. Users considering this thermostat emphasize the benefits of adding multiple Smart Room Sensors to maximize comfort.
Faqs
How do I set up the honeywell T9 Smart Thermostat with Smart Room Sensor for the first time?
What should I do if my honeywell T9 Smart Thermostat with Smart Room Sensor is not responding to heating or cooling commands?
Can I use the honeywell T9 Smart Thermostat with Smart Room Sensor with a heat pump system?
How do I optimize the performance of the honeywell T9 Smart Thermostat with Smart Room Sensor using its features?
What are the compatibility requirements for installing the honeywell T9 Smart Thermostat with Smart Room Sensor?
How do I maintain and care for my honeywell T9 Smart Thermostat with Smart Room Sensor to ensure longevity?
How do I add or remove smart room sensors on my honeywell T9 Smart Thermostat with Smart Room Sensor?
What troubleshooting steps can I take if the honeywell T9 Smart Thermostat with Smart Room Sensor Wi-Fi connection is unstable?
More honeywell manuals
- Pairing: Honeywell T5+ Smart Programmable Thermostat User Manual
- Setup: Honeywell C1 Wi-Fi Security Camera CHC8080W User Manual
- Setup: Honeywell T4 Pro Programmable Thermostat User Manual
- Pairing : Honeywell Portable Wireless Doorbell RDWL917AX2000 User Manual
- Setup: Honeywell T10 & T10+ Pro Smart Thermostat with RedLINK 3.0 User Manual
- Pairing & Setup: Honeywell Portable Wireless Doorbell RDWL311A2000 User Manual
Leave a Comment