
Setup: Lowrance IP Cam-1 Marine Camera User Manual
Content
Lowrance IP Cam-1 Marine Camera
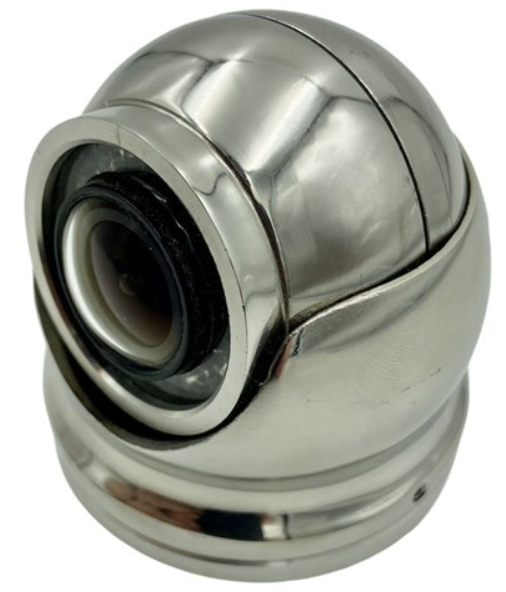
Introduction
The Lowrance IP Cam-1 Marine Camera is a cutting-edge marine video solution designed to enhance vessel awareness and onboard security. Engineered for durability and high performance, this camera offers boaters the ability to monitor key areas such as reverse views, anchor positions, sails, and deck activities with ease. Its robust design and advanced features make it an indispensable tool for recreational boaters, fishing enthusiasts, and professional mariners seeking reliable visual monitoring in harsh marine environments.
Key benefits include seamless integration with Lowrance HDS LIVE chartplotters and compatible multifunction displays, enabling real-time video feeds directly on your navigation screen. The camera’s high-definition 1920 x 1080 resolution,, combined with a wide-angle 1.8mm lens,, delivers crisp, detailed images. Additionally, high-performance infrared LEDs provide night vision capability up to 10 meters, ensuring visibility in low-light or dark conditions.
Constructed with rugged 316 stainless steel, the IP Cam-1 withstands extreme saltwater exposure and other environmental challenges common at sea. The camera supports flexible power options such as Power Over Ethernet (POE) or a standard 12V supply, simplifying installation and network integration.
Targeted at those who require enhanced situational awareness on vessels—whether for docking, safety, or monitoring purposes the Lowrance IP Cam-1 is available through marine electronics retailers and online boating stores, typically priced in the mid to high hundred-dollar range, reflecting its premium build and capabilities.
Specifications of the Lowrance IP Cam-1 Marine Camera
- Power:
- PoE: IEEE802.3af
- DC connector: 12 V DC (10 - 16 V DC) 2.1 x 5.5 mm male CCTV power connector
- Power consumption:
- IR LED Off: 1.38 W (0.1 A at 13.8 V DC)
- IR LED On: 2.76 W (0.2 A at 13.8 V DC)
- Operating temperature: -30˚C to +60˚C (-22˚F to 140˚F)
- Environmental: IP66
- Stream resolutions:
- Main: 1080P (1920*1080)
- Sub: 448P (800*448)
- Protocol: RTSP
- Lens: 1.8 mm (180° wide angle)
- Sensor: 1/4” CMOS sensor
- Housing material: 316 Stainless steel
- Weight: 250 g (0.55 lbs)
Compared to similar marine cameras, the Lowrance IP Cam-1 stands out for its marine-grade stainless steel construction combined with seamless network integration, superior night vision, and wide compatibility with leading marine multifunction displays.
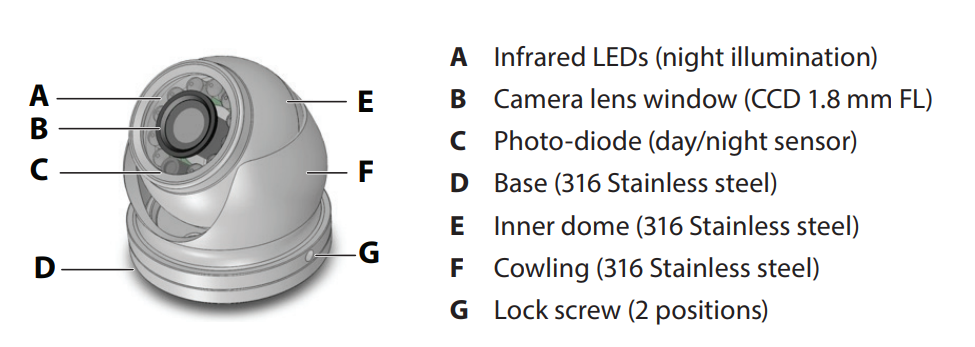
Fetures
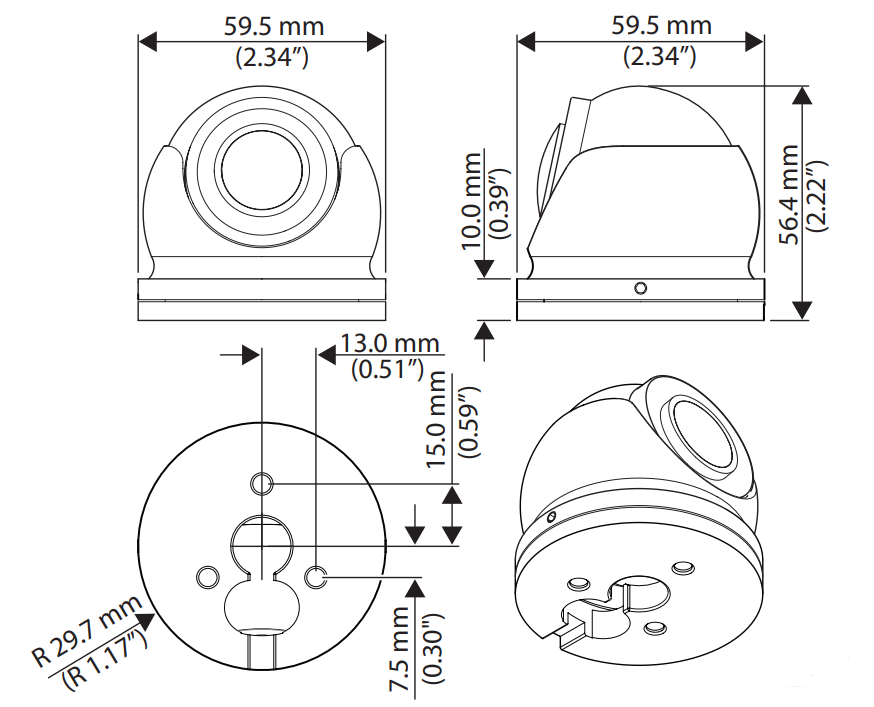
Dimension
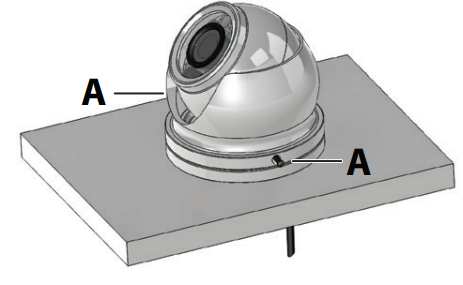
Installation overview
- The camera can be powered by a 12 V DC supply, or via a PoE (Power over Ethernet) power supply. Ensure the power supply is included in your installation planning.
- Power up the camera and connect it to an MFD to find the best installation position.
- Connect the camera to the power supply with a suitable rated fuse or circuit breaker. Switch off the power supply whilst installing the camera.
- To avoid damage to the camera housing, fully loosen the lock screws (A) before making any position adjustments to the inner dome.
The camera is supplied with a fixed IP address. This is displayed on the identification label attached to the camera cable. Note down the IP address. You will need it when setting up the camera in the MFD. Note the IP address here for future reference:
172 23
Installing the camera
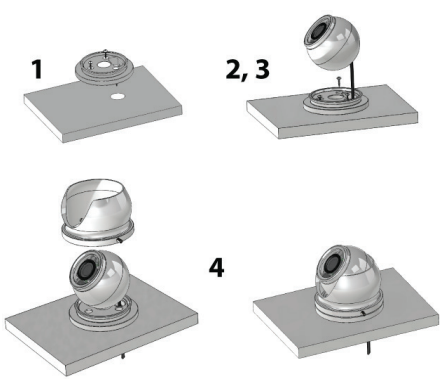
- Place the base into the desired mounting position and mark the screw hole positions and cable entry position on the mounting surface. You can also exit the cable through the base instead of drilling a hole for it. Drill the pilot holes for the mounting screws and the cable hole,, if needed. Screw the base into place using the screws you have decided to use. Use caution to not splinter or damage the surface if fitting onto a fiberglass surface.
- Slide the camera cable through the cable entry hole you have just drilled or the base exit channel.
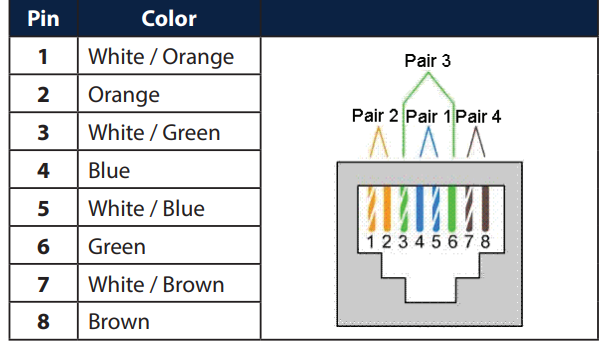
- Ensure terminations are protected from any moisture ingress. Fit the water-resistant RJ45 back shell over the CAT5 cable and terminate the RJ45 connector in accordance with T568B wiring specifications. Plug your RJ45 jack into the camera’s RJ45 socket. Ensure the water-resistant back shell is tightened into place. Refer to the “Fit the field installable waterproof RJ45 jacket” section.
- Place the inner dome onto the protective foam/rubber ring on the base. Place the cowling over the inner dome and move it into position. The cowling will fit over the inner dome and onto the base. Once in position, carefully tighten the lock screws until they lightly hold the inner dome in position.
Fit the field installable waterproof RJ45 jacket..
When installing in an external location, or any position that will be prone to moisture ingress or harsh weather, the waterproof RJ45 connector (supplied) must be used to protect the camera’s RJ45 connection.
- Camera’s network interface socket
- O-Seal
- RJ45 Network Connector
- Waterproof end cap
- Rubber gasket
- Lock nut
- Network cable to MFD/switch/hub / etc

- Feed the plug-less network cable (G) through the lock nut (F) and waterproof rubber gasket (E). Ensure the rubber gasket inset ridge faces the end cap (D).
- Crimp an RJ45 Network plug (C) onto the end of the cable in accordance with the diagram. Ensure the wires are terminated in the correct order and are not crossed.
- Place the O-Seal (B) onto the end of the camera’s network interface socket (A).
- Plug the network plug (C) into the camera’s network interface socket (A).
- Insert the waterproof rubber gasket (E) into the waterproof end cap (D) and secure the lock nut (F) with the waterproof end cap (D).
- Slide the waterproof end cap (D) toward the camera’s network interface socket (A) and rotate until it locks.
Set up your camera on your MFD.
The camera comes pre-configured to be used on select Simrad®, Lowrance®,, or B&G® MFDs - there are user-configurable settings. You will need the camera’s unique IP address, which is located on the packaging or on the identification label attached to the cable of the camera.
For the URL address, enter one of the following:
- 172.23.xxx.xxx/LIVE/0/MAIN for HIGH resolution stream (for high resolution MFDs).
- 172.23.xxx.xxx/LIVE/0/SUB for LOW low-resolution stream (for low-resolution MFDs.
Note: 172.23.xxx.xxx is the IP address of the camera.
For more information r, refer to the documentation of your MFD.
- Note: The camera must be individually set up on all MFDs on which you want to view the camera on.
- Note: Ensure the camera is installed and powered on before proceeding with setup.
Care and cleaning
- This product is a sensitive piece of electronic imaging equipment and must be handled and treated accordingly. Do not drop or shake the unit during installation. Avoid direct sunlight exposure through the lens as this may degrade the camera’s performance over time.
- When cleaning the device, ensure the power is switched off. Clean the camera housing with a soft cloth. Moisten the cloth and use a mild liquid detergent if required. The lens window has a protective coating that may suffer damage as a result of improper cleaning. To clean the lens window , use a microfiber cloth. Moisten with clean water if necessary.
Troubleshooting the Lowrance IP Cam-1 Marine Camera
- No Video Feed: Check all power and Ethernet connections, confirm software on the display is updated to 20.3 or later, and reset the camera by power cycling.
- Poor Night Vision: Clean the camera lens and ensure IR LEDs are unobstructed; verify night mode is enabled on the display.
- Intermittent Connection: Inspect Ethernet cables for damage, use marine-grade cables, and avoid sharp bends or kinks.
- Error Codes: Refer to your multifunction display manual for camera-related error messages. Common fixes include reconnecting cables or reinstalling firmware updates.
- Preventive Measures: Regularly clean the camera lens and housing, secure all mounts tightly, and perform periodic software updates on compatible displays.
Warranty & Support
The IP Cam-1 typically comes with a manufacturer’s warranty covering defects. For assistance, contact Lowrance customer support or authorized marine electronics dealers.
Limited warranty
Navico warrants that its products, when properly installed and used, will be free from defects in material and workmanship for the period stated for the applicable product and/or peripheral device as set out on www.lowrance.com. www.simrad-yachting.com, www.bandg.com, from the date of first purchase (the Warranty Period).
For the purpose of this Warranty, ’date of first purchase’ means the date the product was purchased by the first retail customer; or in the case of a product installed on a new vessel by a Certified/Approved Navico Boat Builder, the date the first retail customer took delivery of the vessel. Navico will, at its sole discretion, repair or replace with new or refurbished parts or product, or equivalent product, any proven defective products or components returned to Navico, or its approved agent, during the
Warranty Period in accordance with the terms, conditions, nd limitations as set out on www.lowrance.com, www.simrad-yachting.com, www.bandg.com. Such repairs or replacements will be the sole remedy of the customer under this Warranty.
This warranty gives you specific legal rights; your rights may vary from jurisdiction to jurisdiction. These rights exist alongside all rights you have under local law.
Pros & Cons of the Lowrance IP Cam-1 Marine Camera
Pros
- Durable Construction: 316 stainless steel housing ensures longevity in saltwater and harsh marine conditions.
- High-Quality Video: Full HD 1080p resolution with a wide-angle lens and IR night vision up to 10m for clear visuals day and night.
- Seamless Integration: Works effortlessly with Lowrance HDS LIVE and other leading marine multifunction displays.
- Flexible Power Options: Supports both POE and 12V DC, accommodating various vessel electrical setups.
- Multiple Camera Support: Ability to connect and cycle through several cameras on one network.
Cons
- Price Point: Mid to high hundred-dollar range may be higher than basic marine cameras, but justified by build quality and features.
- Compatibility Requirements: Requires compatible multifunction displays with updated firmware, limiting use with older or non-supported devices.
- Installation Complexity: Network setup and power integration may require professional assistance for some users.
Customer Reviews of the Lowrance IP Cam-1 Marine Camera
Users consistently praise the Lowrance IP Cam-1 Marine Camera for its robust build and crisp video quality, especially appreciating the night vision capability for improved nighttime vessel monitoring. Many anglers and cruising sailors highlight its value in enhancing situational awareness and safety. Star ratings average around 4.5 out of 5, reflecting strong overall satisfaction.
Some common complaints include occasional challenges with network setup and the necessity of having the latest compatible chartplotter software. However, users find these issues manageable with proper installation guidance. Overall, customers recommend the IP Cam-1 for mariners seeking a reliable, high-performance marine camera that integrates well with their existing Lowrance or Simrad systems.
Faqs
How do I set up the lowrance IP Cam-1 Marine Camera with my chartplotter?
What should I do if my lowrance IP Cam-1 Marine Camera feed is not showing on my multifunction display?
Can I use multiple lowrance IP Cam-1 Marine Cameras on one boat and switch between them?
What are the key features of the lowrance IP Cam-1 Marine Camera that benefit marine users?
Is the lowrance IP Cam-1 Marine Camera compatible with other brands of marine displays besides Lowrance?
How do I maintain and clean my lowrance IP Cam-1 Marine Camera to ensure longevity?
What power options are available for the lowrance IP Cam-1 Marine Camera, and which is recommended?
How does the night vision feature work on the lowrance IP Cam-1 Marine Camera?
More lowrance manuals
Leave a Comment