
Setup: Nebula P1 Portable Smart Projector User Manual
Content
Nebula P1 Portable Smart Projector
Introduction
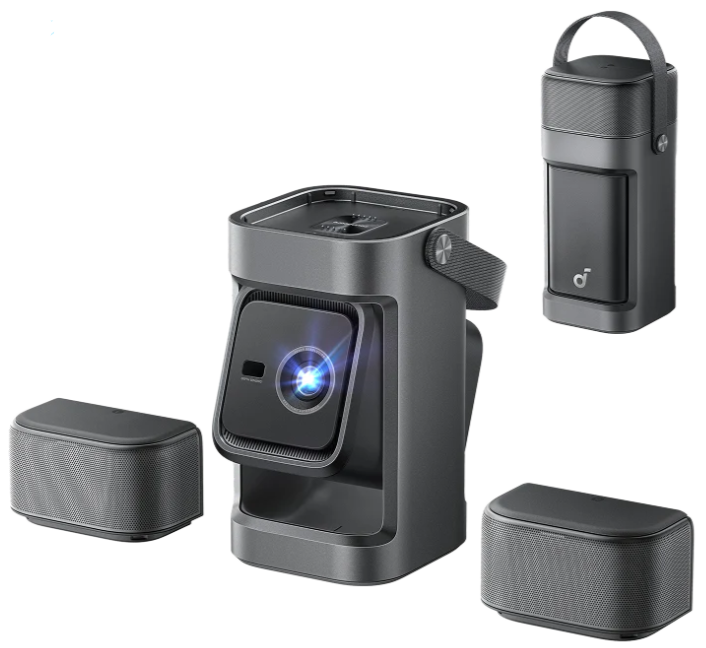
Welcome to the future of portable entertainment with the Nebula P1 Portable Smart Projector, an innovative projector designed for movie nights, gaming, presentations, and outdoor adventures. The Nebula P1 stands out with its sleek, compact design and a unique feature: dual detachable, battery-powered speakers that deliver true 2.0 surround sound for immersive, room-filling audio wherever you go.
This smart projector delivers stunning 1080p Full HD resolution and up to 650 ANSI lumens of brightness, making it ideal for both indoor and outdoor use, though it performs best in low-light environments. With a maximum projection size of 180 inches, you can transform any space into a personal theater. The Nebula P1 features a robust dual-arm 130-degree gimbal for flexible, shake-free angle adjustment, plus real-time autofocus and keystone correction for effortless setup.
Powered by Google TV, the Nebula P1 gives you instant access to over 400,000 movies and shows, including official Netflix, YouTube, Hulu, and Prime Video no dongles or sideloading required. The projector is equipped with HDMI 2.1 (eARC), USB-A, USB-C, and Aux out ports, ensuring compatibility with a wide range of devices, from gaming consoles to streaming sticks.
Designed for tech-savvy consumers, families, and outdoor enthusiasts, the Nebula P1 Portable Smart Projector is perfect for backyard movie nights, camping trips, impromptu presentations, and cozy home cinema experiences. With a starting price around $1,199.99 (with flexible payment options), this projector offers a premium blend of portability, sound, and smart features not commonly found in its class. Available now from Anker and authorized retailers, the Nebula P1 Portable Smart Projector is ready to redefine your viewing experience.
Nebula P1 Portable Smart Projector: Specifications
- Display Technology: DLP
- Resolution: 1080p Full HD
- Brightness: 650 ANSI lumens (LED light source)
- Contrast Ratio: 400:1
- Maximum Projection Size: Up to 180 inches
- Light Source Life: Up to 30,000 hours (LED)
- Operating System: Google TV with official Netflix certification, YouTube, Hulu, Prime Video, and more
- Processor & Memory: ARM Cortex-A55, 2GB RAM, 32GB storage
- Speakers: Dual 10W detachable, IP54 water-resistant, 20 hours of battery life per speaker
- Audio Output: True 2.0 stereo, immersive room-filling sound
- Connectivity: HDMI 2.1 (eARC), USB-A, USB-C, Aux out
- Gimbal System: Dual-arm 130-degree gimbal for flexible, stable projection
- Focus & Keystone: Real-time autofocus and keystone correction
- Durability: IP33-rated projector, IP54-rated speakers
- Dimensions & Weight: Compact, portable design with integrated carry handle; 5.3 lbs (including speakers)
- Power: Mains-powered projector (no built-in battery); 100W input required
Comparison with Similar Products: The Nebula P1 Portable Smart Projector distinguishes itself with its detachable, battery-powered speakers , a feature rare in portable projectors. While competitors may offer higher resolution (4K) or built-in batteries, the P1 excels in audio flexibility and smart TV integration. Its robust gimbal system and Google TV platform make it a versatile choice for users seeking both portability and premium features.
Overview
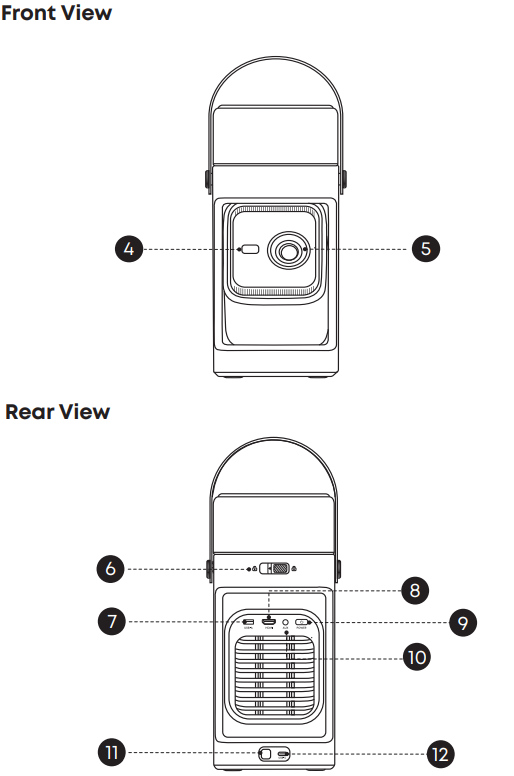
- Handle
If needed, remove the handle by taking out the screws at the connection point.
Cover the screw holes with the plugs provided in the package. - Projector
- Detachable Surround Speakers
- ToF (Time of Flight) Sensor
- Lens
- Speaker Unlock Switch
Slide the left speaker and detach both speakers. - USB-A Port
Connect to a USB storage device, such as a flash drive or hard drive. - HDMI Port
Connect to a playback device with HDMI output. - Power Button
- Press and hold to power on the projector.
- See the Power On/Off section for more information.
- Aux
Connect to headphones or an external speaker. - Infrared Sensor
- USB-C Port
Connect to a power outlet with the provided adapter. - 1/4" Tripod Socket
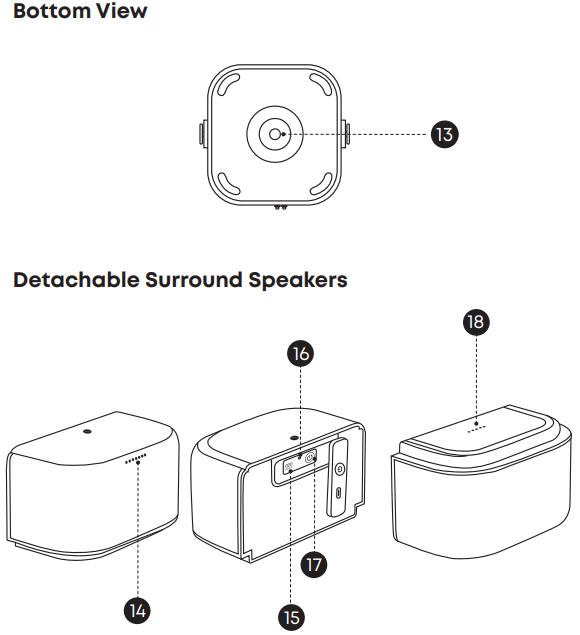
The 1/4" Tripod Socket can be used to connect a tripod, stand, ceiling mount, etc. - Indicator Light
- USB-C Port
Connect the USB-C cable to charge the speakers. - Reset
Insert a paperclip (not included) and hold for 2 seconds to reset the speakers. - Power Button
Press once or long-press to power the speaker on.
Press and hold for 8 seconds to power the speaker on. - Charging Contacts
The speakers automatically start charging when the projector is connected to a power source, and the speakers are attached to he top.
Remote Control
Overview
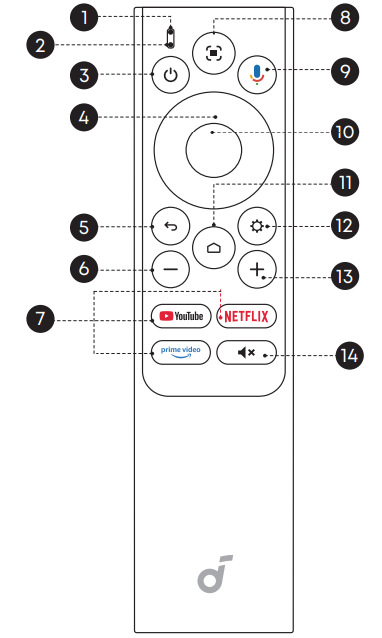
- Status Indicator
- Microphone
- Power
Press to power on / off, switch to standby mode, or wake up. - Navigation
Control the cursor on the screen. - Return
Return to the previous page. - Volume Down
Press to reduce volume. - Streaming Apps
Press to open YouTube, Netflix, or Prime Video. - Auto Image Adjustment
Press to enable auto image adjustment.
Long-press to perform manual adjustment. - Google Assistant
Press and hold to talk to Google Assistant. - Confirm
Press to select, pause, or resume. - Home
Press to go to the home page. - Settings
Press to go to settings. - Volume Up
Press to increase volume. - Mute
Press to mute/unmute the sound.
Go to Settings > Projector > Keystone Correction, and enable Correction for Ceiling Projection.
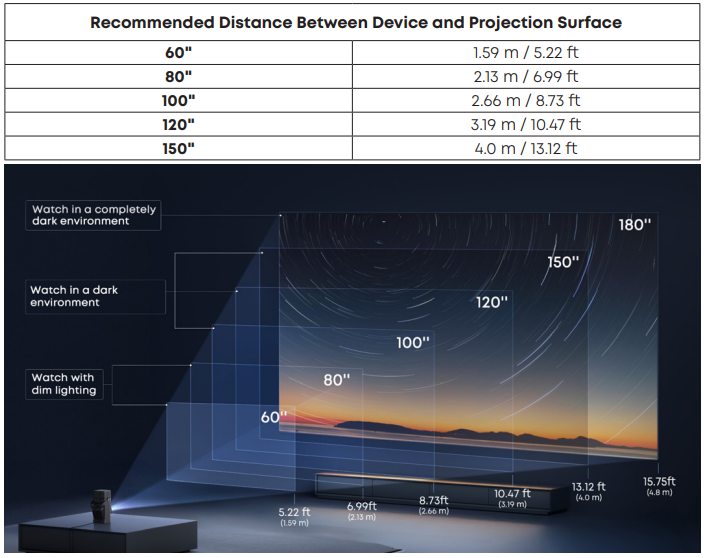
Connect the Projector to Power
Plug the cord into the adapter, then connect the projector to a power outlet.
The projector does not have a built-in battery. It needs to be connected to a power source to operate and to charge the speakers.
Then tilt the projector upward until it is facing forward.

Once connected, the power button on the projector will light up red.
When using a non-official adapter, make sure the input power is at least 100W (20V, 5A); otherwise, the projector will not operate, and the power button will flash red continuously.

Power Your Projector On/Off
Power On:
- Short-press the power button when the projector is off.
- If the projector is in Standby Mode, press the power button once.
- When powered on, the power button will display a steady white light.
Power Of:
Step 1: Press and hold the power button until a prompt appears on the screen. Step 2: Confirm power of with the remote control or wait 20 seconds for automatic power on.
Return the projector to its factory position to power it off.
Standby Mode: Short-press the power button to enter standby mode.
Using Your Speakers
First-Time Using:
- Connect the projector to a power supply.
- Charge the speakers. A full charge takes about 2–3 hours and provides up to 12–14 hours of playtime. There are two ways to charge them:
- Place the speakers on top of the projector, and the projector will automatically charge the speakers (recommended).
- Alternatively, use USB-C cables to charge the speakers.
LED light guide for the speakers:

Prepare the Remote
- Slide to open the battery compartment.
- Insert new batteries matching the polarity (+/-) and close the battery compartment
- Follow the on-screen instructions for initial pairing. If you missed the initial pairing instructions, press the Google Assistant button, and you can start pairing.
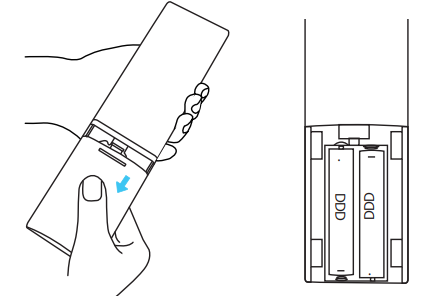
The distance between the remote and the projector should not exceed 10 m / 33 f.ftt
Network Settings
There are two methods to connect the projector to a wireless network:
- Press the Settings button on the remote and turn on Wi-Fi.
- Open the Nebula Connect app, select your projector model, then go to Settings and turn on Wi-Fi.
Auto Focus and Auto Keystone Correction
How to trigger auto focus:
- Press the Auto Image Adjustment button on the remote control.
- Automatically trigger upon powering on.
- Automatically trigger after moving the projector.
How to perform manual calculation:
- Go to Settings > Projector > Focus Settings > Manual Focus Correction.
- Press and hold the Auto Image Adjustment button on the remote to bring up the Quick Panel > select the Manual Focus icon in the center > use the left and right buttons to adjust the focus until the image is clear.
How to trigger Auto Keystone CorrectionAfterrfer enabling Auto Keystone Correction in Settings > Projector > Automation, Auto Keystone Correction will be triggered in the following scenarios:
- When pressing the Auto Image Adjustment button on the remote control.
- At startup.
- After moving the projector.
How to perform manual keystone correction:
- Go to Settings > Projector > Image Correction > Perform Manual Keystone Correction.
- Press and hold the Auto Image Adjustment button on the remote to bring up the quick panel. Then select Move & Zoom and press the Auto Image Adjustment button to switch to Focus & Keystone mode.
Nebula Connect App
Installation Guide
To easily control the projector, we recommend you download the Nebula Connect app.
- Download the Nebula Connect app from the App Store (iOS devices) or Google Play (Android devices).
- Enable Bluetooth on your smartphone.
- Open the Nebula Connect app and select Nebula P1 as the device to be connected.
- Follow the on-screen instructions to complete the setup.
Vision Fit
Use your phone to scan the projection area. The system will automatically detect the screen or obstacles on the wall, and adjust the image to accurately fit the screen or avoid obstacles. You can enable the feature in the app or on the projector.
- Using the App:
In the Nebula Connect app, go to My Device > Tools > Image Correction > Vision Fit. Follow the instructions to complete the setup. - Using the App with the Projector:
Press and hold the Auto Image Adjustment button and select Vision Fit from the menu. Then, open the Nebula Connect app on your phone and follow the instructions to complete the setup.
Alternatively, go to Settings > Projector > Vision Fit. Then, open the Nebula Connect app on your phone and follow the instructions to complete the setup.
Make sure the projection screen has black edges to enable successful recognition, and complete the screen fitting process.
Troubleshooting the Nebula P1 Portable Smart Projector
- Detachable Speakers Disconnecting
- Press and hold the speakers' Power buttons for 8 seconds to restart.
- If the issue persists, follow these steps to reconnect:
Step 1. Settings > Remotes & Accessories > Pair More Official Accessories> Soundcore Surround Speaker.
Step 2. Press Continue > Forget the speaker that is disconnected > Press Yes.
Step 3. Press the Power button on each of the speakers 5 times (until the indicator light flashes blue) > Choose left / right speaker > Press the Pair button.
- Projector Not Charging
- Confirm that you are using the official adapter and cables.
- When using noa non-official adapter, make sure the input power is at least 100W (20V, 5A); otherwise, the projector will not operate, and the power button will flash red continuously.
- Blurry Image
- Ensure that the camera on the front panel is not blocked or dirty.
- Slightly shift the projector or press the Auto Image Adjustment button on the remote to start auto focus.
- To manually adjust the focus, press and hold the Auto Image Adjustment button > select Manual Focus > left and right buttons on the remote.
- Adjust the projection angle and direction, as well as the height of the projector, if necessary.
- For auto-focus to function properly, the distance between the projector and the screen should be 1 - 4 m.
- Auto Keystone Correction Failed
- Ensure that the Camera / TOF on the front panel is not blocked or dirty.
- The best automatic keystone correction distance is 1 - 4 m, horizontal ± 30° at 3 m / ± 10° at 4 m.
- Eye Guard Not Working
- Ensure that the Camera / TOF on the front panel is not blocked or dirty.
- The Eye Guard feature works best at a distance of 0.1 - 4 m.
- Go to Settings > Projector > Advanced Settings > Eye Guard and check if the feature has been enabled.
- No HDMI Signal
- Use a different MI cable.
- Connect your projector to another HDMI playback device.
- Connect the HDMI playback device to your TV via an HDMI cable to check if the device or cable is malfunctioning.
- Adjust the HDMI playback device's output resolution/frequency to be the same as the projector's.
Error Codes and Fixes
Refer to the user manual for specific error codes. Common fixes include restarting the device, checking connections, and ensuring firmware is up to date.
Preventive Measures
- Keep the projector and speakers clean and dry.
- Avoid exposing the device to extreme temperatures.
- Use a surge protector for mains power.
- Regularly update the Google TV software for optimal performance.
Warranty and Support
The Nebula P1 Portable Smart Projector comes with a limited manufacturer’s warranty. For technical support, contact Anker customer service via their official website. Always retain your proof of purchase for warranty claims.
Pros & Cons of the Nebula P1 Portable Smart Projector
Pros
- Unique Detachable Speakers: Dual 10W, battery-powered speakers offer flexible placement and immersive sound rare in portable projectors.
- Full HD Bright Image: 1080p resolution and 650 ANSI lumens deliver clear, vibrant visuals suitable for various environments.
- Smart TV Platform: Google TV with official Netflix and other major streaming apps—no sideloading needed.
- Portable and Durable: Compact, lightweight design with a carry handle; IP33 (projector) and IP54 (speakers) ratings for added durability.
- Flexible Setup: 130-degree gimbal, autofocus, and keystone correction for easy, stable projection anywhere.
- Multiple Connectivity Options: HDMI 2.1, USB-A, USB-C, and Aux out for versatile device compatibility.
Cons
- No Built-in Battery: Requires mains power or a high-capacity power station, reducing true portability for some users.
- Not 4K: Limited to 1080p resolution, which may disappoint users seeking ultra-high definition.
- Premium Price: Higher cost compared to basic portable projectors, though justified by unique features.
- Limited to Stereo Sound: Unlike some c itpelacksi t itlackss advanced surround sound options.
Value for Money: The Nebula P1 Portable Smart Projector offers excellent value for users prioritizing audio flexibility, smart features, and build quality. While not the cheapest option, its unique speaker system and robust performance justify the investment for the right user.
Customer Reviews: Nebula P1 Portable Smart Projector
Users consistently praise the Nebula P1 Portable Smart Projector for its innovative detachable speakers, which deliver powerful, room-filling audio uncommon in portable projectors. The 1080p image quality and Google TV integration are also highlighted as major strengths, making setup and streaming effortless.
Common complaints include the lack of a built-in battery, requiring users to plan for power sources during outdoor use. Some users also note that while the projector is bright, it performs best in low-light conditions. The premium price point is mentioned, but most agree that the that unique features justify the cost for those seeking a versatile, high-quality portable projector.
Star ratings from early adopters average around 4.5 out of 5, with particular appreciation for the audio experience and smart platform. Purchase recommendations emphasize this projector for movie nights, outdoor gatherings, and anyone wanting a step up from basic portable models.
For most users, the Nebula P1 Portable Smart Projector is a standout choice in its category, blending portability, smart features, and exceptional audio in a single, well-designed package.
Faqs
How do I set up the nebula P1 Portable Smart Projector for the first time?
What should I do if the nebula P1 Portable Smart Projector image appears blurry or out of focus?
Can I use the nebula P1 Portable Smart Projector with gaming consoles like PS5 or streaming devices?
What makes the detachable speakers on the nebula P1 Portable Smart Projector unique?
How bright is the nebula P1 Portable Smart Projector and where is it best used?
Does the nebula P1 Portable Smart Projector have a built-in battery for cordless use?
What regular maintenance does the nebula P1 Portable Smart Projector require?
How can I optimize the audio experience when using the nebula P1 Portable Smart Projector?
More nebula manuals
Leave a Comment