
Setup: Nebula Prizm II Pro Projector User Manual
Content
Nebula Prizm II Pro Projector
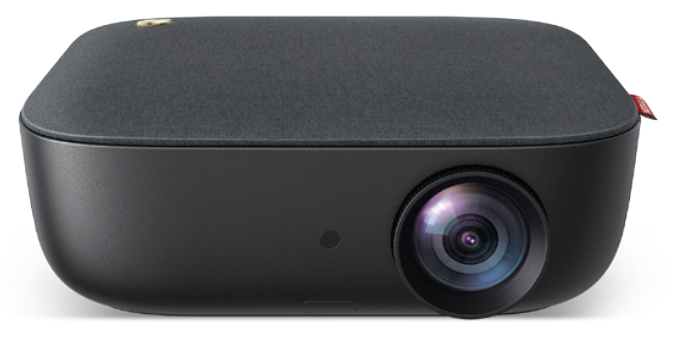
Introduction
The Nebula Prizm II Pro Projector is a cutting-edge portable projector designed for home entertainment, business presentations, and educational use. With its compact design and advanced features, this projector delivers a cinematic experience wherever you go. The Prizm II Pro stands out for its built-in Android OS, allowing users to stream content directly without external devices. Its high brightness and sharp resolution make it ideal for both dark and well-lit environments, ensuring vibrant visuals for movies, games, and presentations.
Key benefits include wireless connectivity, a long-lasting battery, and a user-friendly interface. The Nebula Prizm II Pro Projector is perfect for travelers, students, and professionals who need a reliable, high-quality projector on the go. Whether you're hosting a movie night, delivering a business pitch, or teaching a class, this projector adapts to your needs. Available for purchase online and in select electronics stores, the Nebula Prizm II Pro Projector typically retails between $500 and $700, offering excellent value for its feature set.
What’s Included

Specifications of the Nebula Prizm II Pro Projector
- Power supply: AC 110 ~ 240V
- Power consumption: < 125 W
- Display technology: 5-inch LCD5-inch LCD 1920 × 1080P
- Light source: RGB LED
- Projection image size: 40 - 120 inches
- Resolution: 1920 × 1080P
- Brightness: 200 ANSI / 1000 lumens
- Contrast ratio: 1500 : 1
- Throw ratio: 1.4
- Throw distance: 1m to 3m
- Speaker drivers: 2 × 5W
- Remote control batteries: 2 AAA batteries
- Recommended operating temperature: -10°C to 35°C / 14°F to 95°F
- Relative humidity: 15% ~ 85% (non-condensing)
- Storage temperature and humidity: -20°C / -4°F ~ 65°C / 149°F, < 90% humidity
- Dimensions (W × H × D): 279 × 265 × 97mm / 11 × 10.4 × 3.8 inches
- Weight: 2,420 g / 5.3 lbs
The Nebula Prizm II Pro Projector outperforms many competitors in its class with its combination of portability, brightness, and smart features. Compared to similar models, it offers a more robust battery life and a wider projection size, making it a top choice for users seeking versatility and quality.
Important Safety Instructions
Read and understand all instructions before you use this device. Do not change any settings that are not described in this manual. If physical injury, loss of data, or damage is caused by failure to follow instructions, the warranty does not apply.
Setup
- To reduce the risk of fire and/or electric shock, do not expose the device to rain or moisture, or objects filled with liquids, such as vases, should not be placed on the device.
- Do not place the device in areas susceptible to excessive dust and dirt or near any appliance generating a strong magnetic field.
- To prevent overheating, do not block or clog the ventilation openings.
- Never place the device in a confined space. Always leave enough space around the device for ventilation.
- Protect the device against direct sunlight, heat, large temperature fluctuations, and moisture.
- When the device runs for a long period of time and the surface becomes hot, shut it down and unplug the power cord. Resume operation only after the device has cooled.
- Always handle the device with care. Avoid touching the lens.
- Never place heavy or sharp objects on the device or the power cord.
- To avoid electric shock, do not disassemble.
- Only use attachments or accessories specified by the manufacturer.
- Avoid extreme vibration. It may damage the internal components.
- Do not allow children to handle the device without supervision.
- The suitable temperature for the product and accessories is 14°F-95°F / -10°C-35°C.
- Under the following conditions, a layer of moisture can appear inside the device,, which can lead to malfunctions: a) if the device is moved from a cold to a warm area; b) after a cold room is heated; c) when the device is placed in a damp room. To avoid any moisture, seal the device in a plastic bag before moving it to another room, and wait for one to two hours before you take it out of the bag.
Power Supply
- Use only the provided power adapter. The adapter shall be installed near the equipment and shall be easily accessible.
- The charger type is NSA120EC-19063200 with output voltage/current of DC 19V / 6.32A.
- The adapter is for indoor use only.
- Power off the device before removing the power supply from the socket.
- Protect the power cord from being walked on or pinched, particularly at plugs, convenience receptacles, and the point where they exit from this device.
- Unplug this device if there are lightning storms or when unused for a long period of time.
- Where the MAINS plug or an appliance coupler is used as the disconnect device, the disconnect device shall remain readily operable.
- Before you make or change any connections, ensure that all devices are disconnected from the power outlet.
- Never touch the power cable or the power connection with wet hands.
USB Interface
- The device shall only be connected to a USB Interface of version 2.0 or higher.
Hearing Safety
- To avoid hearing damage, do not listen for extended periods at high volume. Set the volume at a safe level.
Cleaning
- Power off the device and remove it from the power supply before cleaning the surface.
- Use a soft, lint-free cloth. Never use liquid, gaseous, or easily flammable cleansers (like sprays, abrasives, polishes, and alcohol).
- Do not use any liquid cleaning agents to clean the lens,, as they may damage the protective coating on the lens.
- Wipe the surfaces gently. Be careful that you do not scratch the surfaces.
- Use lens cleaning paper to clean the lens of this projector.
Repairs
- Do not make any repairs to the device yourself. Only have your device repaired by an authorized service center.
- Improper maintenance can result in injuries or damage to the device.
- Refer all servicing to qualified service personnel.
Caution
- Possibly hazardous optical radiation emitted from this device.
- Do not stare at the operating beam. The bright light may hurt your eyes.
Overview
Front View
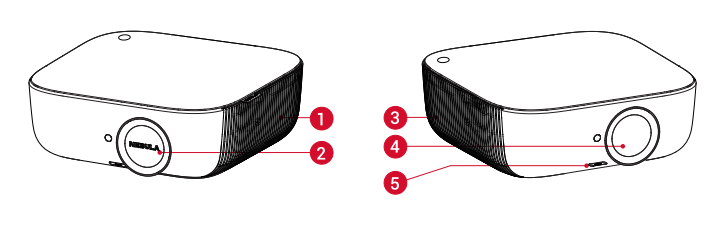
- Speaker / Air ventilation (inlet)
- Lens cover
- Air ventilation (outlet)
- Lens
Rotate to adjust focus - Push button
Press to pop up the flip stand
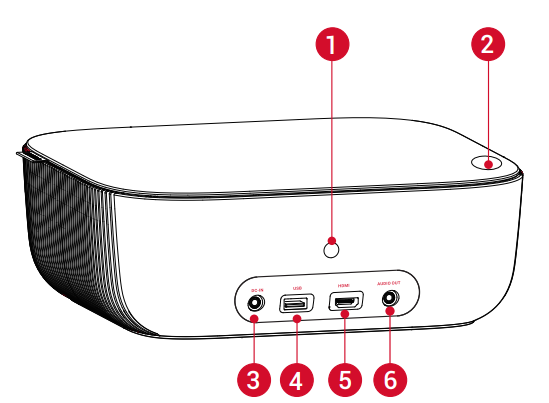
Rear View
- IR receiver
- Power button
- DC-IN port
Connect to the power supply - USB port
Connect to a USB storage device - HDMI port
Connect to a playback device with HDMI output - AUDIO OUT socket
Connect to a headphone or an external speaker
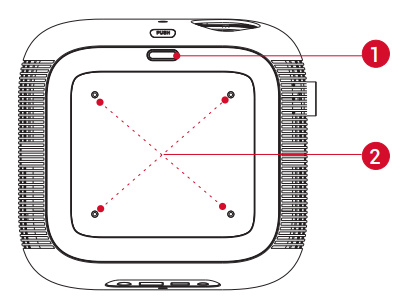
Bottom View
- Flip stand slot
- Mounting slot
Remote Control
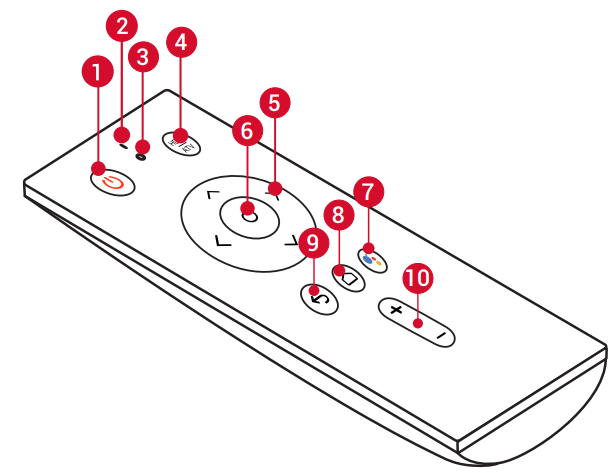
- Power on / off button
- Microphone
- LED indicator
- Signal source switch button
Press to switch between Android TV™ and HDMI interfaces
Press and hold for 3 seconds to engage manual focus - Navigation buttons
Navigate menus or adjust the selected contents - Confirmation button
Press to confirm a selection or entry
Pause/resume play - The Google Assistant button
Press to talk to the Google Assistant (can be used only after Bluetooth pairing is successful) - Home button
Press to access the home menu - Return button
Return to the previous menu - Volume up / down button
Nebula App
To easily control this device, we recommend that you to download the devoted Nebula App, Nebula Connect.
Download the Nebula Connect app from the App Store (iOS phone or tablet) or Google Play (Android phones).
- Enable Wi-Fi on your smartphone and select [Prizm II Pro-XXXX] as the device to be connected. Make sure your phone and the Nebula Prizm II Pro are connected to the same Wi-Fi.
- Open the Nebula Connect app and follow the on-screen instructions to complete connection setup.
Powering the Nebula Prizm II Pro with Android TV™
Follow the on-screen instructions to complete the setup process.
Option 1. Quick setup
Android phone users can follow the instructions to quickly set up Android TV with their Android phone.
Option 2. Set up Nebula Prizm II Pro
For iOS users, follow the instructions to complete the process.
- Skip the quick setup process.
- Connect the Nebula Prizm II Pro to the network.
- Sign in with your Google account.
Your Nebula Prizm II Pro will be powered by Android TV after finishing the setup process.
Enjoy Google Features
Nebula Prizm II Pro also supports Google features. Once connected to a wireless network, you can go online and enjoy movies, music, and pictures, and web browsing. Aside from the pre-installed apps, you can also install additional apps from Google Play, and talk to the Google Assistant to do certain tasks.
To talk to the Google Assistant:
- Make sure you’ve followed the steps in the section “Connect Bluetooth Accessories” to connect your remote control to Nebula Prizm II Pro. Once connected, the LED indicator on the remote control turns solid red.
- Press
 on the remote control to talk to the Google Assistant.
Charge Your Devices
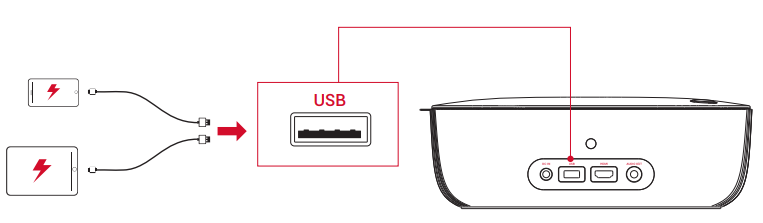
This projector can also be used to charge your USB devices.
Troubleshooting Common Issues with the Nebula Prizm II Pro Projector
Common problems with the Nebula Prizm II Pro Projector include no power, no image, a blurry picture, and remote control issues. If the projector doesn't turn on, ensure the power cord is securely connected and try a different outlet. For no image, check the video source cable and select the correct input source. If the image is blurry, adjust the focus ring and align the projector properly. If the remote control isn't working, replace the batteries and ensure there are no obstacles between the remote and the projector.
Preventive measures include regular cleaning of the lens and vents, avoiding overheating by allowing proper cooling, and updating the firmware. The Nebula Prizm II Pro Projector comes with a one-year warranty. For support, contact Nebula customer service at support@nebula.com or visit the official website for troubleshooting guides and FAQs.
Could not turn on the Nebula Prizm II Pro with the remote control?
- Make sure Nebula Prizm II Pro is connected to a power supply.
- When powered off, you cannot use the remote control to turn it on.
The remote control doesn’t work?
- Make sure the battery is already installed in the remote control.
- Replace the batteries.
Blurred image?
- Rotate the lens until the image is clear..
- Press
 on the remote control to access the home menu, select [Settings] > [Projector Settings]
 - [Vertical keystone correction] / [Horizontal keystone correction] / [Quadrilateral keystone correction] to adjust the keystone value.
Reversed projection image?
- Press to access the home menu, select [Settings]
- [Projector Settings] > [Projector mode] and switch to a correct state.
Constantly rebooting?
- Go to [Settings] > [Projector Settings] > [Update version] to upgrade the firmware and reboot your projector again.
Pros and Cons of the Nebula Prizm II Pro Projector
Pros
- Portable and lightweight design
- High brightness and sharp resolution
- Built-in Android OS for direct streaming
- Long battery life
- User-friendly interface
Cons
- Higher price compared to basic models
- Limited battery life for extended use
- May require external speakers for better audio
The Nebula Prizm II Pro Projector offers excellent value for money, especially for users who prioritize portability and smart features. While it's more expensive than entry-level projectors, its advanced capabilities justify the cost for most buyers.
Customer Reviews of the Nebula Prizm II Pro Projector
Customers consistently praise the Nebula Prizm II Pro Projector for its ease of use, bright image quality, and portability. Many users highlight the built-in Android OS as a standout feature, allowing seamless streaming. The projector receives an average rating of 4.5 out of 5 stars, with reviewers noting its reliability and versatility. Common complaints include the need for external speakers for better sound and occasional connectivity issues. Overall, buyers recommend the Nebula Prizm II Pro Projector for anyone seeking a high-quality, portable projector for home or professional use.
Faqs
How do I set up my nebula Prizm II Pro Projector for the first time?
What should I do if the nebula Prizm II Pro Projector image is blurry or out of focus?
Can the nebula Prizm II Pro Projector connect wirelessly to streaming apps like Netflix or YouTube?
What devices are compatible with the nebula Prizm II Pro Projector for input?
How bright is the nebula Prizm II Pro Projector, and what lighting conditions optimize its performance?
How do I optimize the audio performance on my nebula Prizm II Pro Projector?
What maintenance steps should I follow to prolong the lifespan of the nebula Prizm II Pro Projector?
How do I troubleshoot if the nebula Prizm II Pro Projector is not powering on or responding?
More nebula manuals
Leave a Comment