
Setup: Panasonic Home Monitoring Camera Front Door KX-HN7001 Instruction Guide
Content
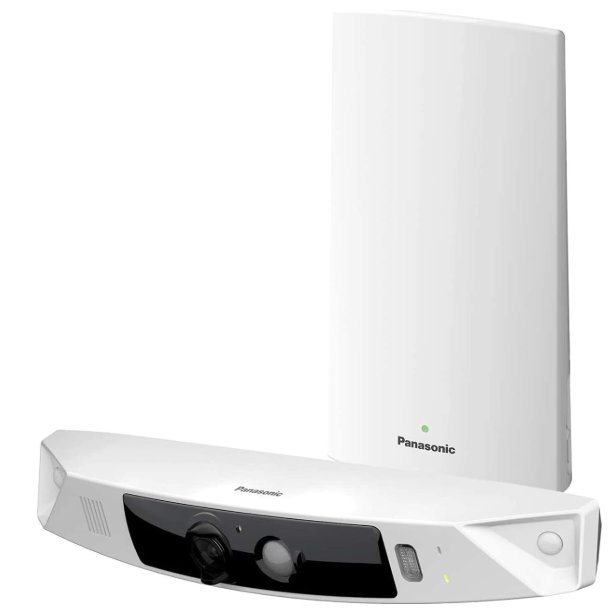
Panasonic Home Monitoring Camera Front Door KX-HN7001
Introduction
Welcome to your essential guide for the Panasonic Home Monitoring Camera Front Door KX-HN7001, a high-definition smart camera designed to bring security, convenience, and peace of mind to your home’s front entrance. With its robust build, advanced motion detection, and seamless integration with the HomeHawk app, this device stands out as a reliable choice for homeowners seeking a dependable front door surveillance solution without recurring subscription fees.
The Panasonic KX-HN7001 offers full HD video (up to 1080p), a wide 172-degree field of view that captures more area than most competitors, color night vision, two-way audio, and weatherproof durability (IP65-rated). It operates wirelessly and is powered by a rechargeable battery, making installation flexible and cable-free. The camera is ideal for monitoring deliveries, greeting visitors, deterring intruders, and keeping an eye on pets or children.
Designed for both tech-savvy and novice users, the Panasonic Home Monitoring Camera Front Door KX-HN7001 is a great fit for suburban homes, apartments, and rental properties. Its estimated price range is $150–$200, and it is available through major electronics retailers and online marketplaces. With no monthly fees and easy self-installation, this camera is a cost-effective, user-friendly addition to any smart home ecosystem.
Part names and functions
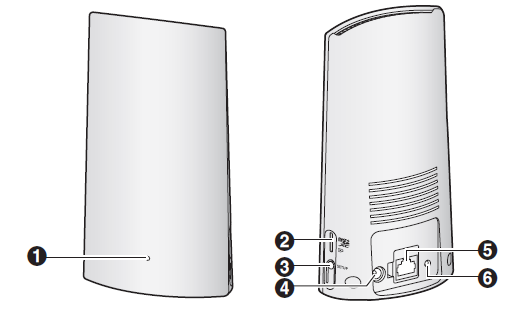
Access Point
- LED indicator
- microSD card slot
- MSETUPN
- DC jack
- LAN jack
- Reset button
Specifications
- Frequency range
Wireless LAN:
2.412 GHz – 2.462 GHz (channels 1 – 11) - RF transmission power
Wireless LAN:
Access point:
200 mW (peak transmission power)
Front door camera/Outdoor camera:
100 mW (peak transmission power) - Power source
Access point:
120 V AC, 60 Hz
Front door camera/Outdoor camera:
5.0 V, 1.0 A1 - Power consumption
Access point:
Standby: 1.2 W
Maximum: 6 W - Battery performance
Front door camera/Outdoor camera:
Operating time: 7 hours
Approx. 3 months (when used 5 minutes a day)2 - Operating conditions
Access point:
0 °C – 40 °C (32 °F – 104 °F)
20 % – 80 % relative air humidity (dry)
Front door camera/Outdoor camera:
-20 °C – 50 °C (-4 °F – 122 °F) up to 90 % relative air humidity(non-condensing) - Image sensor
Front door camera/Outdoor camera:
1.0 megapixel CMOS - Minimum illuminance required
Front door camera/Outdoor camera:
IR-LED: 0 lx3
White LED: 1 lx - Focal length
Front door camera/Outdoor camera:
Fixed 0.2 m (0.7 feet) – infinity - Angular field of view (camera angle)
Front door camera/Outdoor camera:172° - Motion detection method
Pyroelectric infrared sensor (PIR sensor) and visual sensor - PIR sensor detection range (when the surrounding temperature is approx. 25 °C (77 °F))
Front door camera:
Horizontal: 170°
Vertical: 36°
Detection range: 2.5 m (8 feet 2 inches)
Outdoor camera:
Horizontal: 170°
Vertical: 19.1°
Detection range: 6 m (19 feet 8 inches) - Visual sensor detection range
Front door camera/Outdoor camera:
Horizontal: 150°
Vertical: 85° - IP rating
Front door camera/Outdoor camera:
IP654 - Dimensions (height × width × depth)
Access point:
Approx. 179 mm ´ 94 mm ´ 52 mm (71/16 inches ´ 3 11/16 inches ´ 2 1/16 inches)
Front door camera:
Approx. 58 mm ´ 271 mm ´ 61 mm (2 5/16 inches ´ 10 11/16 inches ´ 2 3/8 inches)5
Outdoor camera:
Approx. 98 mm ´ 71 mm ´ 94 mm (3 7/8 inches ´ 2 13/16 inches ´3 11/16 inches)5 - Mass (weight)
Access point:
Approx. 200 g (0.44 lb)
Front door camera:
Approx. 390 g (0.86 lb)*5
Outdoor camera:
Approx. 490 g (1.08 lb)*5- Only when charging.
- Battery performance changes depending on the surrounding temperature, frequency of use, and the actual usage environment. For more information, refer to the User’s Guide (page 32).
- The infrared LEDs that surround the camera lens will illuminate in low-light conditions.
- Water resistance is only assured if the camera is installed correctly according to the instructions in the Installation Guide, and appropriate water protection measures are taken.
- Including the wall mounting adaptor.
Model composition

Accessory information
Supplied accessories
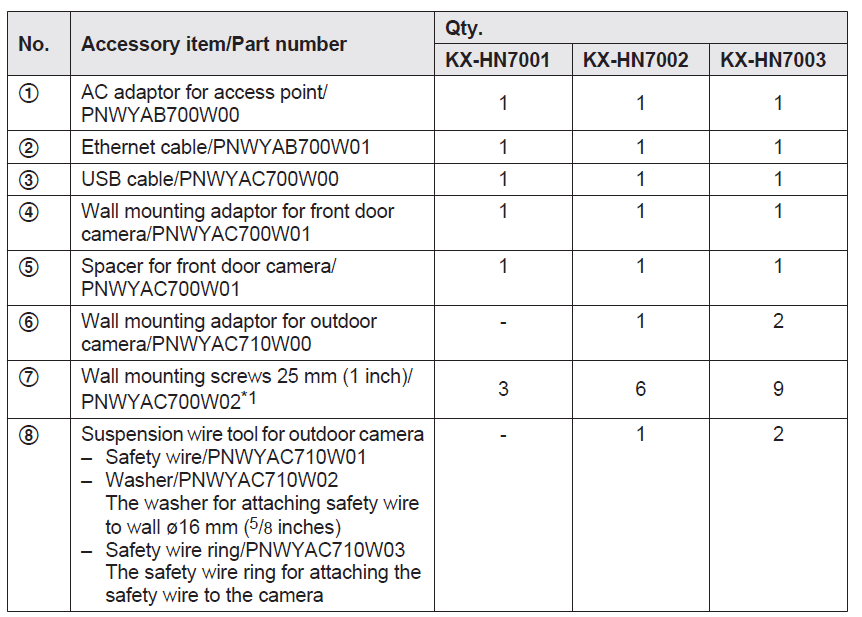
- 1 The supplied screws can be used as follows.
- 3 screws for the front door camera
- 2 screws for each wall mounting adaptor for the outdoor camera
- 1 screw for suspension wire tool

Installation
- To prevent the risk of fire or electrical shock, do not expose the access point to rain or any type of moisture.
- Do not place or use this product near automatically controlled devices such as automatic doors and fire alarms. Radio waves emitted from this product may cause such devices to malfunction,, resulting in an accident.
- Do not allow the power cord to be excessively pulled, bent,,nt or placed under heavy objects.
- Do not mount the bracket in a location higher than 2.2 m (7 feet 3 inches), in an unstable location, in a location subject to frequent vibration, or on a weak wall. (Do not mount on gypsum board, concrete blocks, wooden materials exposed to the outdoors, walls with very rough surfaces, or surfaces that are narrower than the width of the wall mount bracket.) There is a risk of injury if the product falls, or of fire or electric shock if water enters the product.
- Keep small parts (microSD cards, screws, etc.) out of the reach of children. There is a risk of swallowing. In the event they are swallowed, seek medical advice immediately.
Installation and location
- Never install wiring during a lightning storm. R Although this camera conforms to the IPX5 code, do not intentionally expose it to water.
IPX5 indicates that the product is protected against water jets: water projected at all angles through a 6.3 mm (1/4 inches) nozzle flow rate of 12.5 liters/minute at a pressure of 30 kN/m2 for 3 minutes from a distance of 3 meters (9 feet 10 inches). - Although this camera conforms to the IP6X code, do not intentionally expose it to grit and dust.
IP6X indicates that the product is protected against grit and dust: this product has shown the capabilities of preventing dust from entering inside the product after the product was in a device that contained dust with a diameter of 75 μm or less for 7 hours and was shaken and removed from that device. - The AC adaptor and the USB cable are used as the main disconnect device. Ensure that the AC outlet is installed near the product and is easily accessible.
- Do not place magnetic cards or similar objects near the outdoor camera. Magnetic data on the cards, etc., may be deleted.
Installation location examples
Important:
- Install the front door camera with a height of up to 2.2 m (7 feet 3 inches) from the ground.
- When possible, install the front door camera more than 2.5 m (8 feet 2 inches) away from streets.
I want to detect visitors approaching the house. e
Refer to the table below for detecting visitors at an entrance or gate without detecting cars in the street.
Front door camera

Outdoor camera
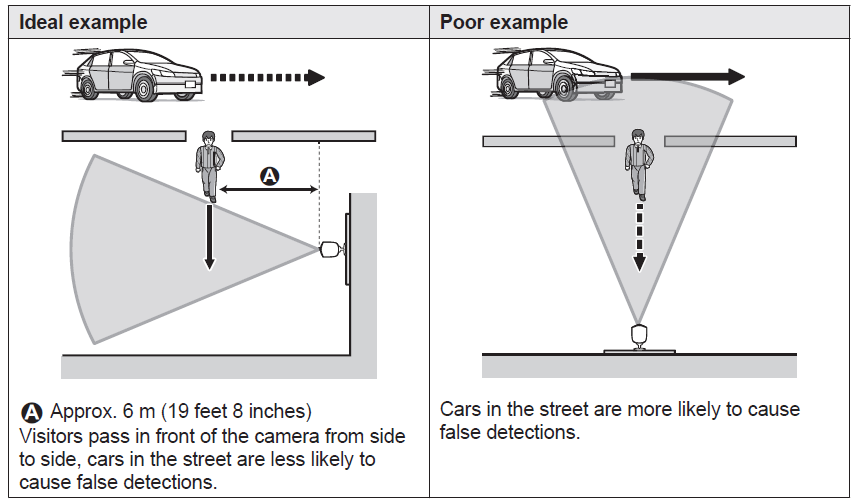
I want to detect people entering the garage
Refer to the table below for detecting people entering a garage without detecting cars in the street.

Wireless communication range
The wireless communication range of each device in the system from the access point is approximately 100 m (up to 328 feet). Wireless communication may be unreliable when the following obstacles are located between the access point and other devices.
- Metal doors or screens
- Walls containing aluminum-sheet insulation
- Walls made of concrete or corrugated iron
- Double-pane glass windows
- Multiple walls
- When using each device on separate floors or in different buildings
Note:
- The access point cannot connect wirelessly to devices other than the front door camera or outdoor camera.
- The camera’s LED indicator blinks slowly in red if it is out of range of the access point. In this case, confirm all connections, including those of the access point.
- The signal strength can be checked with the [HomeHawk] app. For more information, refer to the User’s Guide (page 32).
Information about sensor features
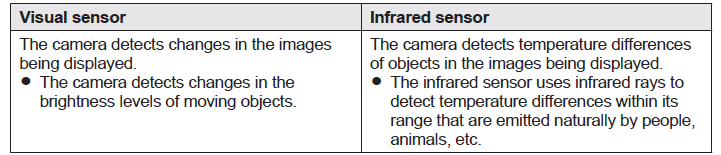
The cameras have 2 sensor features that are used for motion detection: a visual sensor and an infrared sensor (i.e., heat sensor).
Please read the following information before deciding where to install the camera.
Note:
- The camera’s sensor features are not designed to be used in situations that require high reliability. We do not recommend the use of the sensor features in these situations.
- Panasonic takes no responsibility for any injury or damage caused by the use of the camera’s sensor features.
Detection method
Setup
Access point LED indicator
You can use the LED indicator to confirm the access point’s status.
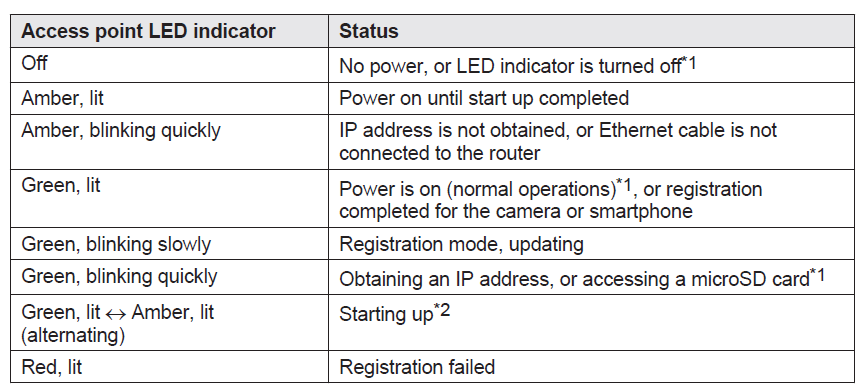
- You can configure the access point so that its LED indicator does not light during normal operation. For more information, refer to the User’s Guide (page 32).
- It may take some time for the access point to finish starting up.
Camera
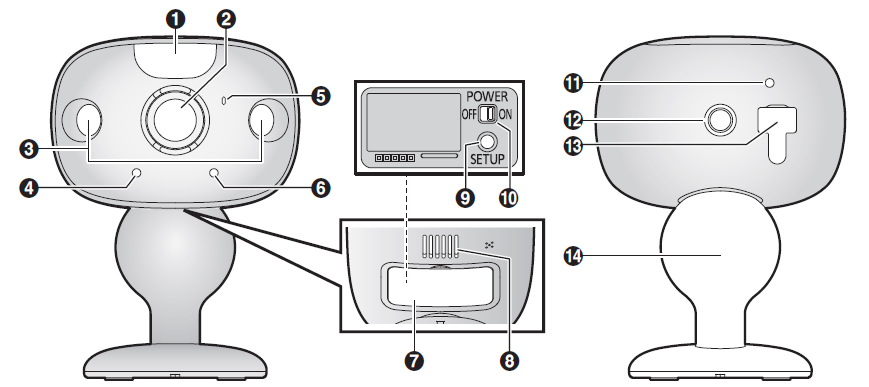
Front door camera
- Infrared sensor
- Speaker
- Lens
- Light sensor
- White LED lens
- LED indicator
- Microphone
- Interface cover
- Lock key micro-USB connector
- Charging LED indicator
- [SETUP]
- Power slide switch

Outdoor camera (KX-HN7002/KX-HN7003)
- White LED lens
- Lens
- Infrared sensors
- LED indicator
- Microphone
- Light sensor
- Interface cover
- Speaker
- [SETUP]
- Power slide switch
- Charging LED indicator
- Camera nut
- USB cover/micro-USB connector
- Wall mounting adaptor
Camera LED indicators
You can use the LED indicators to confirm the camera’s status.
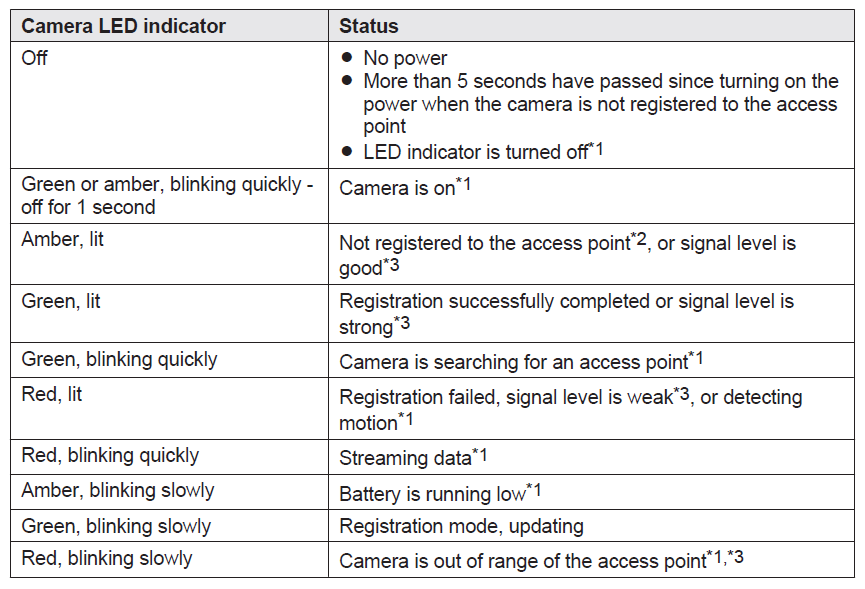
- You can configure the camera so that its LED indicator does not light during normal operation. For more information, refer to the User’s Guide (page 32).
- The LED indicator lights in amber for 5 seconds after the power is turned on for the camera.
- The signal level (strong, good, weak, out of range) is shown after pressing MSETUPN for 3 seconds.
Setup overview
- Charging the cameras
Make sure the battery is fully charged before you set up the cameras. - Turning the power on for the cameras
Turn the power on. - Downloading the application
Download the [HomeHawk] app to your mobile device. - Connection fthe or the access point
Connect the AC adaptor and Ethernet cable to the access point. - Initial setup
Make sure you can access the system using your mobile device. - Registration
Required only if the camera was purchased separately (i.e., not as part of a bundle). - Confirm the installation area..
Read the information in this document to confirm that the desired installation area is suitable for proper operation. - Installation
Install the camera in the desired location.
Charging the cameras
- This camera has an internal rechargeable battery.
- Remove the camera from the wall before charging (page 28).
- Make sure to charge the camera indoors and in a dry location.
- Charge the camera in a location with a temperature between 5 °C and 40 °C (41 °F and 104 °F). The camera cannot charge in locations outside of these temperatures.
Charging the front door camera
Charge for about 7 hours.
Turn the camera off before charging the battery. If the camera is turned on while charging, it may take longer to charge.
- Slide the lock key (A).
- Open the interface cover (B).
- Insert the USB cable into the micro-USB connector (C).

- Power off
- 5.0 V, 1.0 A or higher power source
We recommend using the supplied USB cable. - Charging LED indicator
Note:
- Check the charging LED indicator continues to blink in red for more than 10 seconds after connecting the USB cable.
If the indicator stops blinking and turns off within 10 seconds, perform the following.- If you are not using the supplied USB cable, use it.
- If the indicator still turns off within 10 seconds, try connecting the USB cable to a different power source (5.0 V, 1.0 A or higher).
Charging the outdoor camera
Charge for about 7 hours.
Turn the camera off before charging the battery. If the camera is turned on while charging, it may take longer to charge.
- Open the USB cover (A).
- Insert the USB cable into the micro-USB connector (B).

- Power off
- 5.0 V, 1.0 A or higher power source
We recommend using the supplied USB cable. - Charging LED indicator
Note:
- Check the charging LED indicator continues to blink in red for more than 10 seconds after connecting the USB cable. If the indicator stops blinking and turns off within 10 seconds, perform the following.
- If you are not using the supplied USB cable, use it.
- If the indicator still turns off within 10 seconds, try connecting the USB cable to a different power source (5.0 V, 1.0 A or higher).
Camera charging LED indicator..s
You can use the charging LED indicators to confirm the charging status of the cameras.

Features available when using the [HomeHawk] app
Some of the camera’s features that are available when using the [HomeHawk] app are listed below. For more information, refer to the User’s Guide (page 32).
- Live camera monitoring
You can view live images from the camera, even while away from home. - Listen and talk
You can use your mobile device to talk and listen to anyone within range of the camera’s microphone and speaker. - Sensor adjustment
You can adjust the camera’s motion detection features, such as detection sensitivity and detection area. - Notification
You can configure the camera to send a notification to the [HomeHawk] app when the camera detects motion.
Troubleshooting
Even the most reliable devices encounter occasional issues. Here’s how to address common problems with your Panasonic Home Monitoring Camera Front Door KX-HN7001:
- Camera Not Connecting to Wi-Fi: Ensure your access point is within range and that you’re using the correct network credentials. Restart both the camera and your router if needed.
- Blurry or Low-Quality Video: Adjust the video resolution in the HomeHawk app (1080p, 720p, or VGA) for optimal clarity based on your internet speed and storage preferences.
- No Motion Detection Alerts: Check the motion sensitivity settings and detection area grid in the app. Ensure the camera’s firmware is up to date and that the microSD card is properly inserted if using local recording.
- Battery Drains Quickly: Reduce recording frequency, lower resolution, or disable unnecessary features. The camera typically lasts up to 7 hours on a full charge with regular use, or about 3 months if used minimally.
- App Login Issues: Reset your access point password via the app if you forget it. You must be on the same Wi-Fi network to make changes.
- Audio Quality Concerns: While two-way communication is supported, some users report that the sound quality is average. Ensure the microphone and speaker are unobstructed.
For persistent problems, perform a factory reset from the app or access unit. Preventive measures include regularly updating the app and firmware, keeping the camera clean, and ensuring a stable Wi-Fi connection. The product is backed by Panasonic’s standard warranty; for direct support, visit the official Panasonic website or contact their customer service hotline. Additional help resources and FAQs are available through the HomeHawk app and the Panasonic support portal.
Limited Warranty (ONLY FOR U.S.A.)
Panasonic Products Limited Warranty
Limited Warranty Coverage (For USA Only)
If your product does not work properly because of a defect in materials or workmanship, Panasonic Corporation of North America (referred to as “the warrantor”) will, for the length of the period indicated on the chart below, which starts with the date of original purchase (“warranty period”), at its option either (a) repair your product with new or refurbished parts,(b) replace it with a new or a refurbished equivalent value product, or (c) refund your purchase price. The decision to repair, replace,, or refund will be made by the warrantor.
Product or Part Name
- Home Network System Products
- microSD card (Included model only)
Parts
- One (1) Year
- 90 days
Labor
- One (1) Year
- N/A
Pros & Cons
Advantages
- Wide Field of View: 172-degree angle captures more area than most front door cameras, reducing blind spots.
- No Monthly Fees: Local storage via microSD card means you avoid subscription costs—a major plus for budget-conscious users.
- Color Night Vision: See details in color even in low light, thanks to advanced infrared and white LED technology.
- Weatherproof Design: IP65 rating ensures reliable outdoor performance in rain, snow, and temperature extremes (-4°F to 122°F).
- Flexible Installation: Wireless, battery-powered, and easy to mount without complex wiring.
- Smart Features: Customizable motion detection, two-way audio, and remote access via the HomeHawk app.
Disadvantages
- Average Audio Quality: While functional, the microphone and speaker are not as crisp as some premium models.
- Battery Life: Heavy usage requires frequent recharging (up to 7 hours continuous use).
- No Cloud Storage: Reliance on microSD means if the card is lost or damaged, so is your footage.
- App Limitations: The HomeHawk app is straightforward but lacks some advanced features found in competing ecosystems.
- Value for Money: Priced competitively, but some alternatives offer more integrations or cloud options.
Compared to brands like Ring or Nest, the Panasonic Home Monitoring Camera Front Door KX-HN7001 excels in wide-angle coverage and local storage, but may lag in app polish and ecosystem integration.
Customer Reviews
User feedback for the Panasonic Home Monitoring Camera Front Door KX-HN7001 is generally positive, with an average rating of 4.9 out of 5 stars from verified buyers. Customers praise the camera’s easy setup, clear video quality, and reliable motion detection. Many highlight the wide field of view as a standout feature, especially for monitoring packages and visitors at the front door.
Common compliments include the absence of monthly fees, durable weatherproof construction, and responsive customer support from Panasonic. Some users note that the audio could be improved and wish for cloud storage options. Recurring complaints mention the need for frequent battery charging during active use and occasional Wi-Fi connectivity issues.
Testimonials often recommend this camera for homeowners who want a simple, effective security solution without ongoing costs. If you prioritize wide coverage, color night vision, and local storage, the Panasonic KX-HN7001 is a strong choice. For those seeking advanced smart home integrations or longer battery life, it’s worth comparing with other brands before purchase.
Faqs
How do I set up the panasonic Home Monitoring Camera Front Door KX-HN7001 for the first time?
What should I do if the panasonic Home Monitoring Camera Front Door KX-HN7001 is not connecting to the access point?
Can I expand my panasonic Home Monitoring Camera Front Door KX-HN7001 system with additional cameras?
How do I optimize video quality settings on the panasonic Home Monitoring Camera Front Door KX-HN7001?
What are the recommended placement and installation tips for the panasonic Home Monitoring Camera Front Door KX-HN7001?
How can I maintain and care for my panasonic Home Monitoring Camera Front Door KX-HN7001 to ensure long-term performance?
What should I do if night vision on my panasonic Home Monitoring Camera Front Door KX-HN7001 is not working properly?
Is the panasonic Home Monitoring Camera Front Door KX-HN7001 compatible with multiple mobile devices, and how do I add them?
Leave a Comment