
How to Use: Panasonic Home Monitoring Outdoor Camera KX-HNC715C Instruction Guide
Content
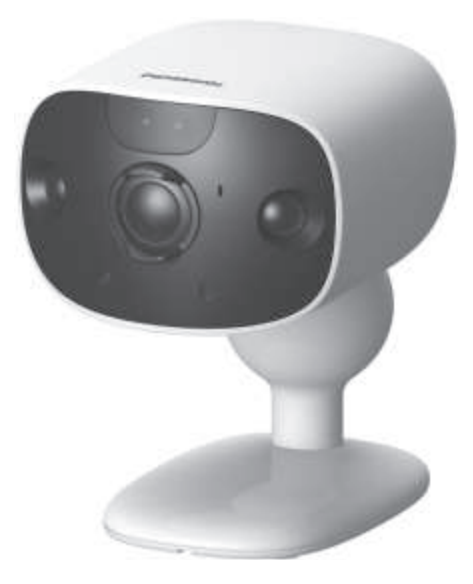
Panasonic Home Monitoring Outdoor Camera KX-HNC715C
Introduction
The Panasonic Home Monitoring Outdoor Camera KX-HNC715C is a versatile wireless security camera designed to enhance your home surveillance system. Part of the Panasonic HomeHawk ecosystem, this camera offers a wide-angle 172° field of view, providing expansive coverage of outdoor spaces. It features full HD recording capabilities, color night vision powered by infrared LEDs, and two-way audio communication, allowing users to see, hear, and speak to visitors remotely via the Panasonic HomeHawk app.
Key benefits include no monthly fees for cloud storage, support for local video storage via a microSD card, and adjustable motion detection sensors that trigger recording and alerts, even without doorbell interaction. The camera's IP65 weatherproof rating and operational temperature range from -4°F to 122°F make it suitable for various climates. Its wireless IEEE 802.11 b/g connectivity ensures flexible installation without complex wiring, ideal for monitoring home entrances, driveways, or backyard areas.
Targeted at homeowners, renters, and small businesses seeking reliable outdoor video surveillance, the KX-HNC715C is an excellent choice for those wanting to enhance home security with ease of use and comprehensive coverage. Its estimated price range varies depending on region and retailer,, but generally falls within the mid-tier market segment, making it a competitive option in the outdoor camera category.
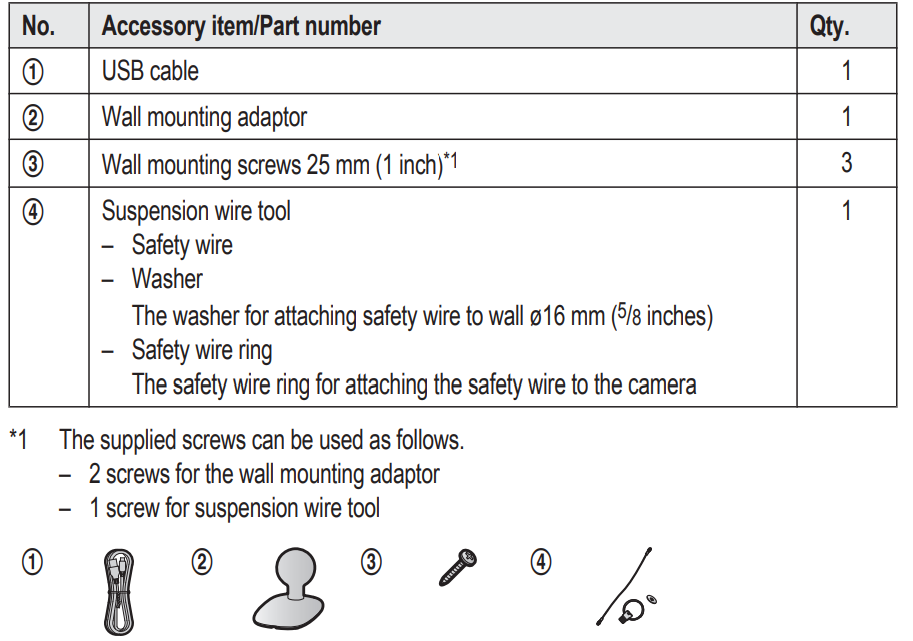
Accessory information
Installation location examples
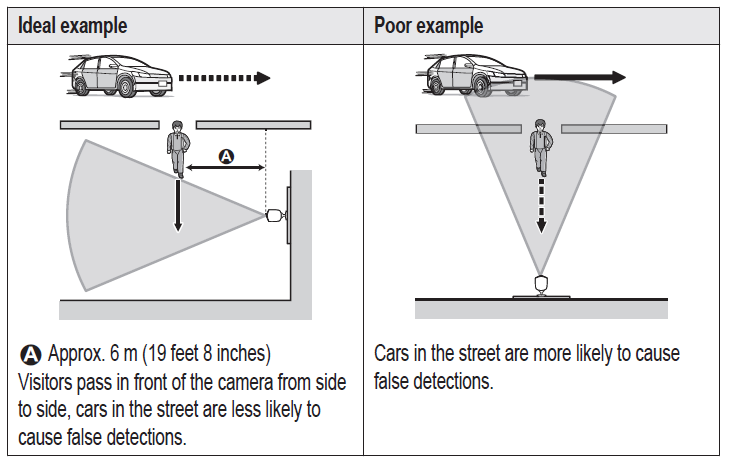
I want to detect visitors approaching the house
Refer to the table below for detecting visitors at an entrance or gate without detecting cars in the street.
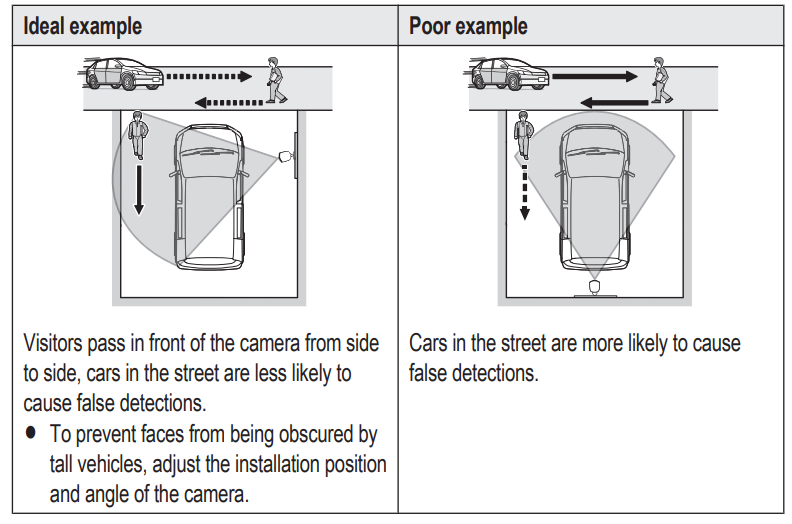
I want to detect people entering the garage..
Refer to the table below for detecting people entering a garage without detecting cars in the street.
Do not install in these locations
- Installing in the following areas may cause deformation, discoloration, malfunction, or operational failure. e
- In direct sunlight or directly under an outdoor light (even if the surroundings are withithe within the operational temperature range, parts of the product may become hot.
- Areas subject to frequent vibration, shock, or impact
- Near fire, heating devices, or air conditioners (including outdoor equipment such as unit compressors)
- Areas exposed to grease or steam
- Near devices that emit strong radio waves, such as mobile phones
- Areas subject to extreme temperature changes (which can lead to condensation).
- If condensation occurs, wipe the outer surface of the product with a soft dry cloth.
- Near coasts directly subjected to sea breezes, or near sulfuric hot springs (exposure to salt can shorten the life of the product)
- Near TVs, radios, automated office equipment such as computers, air conditioners, water heater panels (with intercom), or home security equipment (these may cause noise)
- Near satellite broadcasting receivers such as tuners, TVs with built-in satellite tuners, and recorders (broadcast images may be distorted)
- Areas where hydrogen sulfide, ammonia, dust, or toxic gases are present.. Installing in the following areas may cause false detections..ns..
- Areas where people approach directly from the front of the camera, such as narrow walkways
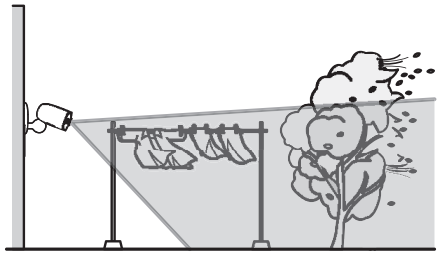
- Areas where objects such as trees or hanging laundry move due to wind (temperature variation and motion may cause false detections)
- Areas affected by breezes from fans, air conditioning unit compressors, water heaters, or car exhaust (severe temperature variations may cause false detections)
- Areas subject to severe weather, such as strong wind (camera shake can cause false detections) or rain (strong rain may be detected as an object moving in front of the camera)
- Areas with reflective objects, such as glass, that can interfere with the detection of temperature variation
- Areas where brightness changes easily
- Areas where backlight occurs (faces appear dark and are difficult to identify), such as the following
- Areas where most of the background is the sky
- Areas where direct sunlight reflects off a white wall or background
- Bright areas,, such as those exposed to direct sunlight
Part names and functions
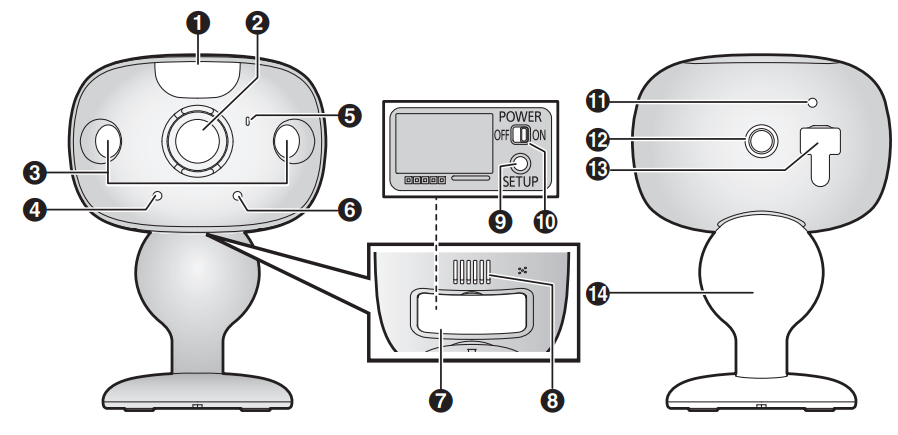
- White LED lens
- Lens
- Infrared sensors
- LED indicator
- Microphone
- Light sensor
- Interface cover
- Speaker
- SETUP
- Power slide switch
- Charging LED indicator
- Camera nut
- USB cover/micro-USB connector N Wall mounting adaptor
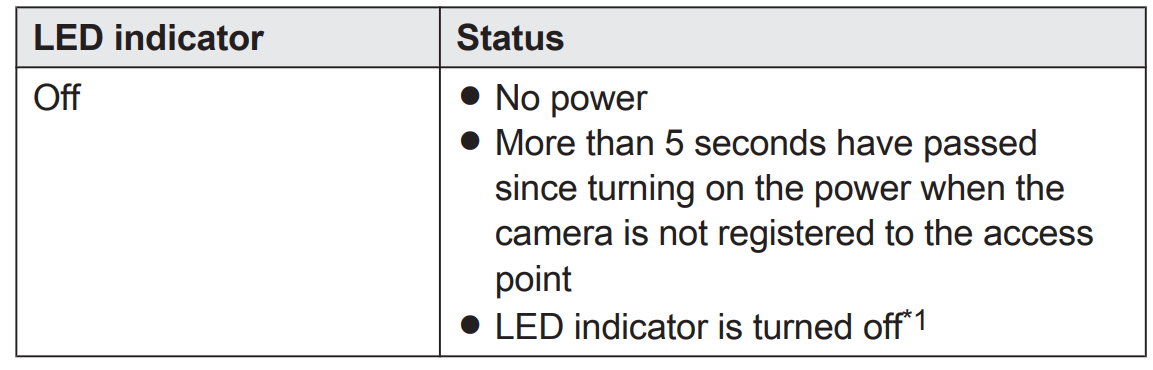
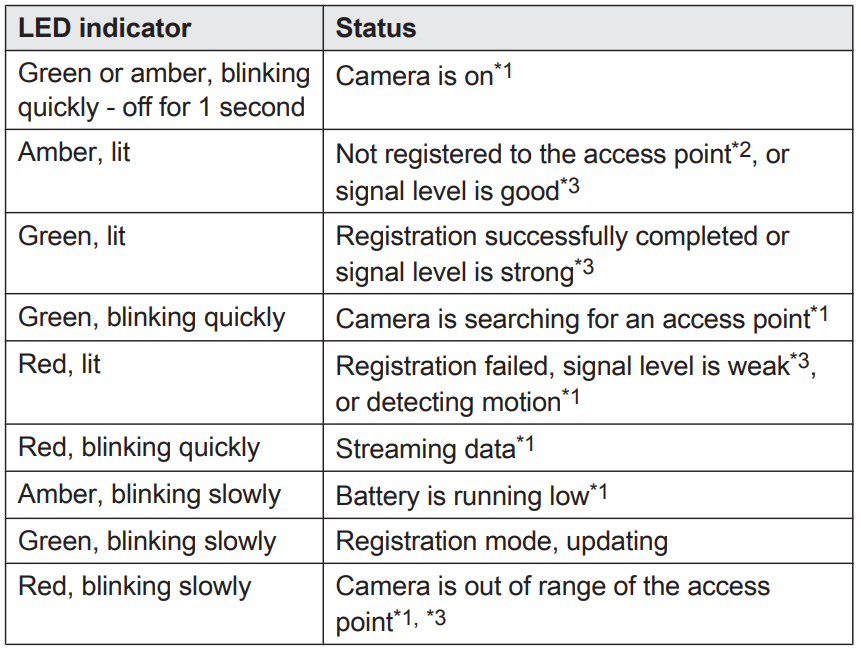
LED indicators
You can use the LED indicators to confirm the camera’s status.
Charging the camera
- This camera has an internal rechargeable battery.
- Remove the camera from the wall before charging.
- Make sure to charge the camera indoors and in a dry location.
- Charge the camera in a location with a temperature between 5 °C and 40 °C (41 °F and 104 °F). The camera cannot charge in locations outside of these temperatures.
- Charge for about 7 hours.
- Turn the camera off before charging the battery. If the camera is turned on while charging, it may take longer to charge.
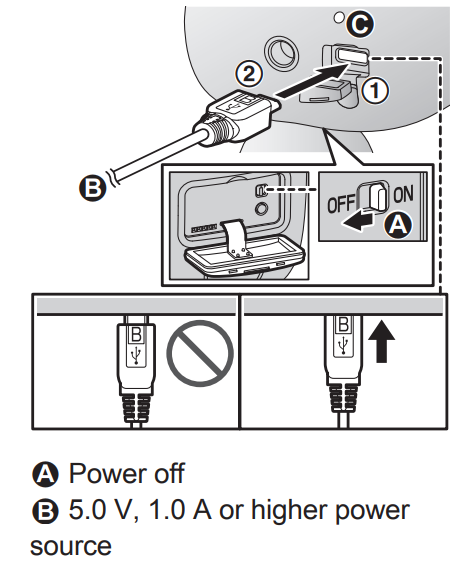
- Open the USB cover (A).
- Insert the USB cable into the micro-USB connector (B). Power off
- 5.0 V, 1.0 A or higher power source.. We recommend using the supplied USB cable.
- Charging LED indicator
- Note:
- Check the charging LED indicator continues to blink in red for more than 10 seconds after connecting the USB cable.
- If the indicator stops blinking and turns off within 10 seconds, perform the following.
- If you are not using the supplied USB cable, use it.
- If the indicator still turns off within 10 seconds, try connecting the USB cable to a different power source (5.0 V, 1.0 A or higher).
Registering the camera
Before you can use the camera, it must be registered to the access point. You can register each camera by using the registration buttons or the [HomeHawk] app.
Note:
Before registering the camera, make sure the camera is turned on, and that the AC adaptor of the access point is connected and the access point is powered.
Using registration buttons
- Access point:
- Press and hold MSETUPN until the LED indicator (1) blinks slowly in green.
- Camera: Press and hold MSETUPN until the LED indicator (2) blinks slowly in green.
- When registration is completed, the camera sounds one long beep.
Note:- If registration fails, the camera sounds several short beeps.
- Using the app
You can change the name of the camera using the [HomeHawk] app. For more information, refer to the User’s Guide (page 19).
Installation
Installation precautions
- Do not use an impact driver.
(This may lead to damaged screws or over-tightening.) - Mount the camera on a stable location with a height of 2.2 m (7 feet 3 inches) where the unit can be adequately supported when installing.
- Do not mount the camera on a soft material. It may fall down, break, or cause injury.
Wall material information
Siding
- Use the included screws ø4 mm ´ 25 mm (ø5/32 inches ´ 1 inch). Make sure the pull-out capacity of each screw is at least 294 N (30 kgf).
- If the weight of the camera is supported by the siding only, the siding could become damaged. Make sure you mount the camera in a location where the structure behind the siding can be used to support the weight of the camera. If this is not possible due to the thickness of the siding, use commercially available screws ø4 mm ´ longer than 25 mm (ø5/32 inches ´ longer than
1 inch). - Drill a pilot hole using a drill bit that is appropriate for the type of siding. Remove any debris after drilling the pilot hole. Do not drill the pilot hole into the structure behind the siding.
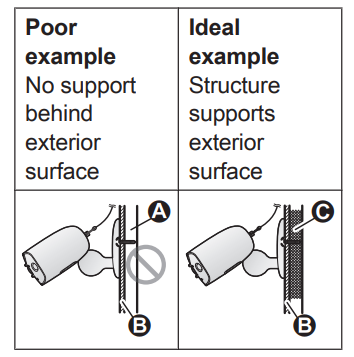
- Open space, no support
- Siding
- Structure behind siding
Concrete
- Do not use the included screws.
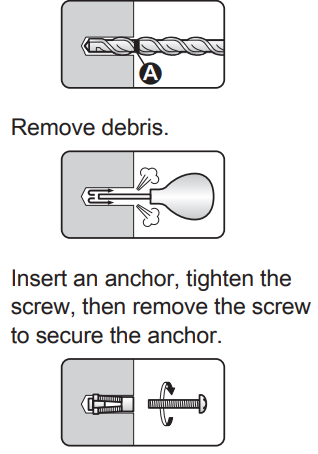
- Use screw anchors (screw ø4 mm (5/32 inches)) designed for concrete walls.
- Carefully read the instructions supplied with the anchors.
- Follow instructions regarding drill bit diameter, hole depth, etc.
- Drill a pilot hole. Remove any debris after drilling the pilot hole.
Mark the hole depth on the drill bit (and then drill a pilot.
ALC (autoclaved lightweight cellular concrete)
- Depending on the type of ALC panel, you may not be able to attach the camera. Consult the ALC panel manufacturer.
- Do not use the included screws. After consulting the manufacturer of the ALC panel, use only commercially available metal screw anchors (screw ø4 mm (5/32 inches)) designed for ALC panels.
- Carefully read the instructions supplied with the anchors. Follow instructions regarding drill bit diameter, hole depth, etc.
- Drill a pilot hole. Remove any debris after drilling the pilot hole.
- Seal the pilot hole with a commercially available waterproof sealant
Installing the camera
- Open the interface cover (A), and then slide the power slide switch to ON (B).
- Close the interface cover (C).
Secure the safety wire ring to the camera nut of the camera using a driver (D), and then pass the safety wire through the ring of the safety wire ring (E).
Important:
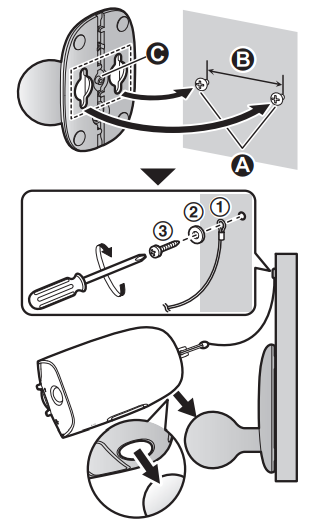
Make sure to close the interface cover securely. Weatherproofness cannot be assured if the interface cover is open.- Drive the wall mounting screws into the wall.
Mount the wall mounting adaptor to the wall. Next, attach the safety wire to the wall, and then attach the camera to the wall mounting adaptor.
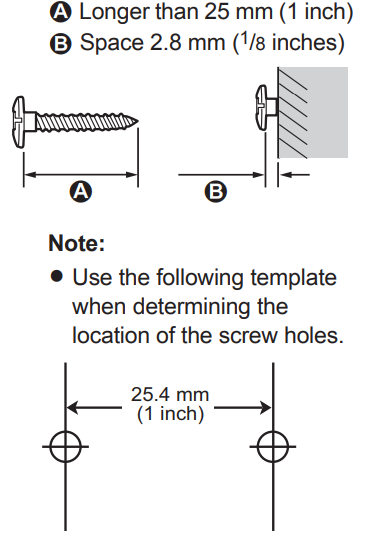
- Wall mounting screws
- 25.4 mm (1 inch)
Hole.. You can prevent the camera from falling by passing a string through the hole in the wall mounting adaptor.
- Adjust the camera angle.
Note:- Attach the safety wire while it is bent.
- Attach the safety wire high on the wall so that the camera does not strike anyone if the camera detaches from the wall.
- Do not hang from the camera or wall mounting adaptor.
Specifications
- Frequency range
Wireless LAN: 2.412 GHz – 2.462 GHz (channels 1 – 11) - RF transmission power
Wireless LAN: 100 mW (peak transmission power) - Power source
5.0 V, 1.0 A*1 - Battery performance
Operating time: 7 hours Approx. 3 months (when used 5 minutes a day)*2 - Operating conditions
-20 °C – 50 °C (-4 °F – 122 °F) up to 90 % relative air humidity (non-condensing) - Image sensor
1.0 megapixel CMOS - Minimum illuminance required
IR-LED: 0 lx*3
White LED: 1 lx - Focal length
Fixed 0.2 m (0.7 feet) – infinity - Angular field of view (camera angle): 172°
- Motion detection method
Pyroelectric infrared sensor (PIR sensor) and visual sensor - PIR sensor detection range (when the surrounding temperature is approx. 25 °C (77 °F))
Horizontal: 170°
Vertical: 19.1°
Detection range: 6 m (19 feet 8 inches) - Visual sensor detection range
Horizontal: 150°
Vertical: 85° - R IP rating: IP65*4
- Dimensions: (height × width × depth) Approx. 98 mm ´ 71 mm ´ 94 mm (3 7/8 inches ´ 2 13/16 inches ´ 3 11/16 inches)*5
- Mass (weight)
Approx. 490 g (1.08 lb)*5- Only when charging.
- Battery performance changes depending on the surrounding temperature, frequency of use, and the actual usage environment. For more information, refer to the User’s Guide (page 19).
- The infrared LEDs that surround the camera lens will illuminate in low-light conditions.
- Weatherproofness is only assured if the camera is installed correctly according to the instructions in the Installation Guide, and appropriate water protection measures are taken.
- Including the wall mounting adaptor. r
Warranty
- Panasonic Canada Inc.
- 5770 Ambler Drive, Mississauga, Ontario L4W 2T3
- PANASONIC PRODUCT - LIMITED WARRANTY
- EXCHANGE PROGRAM
- Panasonic Canada Inc. warrants this product to be free from defects in material and workmanship under normal use and for a period as stated below from the date of original purchase agrees to, at its option either (a) repair your product with new or refurbished parts, (b) replace it with a new or a refurbished equivalent value product, or (c) refund your purchase price. The decision to repair, replace, cancel, cease, , or refund will be made by Panasonic Canada Inc.
- Home Network System Products – One (1) year
- microSD card (Included model only) – One (1) year
- This warranty is given only to the original purchaser, or the person for whom it was purchased as a gift, of a Panasonic brand product mentioned above sold by an authorized Panasonic dealer in Canada and purchased and used in Canada, which product was not sold “as is”, and which product was delivered to you in new condition in the original packagingTORDER TO BE ELIGIBLE TO RECEIVE WARRANTY SERVICE HEREUNDER, A PURCHASE RECEIPT OR OTHER PROOF OF DATE OF ORIGINAL PURCHASE, SHOWING AMOUNT PAID AND PLACE OF PURCHASE,, IS REQUIRED..
LIMITATIONS AND EXCLUSIONS
- This warranty ONLY COVERS failures due to defects in materials or workmanship, and DOES NOT COVER normal wear and tear or cosmetic damage. The warranty ALSO DOES NOT COVER damages which occurred in shipment, or failures which are caused by products not supplied by Panasonic Canada Inc., or failures which result from accidents, misuse, abuse, neglect, mishandling, misapplication, alteration, faulty installation, set-up adjustments, misadjustment of consumer controls, improper maintenance, improper batteries, power line surge, lightning damage, modification, introduction of sand, humidity or liquids, commercial use such as hotel, office, restaurant, or other business or rental use of the product, or service by anyone other than a Authorized Servicer, or damage that is attributable to acts of God.
- Dry cell batteries are also excluded from coverage under this warranty. Rechargeable batteries are warranted for ninety (90) days frothe m the date of original purchase.
- THIS EXPRESS, LIMITED WARRANTY IS INSTEAD OF ALL OTHER WARRANTIES, EXPRESS OR IMPLIED, INCLUDING ANY IMPLIED WARRANTIES OF MERCHANTABILITY AND FITNESS FOR A PARTICULAR PURPOSE. IN NO EVENT WILL PANASONIC CANADA INC. BE LIABLE FOR ANY SPECIAL, INDIRECT,, OR CONSEQUENTIAL DAMAGES RESULTING FROM THE USE OF THIS PRODUCT OR ARISING OUT OF ANY BREACH OF ANY EXPRESS OR IMPLIED WARRANTY.
(As examples, this warranty excludes damages for lost time, travel to and from the Authorized Servicer, loss of or damage to media or images, da,, ta or other memory or recorded content. This list of items is not exhaustive, but for illustration only.) - In certain instances, some jurisdictions do not allow the exclusion or limitation of incidental or consequential damages, or the exclusion of implied warranties, so the above limitations and exclusions may not be applicable. This warranty gives you specific legal rights,,s and you may have other rights which vary depending on your province or territory. ..
Troubleshooting Panasonic Home Monitoring Outdoor Camera KX-HNC715C
Common issues with the Panasonic Home Monitoring Outdoor Camera KX-HNC715C include connectivity interruptions, video lag, and app syncing problems. To resolve Wi-Fi connection failures, ensure the camera is within range of the HomeHawk access point, which is sold separately and required for operation. Resetting the camera and access point can often restore connectivity.
In cases of video feed not loading or delayed notifications, verify that the microSD card is correctly installed and formatted, and that motion detection settings are enabled through the app. For error codes, consult the camera’s user manual or Panasonic support website, as specific codes vary by firmware versions.
Preventive measures include keeping firmware up to date via the HomeHawk app, positioning the camera to avoid direct sunlight or reflective surfaces to maintain image clarity, and regularly checking for physical obstructions or dirt on the lens. The product typically comes with a limited warranty, and Panasonic offers customer support through its official website and phone lines.
For additional assistance, contact Panasonic support directly or visit authorized service centers. Promptly addressing issues ensures sustained performance and security coverage.
Pros & Cons of Panasonic Home Monitoring Outdoor Camera KX-HNC715C
- Pros:
- A wide 172° field of view covers large outdoor areas effectively.
- Color night vision with infrared LEDs for clear nighttime monitoring.
- No recurring monthly fees for video recording; supports local microSD storage.
- Two-way audio communication allows real-time interaction remotely.
- Weatherproof IP65 rating suitable for various outdoor environments.
- Cons:
- Requires a separate HomeHawk access point for wireless connectivity, adding to setup cost.
- Audio quality is adequate but not exceptional, limiting clarity in noisy environments.
- Motion detection sensitivity may require adjustment to reduce false alerts.
- Limited integration with non-Panasonic smart home systems.
Overall, the Panasonic Home Monitoring Outdoor Camera KX-HNC715C offers strong value for money, especially for users already invested in the HomeHawk system. Compared to alternatives, its wide-angle view and color night vision stand out, although some competitors provide more advanced app ecosystems or cloud features.
Customer Reviews of Panasonic Home Monitoring Outdoor Camera KX-HNC715C
Users generally praise the Panasonic Home Monitoring Outdoor Camera KX-HNC715C for its easy installation and clear video quality, particularly highlighting the broad 172° field of view and reliable motion detection. Many appreciate the absence of monthly fees and the ability to store footage locally on a microSD card.
However, some common complaints include occasional Wi-Fi connectivity issues, the need for a separate HomeHawk access point, and the moderate audio quality during two-way communication. Star ratings often range from 4 to 4.5 out of 5, reflecting overall satisfaction with minor reservations.
Many reviewers recommend the camera for homeowners seeking a robust, no-subscription outdoor camera solution compatible with Panasonic’s HomeHawk system. Reviews also suggest periodically updating firmware and adjusting motion sensor settings to optimize performance.
Faqs
How do I set up the panasonic Home Monitoring Outdoor Camera KX-HNC715C for the first time?
What should I do if the panasonic Home Monitoring Outdoor Camera KX-HNC715C is not connecting to the wireless network?
Can the panasonic Home Monitoring Outdoor Camera KX-HNC715C record audio and allow two-way communication?
What are the recommended installation locations and mounting guidelines for the panasonic Home Monitoring Outdoor Camera KX-HNC715C?
How do I maintain and clean the panasonic Home Monitoring Outdoor Camera KX-HNC715C for optimal performance?
Is the panasonic Home Monitoring Outdoor Camera KX-HNC715C compatible with all routers and Wi-Fi standards?
How can I optimize the motion detection features on the panasonic Home Monitoring Outdoor Camera KX-HNC715C to avoid false alerts?
What troubleshooting steps can I take if the panasonic Home Monitoring Outdoor Camera KX-HNC715C battery drains quickly?
Leave a Comment